A Visual Studio 2022 project and a Java application project are presented. The VS2022 project generates a DLL file that is called by the Java application via JNA in Windows 11 environment. The two CUDA's libraries, cuBLAS and cuSOLVER, are involved in this project.
This Java application is used in:
Denoising NMR time-domain signal by singular-value decomposition accelerated
by graphics processing units,
Pascal P. Man, Christian Bonhomme, and Florence Babonneau
Solid State Nucl. Magn. Reson. 61-62, 28-34 (2014).
Abstract
*** Outline ***
- svdComplexDevice2 DLL project in MS Visual Studio 2022
- svdComplexDevice2X64 Java application project in Eclipse IDE
- CUDA and DLL references
- cusolver references
- cublas references
- selfmatrixMulCUBLAS.cpp project in MS Visual Studio 2022
***************************************** - 3X2, cusolver_Xgesvd_example.cu project in MS Visual Studio 2022
- 3X2, cusolver_Xgesvd_example.cpp
project with Microsoft Visual C++ toolchain in Eclipse IDE
***************************************** - cusolver_getrf_example.cu project in MS Visual Studio 2022
- cusolver_getrf_example.cpp project with MinGW GCC toolchain in Eclipse IDE
- 3X2, svd_example.cpp project in MS Visual Studio 2022
- 3X2, svd_example.cpp
project with Microsoft Visual C++ toolchain in Eclipse IDE
***************************************** - 3X2, svd_complex_matrix.cu project in MS Visual Studio 2022
- 3X2, svd_complex_matrix.cpp project
with Microsoft Visual C++ toolchain in Eclipse IDE
- svd_3x2complex_matrix.cpp project in MS Visual Studio 2022
- svd_4X4complex_matrix.cpp project in MS Visual Studio 2022
***************************************** - svd_3X3complex_matrix.cpp project in MS Visual Studio 2022
- svd_3X3complex_matrix.cpp project
with MinGW GCC toolchain in Eclipse IDE
- (2X3)(3X4)complexMatrixMultiplication.cpp project in MS Visual Studio 2022
- (2X3)(3X4)complexMatrixMultiplication.cpp
project with MinGW GCC toolchain in Eclipse IDE
***************************************** - (3X3)(3X2)DgComplexMatrixMultiplication.cpp project in MS Visual Studio 2022
- (3X3)(3X2)DgComplexMatrixMultiplication.cpp project with MinGW GCC toolchain in Eclipse IDE
svdComplexDevice2 DLL project in MS Visual Studio 2022
- In Visual Studio 2022 panel, select Create a new Project.
- In Create a new project panel, select Dynamic-Link Library (DLL)
Click Next button.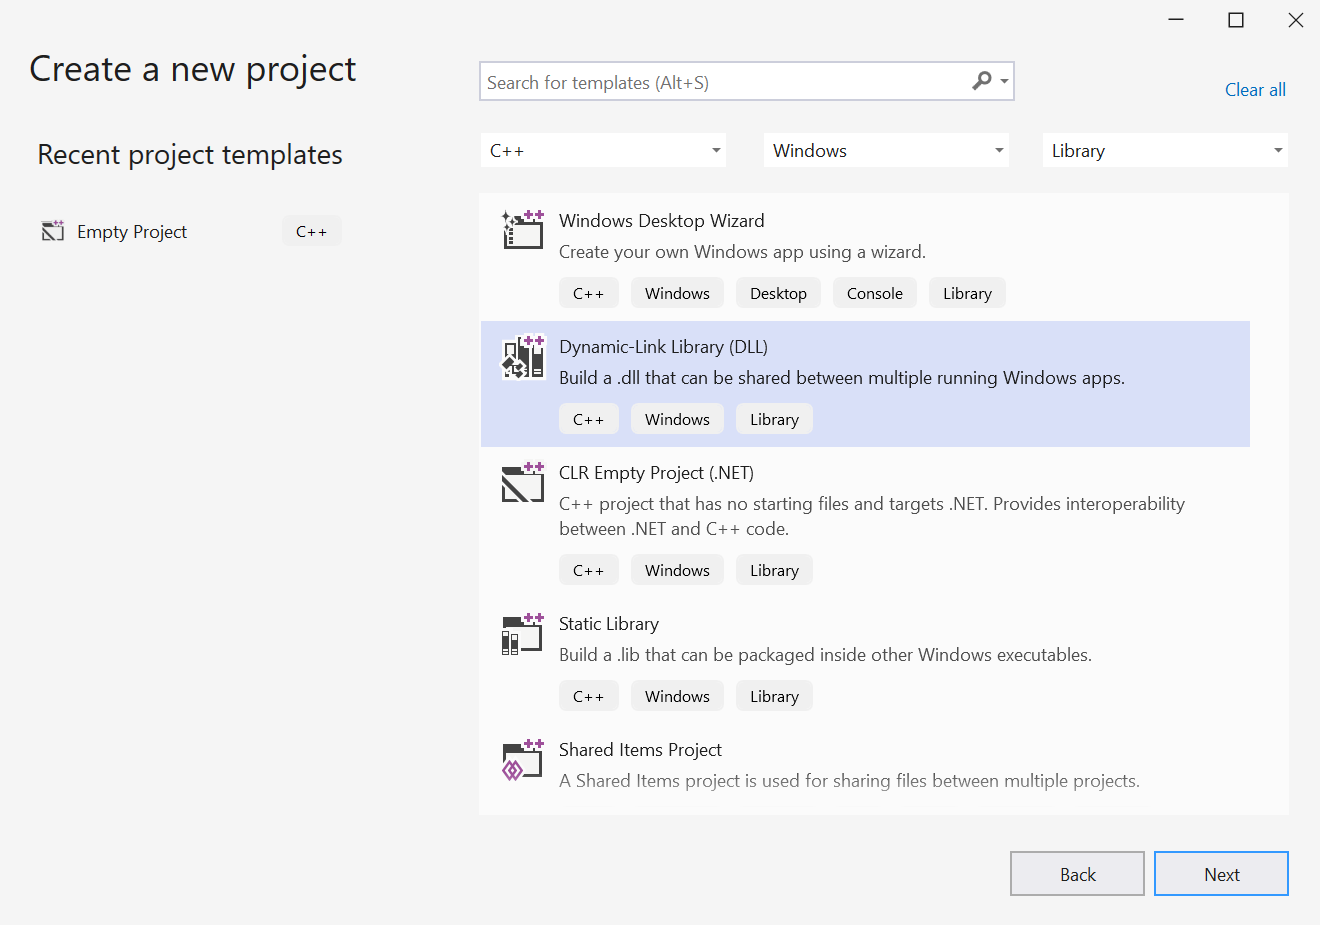
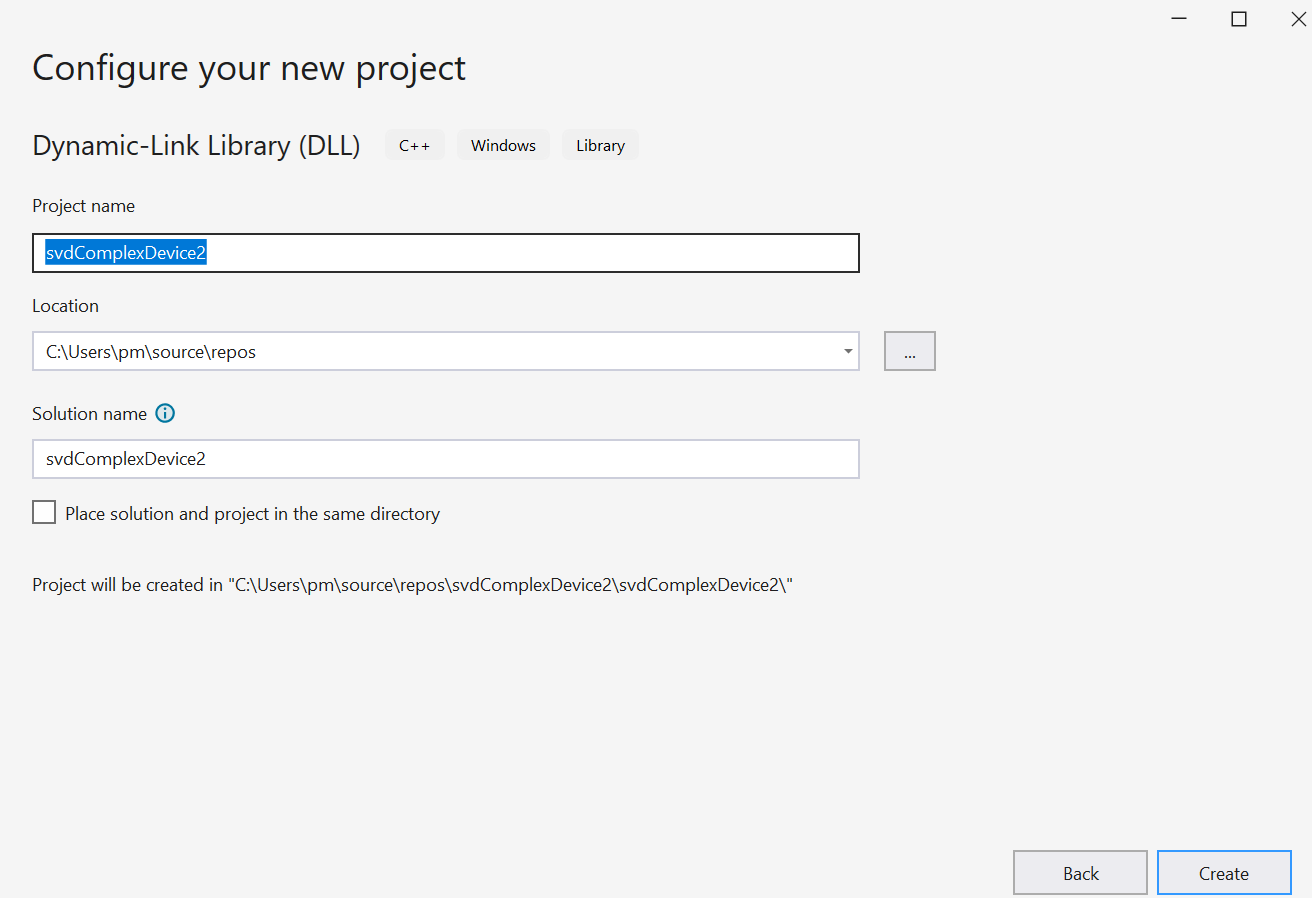
- In Configure a new project panel, provid the name of the project:
svdComplexDevice2
Click Create button.
- The Visual Studio editor appears with a dllmain.cpp file.
Four files are generated: dllmain.cpp, pch.cpp, pch.h, and framework.h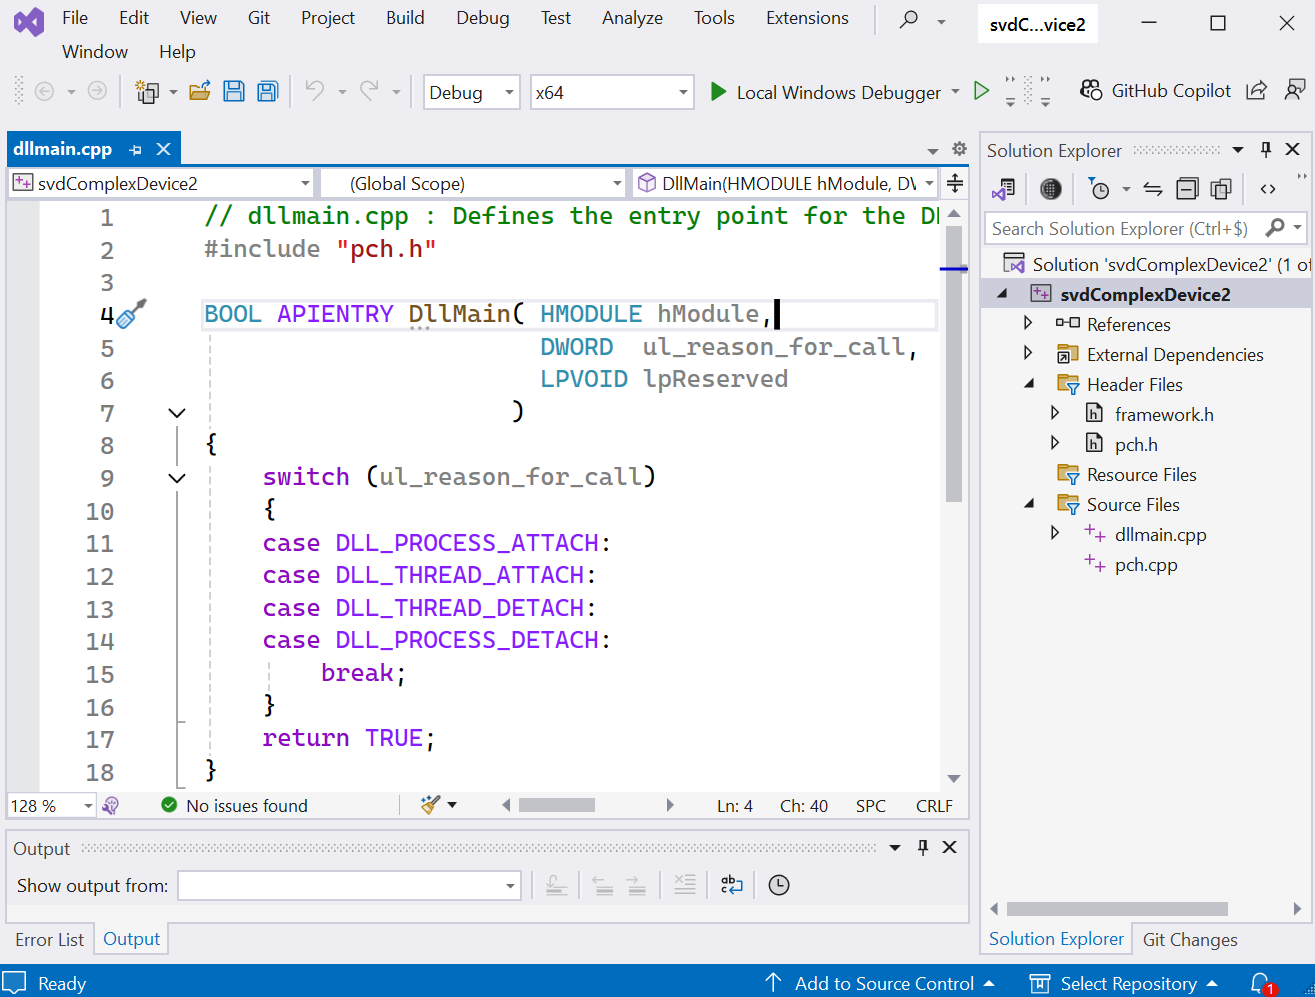
- Right click the folder of Source Files in Solution Explorer
for adding a new item.
Select Add then New Item...
Add New Item panel appears.
Select C++ File (.cpp)
Provid the Name: svdComplexDevice2.cpp
Click Add button. - An empty svdComplexDevice2.cpp file is created.
Open svdComplexDevice2.cpp
Copy and paste its content into the empty source file svdComplexDevice2.cpp. - Right click the folder of Header Files in Solution Explorer
for adding a new item...
Select Add then New Item.
Add New Item panel appears.
Select Header File(.h)
Provid the Name: svdComplexDevice2.h
Click Add button. - An empty svdComplexDevice2.h file is created.
Open svdComplexDevice2.h
Copy and paste its content into the empty Header File svdComplexDevice2.h. - Right click the project svdComplexDevice2 in
Solution Explorer.
Select Properties, then VC++ Directories.
Add C:\Program Files\NVIDIA GPU Computing Toolkit\CUDA\v12.5\include; in Include Directories.
Add C:\Program Files\NVIDIA GPU Computing Toolkit\CUDA\v12.5\lib\x64; in Library Directories.
- Select Linker then Input.
Add cudart.lib;cusolver.lib;cublas.lib; in Additional Dependencies.
Click Apply button then OK button.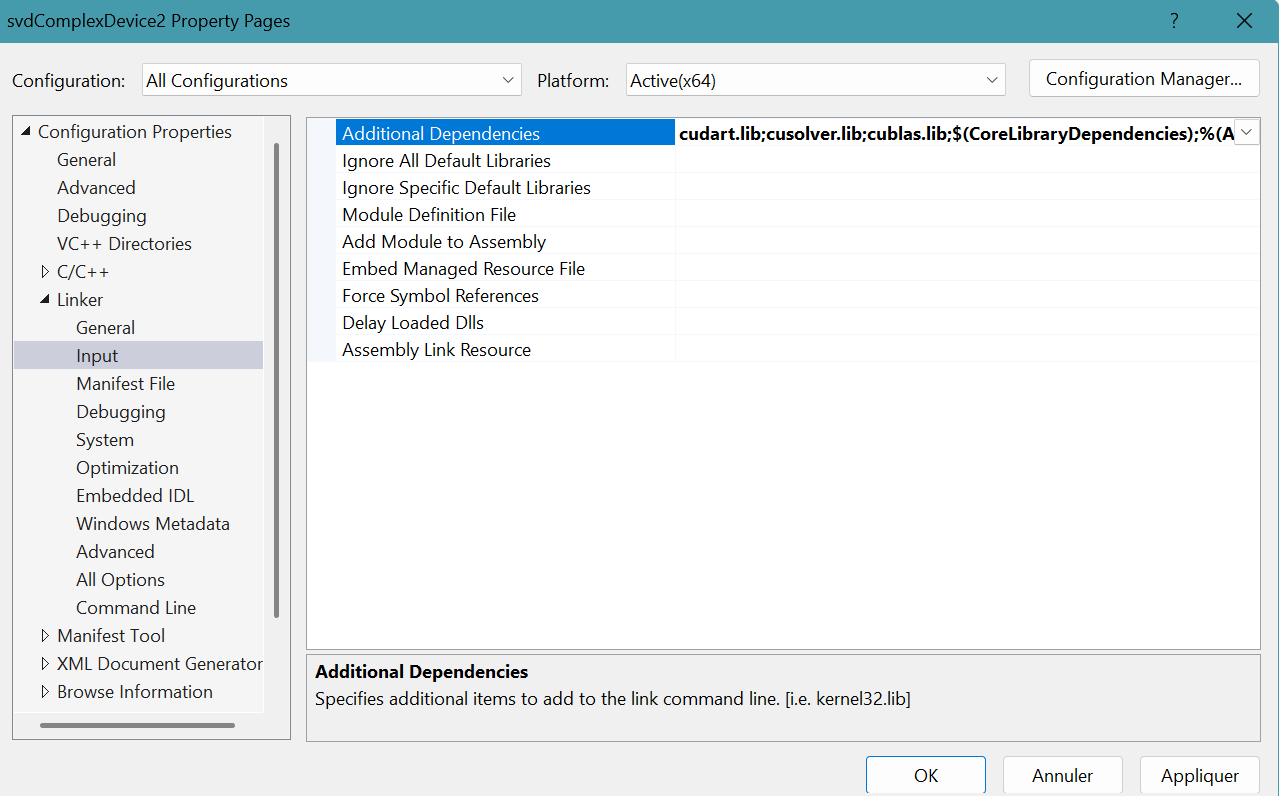
- Select Build menu then Build Solution.
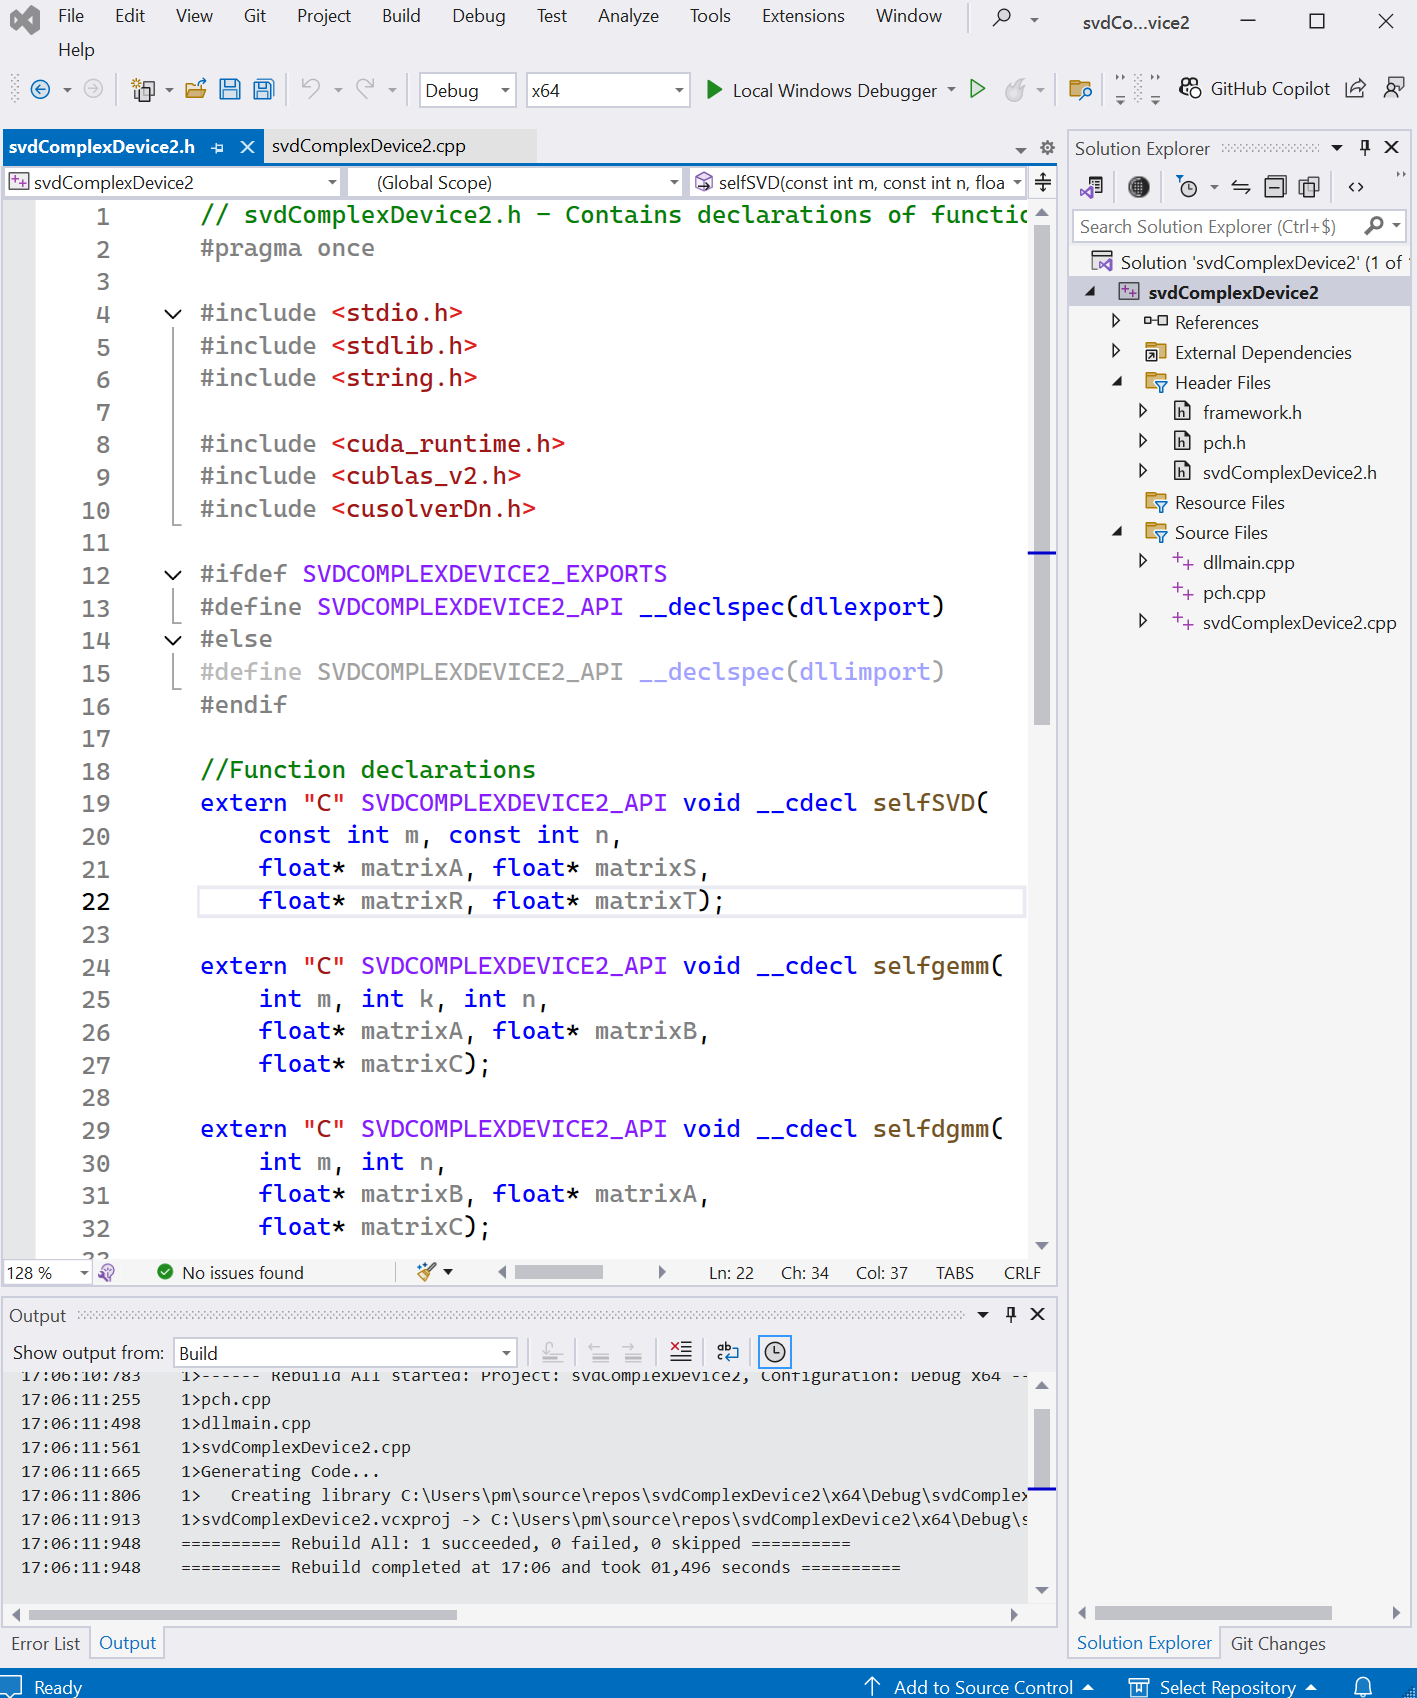 The file svdComplexDevice2.dll with 73 kbit size is generated in the folder
C:\Users\pm\source\repos\svdComplexDevice2\x64\Debug
svdComplexDevice2X64 Java application project in Eclipse IDE
- Open Eclipse IDE 2024-09.
Select File menu, select New then Project...
New Project panel appears.
Select Java Project.
Click Next> button.
New Java Project panel appears.
Provid the Project name: svdComplexDevice2X64
Click Finish button.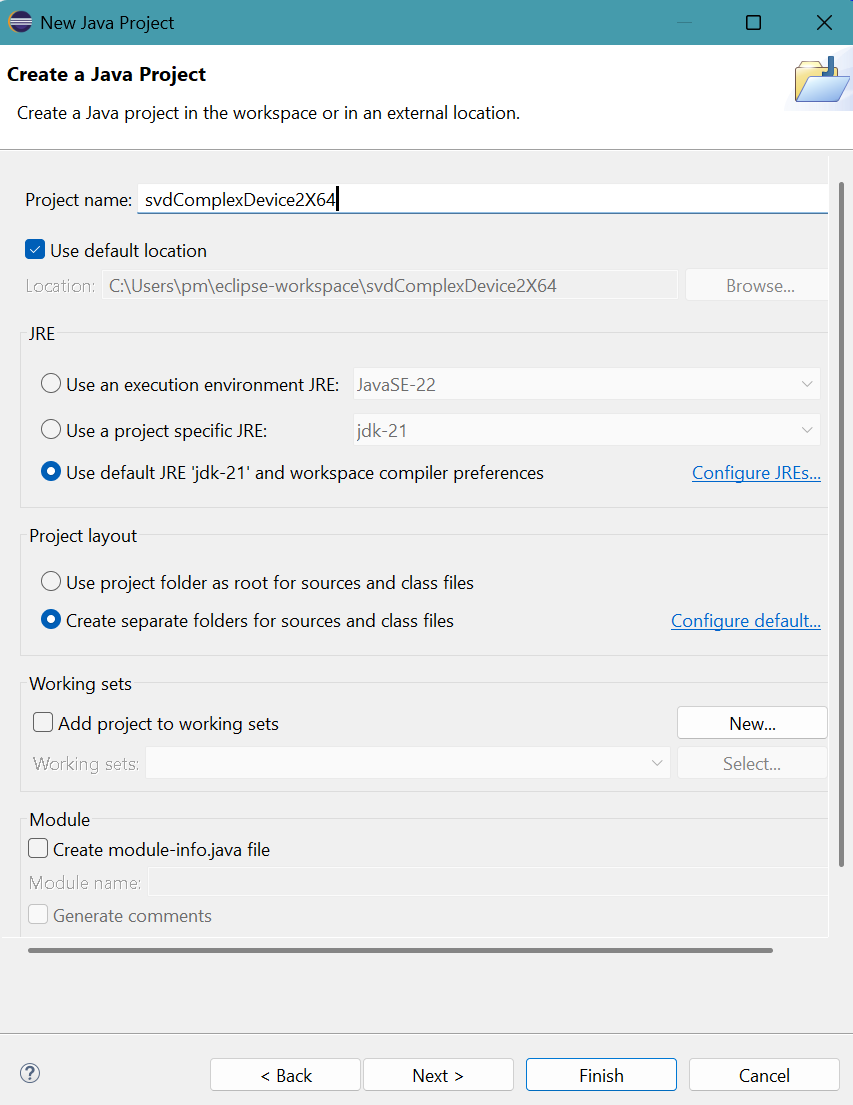
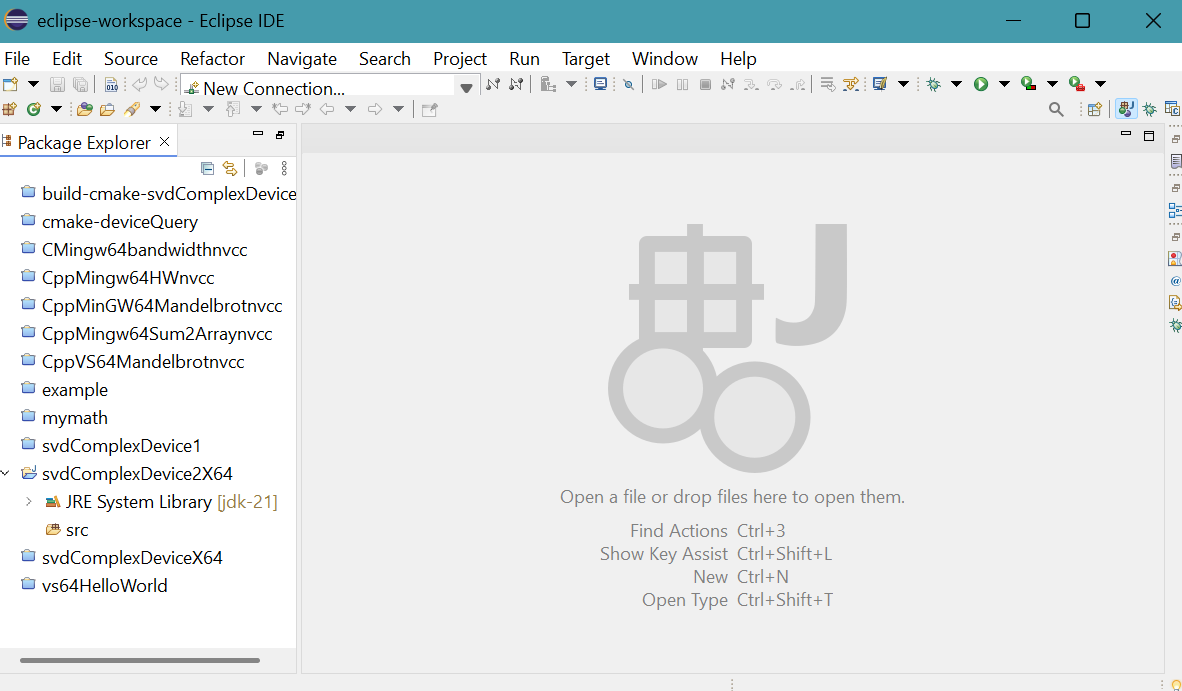
- The project folder appears in Package Explorer.
- The file .classpath in the project folder located at
C:\Users\pm\eclipse-workspace\svdComplexDevice2X64 is filled.

- Open the project folder.
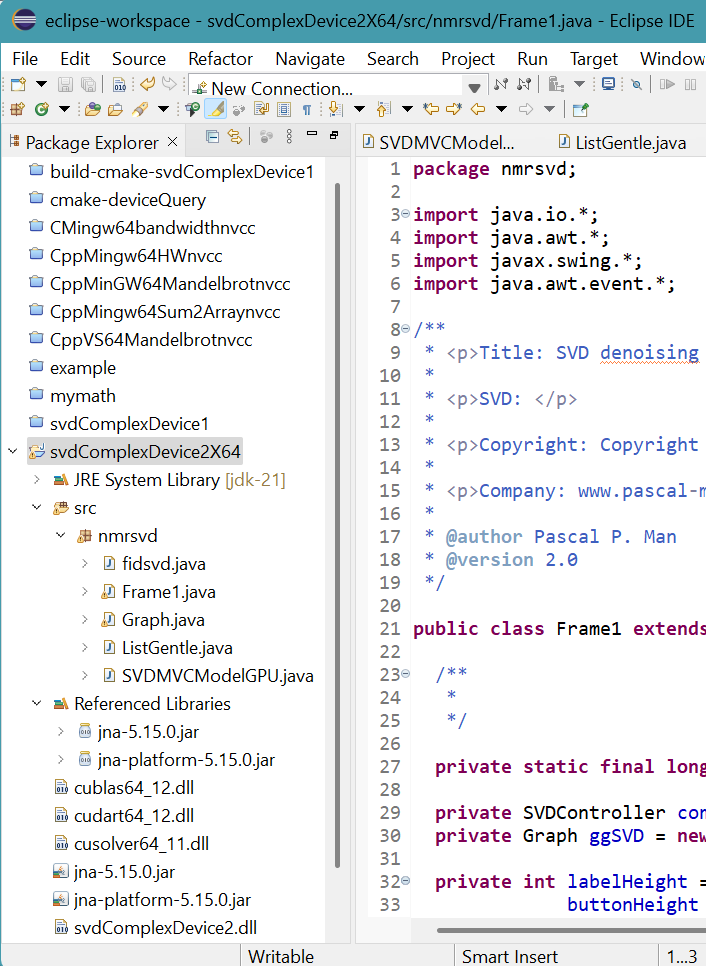
Transfer the following six files into the project folder:
svdComplexDevice2.dll, [cudart64_12.dll, cusolver64_11.dll, and cublas64_12.dll] from folderC:\Program Files\NVIDIA GPU Computing Toolkit\CUDA\v12.5\bin,jna-platform-5.15.0.jar and jna-5.15.0.jar.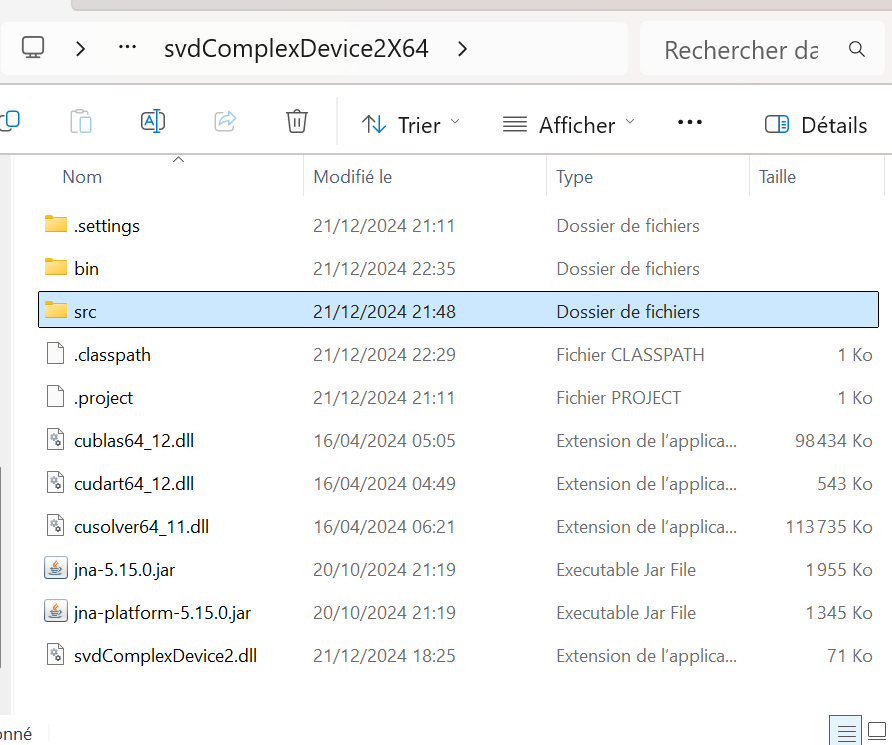
- Right click the project name in Package Explorer then select Refresh.
The six files appear in Package Explorer.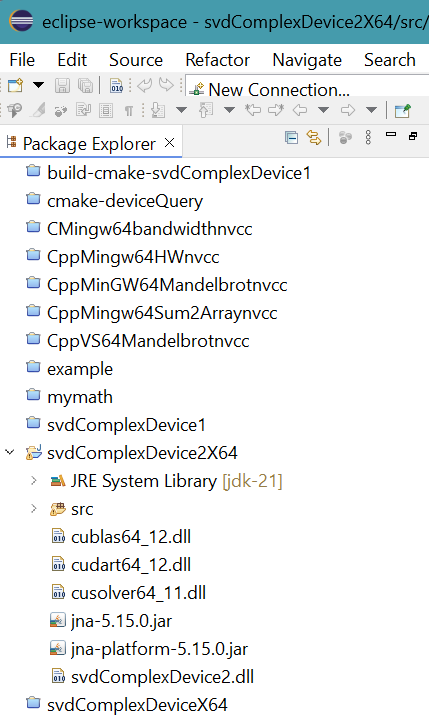
- Right click the source folder src in Package Explorer.
Select New then Package. Provid the package name: nmrsvd
Click Finish button.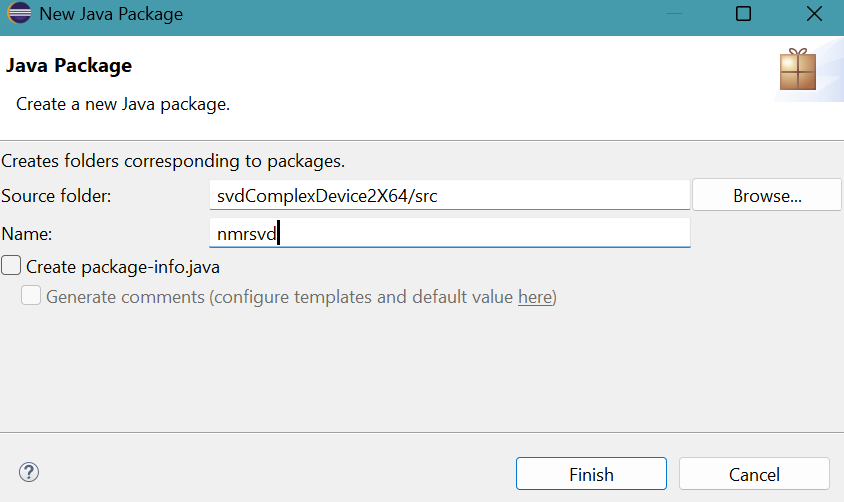
- Right click the package folder nmrsvd in Package Explorer.
Select New then class. Provid the class name: fidsvd
Click Finish button.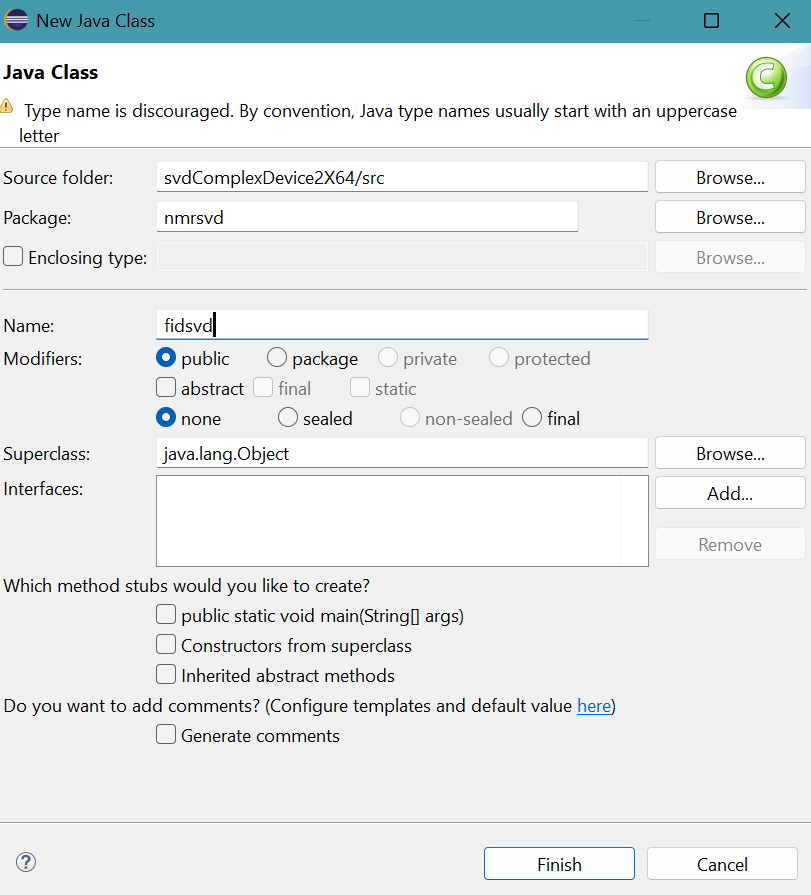
- Similarly, generate four Java classes: Frame1, Graph, ListGentle,
and SVDMVCModelGPU
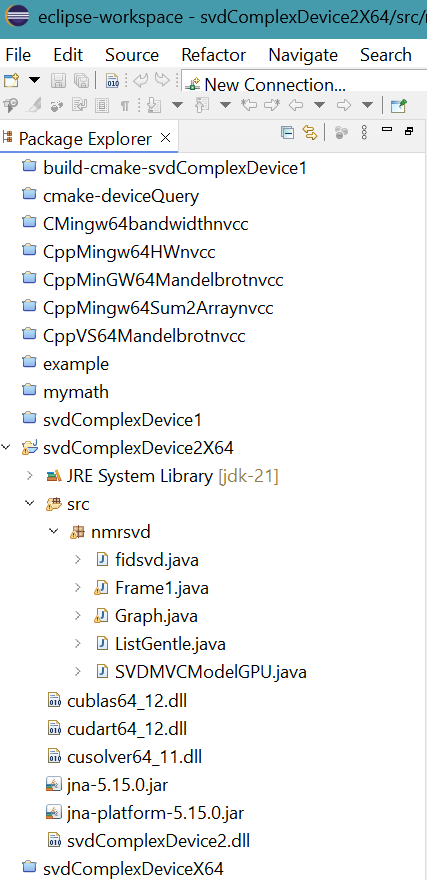
- Copy and paste fidsvd.java, Frame1.java, Graph.java, ListGentle.java, and SVDMVCModelGPU2.java into the five newly generated java files, respectively.
- Right click the project folder svdComplexDevice2X64 in Package Explorer.
Select Properties, Java Build Path, Library.
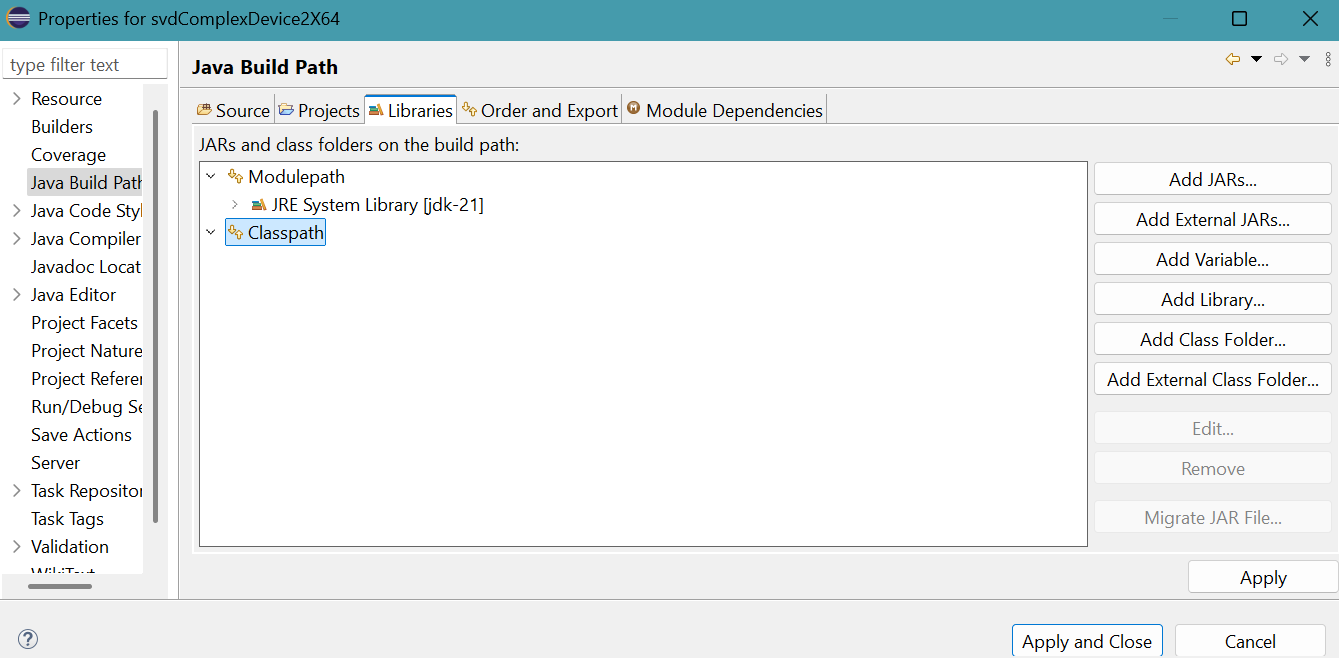
- Select Classpath to activate Add buttons.
Click Add JARs... button.
Click the project folder in JAR Selection panel.
Select the two jar files.
Click OK button.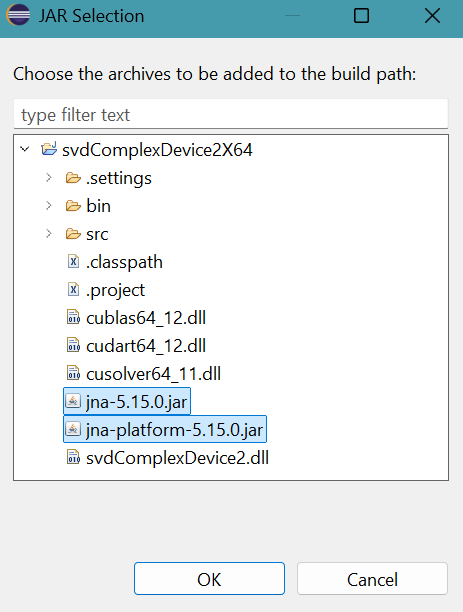
- The result is
Click Apply and Close button.
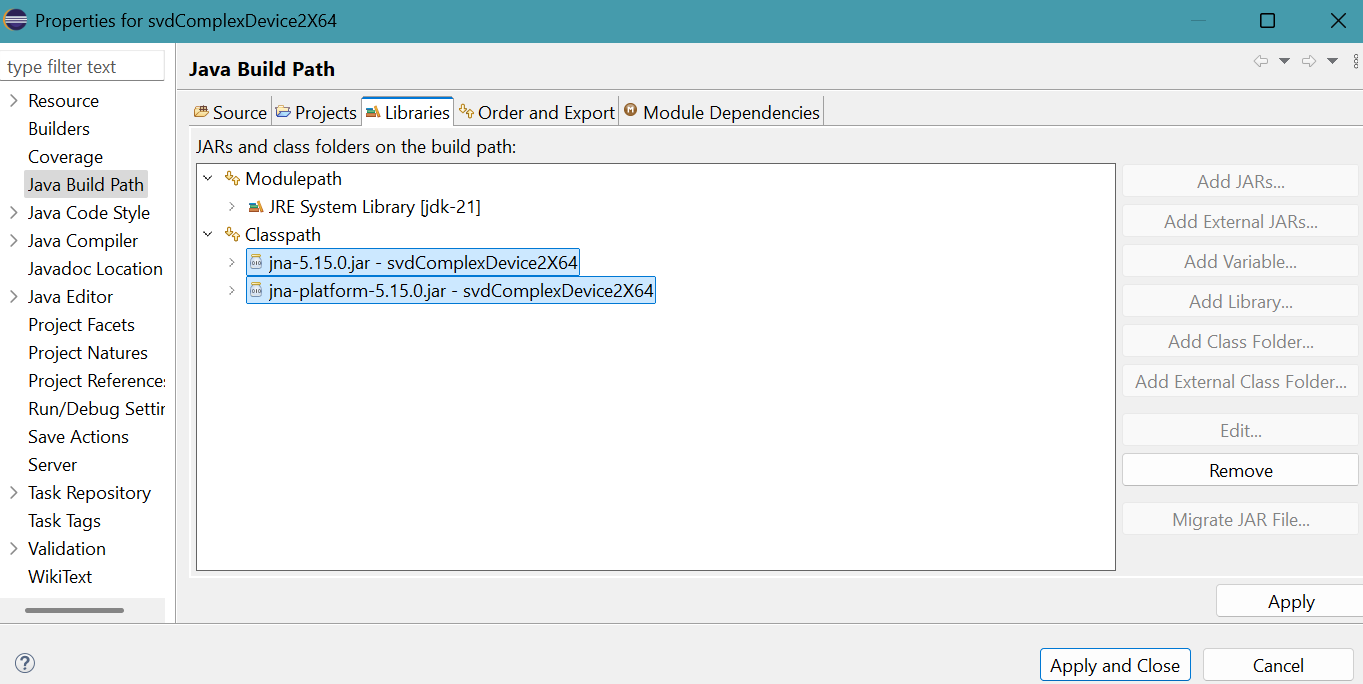
- The result is
A new folder, Referenced Libraries containing the two jna files, is added to the project in Package Explorer.
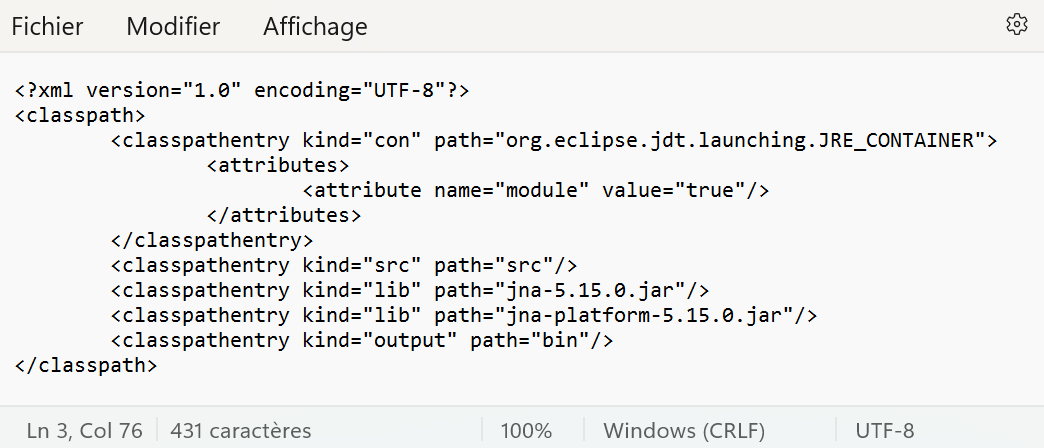
- The file .classpath in the project folder located at
C:\Users\pm\eclipse-workspace\svdComplexDevice2X64 is filled.Two lines concerning with jna files are added.
- Select Run menu then Run Configuration...
Click Java Application then New_configuration.
Click Run button.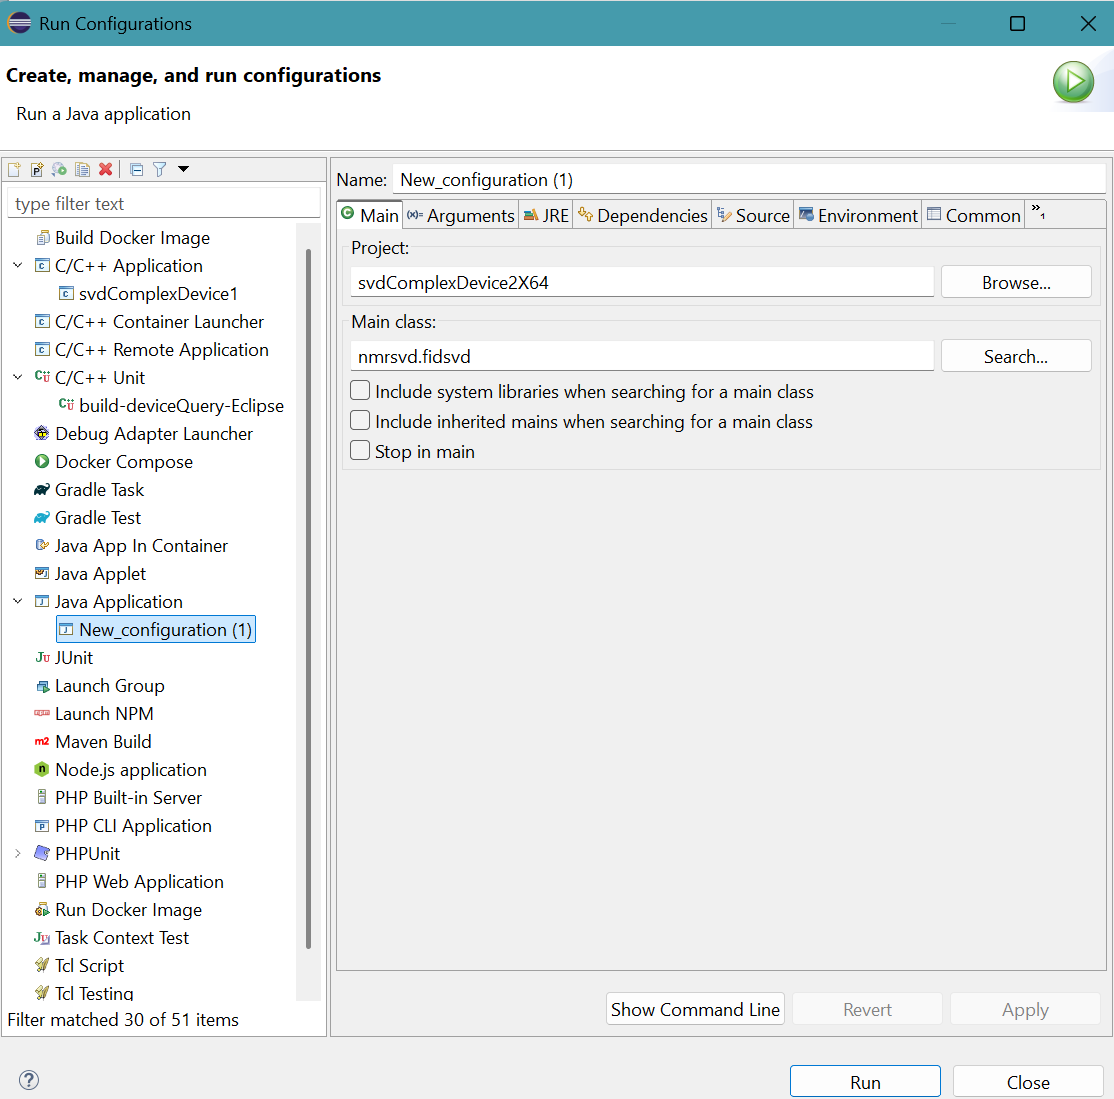
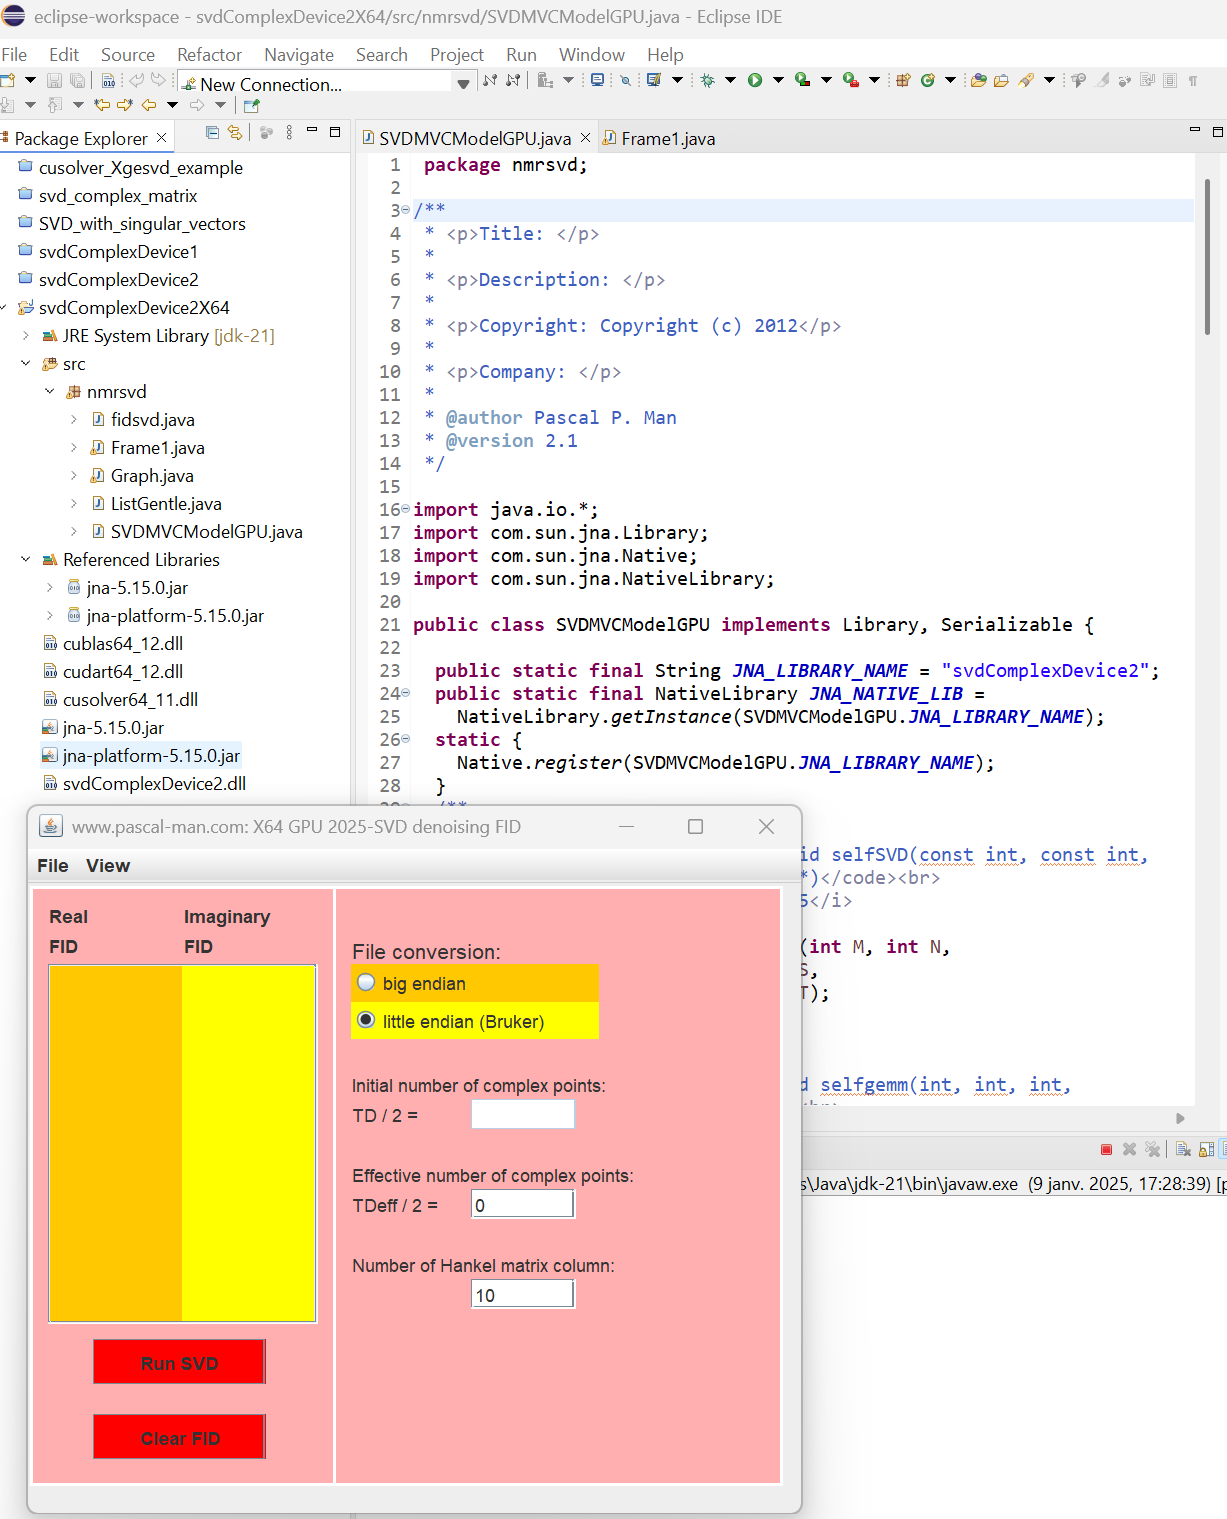
- The Java application panel appears.
Number of Hankel matrix column must be smaller than Tdeff/4.
CUDA and DLL references
- Creating a jar File in Eclipse
- Creating an executable Jar file
- StockOveflow: Eclipse CDT clean fails on Windows: tries to run rm -rf
- mickael-baron: Tutoriel pour exécuter du code natif en Java : JNI VS JNA
- Capsis:
A Java - Fortran connection with JNA (a test with Organon by the Oregon State University, USA)
- Wikipédia: Compute Unified Device Architecture
- National Academic Digital Library of Ethiopia: CUDA for Engineers
- CUDA C++ programming guide 2019, (PDF file)
- CUDA quick start guide 2018, (PDF file)
- CUDA installation guide Windows Release 12.6
- CUDA samples, Reference Manual, v10.1, April 2019
- Nvidia: CUDA toolkit documentation 12.6 update 3
- Nvidia: CUDA C++ best practices guide
- Nvidia: NVIDIA CUDA toolkit documentation
- Nvidia: NVIDIA CUDA compiler driver NVCC
- StackOverflow: What is the canonical way to check for errors using the CUDA runtime API?
- Dan Piponi: Minimal CUDA example (with helpful comments)
- selkie.macalester.edu: Vector add with CUDA
- ✠Essex Edwards :
CUDA library samples
- LEARN: Visual studio 2022: missing vcruntime.h
- Nvidia: Configure CUDA project properties
- StockOverflow:
vcruntime.h missing from Windows include folder?
- StockOverflow: __cdecl and __declspec calling conventions confusion
- StockOverflow: Windows & C++: extern & __declspec(dllimport)
- StockOverflow: What is the difference between __declspec( dllimport ) extern "C" AND extern "C" __declspec( dllimport )
- StockOverflow: Exporting functions from a DLL with dllexport
- Software and Finance: Visual C++ - Exporting functions in DLL and Dynamic Binding - Accessing by loading the DLL at run-time
- Antoine Rincent: Comment créer un fichier .dll en C++
- Gerbelot Barillon: Ecrire une DLL en C/C++ sous Windows
- cygwin: Building and using DLLs
- Medium: Dynamic or shared libraries
cusolver references
- Nvidia Developer: CUDA libraries documentation
- CUDA: cuSOLVER API Reference v12.6
- ✠Nvidia: CUSOLVER library 2019
- Applied Parallel Computing LLC: Introduction to GPU-enabled Numerical Libraries
- Wikipedia: Singular value decomposition
- ✠Stackoverflow: Singular values calculation only with CUDA
- ✠Mirage1089:
Eigen decomposition for Hermitian complex matrix does not match
the result with matlab #58
void BuildMatrix(cuComplex* input) { std::vector<float> realVector = { 0.5560, -0.4864, 0.8592, -1.5374}; std::vector<float> imagVector = { 0, -0.0548, -0.2101, 0.2069}; for (int i = 0; i < N; i++) { input[i].x = realVector.at(i) * std::pow(10, 11); input[i].y = imagVector.at(i) * std::pow(10, 11); } } - nazmul.haque: Eigen decomposition for Hermitian complex matrix does not match the result with matlab
- ✠✠Nvidia: Cusolver SVD for general complex matrix
- Nvidia: cusolverDnSgesvd svd of matrix with m<n
- ✠Nvidia: [cusolverDn] Fail to compute the singular values only in Cuda 7.0
- ✠✠✠Nvidia Developer zone, CUDA Toolkit v10.1.168: G. Examples of Singular Value Decomposition
- Nvidia cuQuantum : Define SVD decomposition
- Angelika Schwarz: cuSOLVER library - APIs examples
- ✠Angelika Schwarz: cuSOLVER Singular Value Decomposition example
- csdn: CUDA cusolverDn<t>gesvd()函数认知
- Andrzej Chrzęszczyk and Jacob Anders: Matrix computations on the GPU, CUBLAS, CUSOLVER and MAGMA by example
- ✠SIJIA ZHOU: cusolver_utils.h
- ✠Angelika Schwarz: Bug 4593086: Type mismatch in cusolver_utils.h
- DP3: Complex.h
- Stackoverflow: CUDA - How to work with complex numbers?
- Stackoverflow: What is the canonical way to check for errors using the CUDA runtime API?
- Stackoverflow: CUDA - Simple complex number multiplication
- Stackoverflow: Programme execution time counter
- OrangeOwlSolutions: SVD_singular_values_only_complex.cu
- IBM: SGESVD, DGESVD, CGESVD, ZGESVD, SGESDD, DGESDD, CGESDD, and ZGESDD (Singular Value Decomposition for a general matrix)
- numericalalgorithmsgroup: Example program for zgesvd
- NAG: NAG FL Interface f08kpf (zgesvd)
- NAG: NAG library routine document F08KPF (ZGESVD)
- INTEL: CGESVD example program in C
- MathWorks: Singular value decomposition
- Stackoverflow: Eigen decomposition of Hermitian Matrix using CuSolver does not match the result with matlab
- Stackoverflow: cuSolver sample with cuSolverDnDgetrf not working
- Stackoverflow: CUDA cuSolver gesvdj with large matrix
- Stackoverflow: How can solve SVD from row-major matrix using cusolver gesvd function
- Stackoverflow: Parallel implementation for multiple SVDs using CUDA
- Nvidia: cusolverDnCgesvd performance vs MKL
- Nvidia: Eigen decomposition for Hermitian complex matrix does not match the result with matlab
- OrangeOwlSolutions: Create SVD_CUDA_Jacobi_Batched.cu
cublas references
- Nvidia Developer:
cuBLAS: Basic Linear Algebra on NVIDIA GPUs
The cuBLAS library is included in both the NVIDIA HPC SDK and the CUDA Toolkit. - CUDA:
cuBLAS v12.6
Starting with version 4.0, the cuBLAS Library provides a new API, in addition to the existing legacy API. The legacy cuBLAS API is deprecated and will be removed in future release. The new cuBLAS library API can be used by including the header file cublas_v2.h. - Nvidia:
cuBLAS Library User Guide 2022
- Nvidia:
function definition of cublasDgemm is different from documentation in CUDA 8.0
The first calling parameter in the modern CUBLAS API is the handle. You’ll note that no handle exists in the legacy API call. - Nvidia:
CUDA Toolkit 5.0, CUBLAS Library 2012
9.8 Converting Legacy to the CUBLAS API - NVIDIA cuBLASDx 0.2.0:
General Matrix Multiply using cuBLASDx
The cuBLAS Device Extensions (cuBLASDx) library enables you to perform selected linear algebra functions known from cuBLAS inside your CUDA kernel. This is currently limited only to General Matrix Multiplication (GEMM). - Nvidia Developer: New cuBLAS 12.0 features and matrix multiplication performance on NVIDIA Hopper GPUs
- Massed Compute: What is the difference between cuBLAS and cuSOLVER for NVIDIA GPU acceleration?
- Stéphane Vialle: TD2: CUBLAS library (PDF)
- Stéphane Vialle: Bibliothèque CUBLAS (PDF)
- Will Landau: The CUBLAS and CULA libraries (PDF)
- Wikipedia: Row- and column-major order
- wlandau-lilly: simpleCUBLAS.cpp
- Goran Frehse ENSTA Paris: Introduction to cuBLAS
- Andrzej Chrzeszczyk and Jakub Chrzeszczyk: Matrix computations on the GPU, CUBLAS and MAGMA by example (2013)
- Solarian Programmer: Matrix multiplication on GPU using CUDA with CUBLAS, CURAND and Thrust
- Harshit Kumar: Matrix multiplication in CUDA
- QuantStart: Matrix-matrix multiplication on the GPU with Nvidia CUDA
- paperswithbacktest: Matrix-matrix multiplication on the GPU with Nvidia CUDA (Algo Trading)
- UFRC: CUDA Examples
- Chris McCormick: Matrix multiplication with cuBLAS example
- Cjkkkk Shanbin Ke: CUDA_gemm
- Trent Nelson: cuComplex.h
- YouTube: CUDA crash course: cuBLAS matrix multiplication
- developpez:
VII-E. La mémoire
// Remplissage de la matrice source
   // Première colonne
   a[0] = 1;
   a[1] = 2;
   a[2] = 3;
   a[3] = 4;
   // Deuxième colonne
   a[rows    ] = 1;
   a[rows + 1] = 1;
   a[rows + 2] = 1;
   a[rows + 3] = 1;
   // Troisième colonne
   a[rows * 2    ] = 3;
   a[rows * 2 + 1] = 4;
   a[rows * 2 + 2] = 5;
   a[rows * 2 + 3] = 6;
   // Quatrième colonne
   a[rows * 3    ] = 5;
   a[rows * 3 + 1] = 6;
   a[rows * 3 + 2] = 7;
   a[rows * 3 + 3] = 8;
- IBM: SGEMM, DGEMM, CGEMM, and ZGEMM (combined matrix multiplication and addition for general matrices, their transposes, or conjugate transposes)
- github, Matthew Nicely: cublas_gemm_example.cu
- StackOverflow: How to configure cublas{t}symm() function arguments
selfmatrixMulCUBLAS.cpp project in MS Visual Studio 2022
- Launch Visual Studio 2022, select Create a new Project.
- In Create a new project panel, select Empty Project.
Click Next button.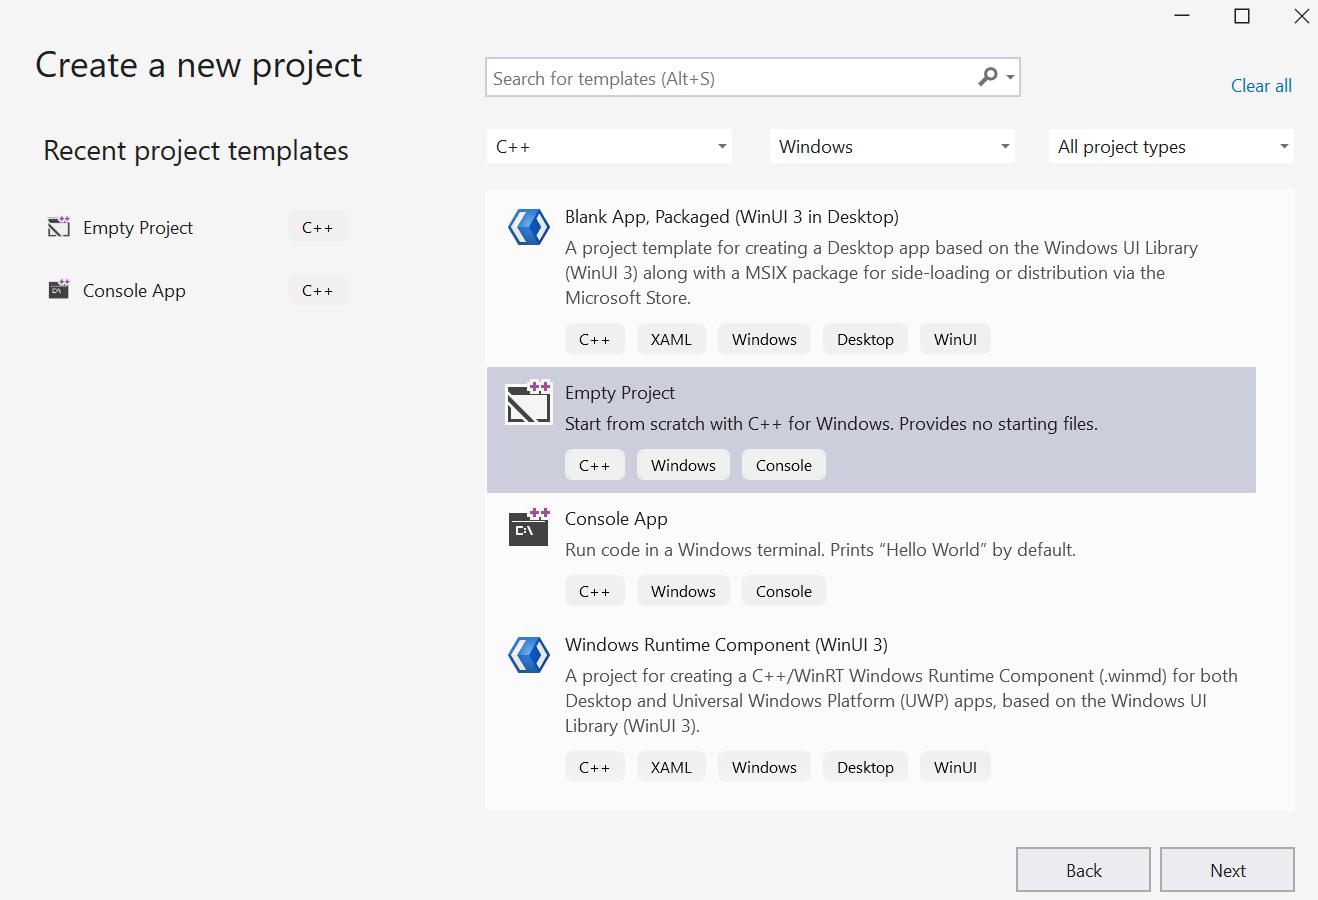
- In Configure your new project panel:
Provid the Project name: selfmatrixMulCUBLAS
Click Create button.
- The Visual Studio editor appears.
Right-click the folder of Source Files in Solution Explorer. Select Add then New Item... - Add New Item panel appears. Select C++ File (.cpp).
Provid the name of the file: matrixMulCUBLAS.cpp
Click Add button. - An empty matrixMulCUBLAS.cpp source file appears for editing.

- Copy and paste the file
C:\Users\pm\source\repos\cuda-samples-12.5\Samples\4_CUDA_Libraries\matrixMulCUBLAS\matrixMulCUBLAS.cpp into the empty source file.Many words are wavy-underlined in red.
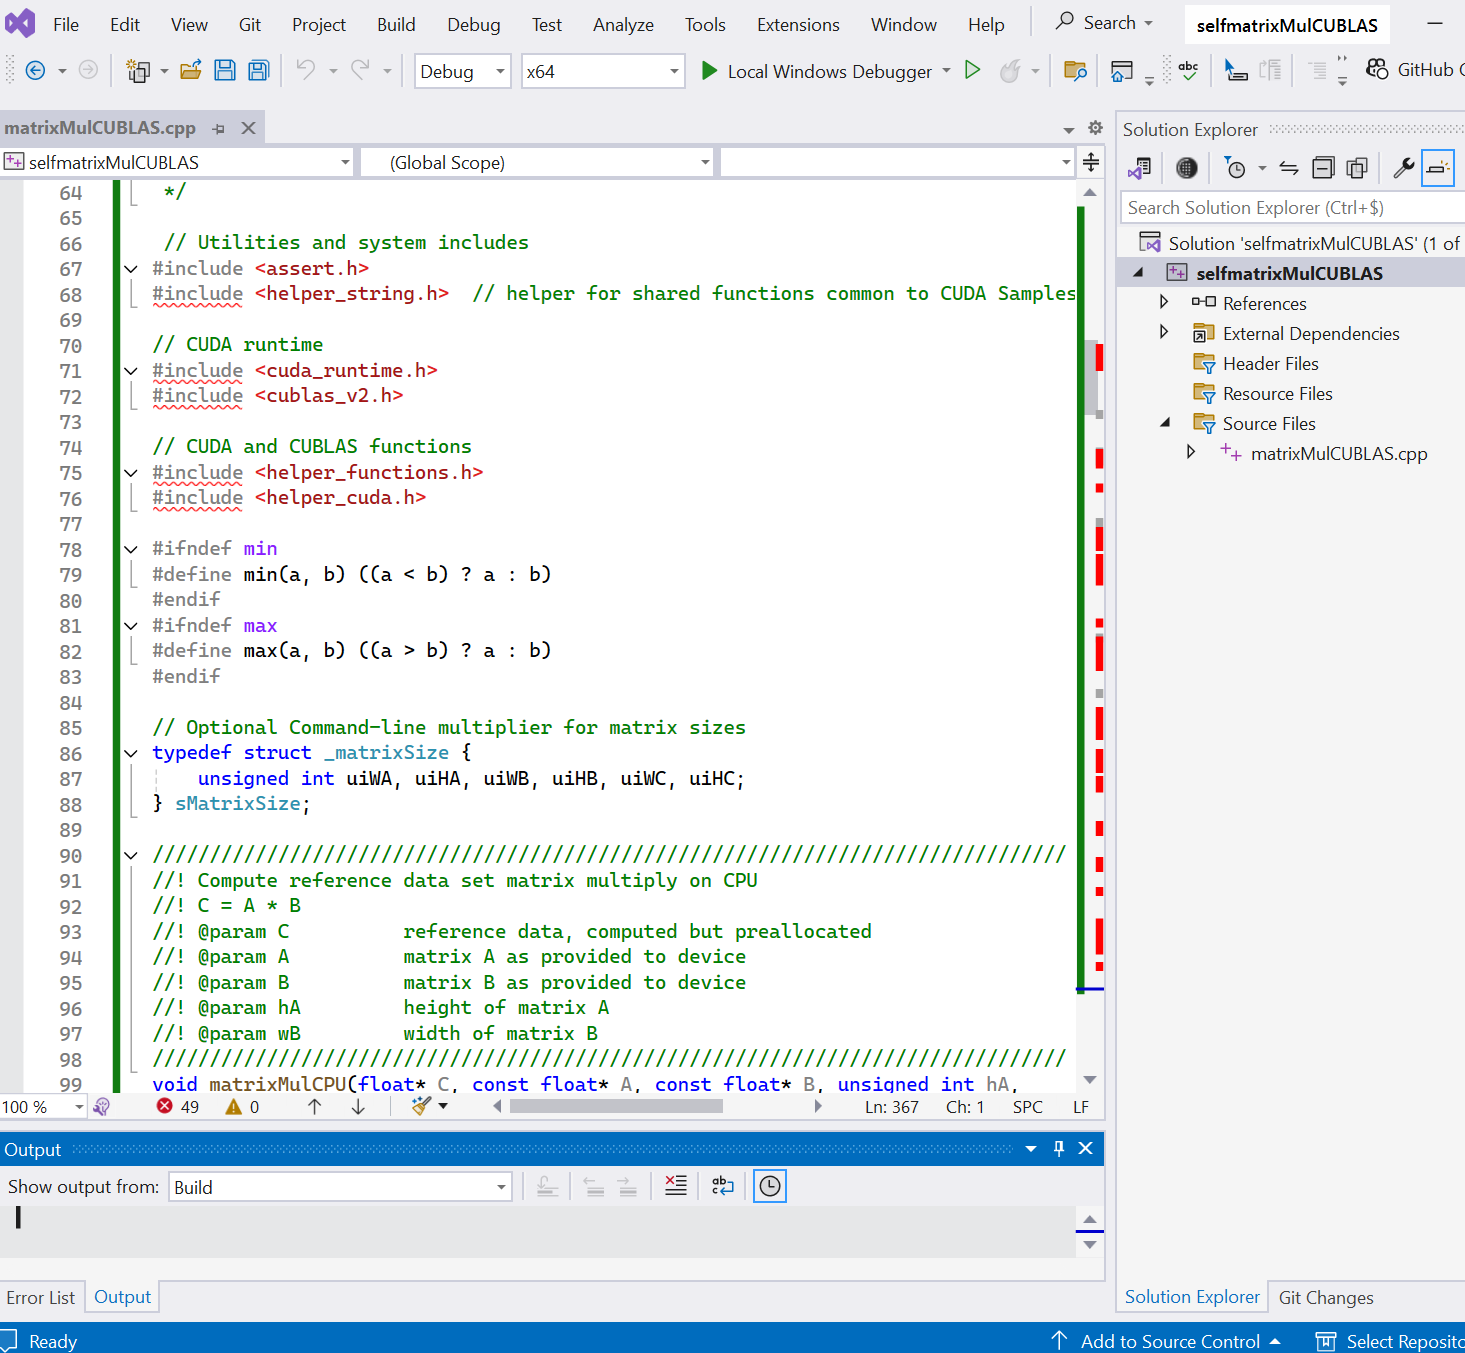
- Right click the project selfmatrixMulCUBLAS in Solution Explorer.
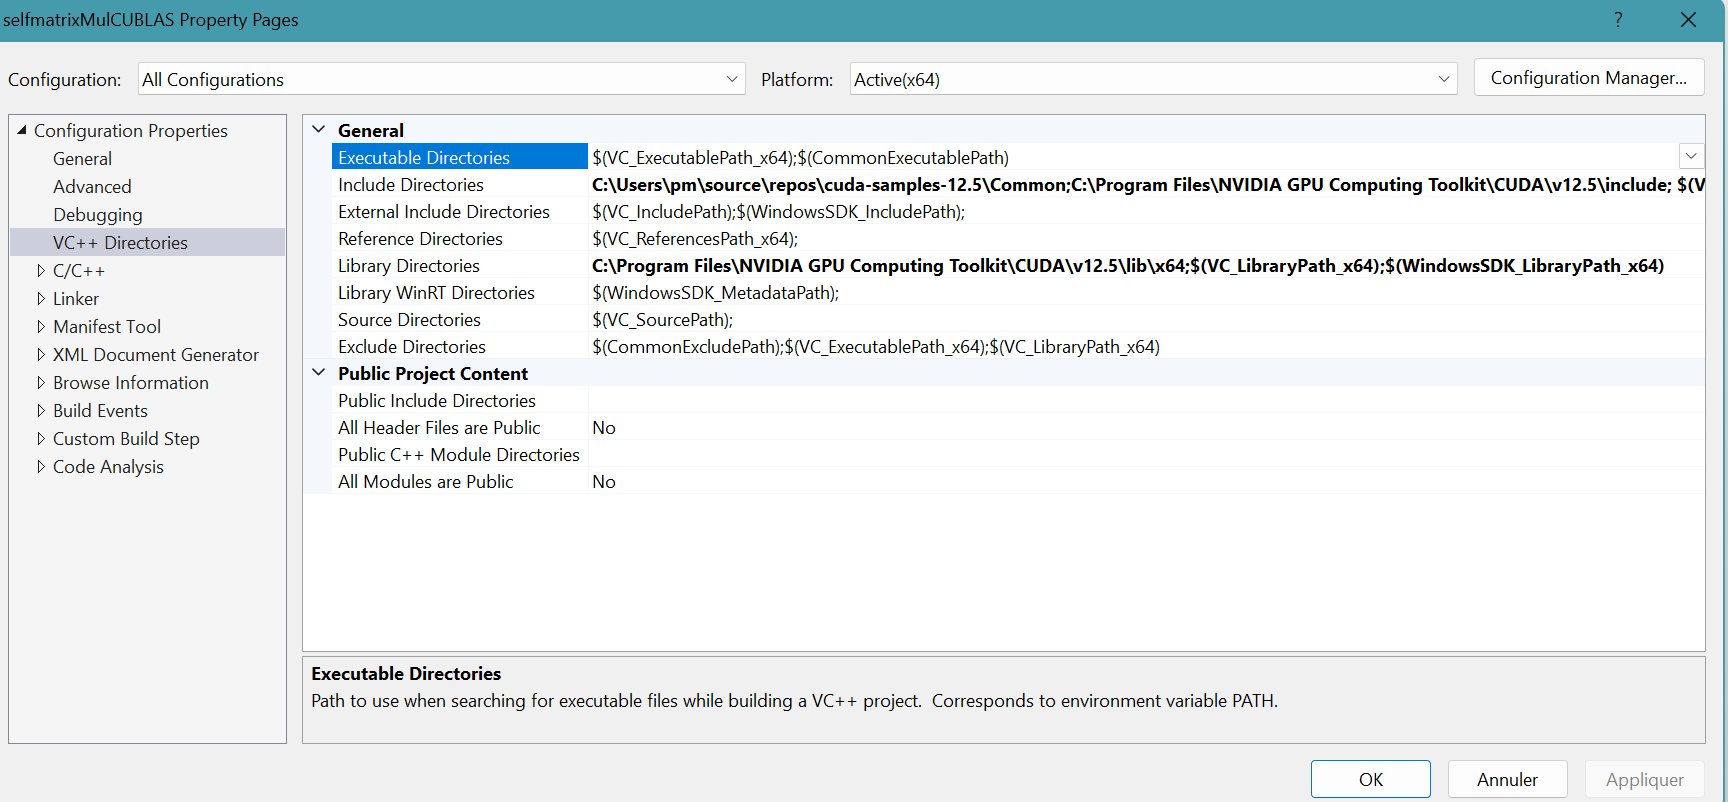
Select Properties.
Select VC++ Directories.
Add C:\Users\pm\source\repos\cuda-samples-12.5\Common;C:\Program Files\NVIDIA GPU Computing Toolkit\CUDA\v12.5\include; in Include Directories.
Add C:\Program Files\NVIDIA GPU Computing Toolkit\CUDA\v12.5\lib\x64; in Library Directories.
- Select Linker then select Input.
Add cudart.lib;cublas.lib; in Additional Dependencies.
Click Apply button then OK button.
- The red wavy-underlines disappeared.

- Select Build menu then Build Solution.
Two files, selfmatrixMulCUBLAS.exe and selfmatrixMulCUBLAS.pdb, are generated in the folder
 C:\Users\pm\source\repos\selfmatrixMulCUBLAS\x64\Debug.
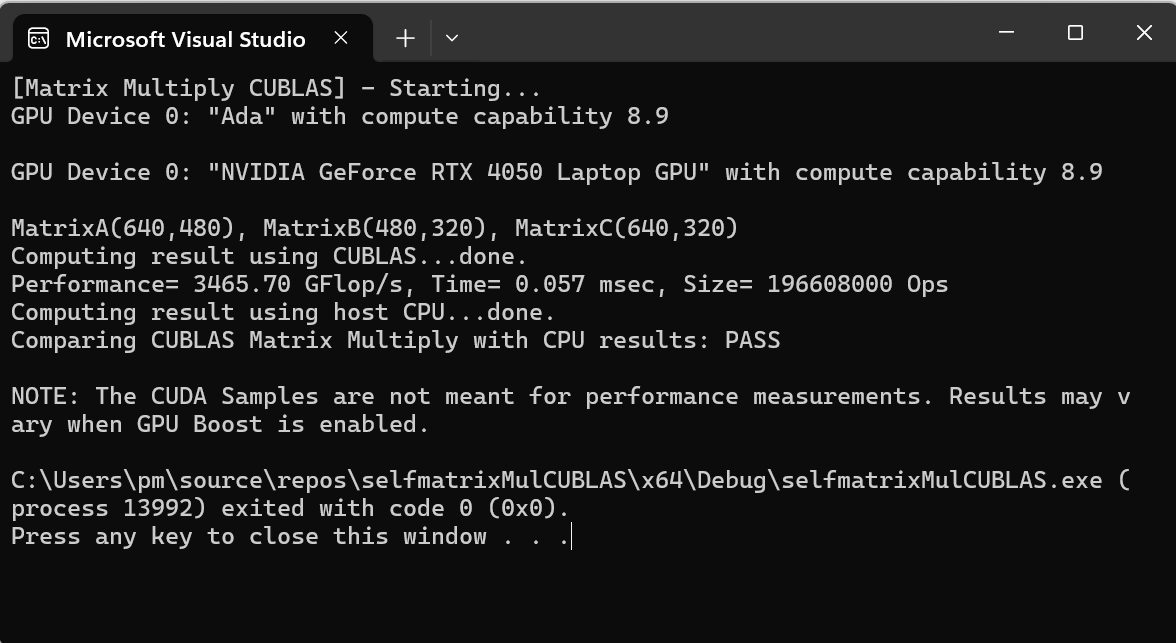
 - Select Debug menu then Start Without Debugging.
3X2, cusolver_Xgesvd_example.cu project in MS Visual Studio 2022
- Launch Visual Studio 2022, select Create a new Project.
- In Create a new project panel, select CUDA 12.5 Runtime.
Click Next button.
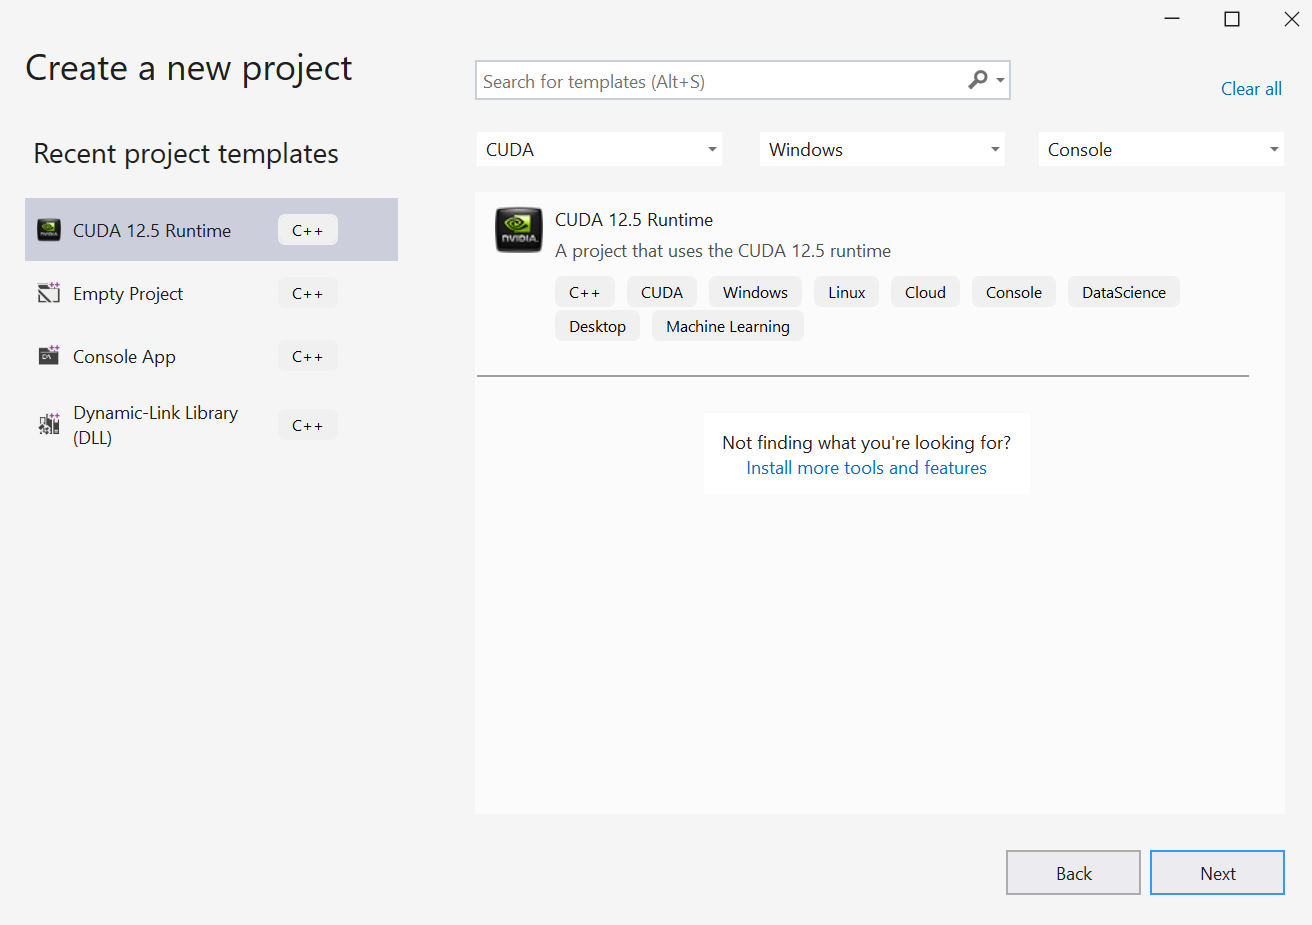
- In Configure your new project panel:
Provid the Project name: cusolver_Xgesvd_example
Click Create button. - The Visual Studio editor appears.
Right-click the project folder cusolver_Xgesvd_example in Solution Explorer.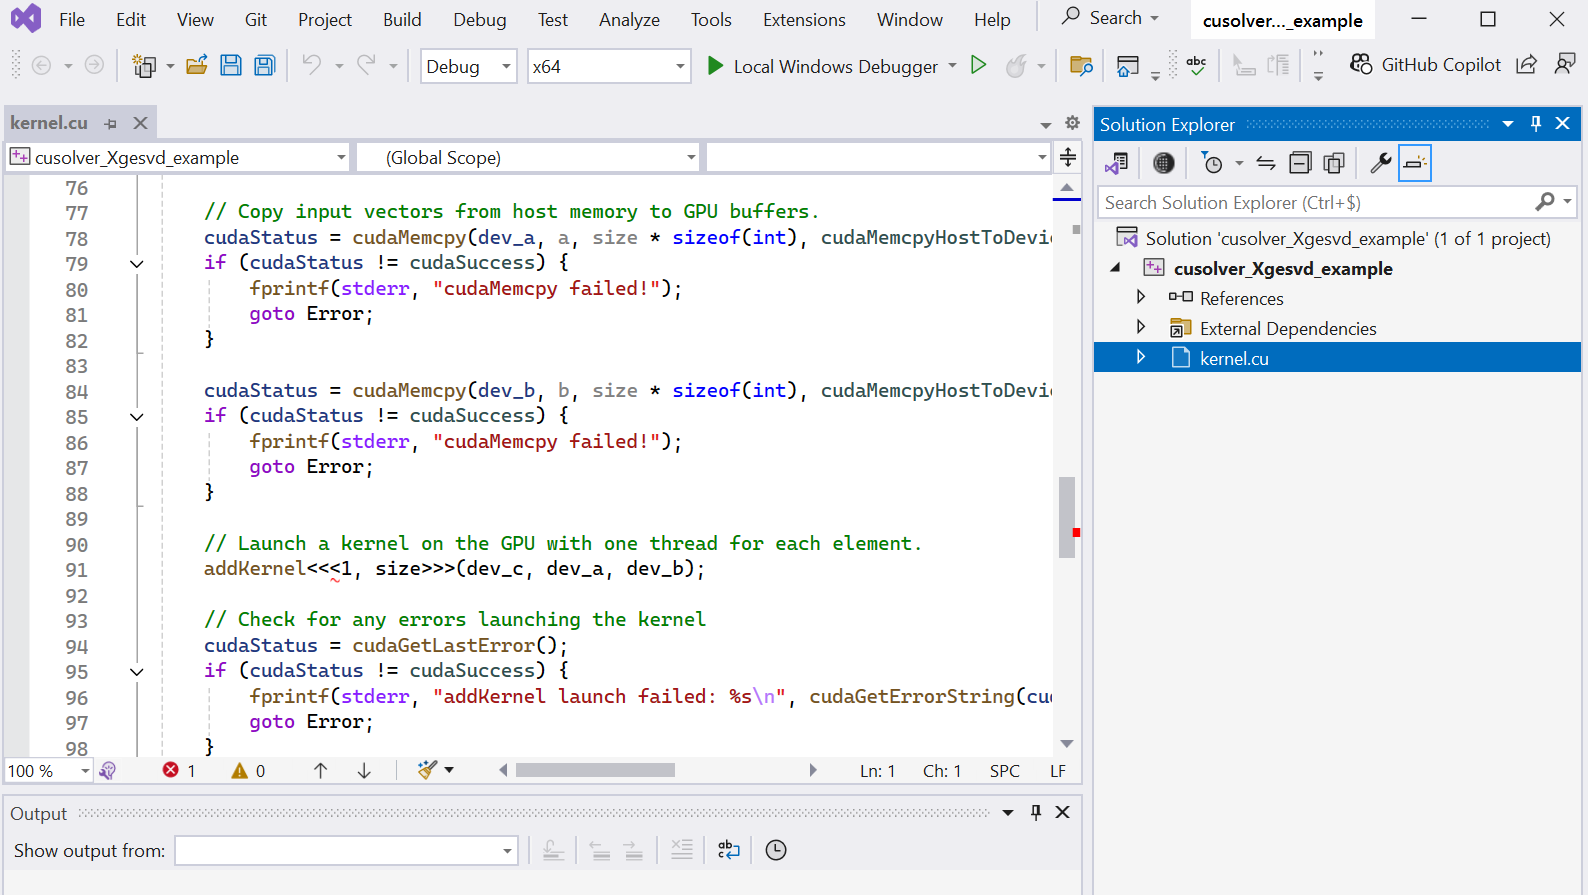
Select Add then New Item... - Add New Item panel appears. Select CUDA 12.5 C/C++ File
Provid the name of the file: cusolver_Xgesvd_example.cuClick Add button.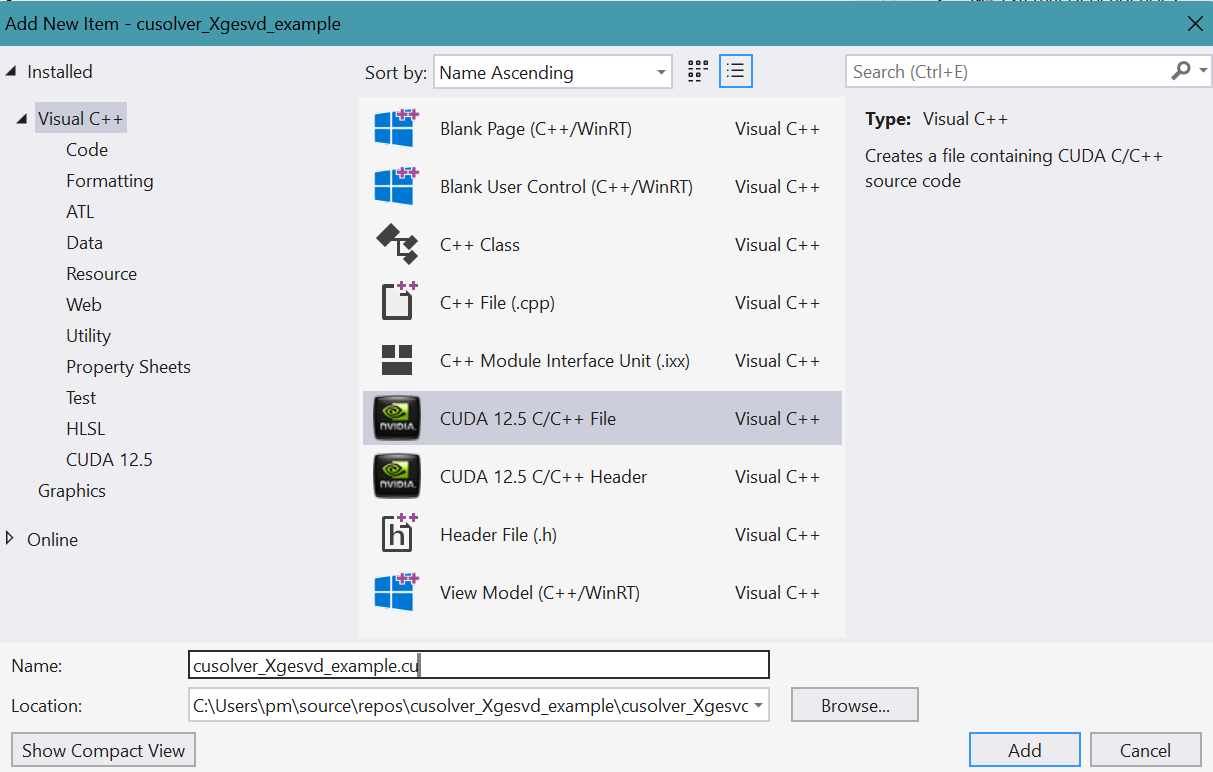
- An empty cusolver_Xgesvd_example.cu source file appears for editing.
- Copy and paste the file cusolver_Xgesvd_example.cu provided by
Angelika Schwarz
into the empty source file.
Many words are wavy-underlined in red.
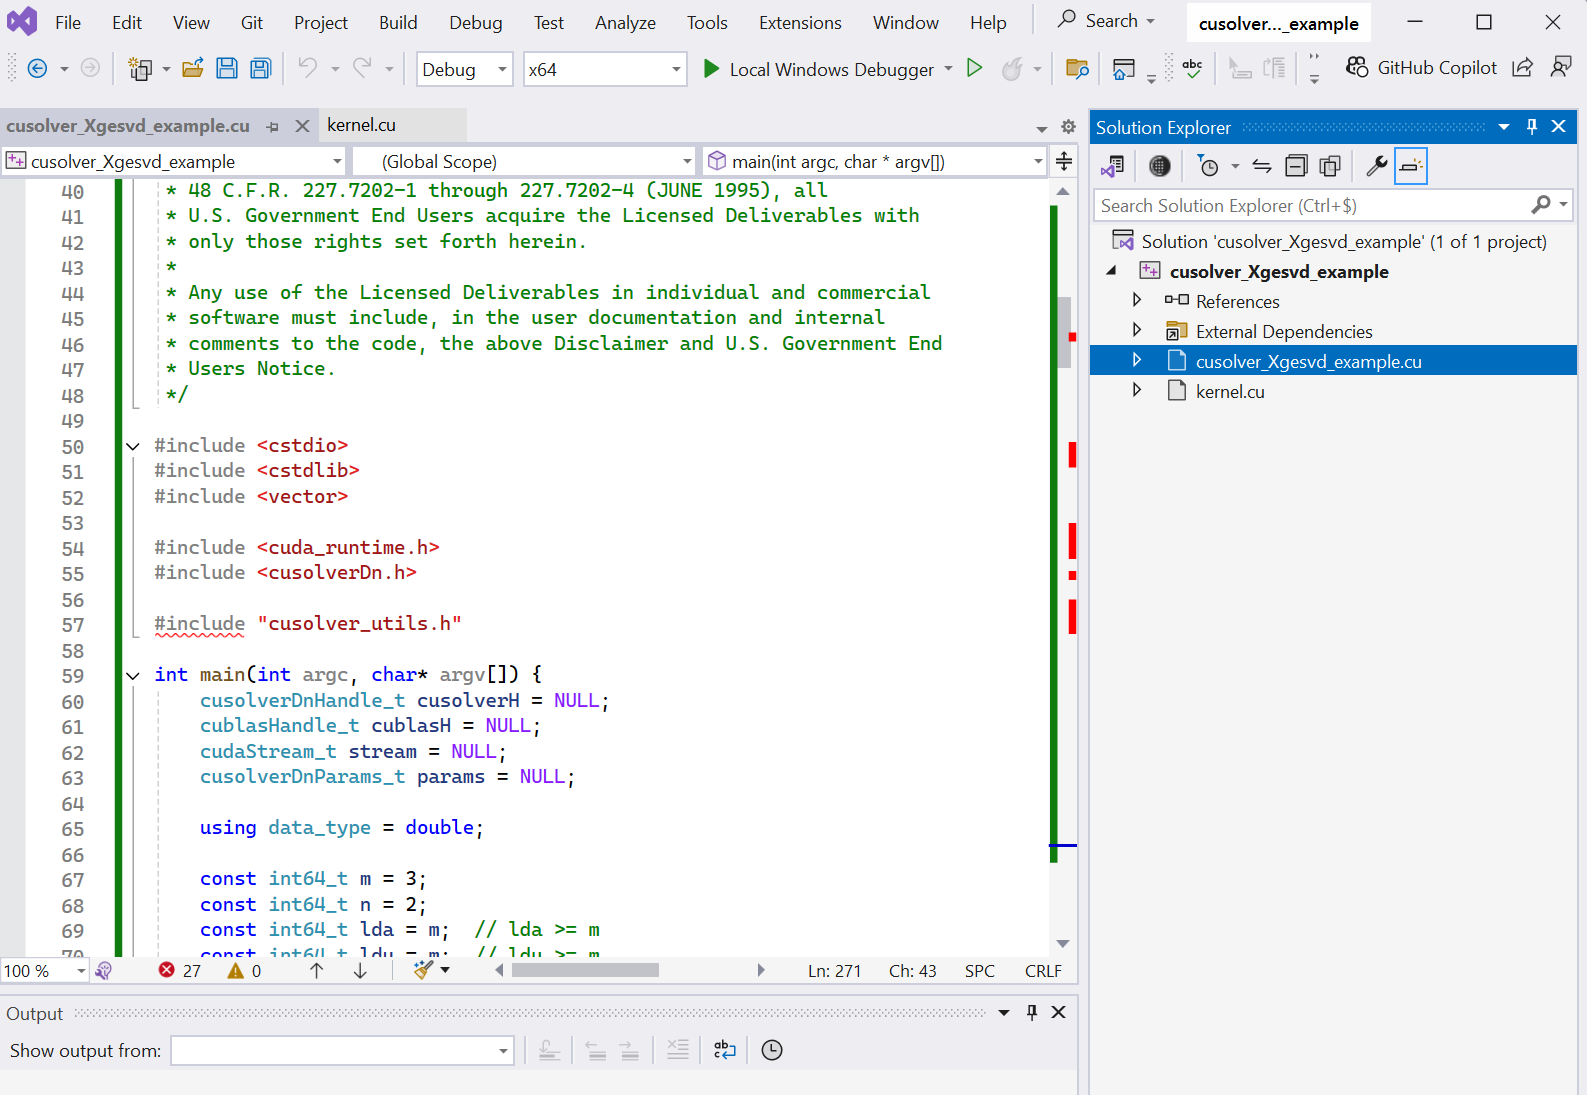
- Copy and paste the file cusolver_utils.h provided by
Sijia Zhou
into the project folder
C:\Users\pm\source\repos\cusolver_Xgesvd_example
- Right click the project cusolver_Xgesvd_example in Solution Explorer.
Select Properties.
Select VC++ Directories.Add C:\Users\pm\source\repos\cusolver_Xgesvd_example; in Include Directories.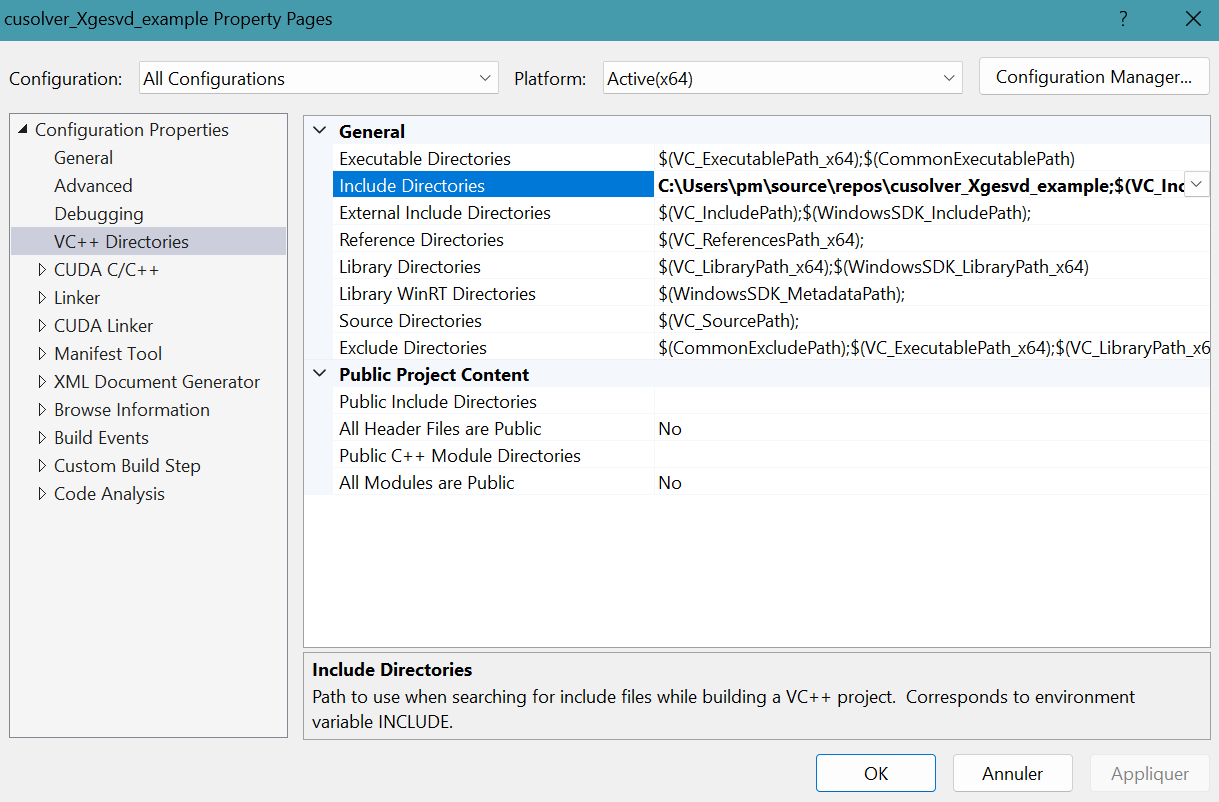
- Select Linker then select Input.
Add cusolver.lib;cublas.lib; in Additional Dependencies.
Others library files are already added.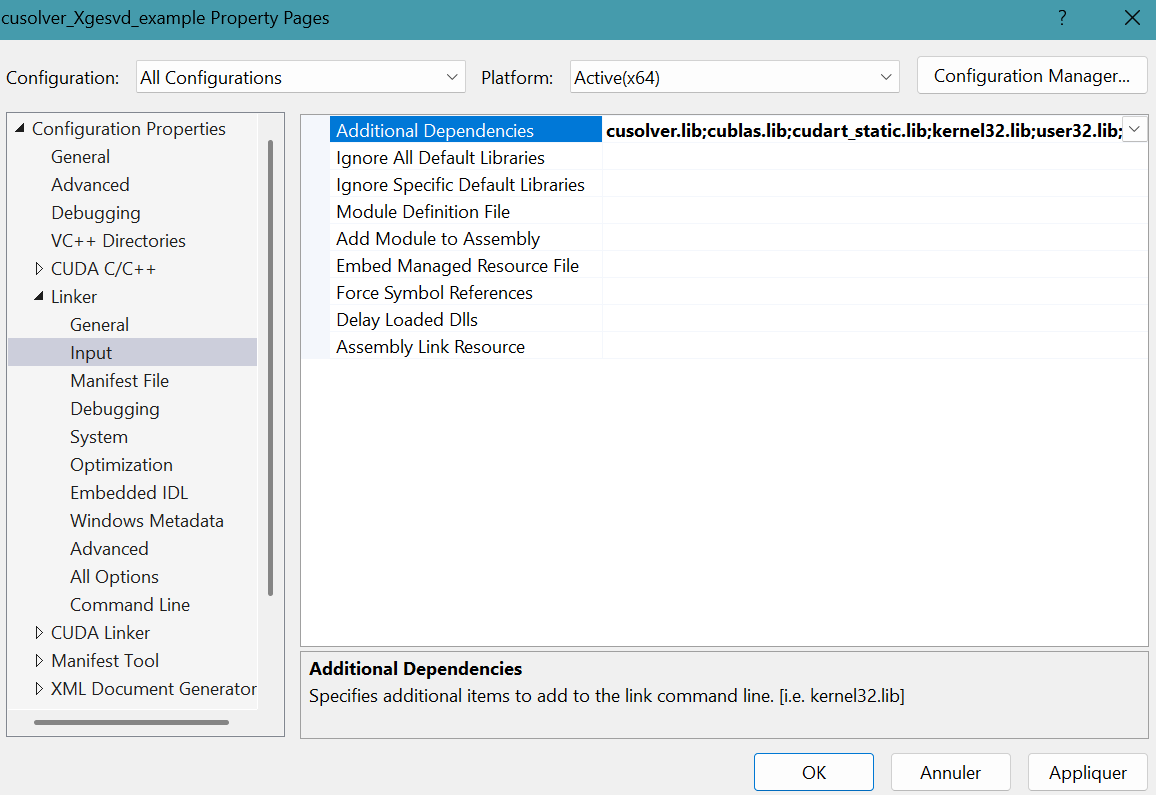
Click Apply button then OK button. - Delete kernel.cu file in the project folder.
- The red wavy-underlines disappeared.

- Right click the project cusolver_Xgesvd_example in Solution Explorer.
Select Build Dependencies then Build Customizations...
CUDA 12.5(.targets, .props) is already selected.
Close the panel.
- Right click the file cusolver_Xgesvd_example.cu in Solution Explorer.
Select Properties.
Item Type is CUDA C/C++.Close the panel.
- Select Build menu then Build Solution.
A message appears on the CDT Build Console.
The file cusolver_Xgesvd_example.exe is generated in the folderC:\Users\pm\source\repos\cusolver_Xgesvd_example\x64\Debug
- Select Debug menu then Start Without Debugging.

3X2, cusolver_Xgesvd_example.cpp project with Microsoft Visual C++ toolchain in Eclipse IDE
- Launch Eclipse IDE for Java Developers.
Select File menu, New, then Project....
New Project panel appears:
Select C/C++ then C/C++ Project. Click Next > button.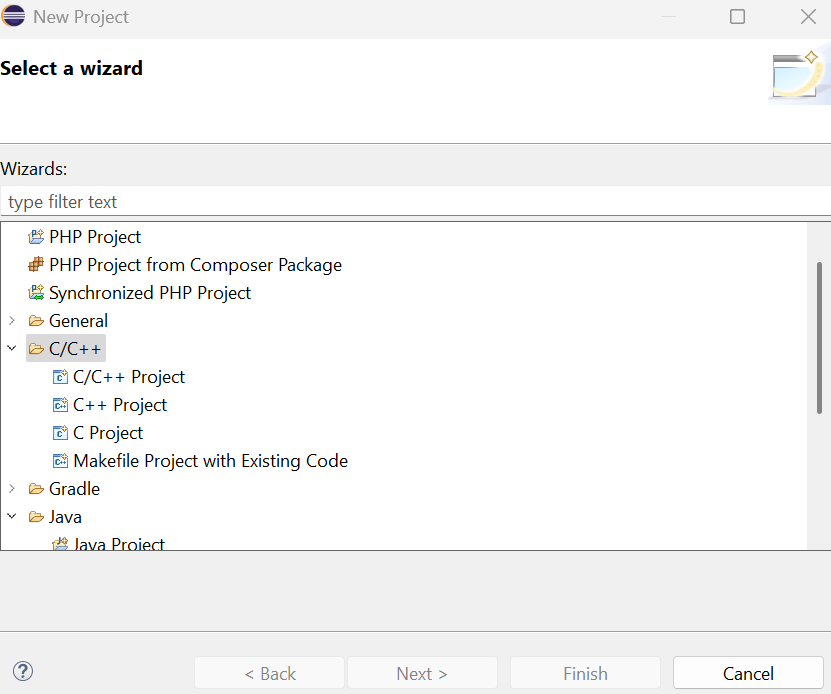
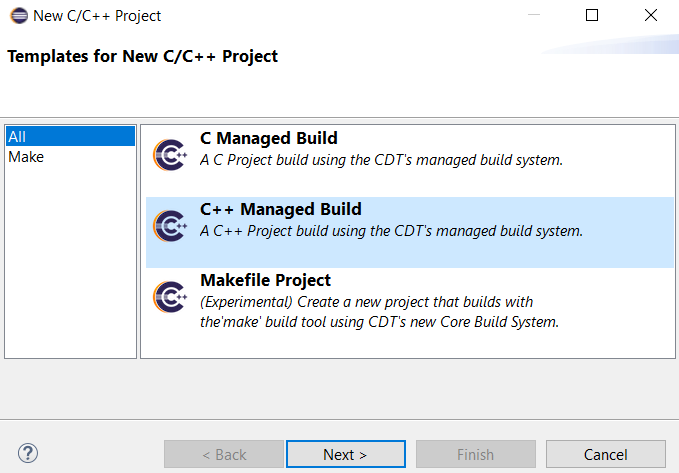
- New C/C++ Project panel appears. Select C++ Managed Build.
Click Next > button.
- C++ Project panel appears.
Provide Project name: cusolver_Xgesvd_example
Select Executable then Empty Project.
Select Microsoft Visual C++ in Toolchains.Click Finish button.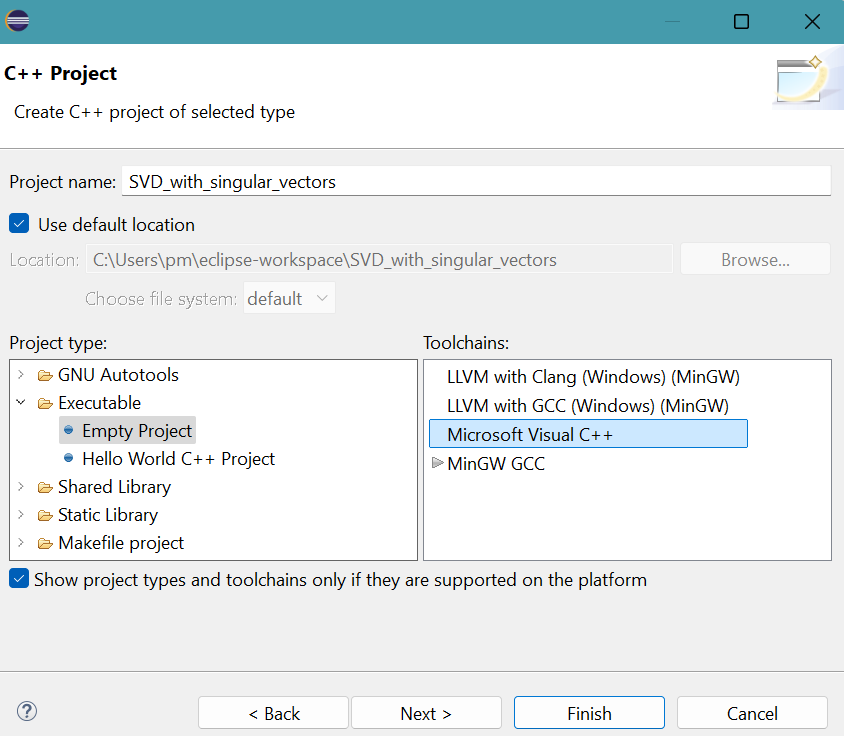
- The project folder cusolver_Xgesvd_example appears in Package Explorer of Eclipse.
- Right-click the project folder cusolver_Xgesvd_example.
Select New, then File.
Create New File panel appears.
Provide the File name: cusolver_Xgesvd_example.cpp
Click Finish button.
- Copy and paste the file cusolver_Xgesvd_example.cpp provided by
Angelika Schwarz
into the empty source file.
Press Ctrl S to save cusolver_Xgesvd_example.cpp.
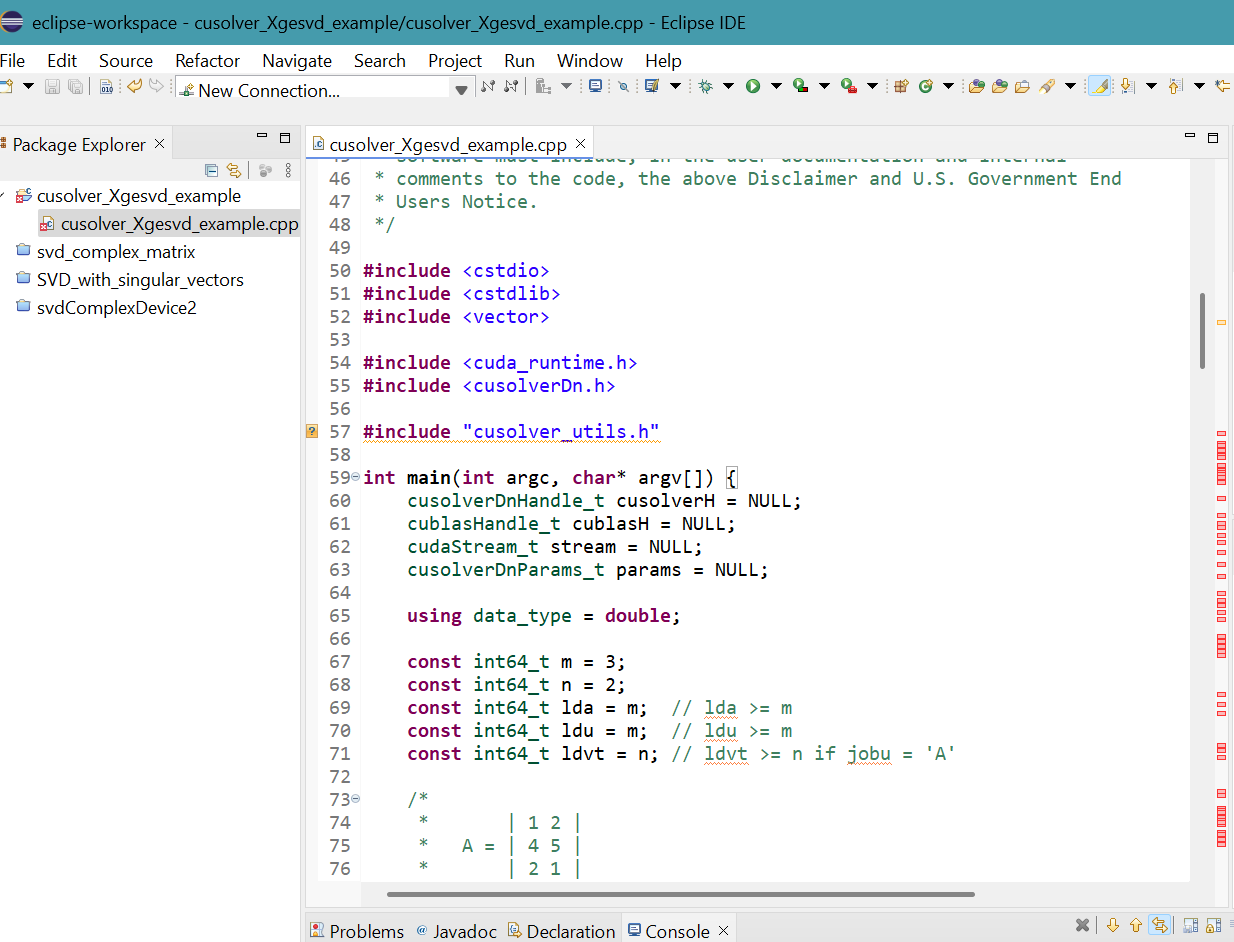
- Right-click the project folder cusolver_Xgesvd_example
Select New, then File.
Create New File panel appears.
Provide the File name: cusolver_utils.h
Click Finish button.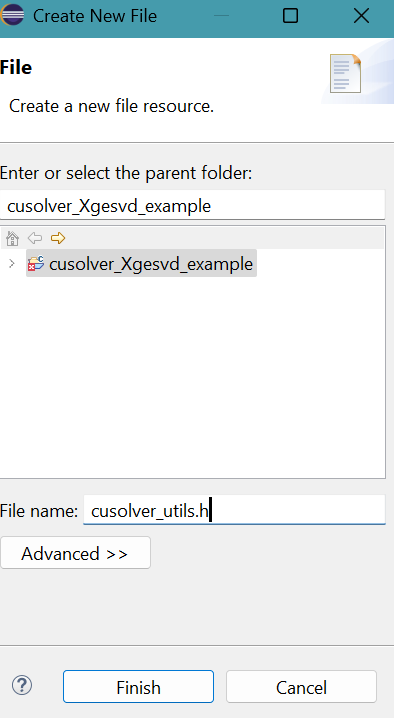
- Copy and paste the file cusolver_utils.h provided by
Sijia Zhou
into the empty file.
Press Ctrl S to save cusolver_utils.h.
- Provide the path of include folder of CUDA to compiler.
Include folder contains header files.
Right click cusolver_Xgesvd_example project in Package Explorer then select Properties.
Properties for cusolver_Xgesvd_example panel appears.
Click Settings in C/C++ Build.
Click Preprocessor for C++ Compiler (cl) in Tool Settings tab. Click + symbol in top part of Include Path (/I).
Add directory path panel appears.
Provide "${CUDA_INC_PATH}" for Directory.
Directory must be enclosed in double quotes because this path contains space characters.Click Apply button.
- A message apears.
Click Rebuild Index button.

- Provide the libraries (cusolver.lib, cublas.lib,
and cudart.lib)
and their folder location ("${CUDA_LIB_PATH_64}")to the linker.
Click Libraries for Linker (link) in Tool Settings tab.
Library file names are provided with extension .lib like in MS Visual Studio and paths are enclosed in double quotes.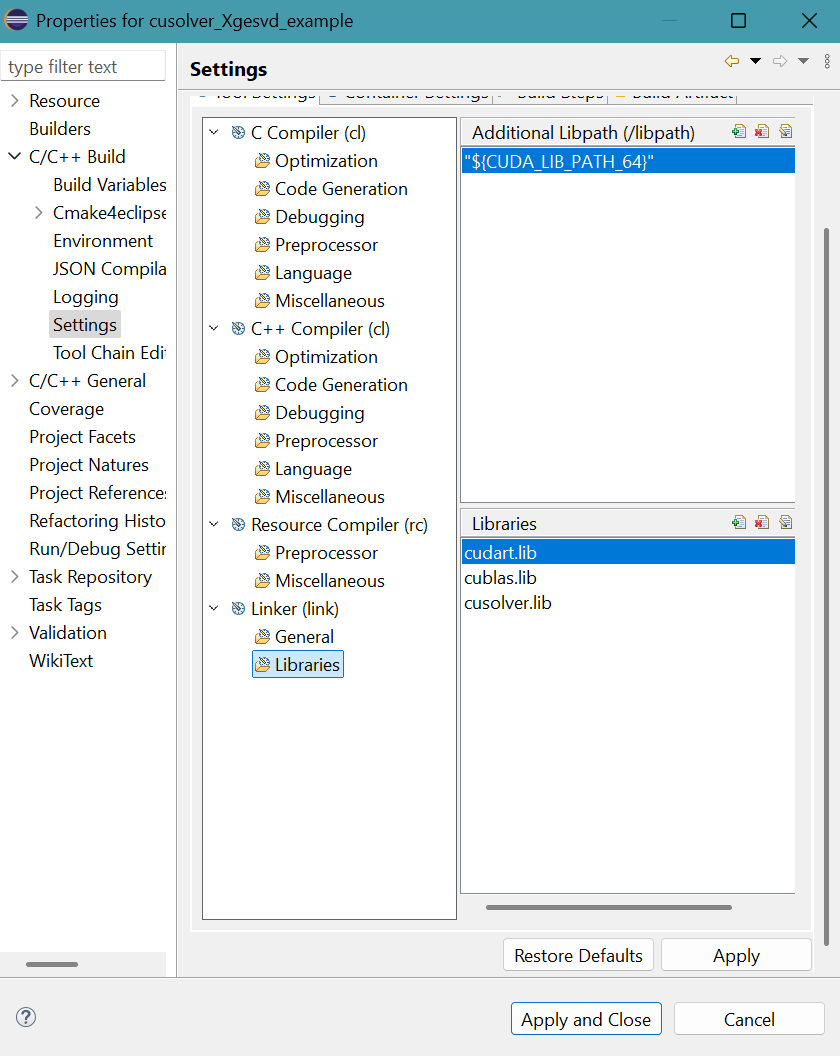
Click Apply and Close button.
A message appears.
Click Rebuild Index button.
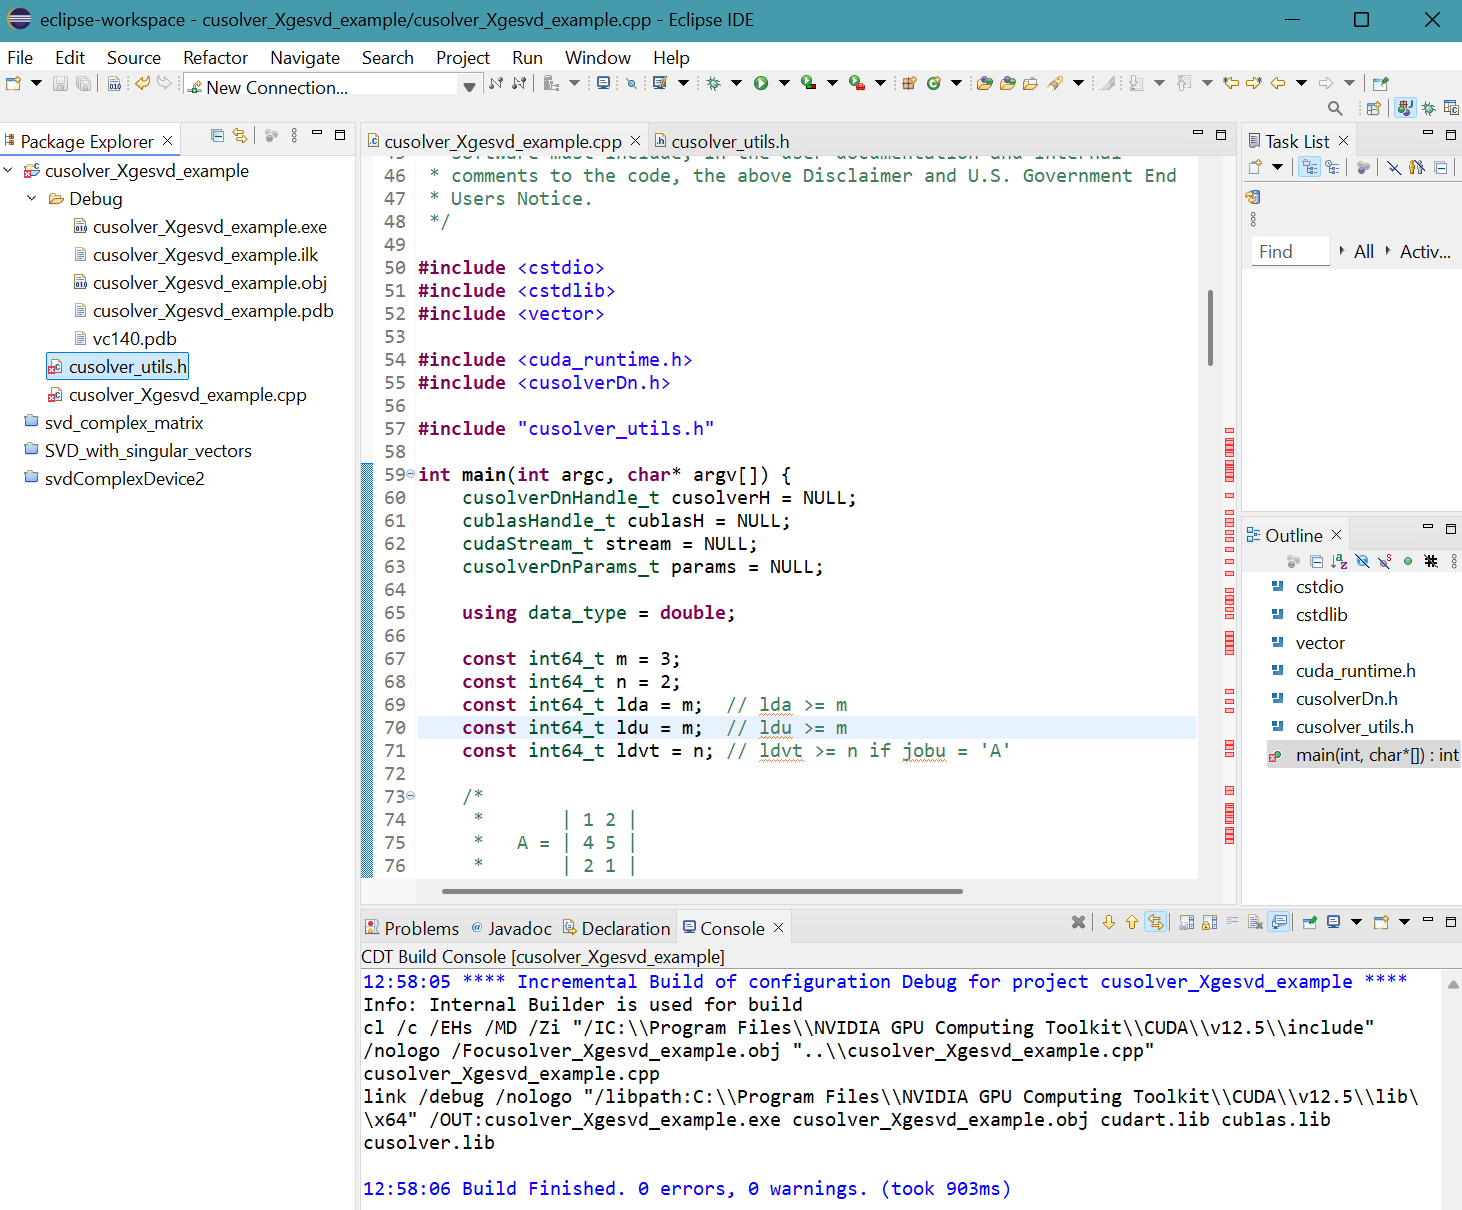
- The project before Build.
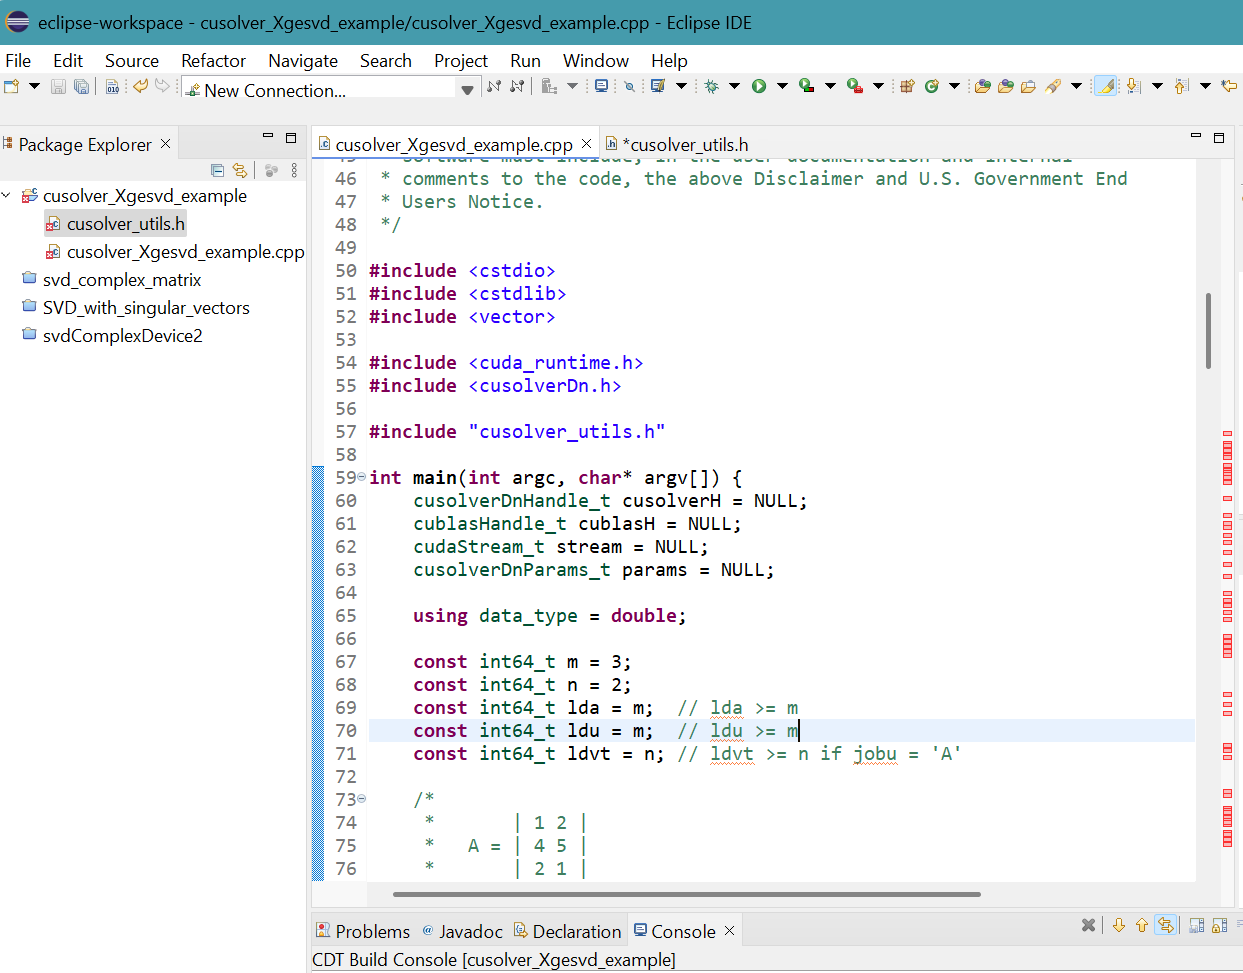
- Select Project menu then Build Project.
64-bit cusolver_Xgesvd_example.exe file is generated in Debug folder.
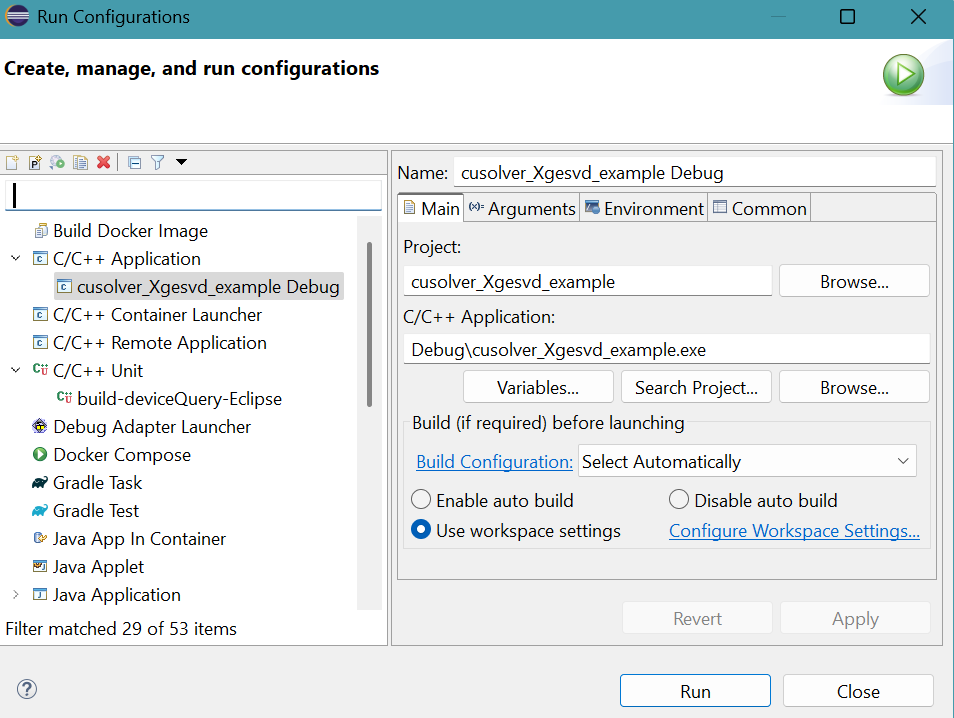
- Select Run menu then Run configurations...
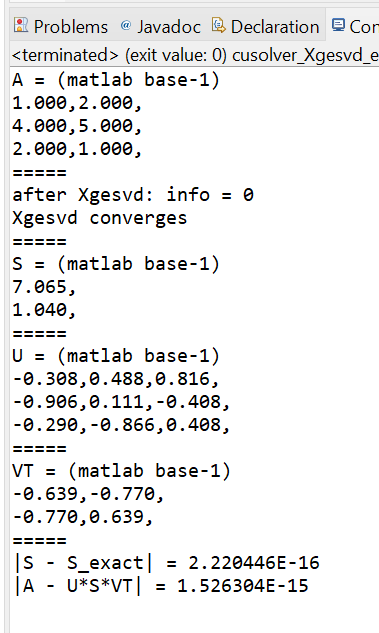
Press Run button.
cusolver_getrf_example.cu project in MS Visual Studio 2022
- Launch Visual Studio 2022, select Create a new Project.
- In Create a new project panel, select CUDA 12.5 Runtime.
Click Next button. - In Configure your new project panel:
Provid the Project name: cusolver_getrf_example
Click Create button. - The Visual Studio editor appears.
Right-click kernel.cu in Solution Explorer.
Select Remove, then click Delete button. - Right-click the project folder cusolver_getrf_example
in Solution Explorer.
Select Add then New Item... - Add New Item panel appears. Select CUDA 12.5 C/C++ File
Provid the name of the file: cusolver_getrf_example.cu
Click Add button. - An empty cusolver_getrf_example.cu source file appears for editing.
- Copy and paste the file cusolver_getrf_example.cu provided by
mnicely Matthew Nicely into the empty source file.
Some words are wavy-underlined in red.
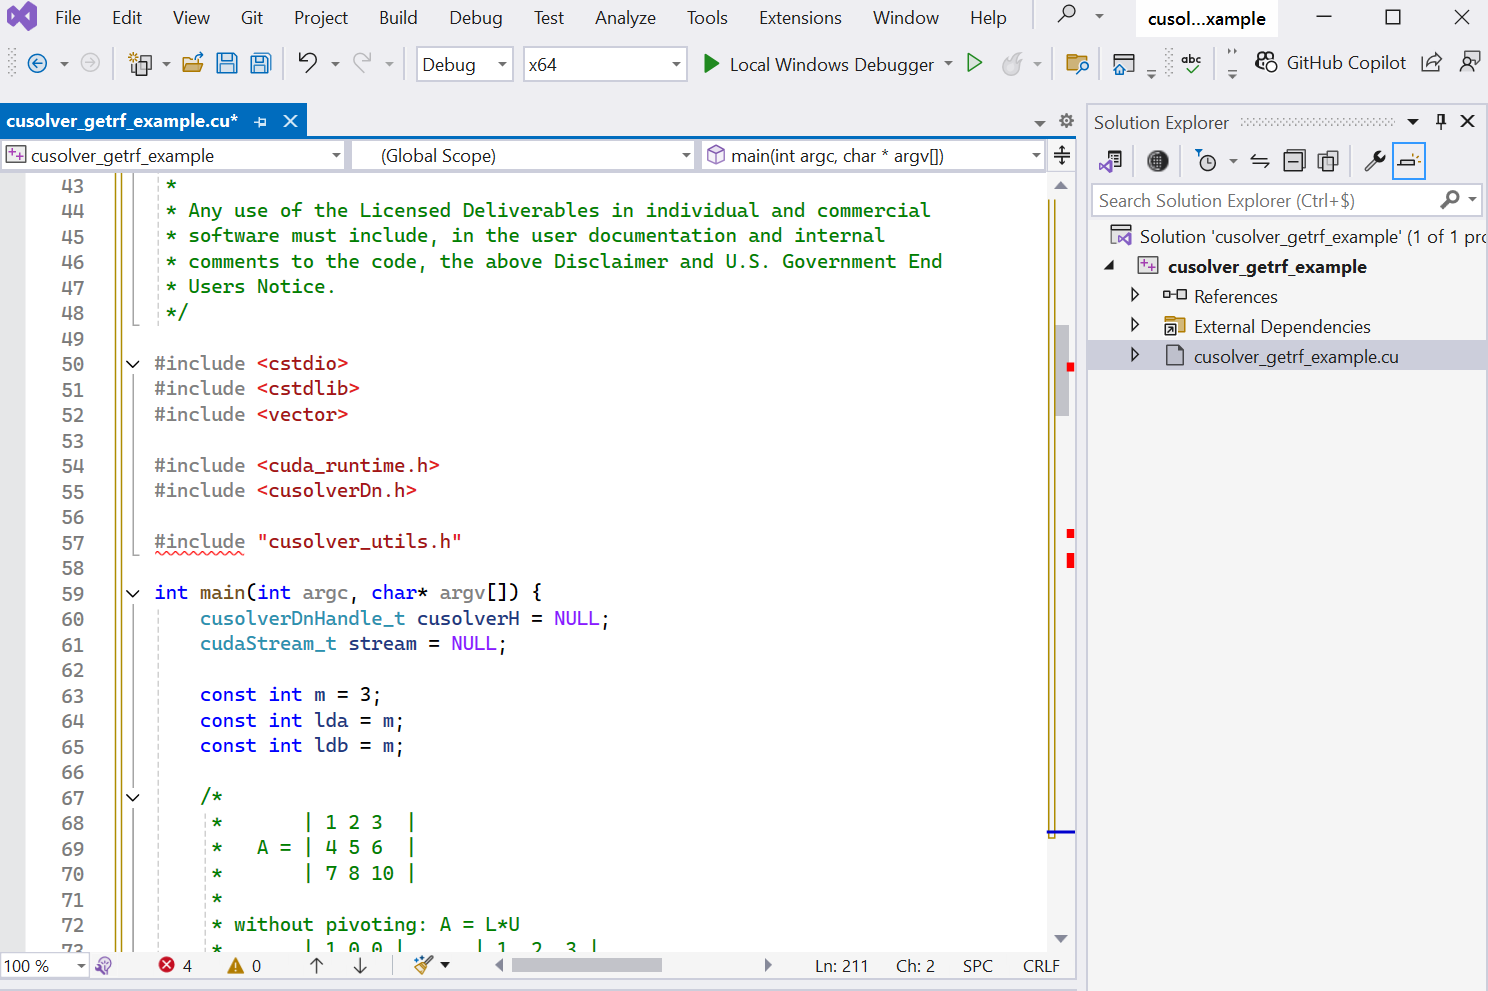
- Copy and paste the file cusolver_utils.h provided by
Sijia Zhou
into the project folder
C:\Users\pm\source\repos\cusolver_getrf_example
- Right click the project cusolver_getrf_example in Solution Explorer.
Select Properties.
Select VC++ Directories.Add C:\Users\pm\source\repos\cusolver_getrf_example; in Include Directories. - Select Linker then select Input.
Add cusolver.lib;cublas.lib; in Additional Dependencies.
Others library files are already added.
Click Apply button then OK button. - The red wavy-underlines in the editor disappeared.
- Select Build menu then Build Solution.
A message appears on the CDT Build Console.
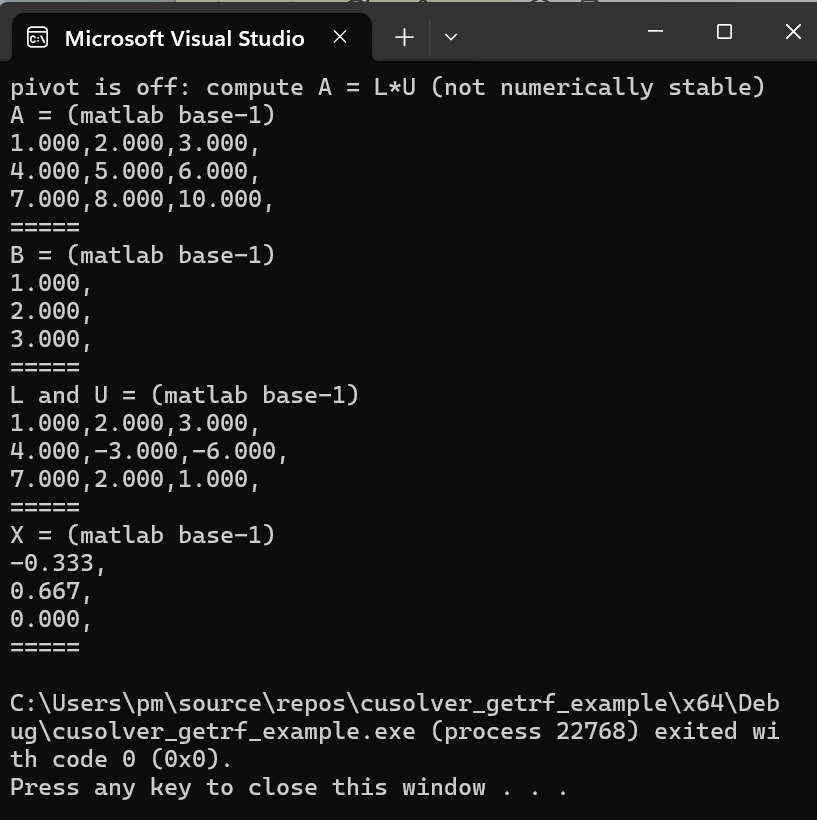
The file cusolver_getrf_example.exe is generated in the folderC:\Users\pm\source\repos\cusolver_getrf_example\x64\Debug - Select Debug menu then Start Without Debugging.
cusolver_getrf_example.cpp project with MinGW GCC toolchain in Eclipse IDE
- Launch Eclipse IDE for Java Developers.
Press CTRL N.
Select a wizard panel appears.
Select C/C++ folder then C/C++ Project.
Click Next > button.
New C/C++ Project panel appears.
Select C++ Managed Build.
Click Next > button.
C++ Project panel appears.
Provide the project name: cusolver_getrf_example
Select Empty Project for Executable.
Select MinGW GCC for Toolchains.Click Finish button.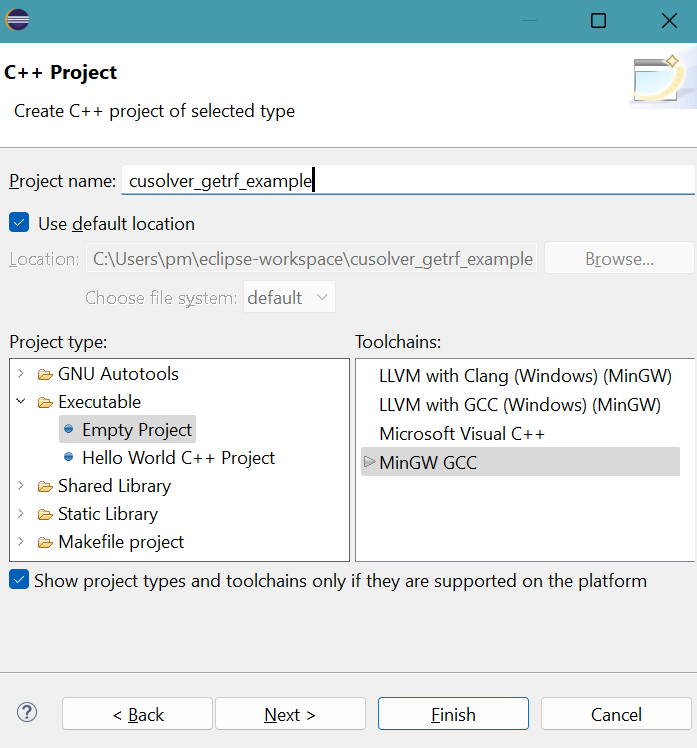
- The project folder cusolver_getrf_example appears in Package Explorer of Eclipse.
- Right click the project folder cusolver_getrf_example.
Select New, then File.
Create New File panel appears.
Provide the File name: cusolver_getrf_example.cppClick Finish button.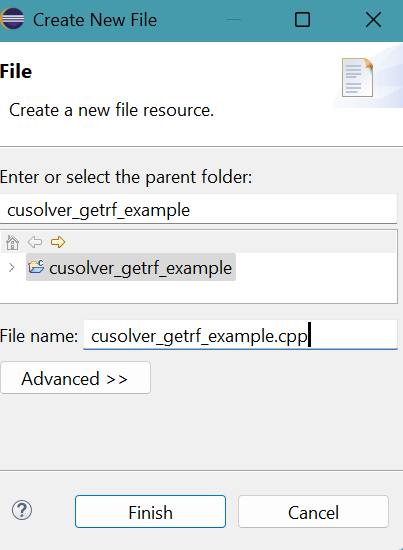
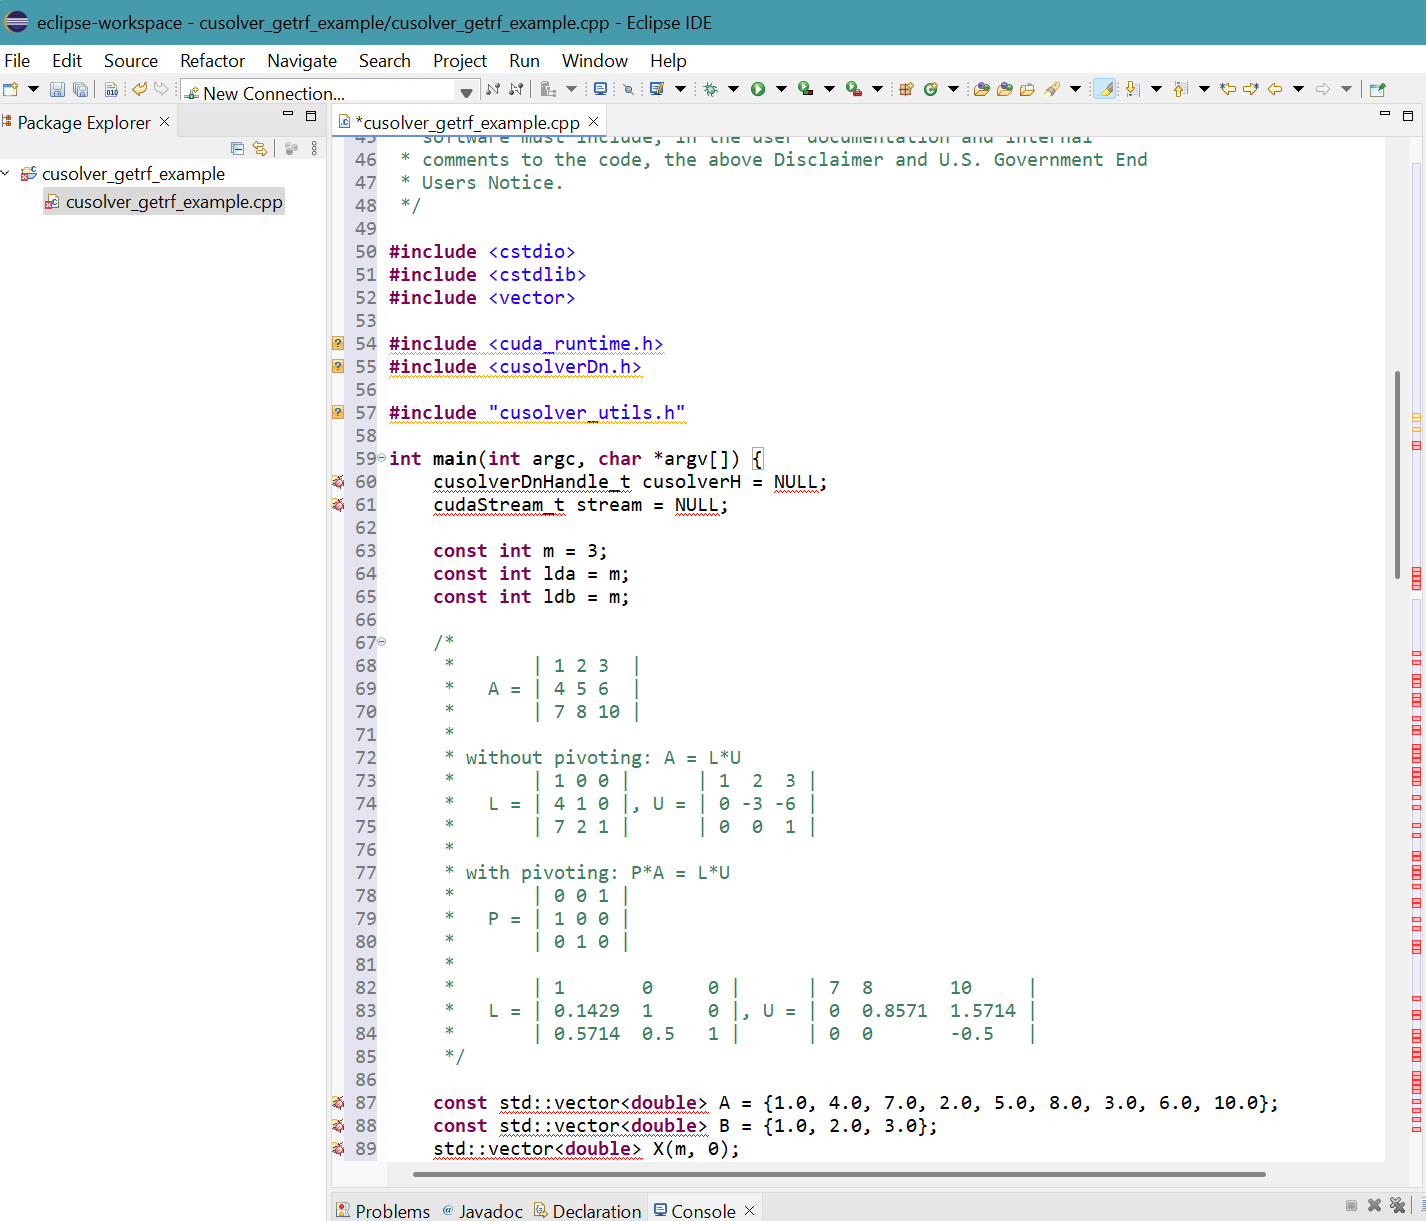
- Copy and paste the file cusolver_getrf_example.cpp provided by
mnicely Matthew Nicely into the empty source file.
Press Ctrl S to save cusolver_getrf_example.cpp.
- Similarly, create the empty file cusolver_utils.h
- Copy and paste the file cusolver_utils.h provided by
Sijia Zhou
into the newly created file.
Press Ctrl S to save cusolver_utils.h.
- Right click cusolver_getrf_example project in Package Explorer then select Properties.
Properties for cusolver_getrf_example panel appears.
Click Settings in C/C++ Build.
Click Includes for GCC C++ Compiler in Tool Settings tab.Click + symbol in top part of Include paths (-I).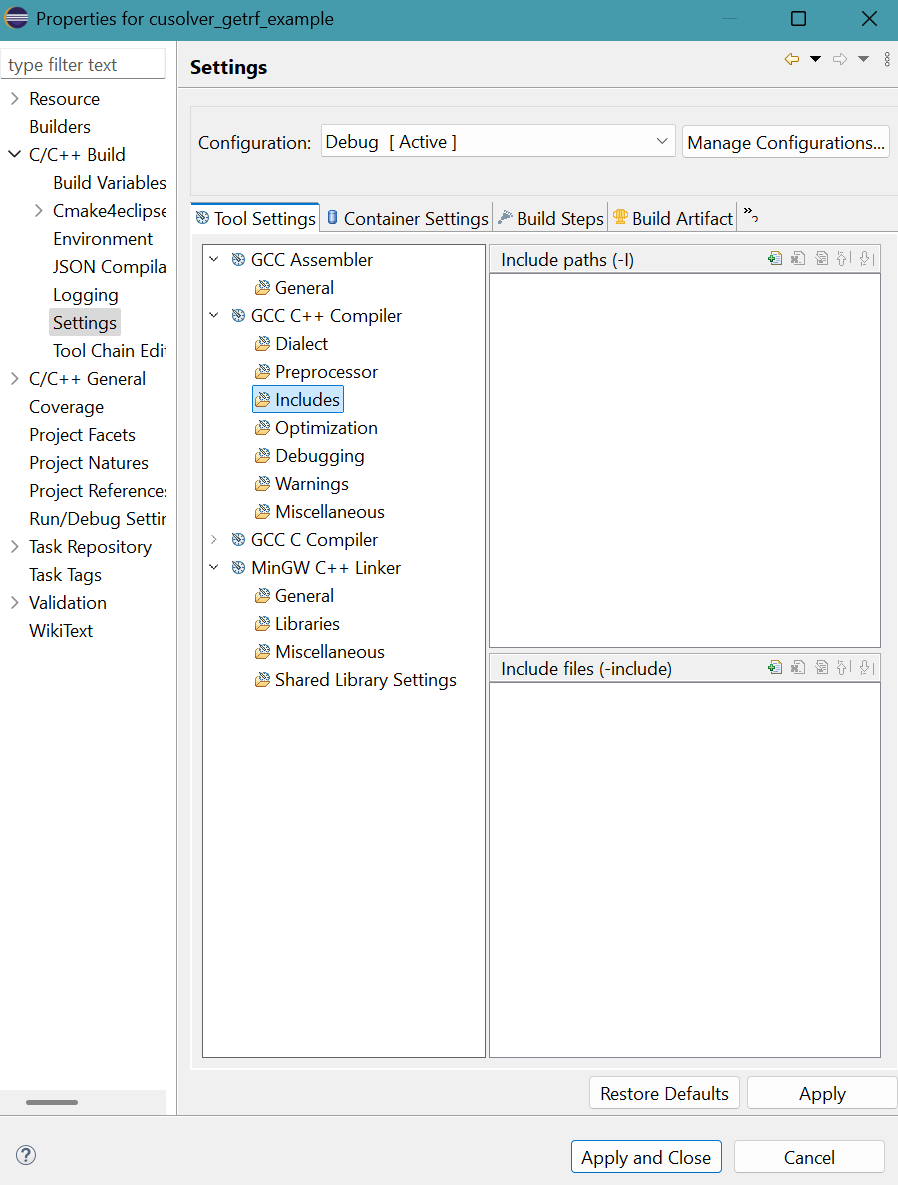
- Add directory path panel appears.
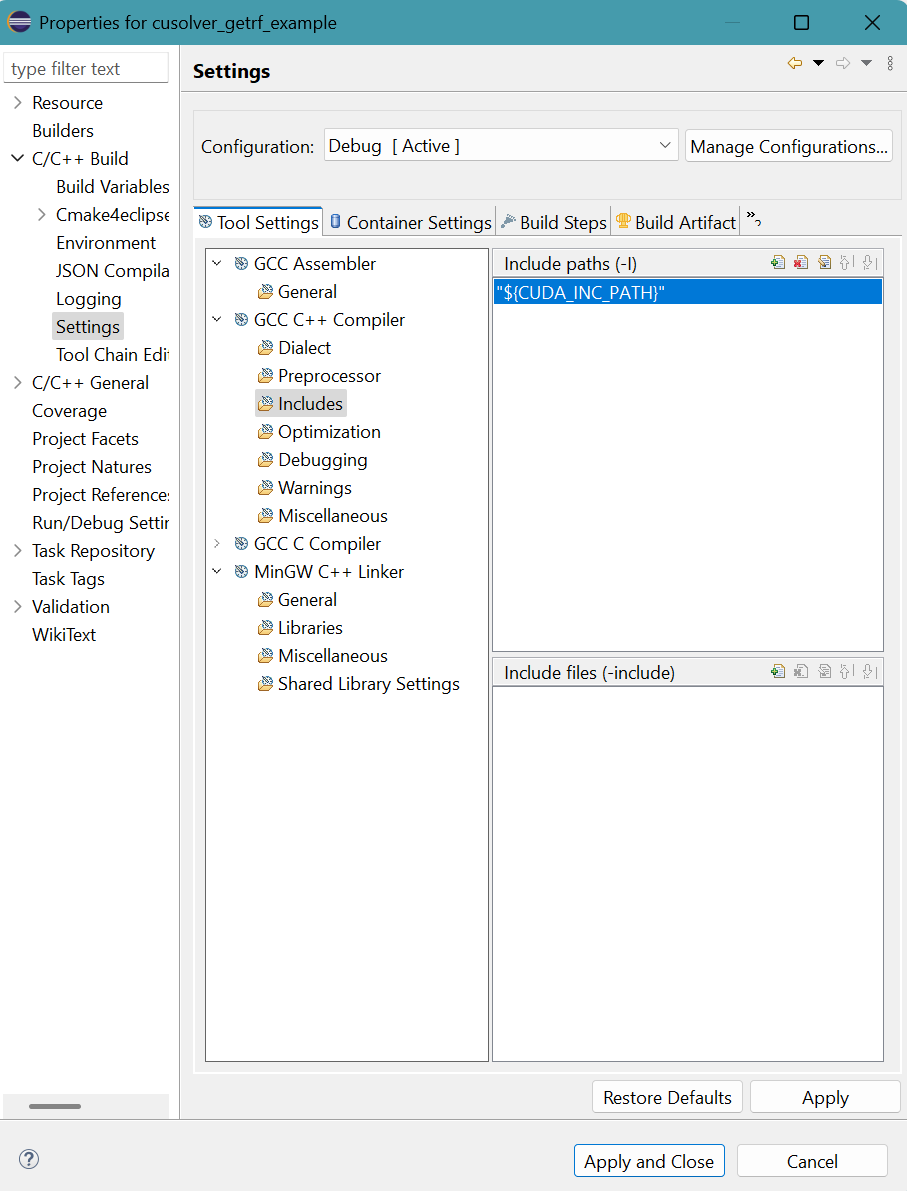
Provide "${CUDA_INC_PATH}" for Directory.
Directory must be enclosed in double quotes because this path contains space characters.Click OK button.
- The result is
Click Apply button.
- A message apears.
Click Rebuild Index button.

- Click Libraries for MinGW C++ Linker in Tool Settings tab.
Provide the three libraries (cusolver.lib, cublas.lib, cudart.lib) and their folder location ("${CUDA_LIB_PATH_64}") to the MinGW C++ Linker.
The result is:Library file names are provided without extension .lib and paths are enclosed in double quotes.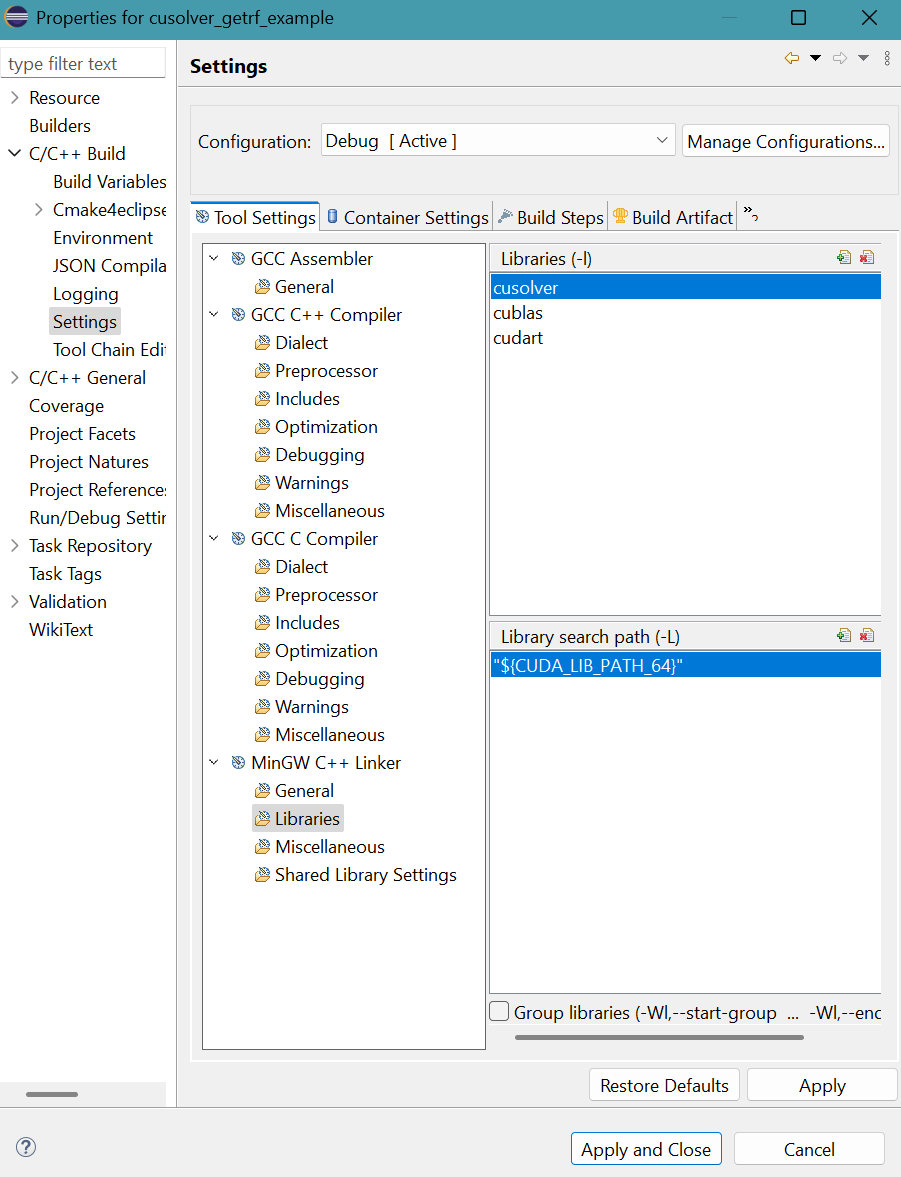
Click Apply and Close button.
- The project before Build.
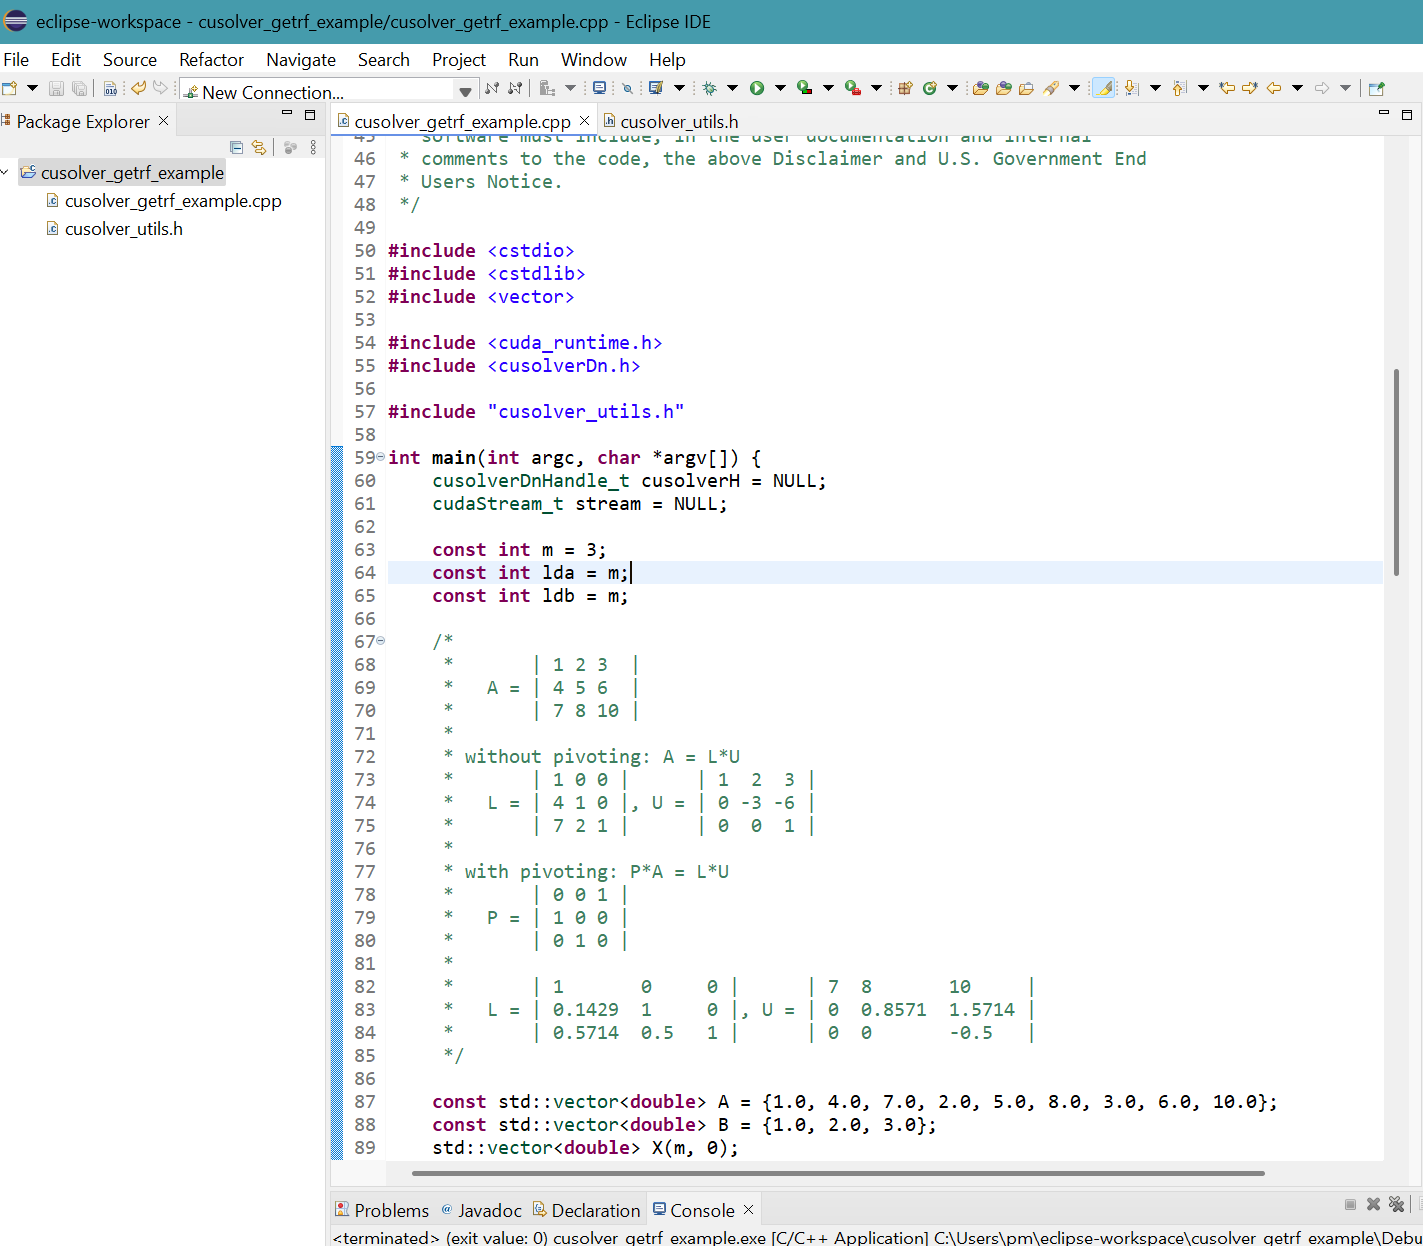
- Select Project menu then Build Projet.
cusolver_getrf_example.exe is generated in Debug folder.
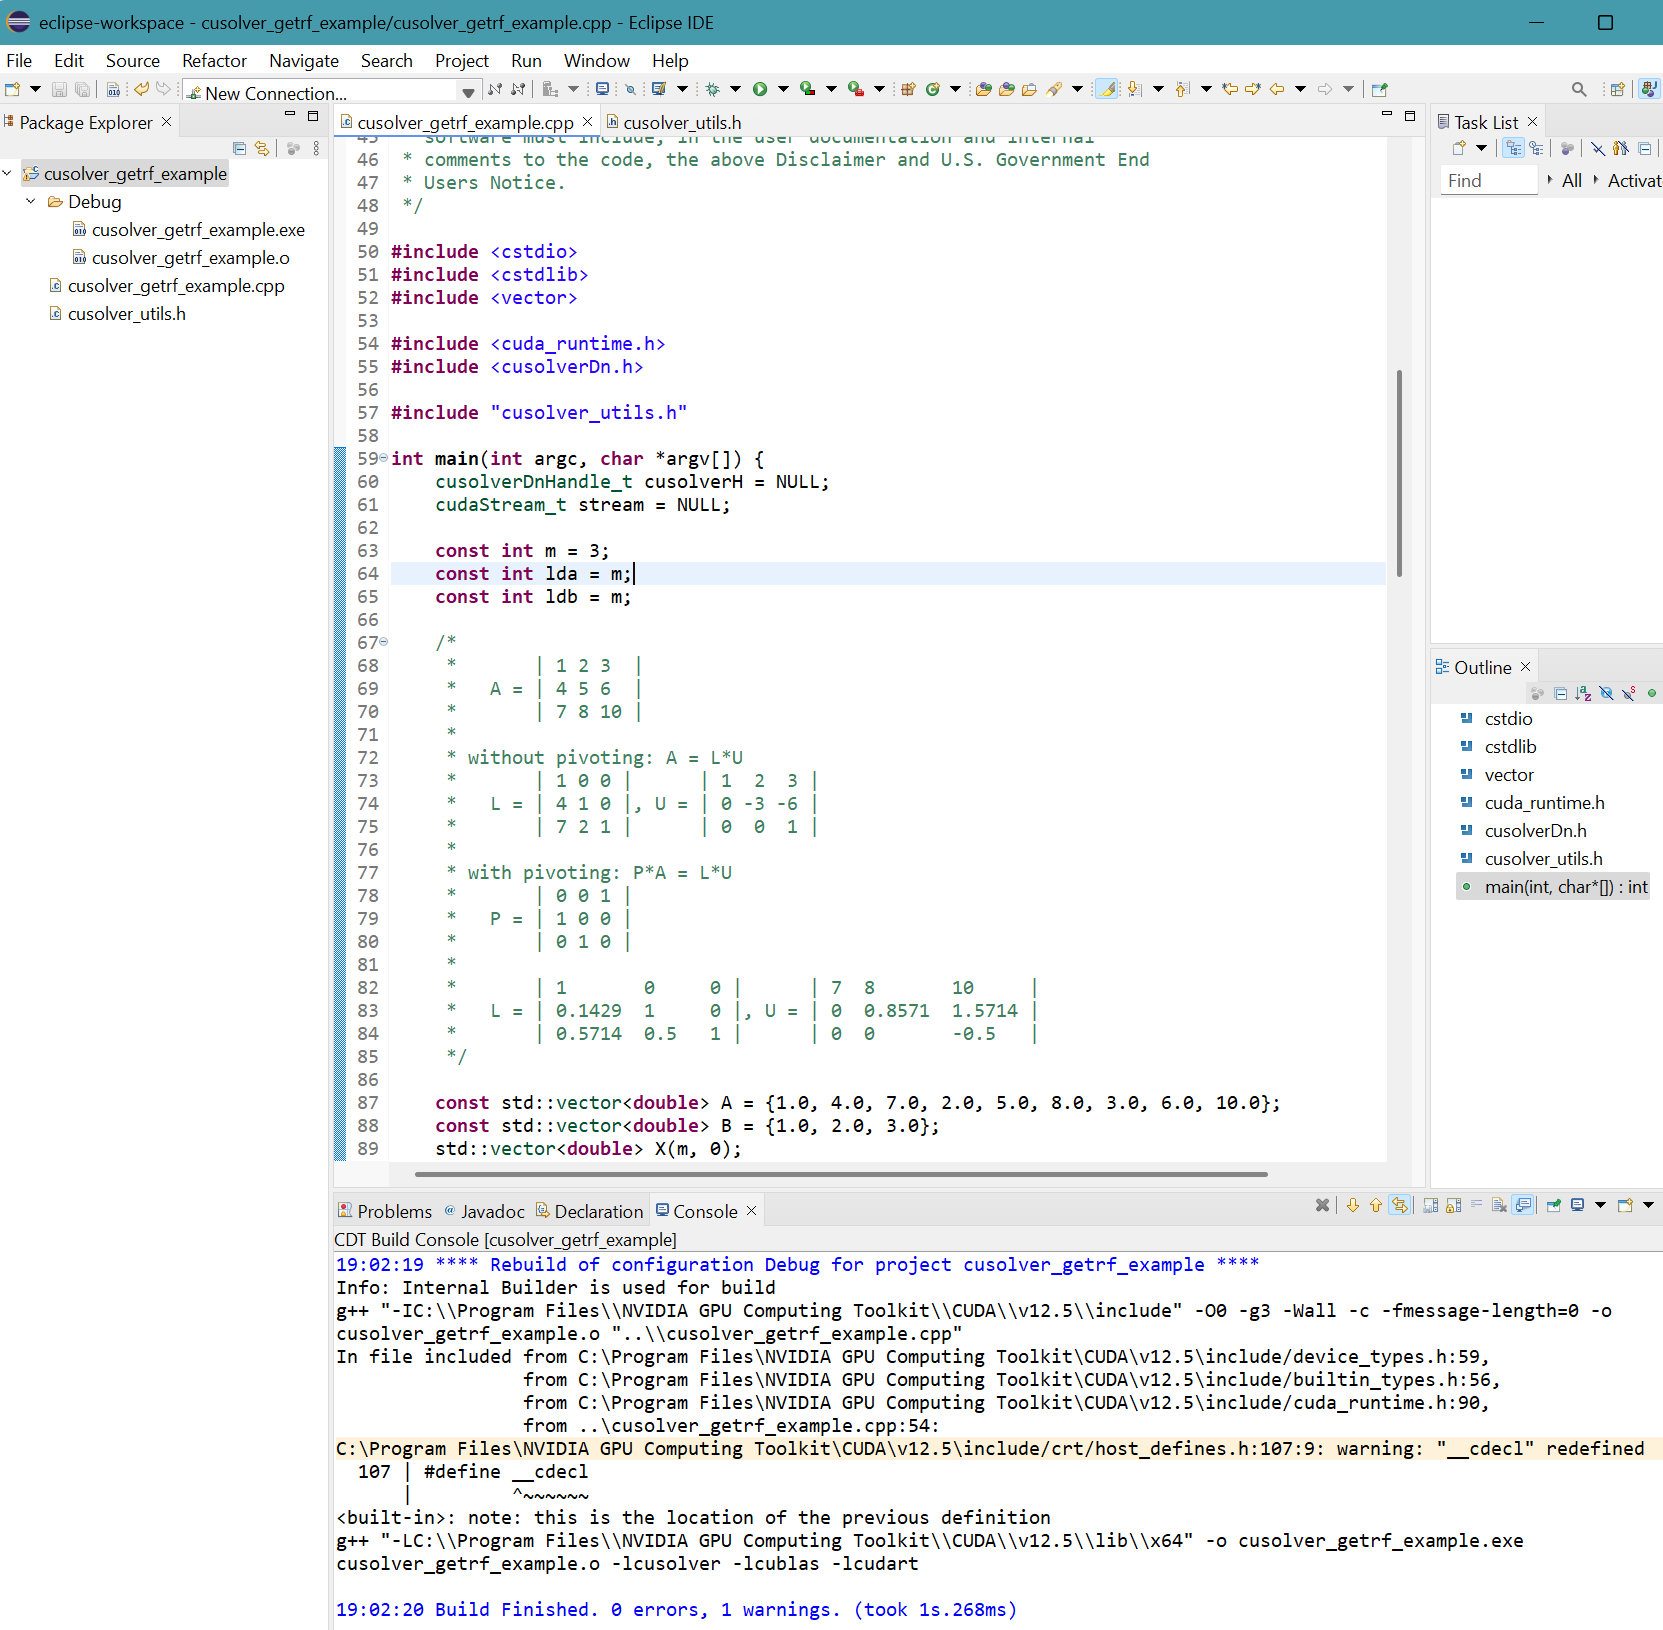
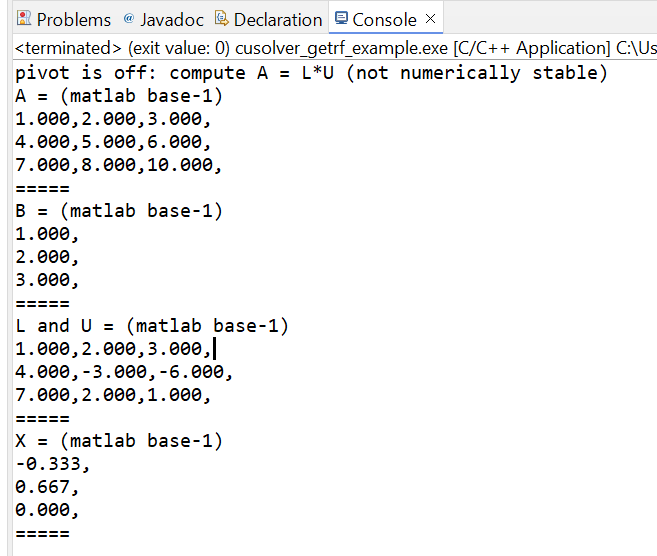
- Select Run menu then Run.
3X2, svd_example.cpp project in MS Visual Studio 2022
- Launch Visual Studio 2022, select Create a new Project.
- In Create a new project panel, select CUDA 12.5 Runtime.
Click Next button. - In Configure your new project panel:
Provid the Project name: SVD_with_singular_vectors
Click Create button. - The Visual Studio editor appears.
Right-click kernel.cu in Solution Explorer.
Select Remove, then click Delete button. - Right-click the project folder SVD_with_singular_vectors
in Solution Explorer.
Select Add then New Item... - Add New Item panel appears. Select CUDA 12.5 C/C++ File
Provid the name of the file: svd_example.cpp
Click Add button. - An empty svd_example.cpp source file appears for editing.
- Copy and paste the file svd_example.cpp provided by Nvidia Developer zone into the empty source file.
- Right click the project SVD_with_singular_vectors in Solution Explorer.
Select Properties. - Select Linker then select Input.
Add cusolver.lib;cublas.lib; in Additional Dependencies.
Others library files are already added.
Click Apply button then OK button. - Select Build menu then Build Solution.
A message appears on the CDT Build Console.
The file SVD_with_singular_vectors.exe is generated in the folderC:\Users\pm\source\repos\SVD_with_singular_vectors\x64\Debug - Select Debug menu then Start Without Debugging.
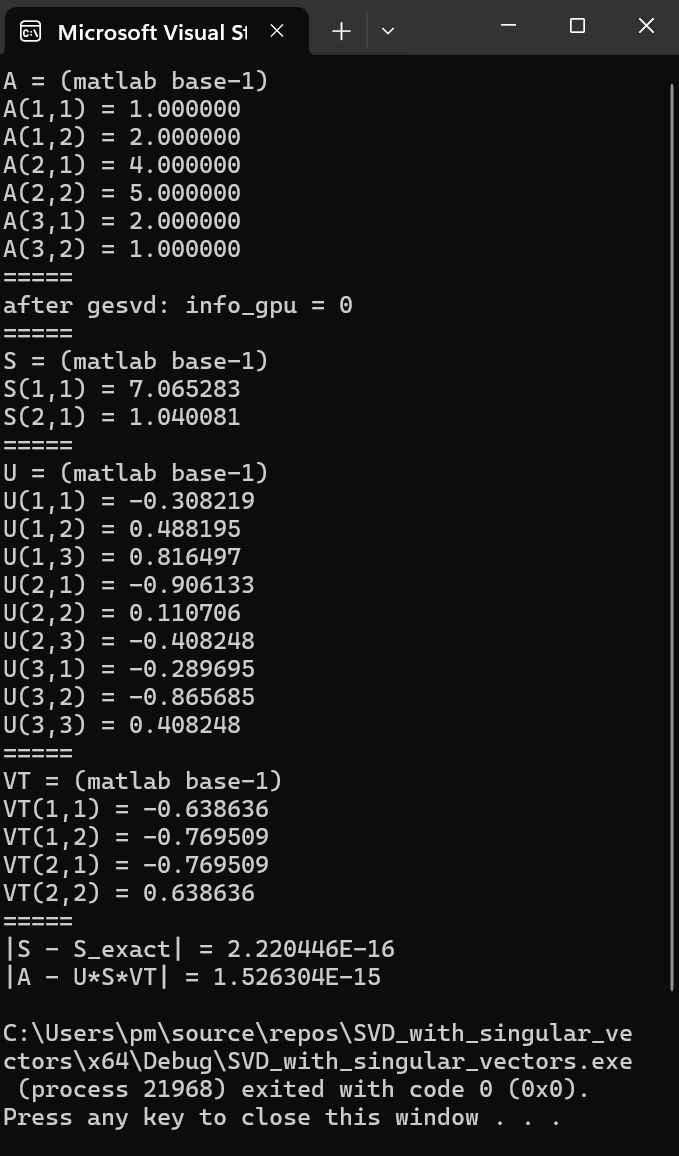
3X2, svd_example.cpp project with Microsoft Visual C++ toolchain in Eclipse IDE
- Launch Eclipse IDE for Java Developers.
Select File menu, New, then Project....
New Project panel appears:
Select C/C++ then C/C++ Project. Click Next > button.
- New C/C++ Project panel appears. Select C++ Managed Build.
Click Next > button.
- C++ Project panel appears.
Provide Project name: SVD_with_singular_vectors
Select Executable then Empty Project.
Select Microsoft Visual C++ in Toolchains.Click Finish button.
- The project folder SVD_with_singular_vectors appears in Package Explorer of Eclipse.
- Right-click the project folder SVD_with_singular_vectors.
Select New, then File.
Create New File panel appears.
Provide the File name: svd_example.cpp
Click Finish button.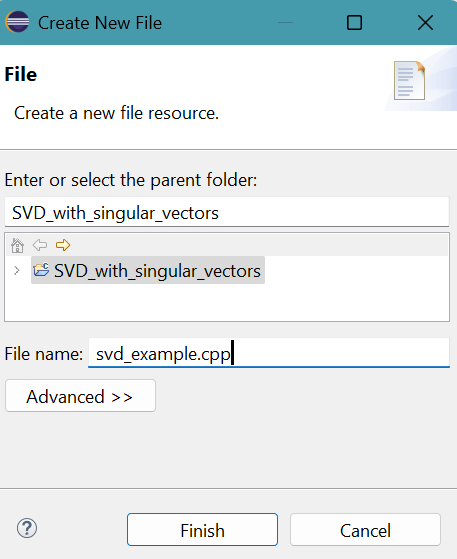
- Copy and paste the file svd_example.cpp provided by
Nvidia Developer zone into the empty source file.
Press Ctrl S to save svd_example.cpp.

- Provide the path of include folder of CUDA to compiler.
Include folder contains header files.
Right click SVD_with_singular_vectors project in Package Explorer then select Properties.
Properties for SVD_with_singular_vectors panel appears.
Click Settings in C/C++ Build.
Click Preprocessor for C++ Compiler (cl) in Tool Settings tab.Click + symbol in top part of Include Path (/I).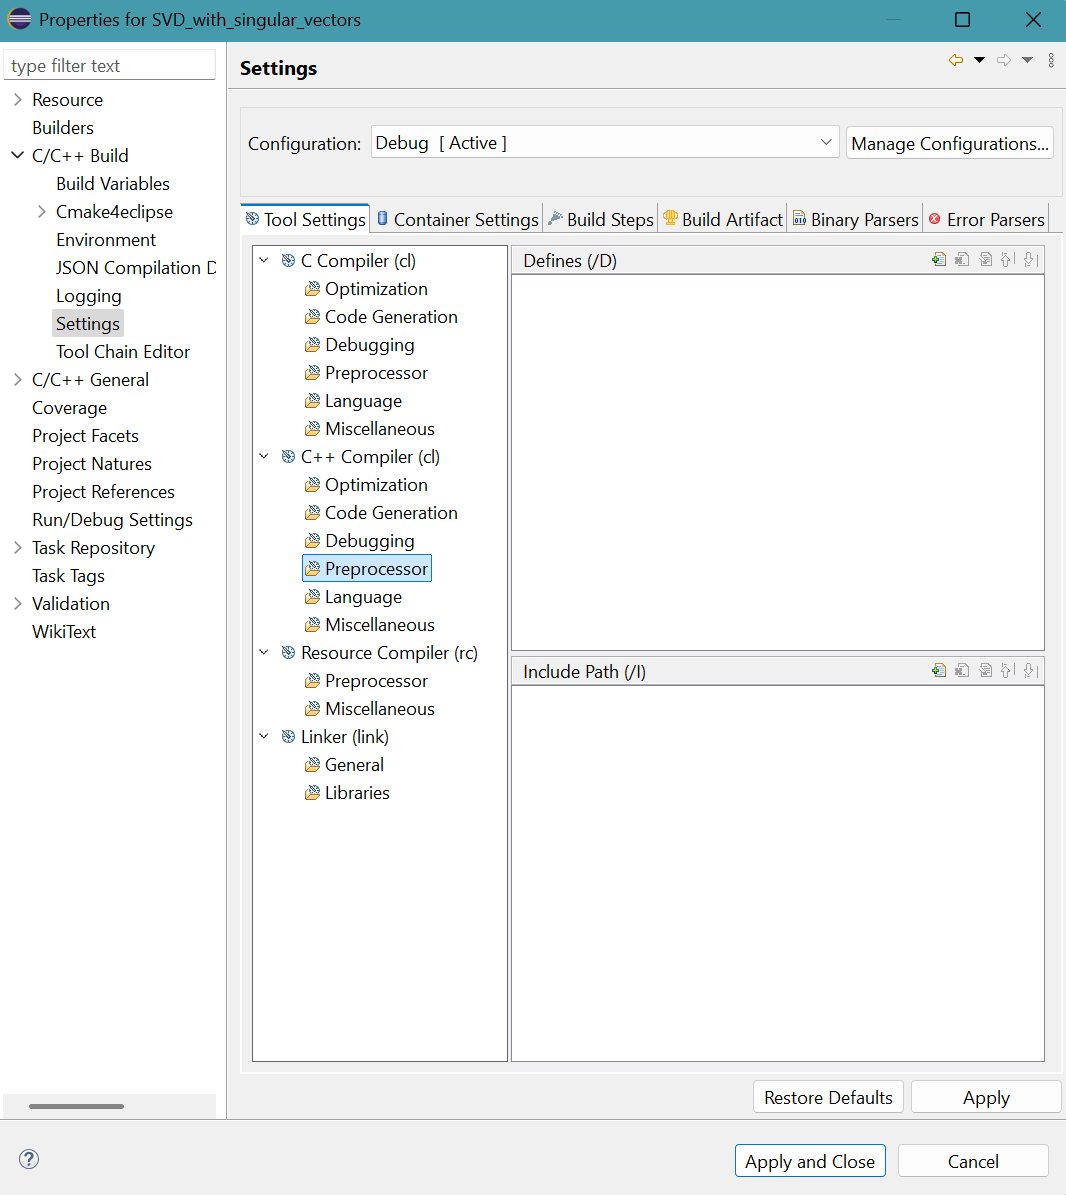
- Add directory path panel appears.
Provide "${CUDA_INC_PATH}" for Directory.
Directory must be enclosed in double quotes because this path contains space characters. - "${ASSERT}" provides the location of assert.h,
C:\Program Files (x86)\Windows Kits\10\Include\10.0.26100.0\ucrtSimilarly, provide the paths "${INCLUDE1}" and "${ASSERT}"Click Apply button.
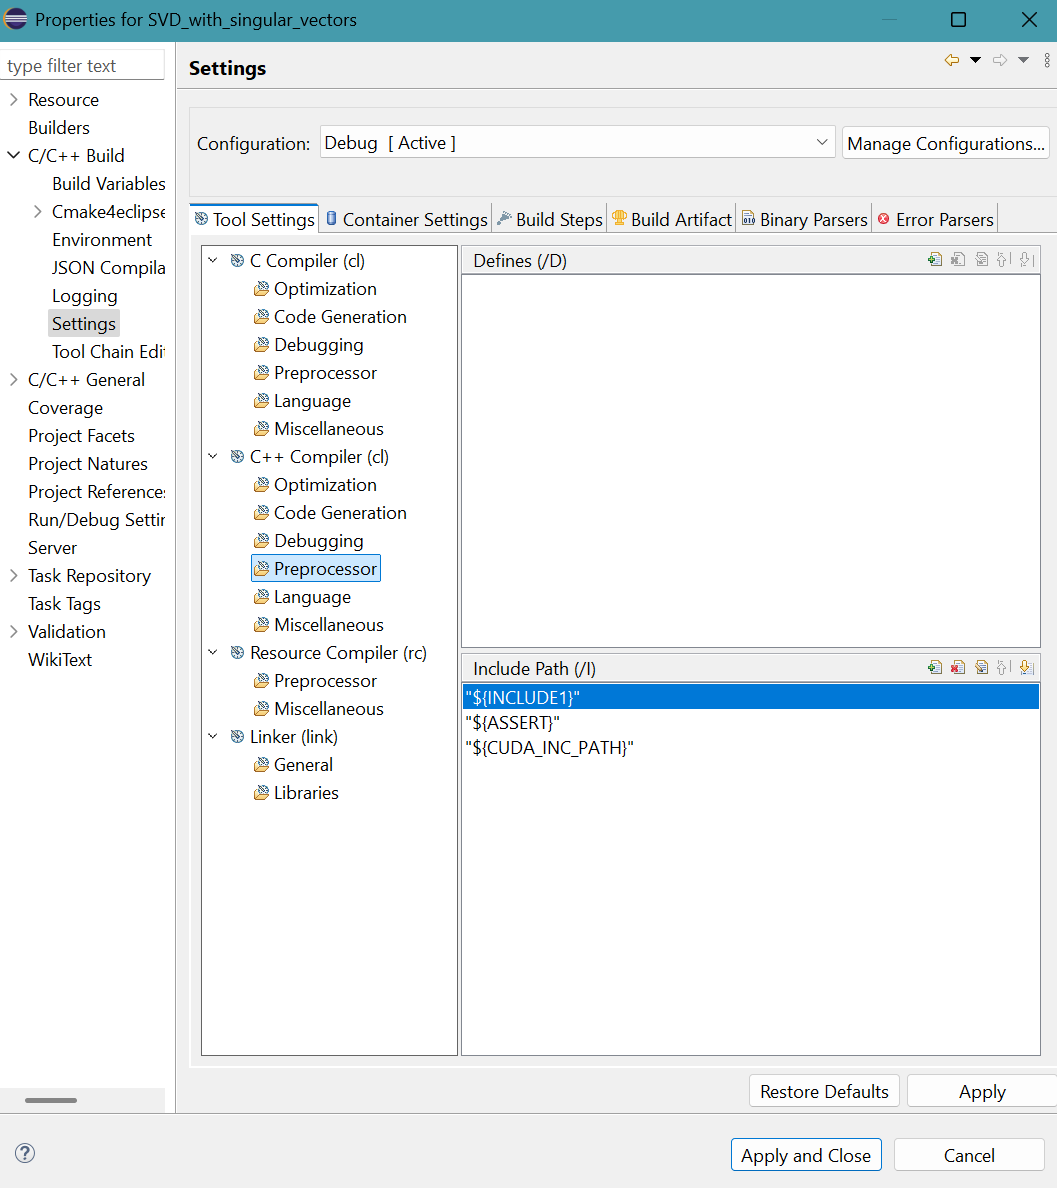
- A message apears.
Click Rebuild Index button.

- Provide the libraries (cusolver.lib, cublas.lib,
and cudart.lib)
and their folder location ("${CUDA_LIB_PATH_64}")to the linker.
Click Libraries for Linker (link) in Tool Settings tab.
Library file names are provided with extension .lib like in MS Visual Studio and paths are enclosed in double quotes.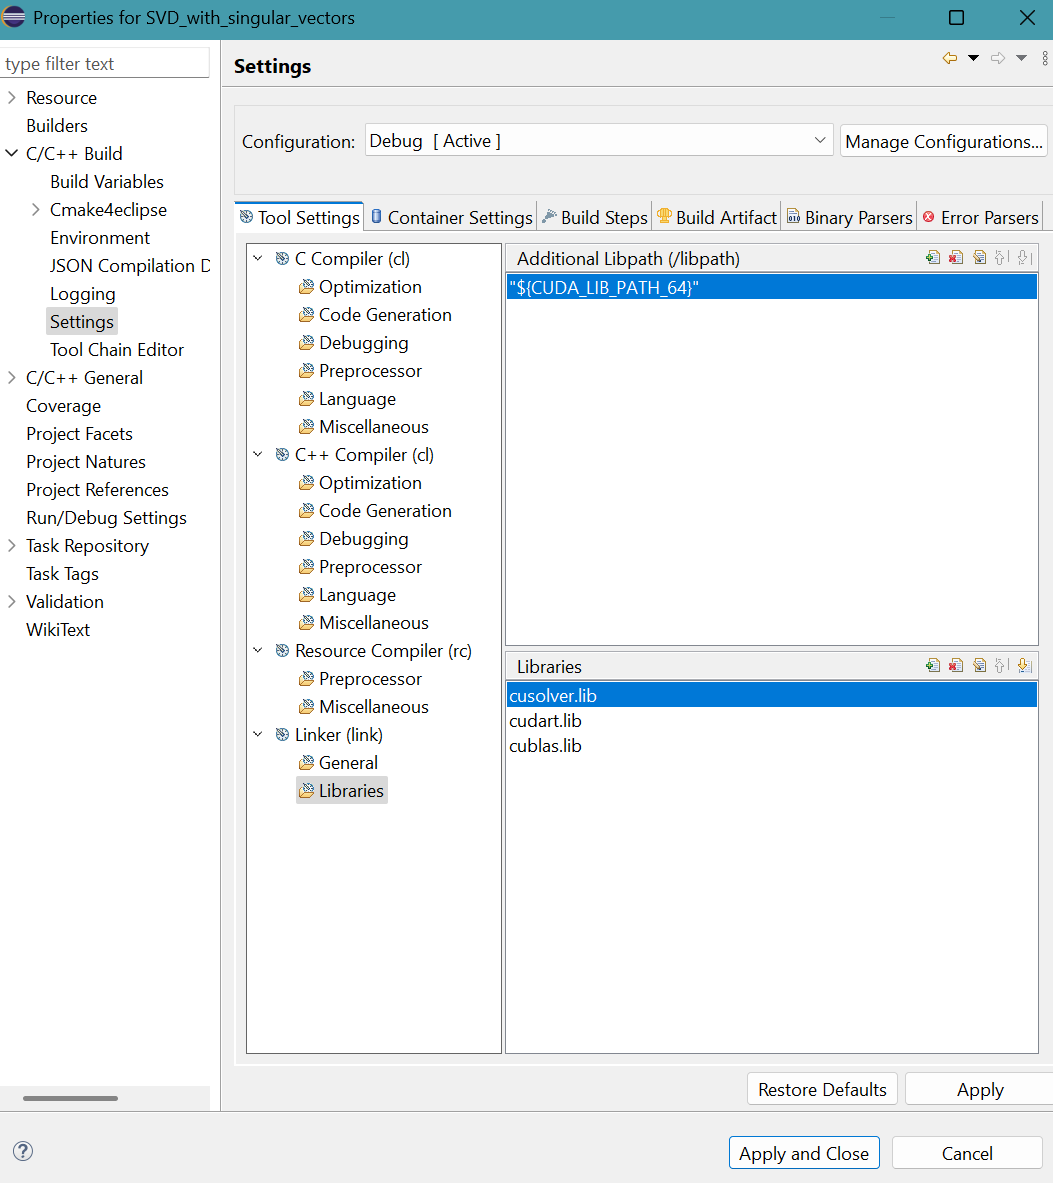
Click Apply and Close button.
A message appears.
Click Rebuild Index button.
- The project before Build.
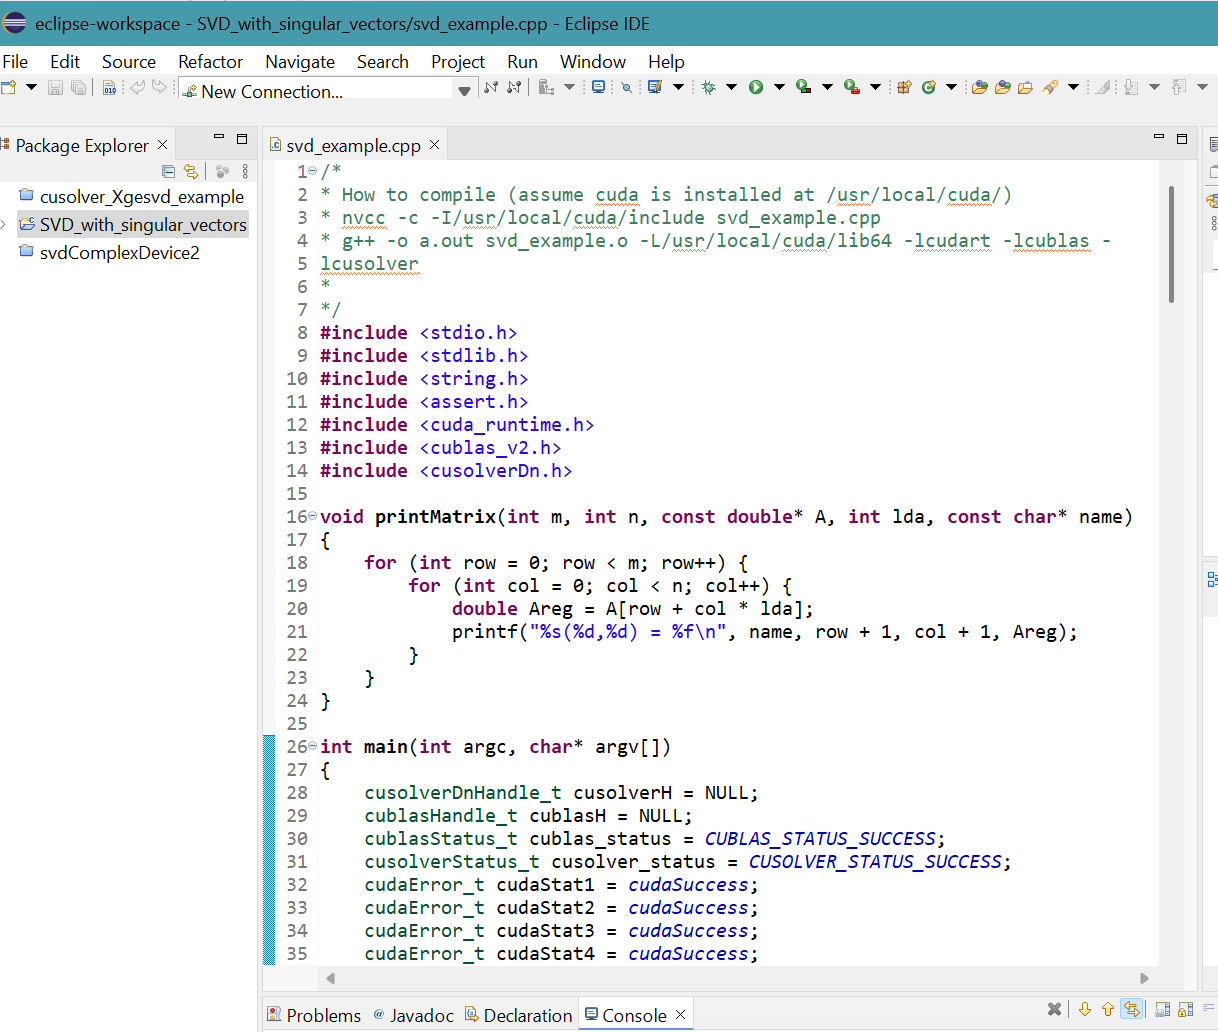
- Select Project menu then Build Project.
64-bit SVD_with_singular_vectors.exe file is generated in Debug folder.

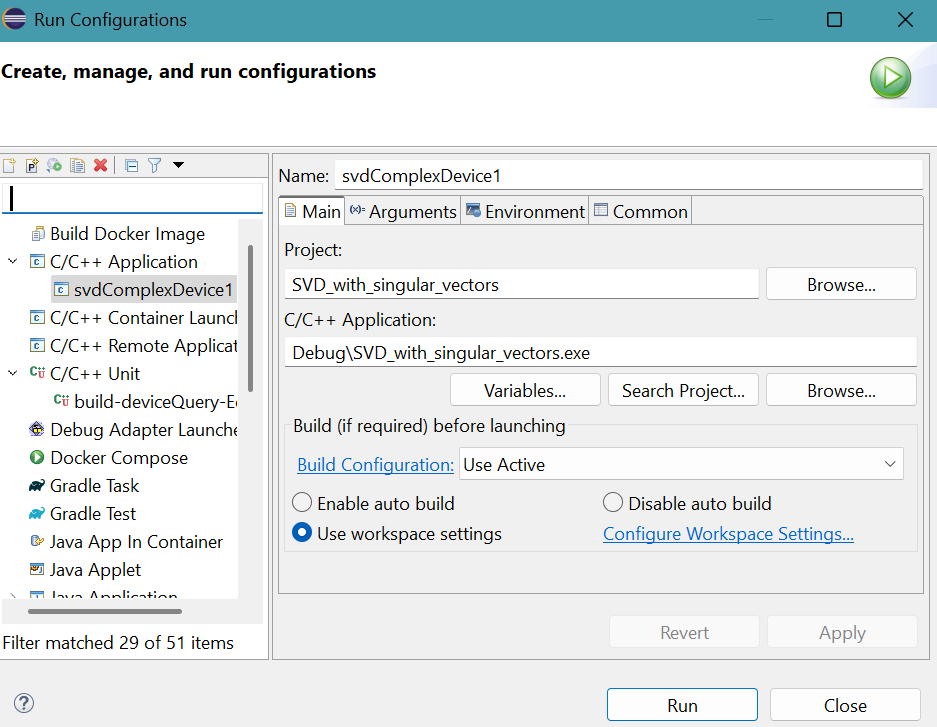
A message appears on the CDT Build Console. - Select Run menu then Run configurations...
Press Run button.
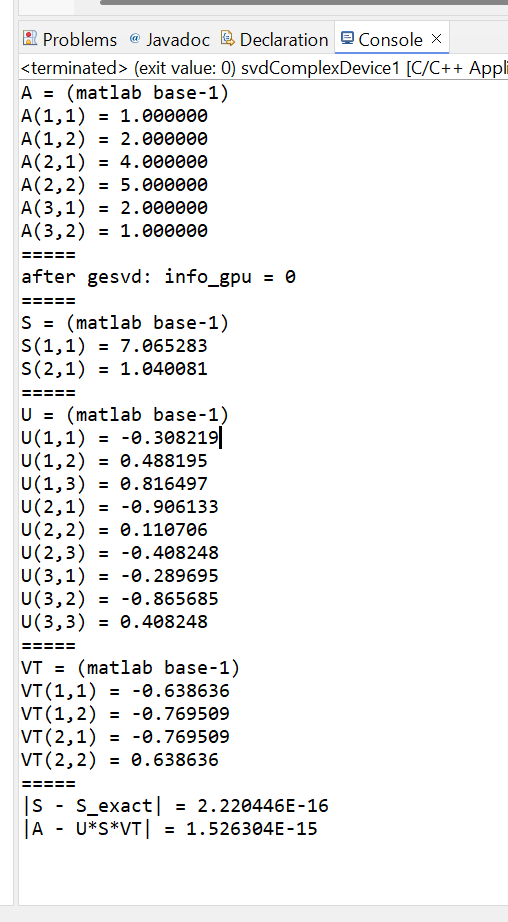
- The result is
3X2, svd_complex_matrix.cu project in MS Visual Studio 2022
- Launch Visual Studio 2022, select Create a new Project.
- In Create a new project panel, select CUDA 12.5 Runtime.
Click Next button. - In Configure your new project panel:
Provid the Project name: svd_complex_matrix
Click Create button. - The Visual Studio editor appears.
Right-click kernel.cu in Solution Explorer.
Select Remove, then click Delete button. - Right-click the project folder svd_complex_matrix
in Solution Explorer.
Select Add then New Item... - Add New Item panel appears. Select CUDA 12.5 C/C++ File
Provid the name of the file: svd_complex_matrix.cu
Click Add button. - An empty svd_complex_matrix.cu source file appears for editing.
- Copy and paste the file svd_complex_matrix.cu provided by Boubou63 into the empty source file.
- Right click the project svd_complex_matrix in Solution Explorer.
Select Properties. - Select Linker then select Input.
Add cusolver.lib;cublas.lib; in Additional Dependencies.
Others library files are already added.
Click Apply button then OK button. - Select Build menu then Build Solution.
A message appears on the CDT Build Console.
The file svd_complex_matrix.exe is generated in the folder
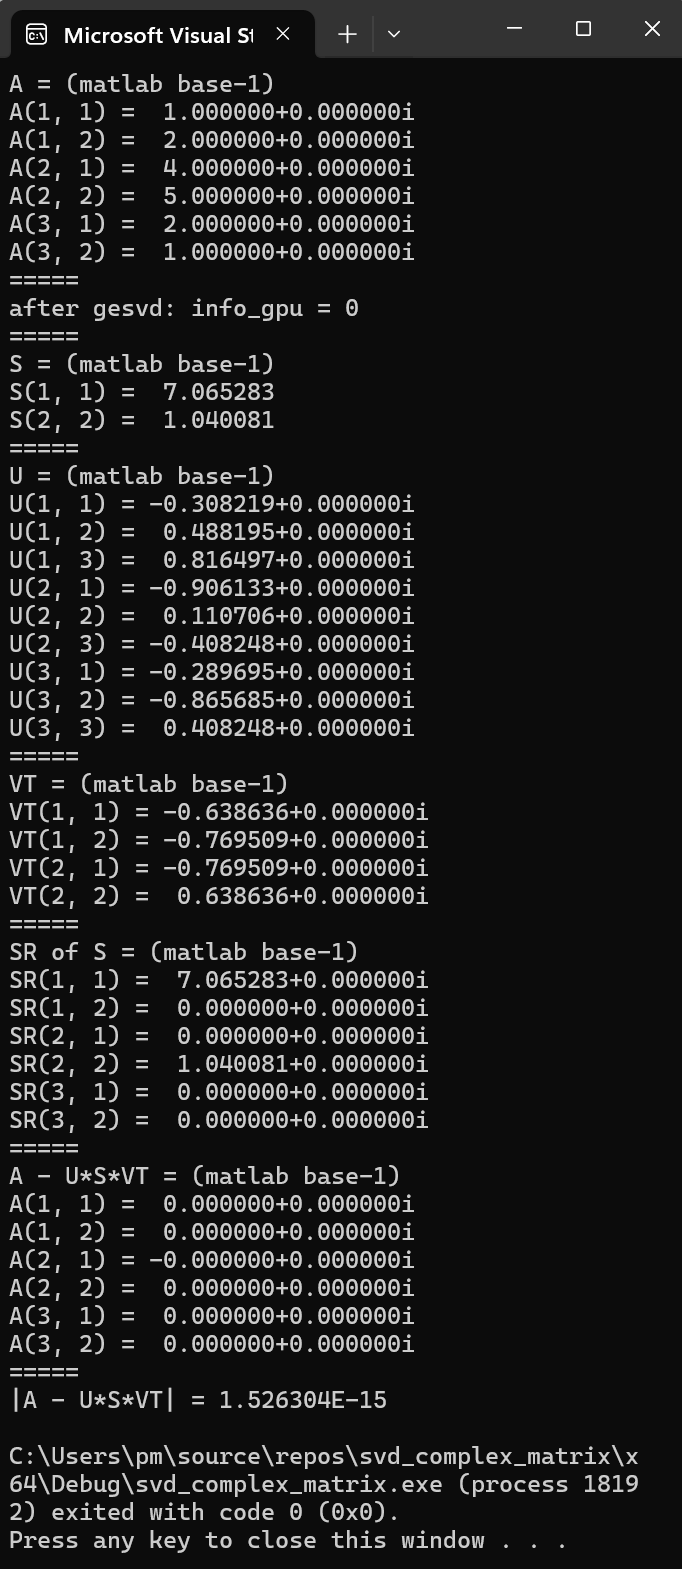
C:\Users\pm\source\repos\svd_complex_matrix\x64\Debug - Select Debug menu then Start Without Debugging.
3X2, svd_complex_matrix.cpp project with Microsoft Visual C++ toolchain in Eclipse IDE
- Launch Eclipse IDE for Java Developers.
Select File menu, New, then Project....
New Project panel appears.
Select C/C++ then C/C++ Project. Click Next > button. - New C/C++ Project panel appears. Select C++ Managed Build.
Click Next > button. - C++ Project panel appears.
Provide Project name: SVD_complex_matrix
Select Executable then Empty Project.
Select Microsoft Visual C++ in Toolchains.
Click Finish button. - The project folder SVD_complex_matrix appears in Package Explorer of Eclipse.
- Right-click the project folder SVD_complex_matrix
Select New, then File.
Create New File panel appears.
Provide the File name: SVD_complex_matrix.cpp
Click Finish button. - Copy and paste the file svd_complex_matrix.cpp provided by
Boubou63 into the empty source file.
Press Ctrl S to save svd_complex_matrix.cpp.
- Provide the path of include folder of CUDA to compiler.
Include folder contains header files.
Right click SVD_with_singular_vectors project in Package Explorer then select Properties.
Properties for SVD_with_singular_vectors panel appears.
Click Settings in C/C++ Build.
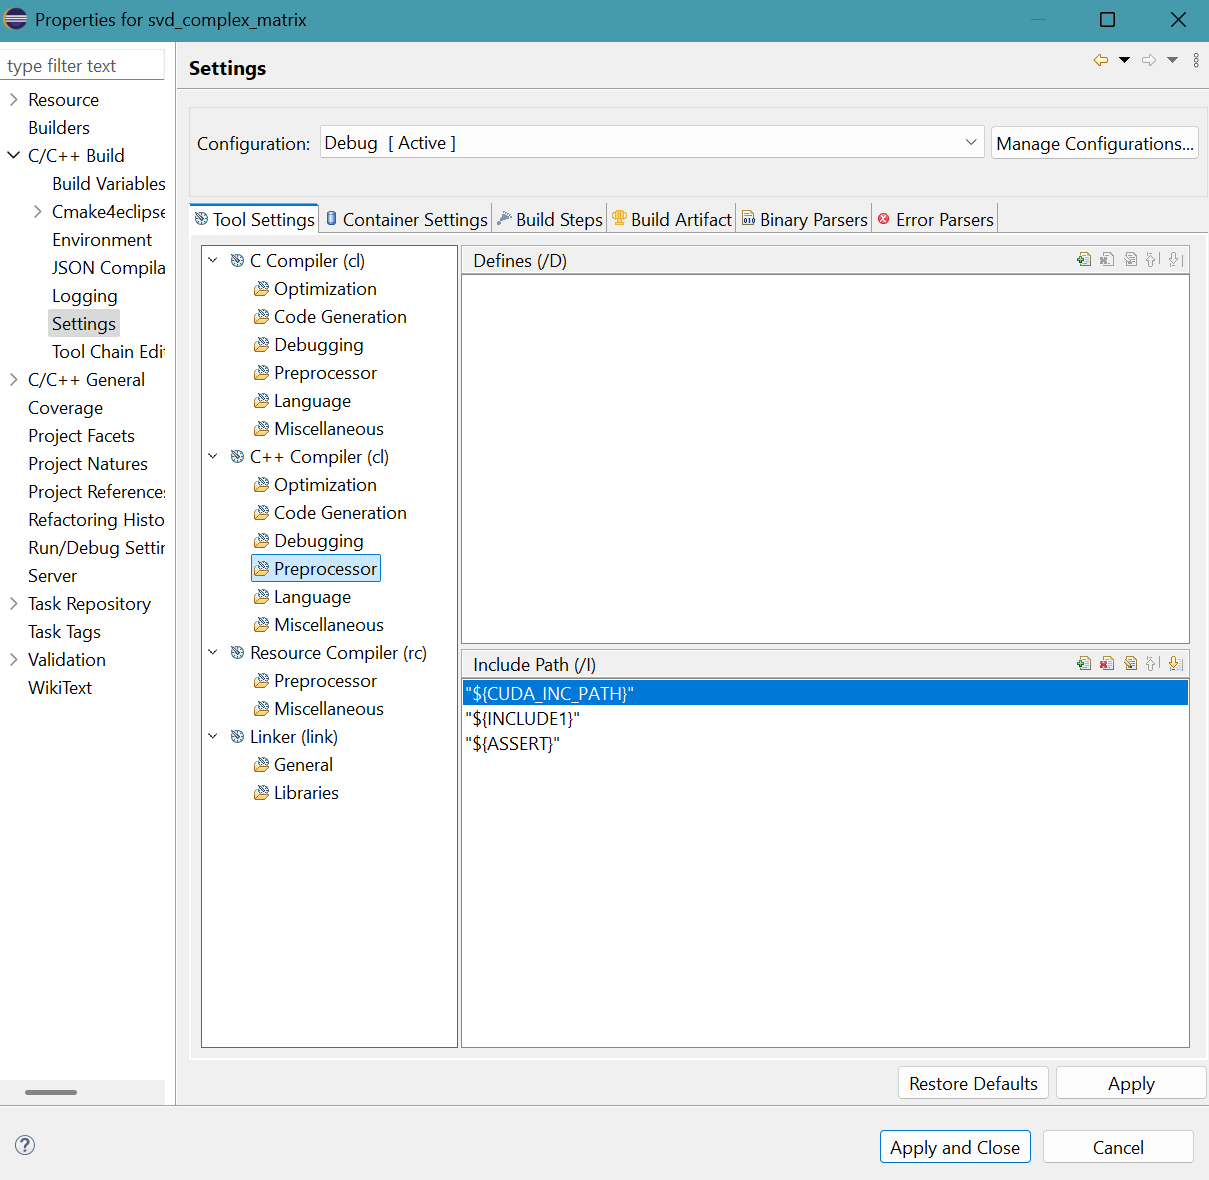
Click Preprocessor for C++ Compiler (cl) in Tool Settings tab.
Click + symbol in top part of Include Path (/I). - Add directory path panel appears.
Provide "${CUDA_INC_PATH}" for Directory.
Directory must be enclosed in double quotes because this path contains space characters. - "${ASSERT}" provides the location of assert.h,
C:\Program Files (x86)\Windows Kits\10\Include\10.0.26100.0\ucrtSimilarly, provide the paths "${INCLUDE1}" and "${ASSERT}"Click Apply button.
- A message apears.
Click Rebuild Index button.
- Provide the libraries (cusolver.lib, cublas.lib,
and cudart.lib)
and their folder location ("${CUDA_LIB_PATH_64}")to the linker.
Click Libraries for Linker (link) in Tool Settings tab.
Library file names are provided with extension .lib like in MS Visual Studio and paths are enclosed in double quotes.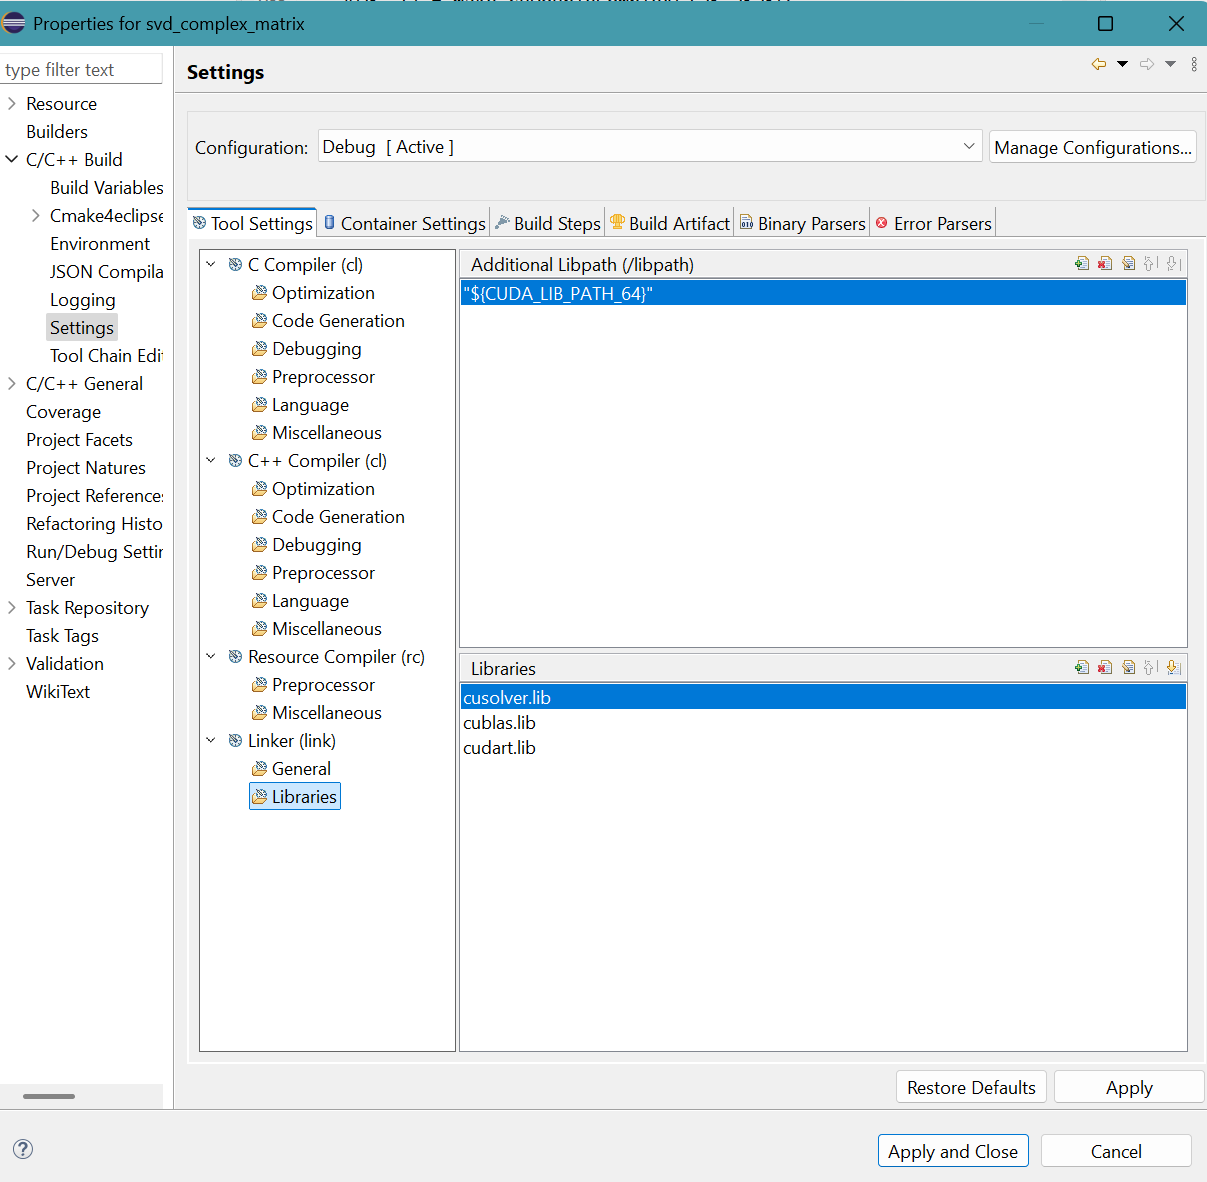
Click Apply and Close button.
A message appears.
Click Rebuild Index button.
- The project before Build.
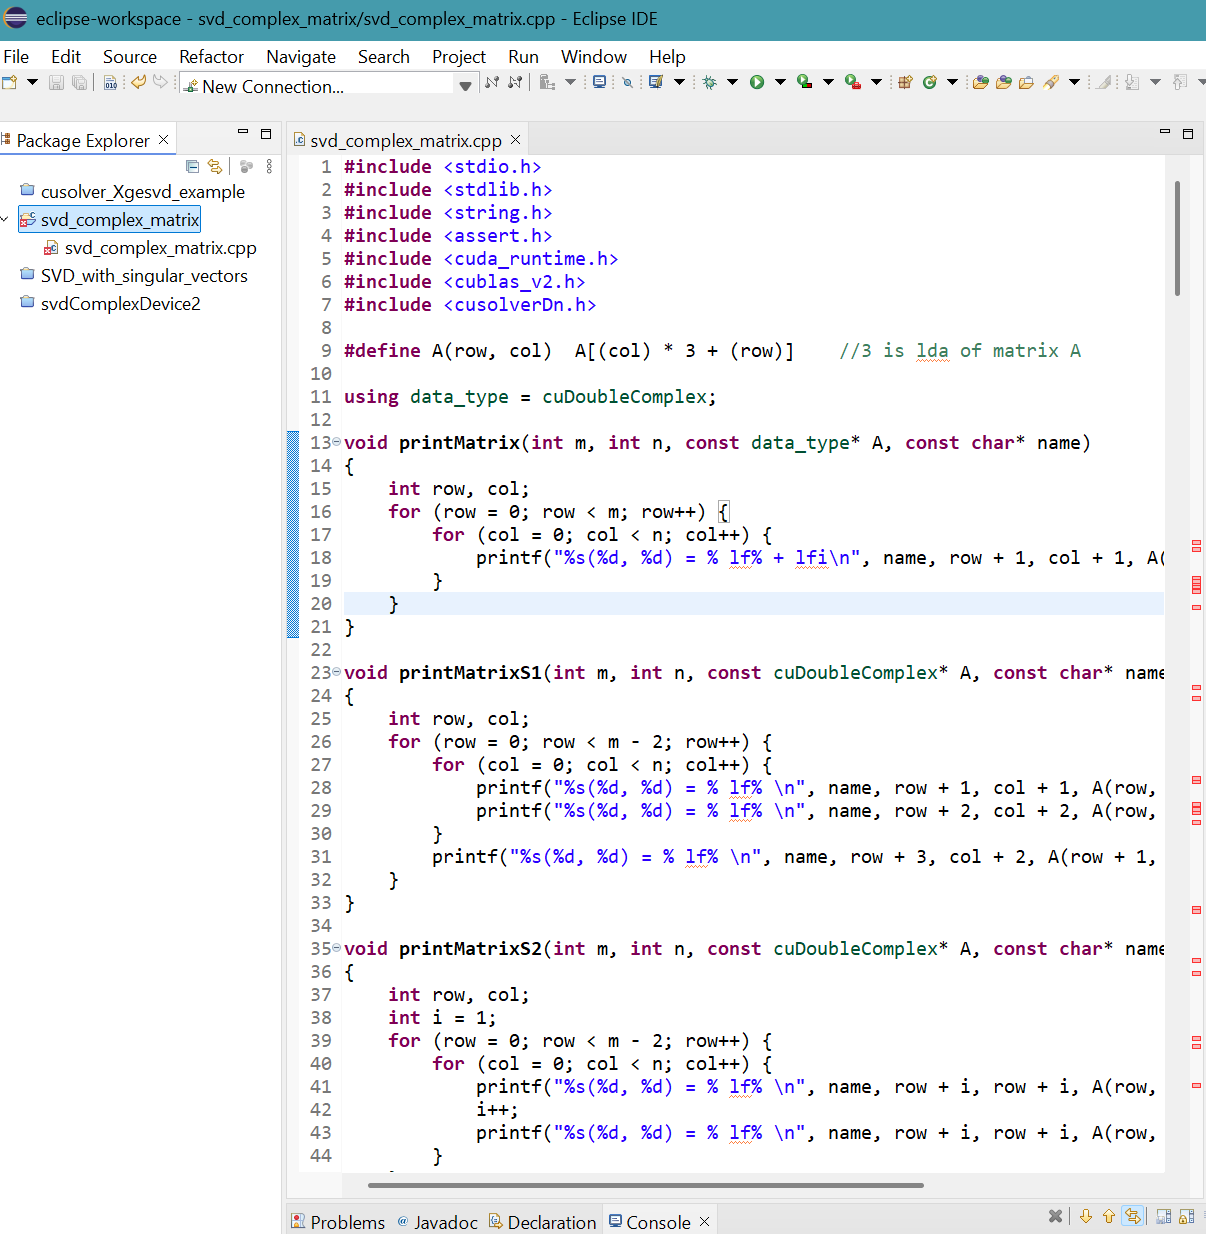
- Select Project menu then Build Project.
64-bit SVD_complex_matrix.exe file is generated in Debug folder.
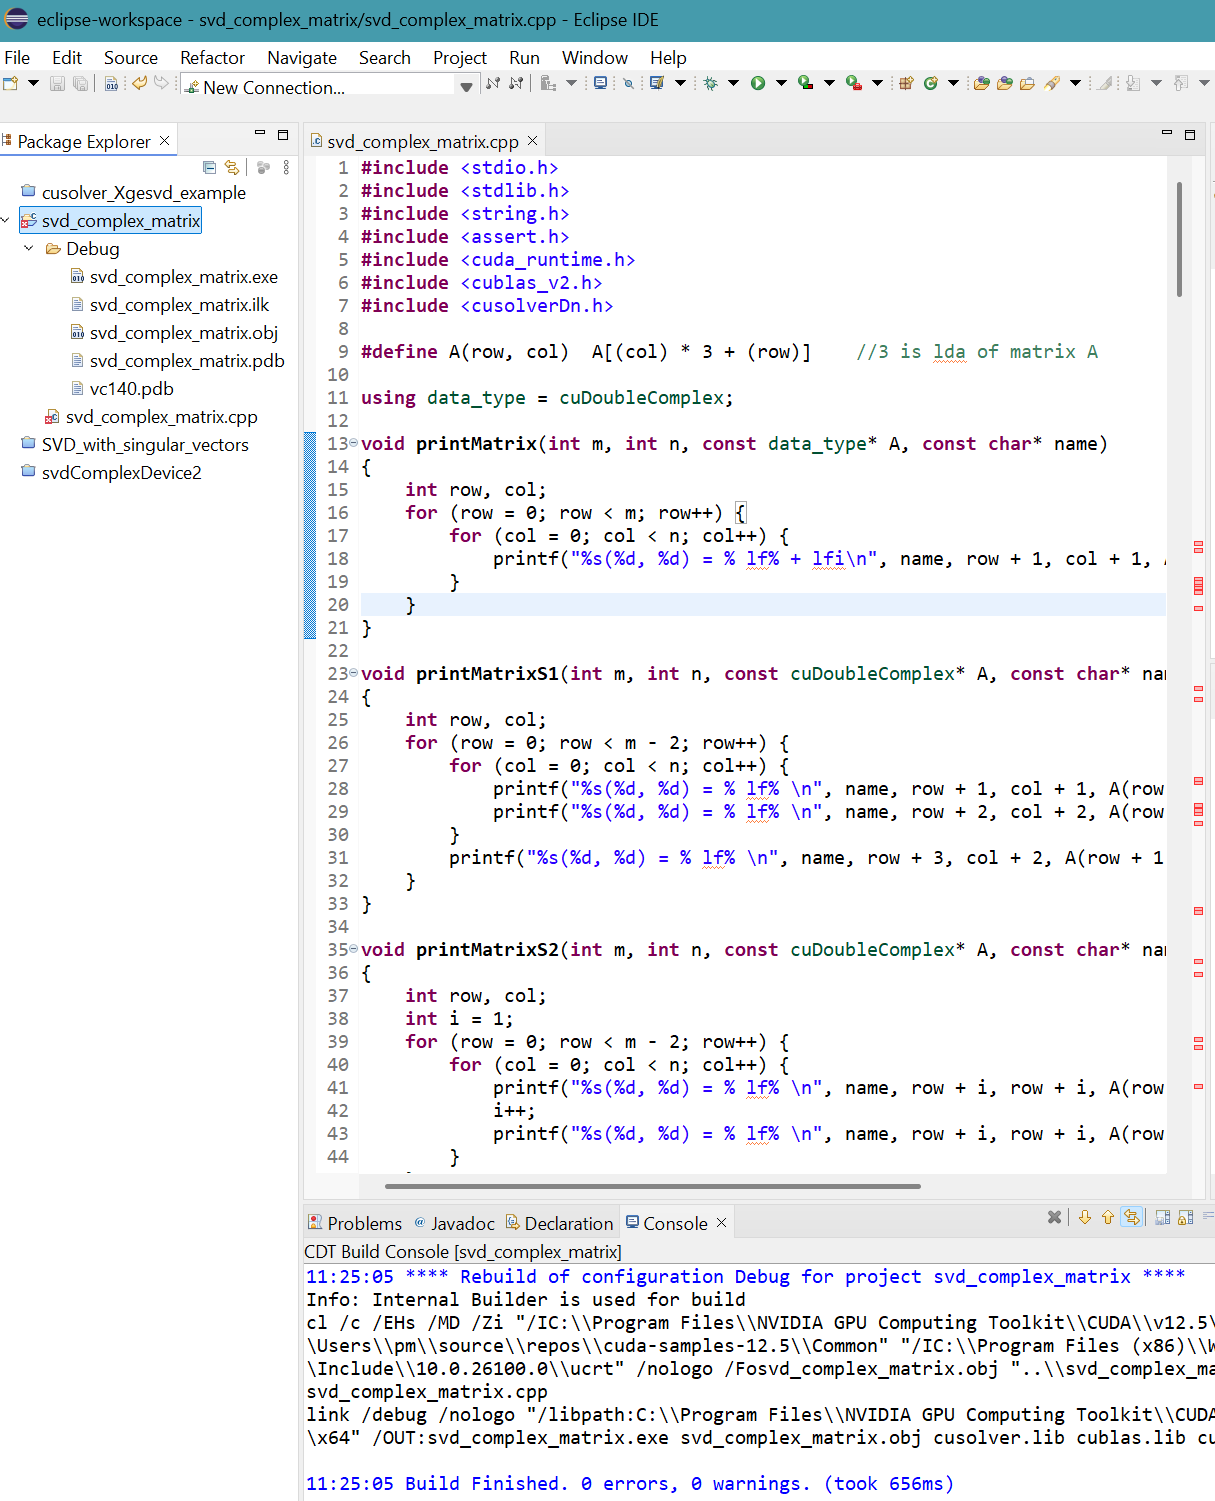
A message appears on the CDT Build Console. - Select Run menu then Run configurations...
Press Run button.
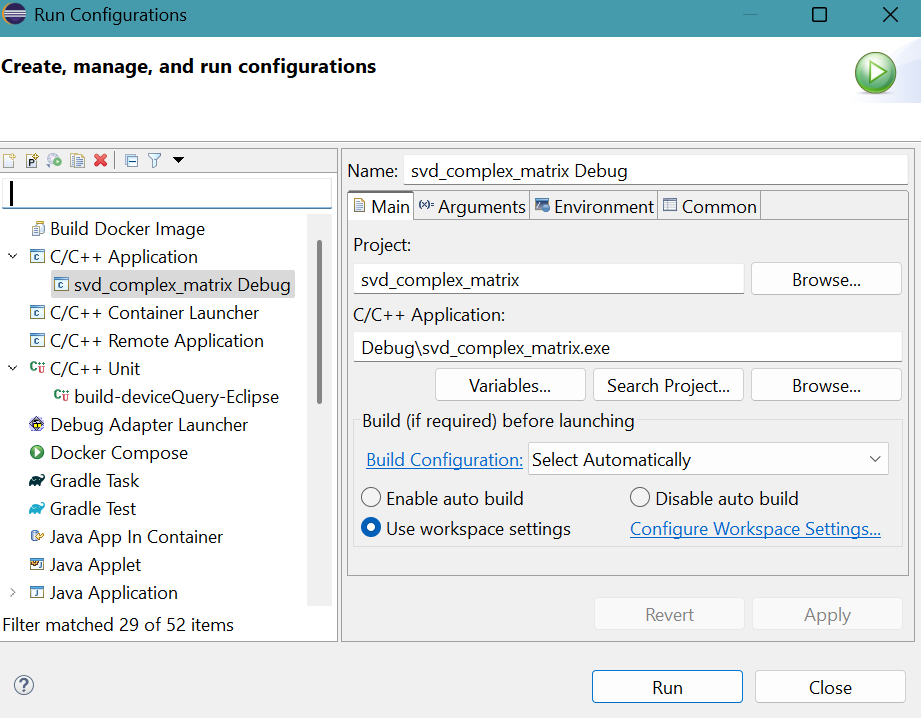
- The result is
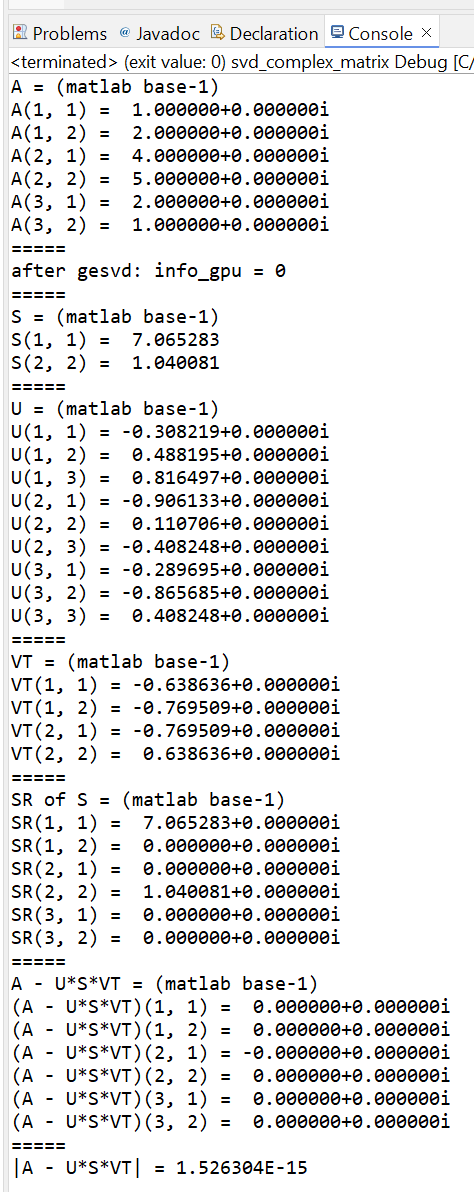
svd_3x2complex_matrix.cpp project in MS Visual Studio 2022
- Launch Visual Studio 2022, select Create a new Project.
- In Create a new project panel, select CUDA 12.5 Runtime.
Click Next button. - In Configure your new project panel:
Provid the Project name: svd_3x2complex_matrix
Click Create button. - The Visual Studio editor appears.
Right-click kernel.cu in Solution Explorer.
Select Remove, then click Delete button. - Right-click the project folder svd_3x2complex_matrix
in Solution Explorer.
Select Add then New Item... - Add New Item panel appears. Select C++ File (.cpp)
Provid the name of the file: svd_3x2complex_matrix.cpp
Click Add button. - An empty svd_3x2complex_matrix.cpp source file appears for editing.
- Copy and paste the file svd_3x2complex_matrix.cpp into the empty source file.
- Right click the project svd_3x2complex_matrix in Solution Explorer.
Select Properties. - Select Linker then select Input.
Add cusolver.lib; in Additional Dependencies.
Others library files are already added.
Click Apply button then OK button. - Select Build menu then Build Solution.
A message appears on the CDT Build Console.
The file svd_3x2complex_matrix.exe is generated in the folderC:\Users\pm\source\repos\svd_3x2complex_matrix\x64\Debug - Select Debug menu then Start Without Debugging.
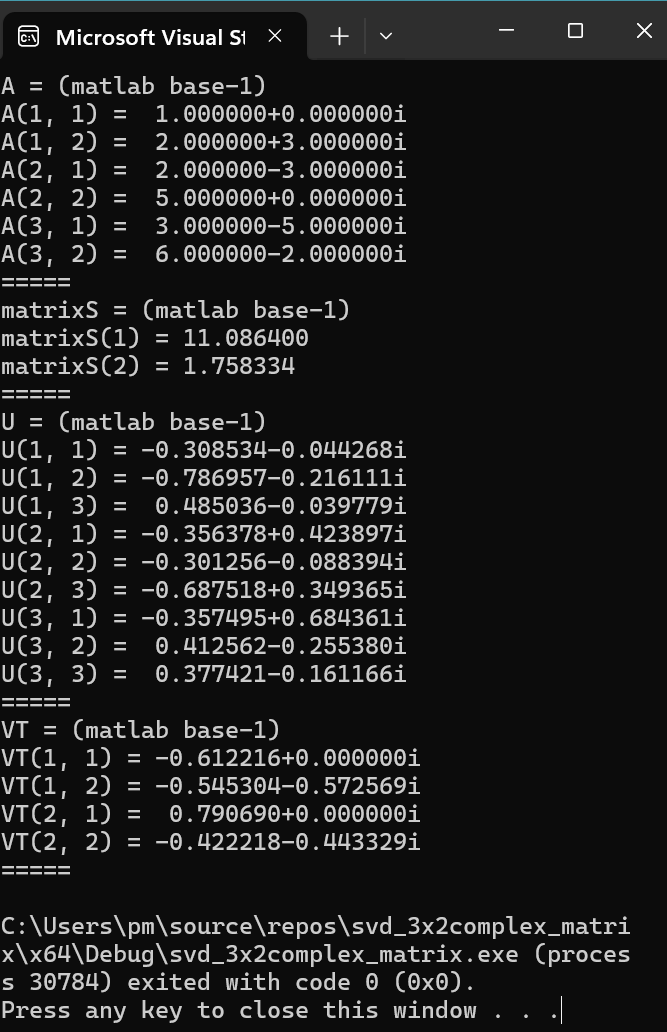
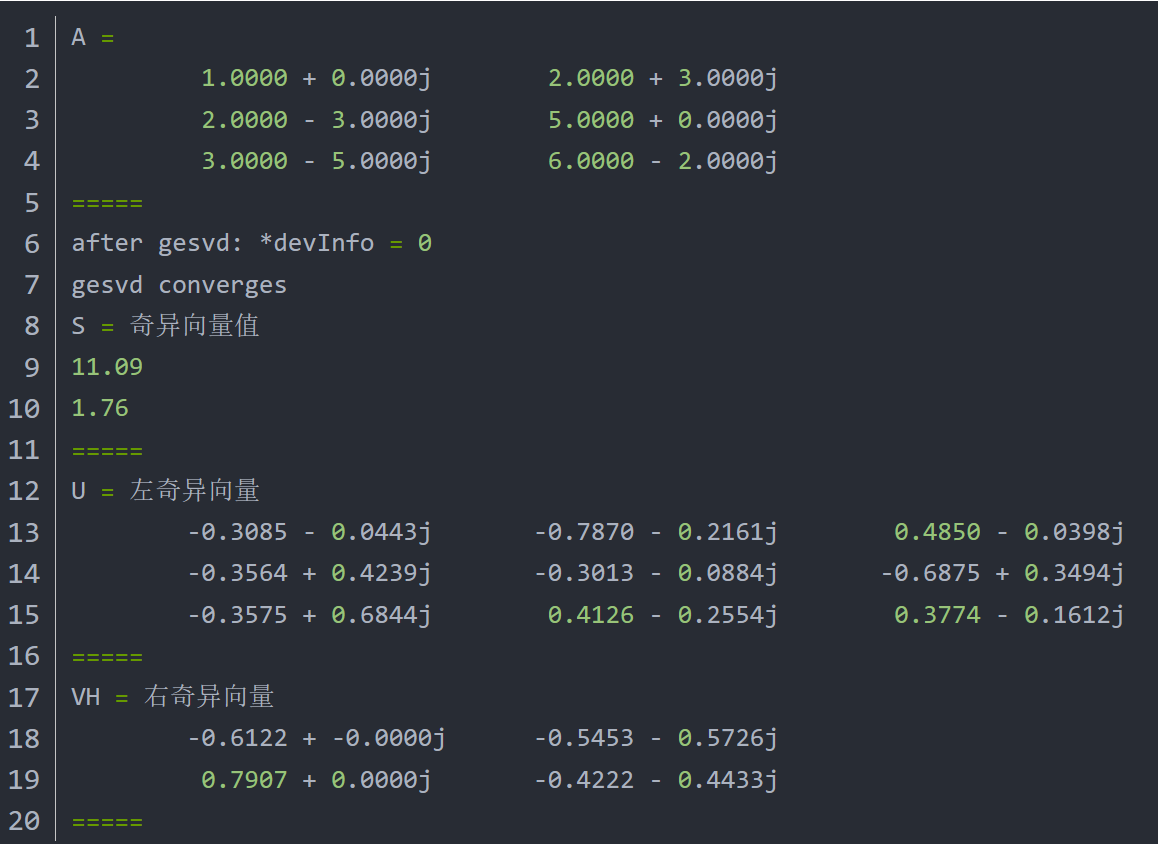
- CUDA cusolverDn<t>gesvd()函数认知.
svd_4X4complex_matrix.cpp project in MS Visual Studio 2022
- Launch Visual Studio 2022, select Create a new Project.
- In Create a new project panel, select CUDA 12.5 Runtime.
Click Next button. - In Configure your new project panel:
Provid the Project name: svd_4X4complex_matrix
Click Create button. - The Visual Studio editor appears.
Right-click kernel.cu in Solution Explorer.
Select Remove, then click Delete button. - Right-click the project folder svd_4X4complex_matrix
in Solution Explorer.
Select Add then New Item... - Add New Item panel appears. Select C++ File (.cpp)
Provid the name of the file: svd_4X4complex_matrix.cpp
Click Add button. - An empty svd_4X4complex_matrix.cpp source file appears for editing.
- Copy and paste the file svd_4X4complex_matrix.cpp provided by Boubou63 into the empty source file.
- Right click the project svd_4X4complex_matrix in Solution Explorer.
Select Properties. - Select Linker then select Input.
Add cusolver.lib; in Additional Dependencies.
Others library files are already added.
Click Apply button then OK button. - Select Build menu then Build Solution.
A message appears on the CDT Build Console.
The file svd_4X4complex_matrix.exe is generated in the folderC:\Users\pm\source\repos\svd_4X4complex_matrix\x64\Debug - Select Debug menu then Start Without Debugging.
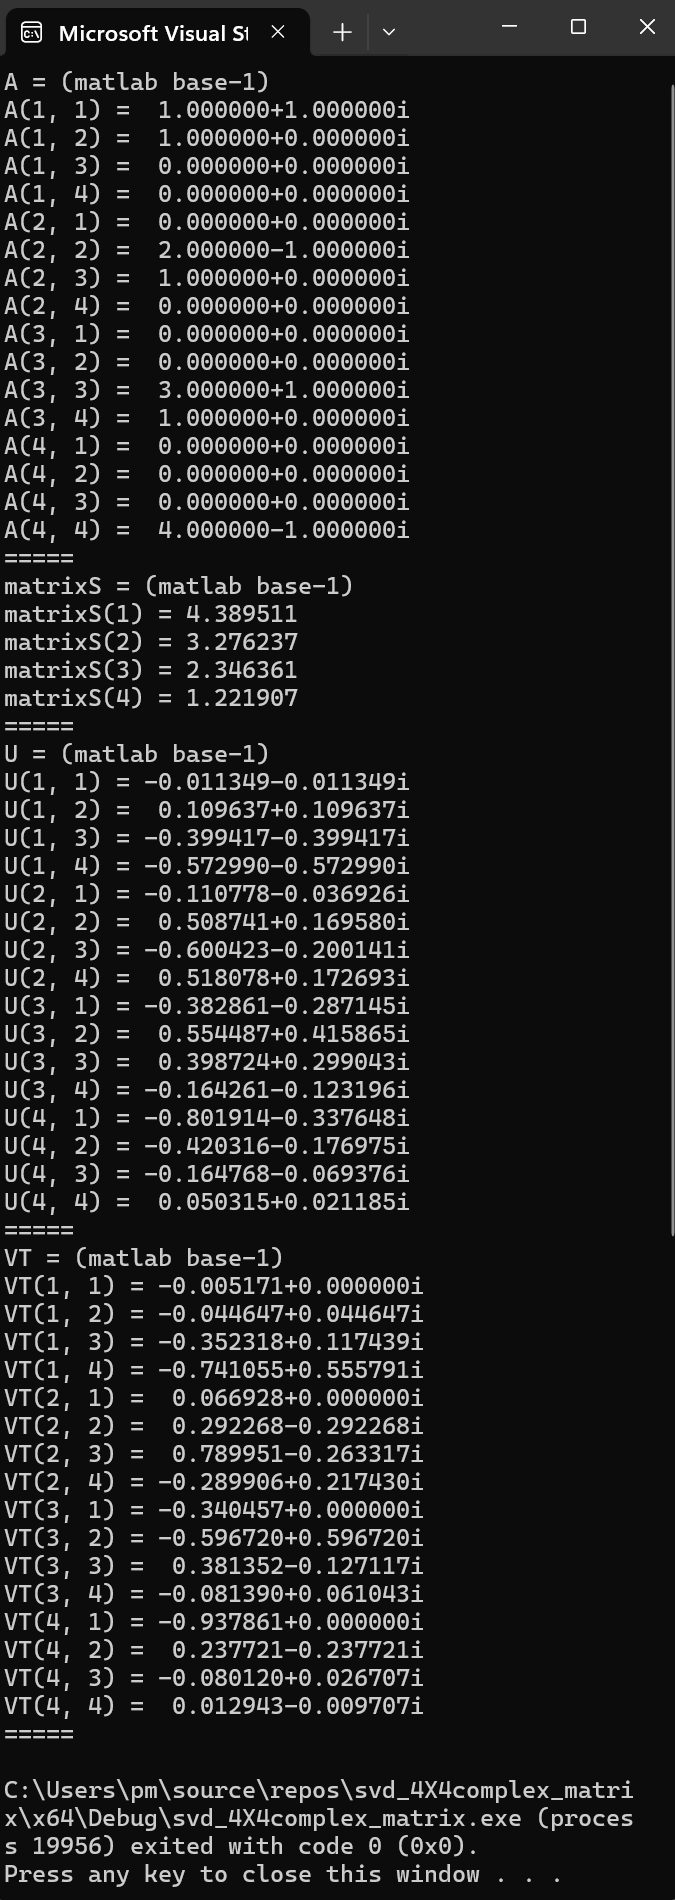
svd_3X3complex_matrix.cpp project in MS Visual Studio 2022
- Launch Visual Studio 2022, select Create a new Project.
- In Create a new project panel, select CUDA 12.5 Runtime.
Click Next button. - In Configure your new project panel:
Provid the Project name: svd_3X3complex_matrix
Click Create button. - The Visual Studio editor appears.
Right-click kernel.cu in Solution Explorer.
Select Remove, then click Delete button. - Right-click the project folder svd_3X3complex_matrix
in Solution Explorer.
Select Add then New Item... - Add New Item panel appears. Select C++ File (.cpp)
Provid the name of the file: svd_3X3complex_matrix.cpp
Click Add button. - An empty svd_3X3complex_matrix.cpp source file appears for editing.
- Copy and paste the file svd_3X3complex_matrix.cpp provided by Boubou63 into the empty source file.
- Right click the project svd_3X3complex_matrix in Solution Explorer.
Select Properties. - Select Linker then select Input.
Add cusolver.lib; in Additional Dependencies.
Others library files are already added.
Click Apply button then OK button. - Select Build menu then Build Solution.
A message appears on the CDT Build Console.
The file svd_3X3complex_matrix.exe is generated in the folderC:\Users\pm\source\repos\svd_3X3complex_matrix\x64\Debug - Select Debug menu then Start Without Debugging.
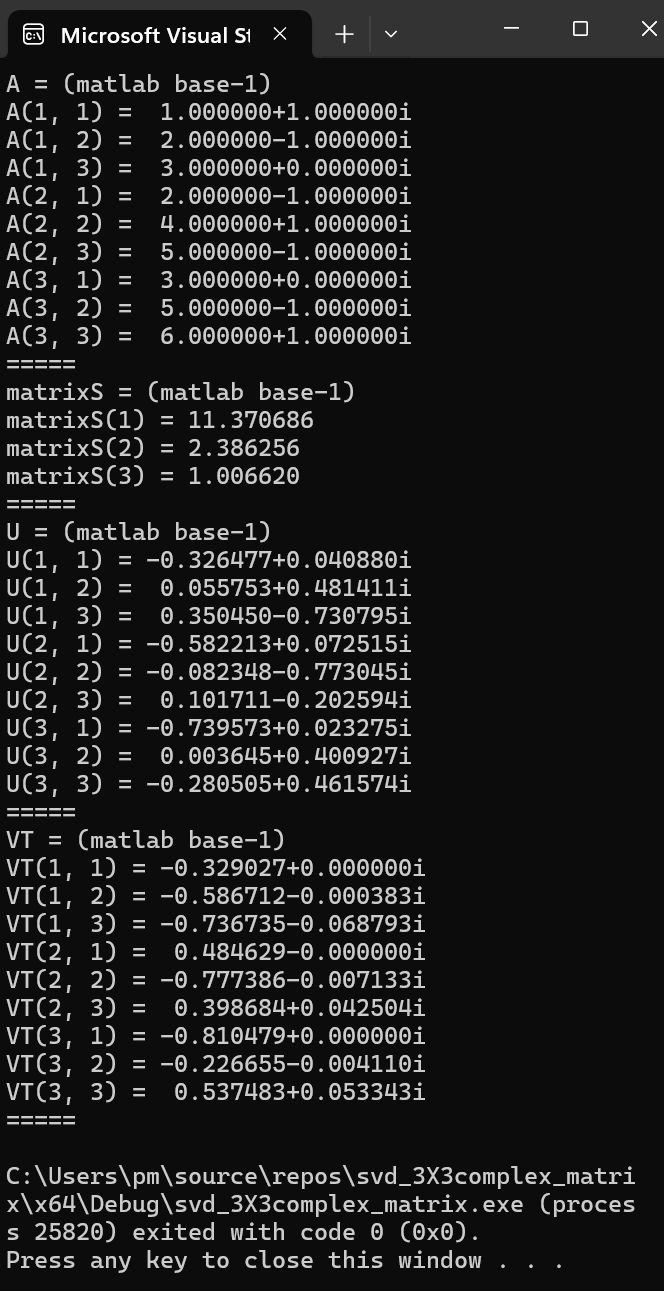
svd_3X3complex_matrix.cpp project with MinGW GCC toolchain in Eclipse IDE
- Launch Eclipse IDE for Java Developers.
Press CTRL N.
Select a wizard panel appears.
Select C/C++ folder then C/C++ Project.
Click Next > button.
New C/C++ Project panel appears.
Select C++ Managed Build.
Click Next > button.
C++ Project panel appears.
Provide the project name: svd_3X3complex_matrix
Select Empty Project for Executable.
Select MinGW GCC for Toolchains.
Click Finish button. - The project folder svd_3X3complex_matrix appears in Package Explorer of Eclipse.
- Right click the project folder svd_3X3complex_matrix.
Select New, then File.
Create New File panel appears.
Provide the File name: svd_3X3complex_matrix.cpp
Click Finish button. - Copy and paste the file svd_3X3complex_matrix.cpp
into the empty source file.
Press Ctrl S to save svd_3X3complex_matrix.cpp. - Similarly, create the empty file cusolver_utils.h
- Copy and paste the file cusolver_utils.h provided by
Sijia Zhou
into the newly created file.
Press Ctrl S to save cusolver_utils.h.
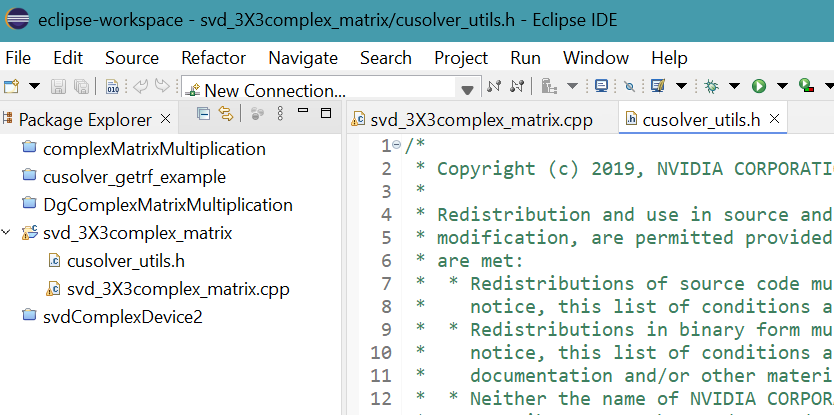
- Right click svd_3X3complex_matrix project in Package Explorer then select Properties.
Properties for svd_3X3complex_matrix panel appears.
Click Settings in C/C++ Build.
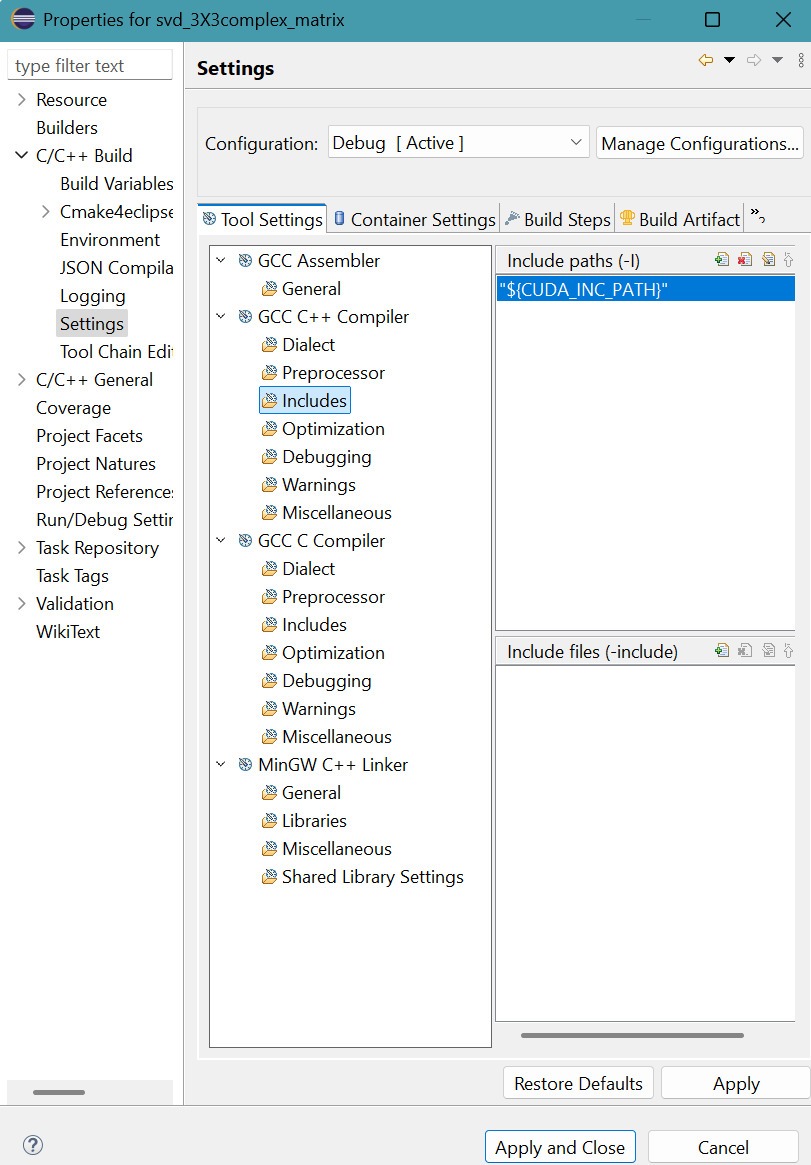
Click Includes for GCC C++ Compiler in Tool Settings tab.
Click + symbol in top part of Include paths (-I). - Add directory path panel appears.
Provide "${CUDA_INC_PATH}" for Directory.
Directory must be enclosed in double quotes because this path contains space characters.Click OK button.
- The result is
Click Apply button.
- A message apears.
Click Rebuild Index button.

- Click Libraries for MinGW C++ Linker in Tool Settings tab.
Provide the three libraries (cusolver.lib, cublas.lib, cudart.lib) and their folder location ("${CUDA_LIB_PATH_64}") to the MinGW C++ Linker.
The result is:Library file names are provided without extension .lib and paths are enclosed in double quotes.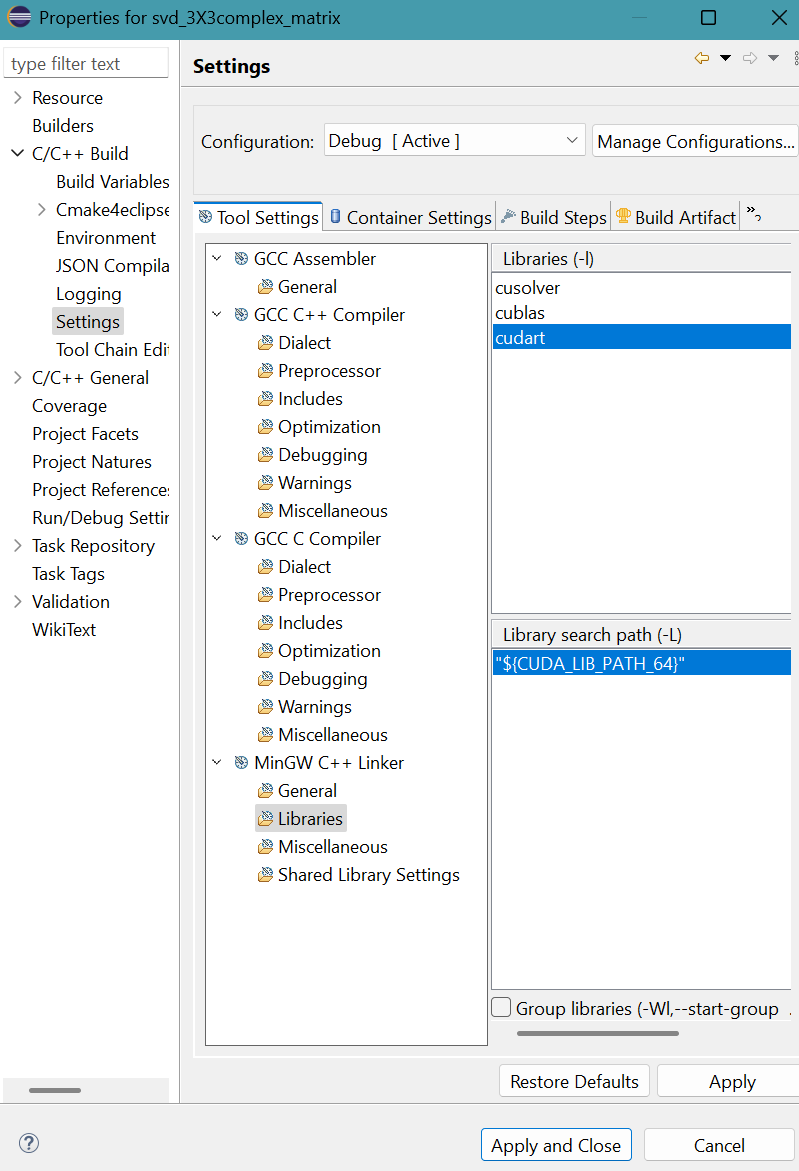
Click Apply and Close button.
- Select Project menu then Build Projet.
A message appears on the CDT Build Console.
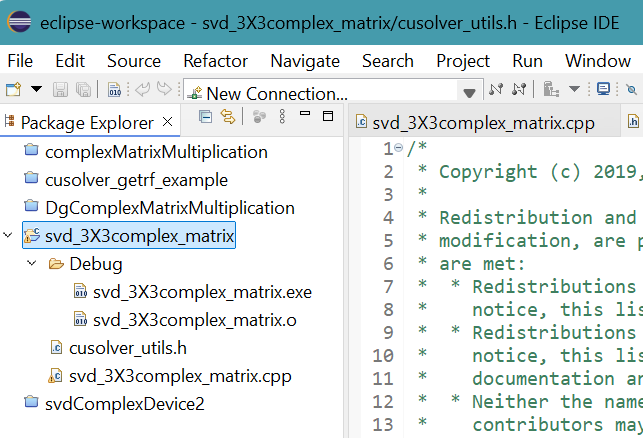
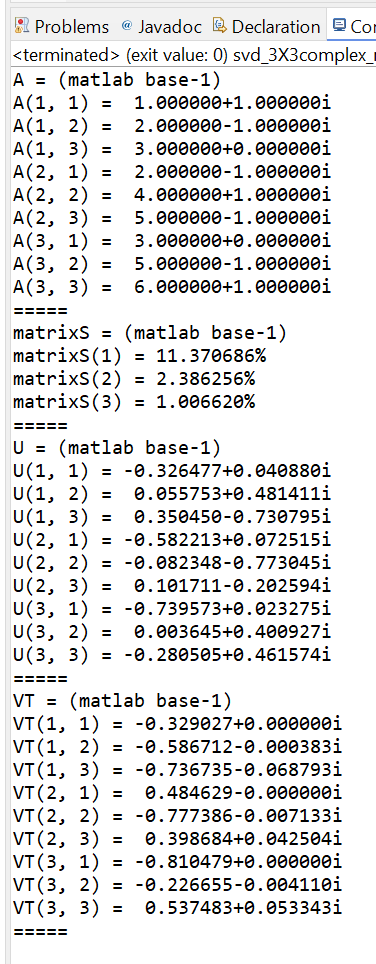
svd_3X3complex_matrix.exe is generated in Debug folder. - Select Run menu then Run.
(2X3)(3X4)
complexMatrixMultiplication.cpp
project in MS Visual Studio 2022
- Launch Visual Studio 2022, select Create a new Project.
- In Create a new project panel, select CUDA 12.5 Runtime.
Click Next button. - In Configure your new project panel:
Provid the Project name: complexMatrixMultiplication
Click Create button. - The Visual Studio editor appears.
Right-click kernel.cu in Solution Explorer.
Select Remove, then click Delete button. - Right-click the project folder complexMatrixMultiplication
in Solution Explorer.
Select Add then New Item... - Add New Item panel appears. Select C++ File (.cpp)
Provid the name of the file: complexMatrixMultiplication.cpp
Click Add button. - An empty complexMatrixMultiplication.cpp source file appears for editing.
- Copy and paste the file complexMatrixMultiplication.cpp into the empty source file.
- Right click the project complexMatrixMultiplication in Solution Explorer.
Select Properties. - Select Linker then select Input.
Add cublas.lib; in Additional Dependencies.
Others library files are already added.
Click Apply button then OK button. - Select Build menu then Build Solution.
A message appears on the CDT Build Console.
The file complexMatrixMultiplication.exe is generated in the folderC:\Users\pm\source\repos\complexMatrixMultiplication\x64\Debug - Select Debug menu then Start Without Debugging.
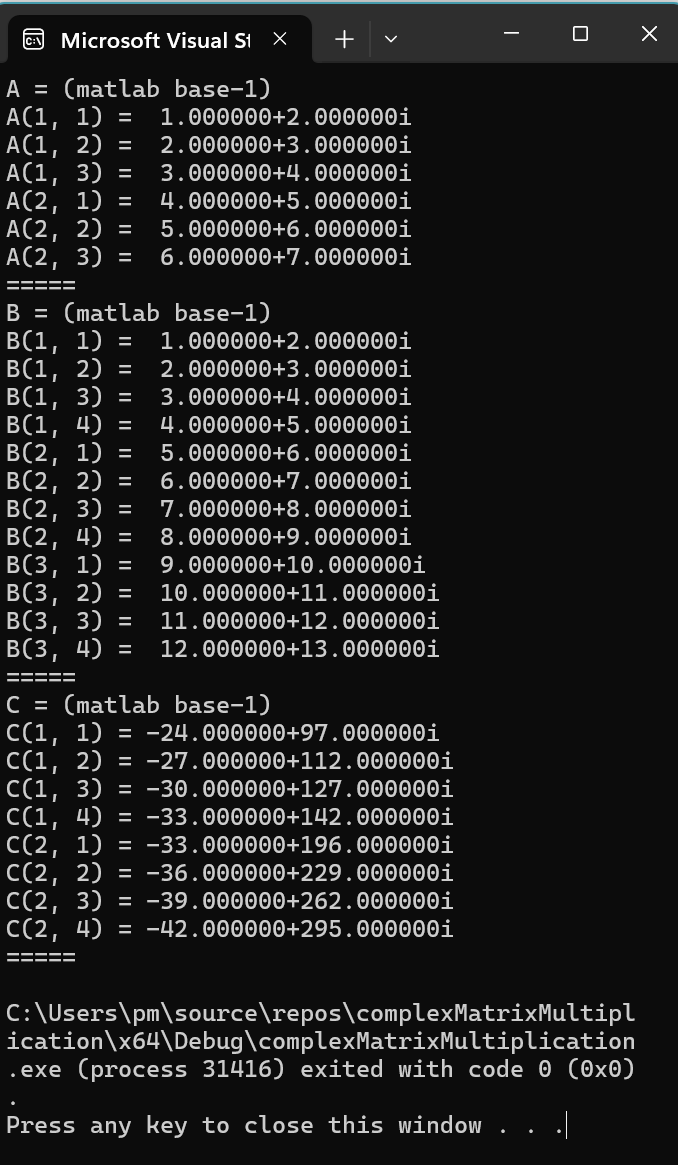
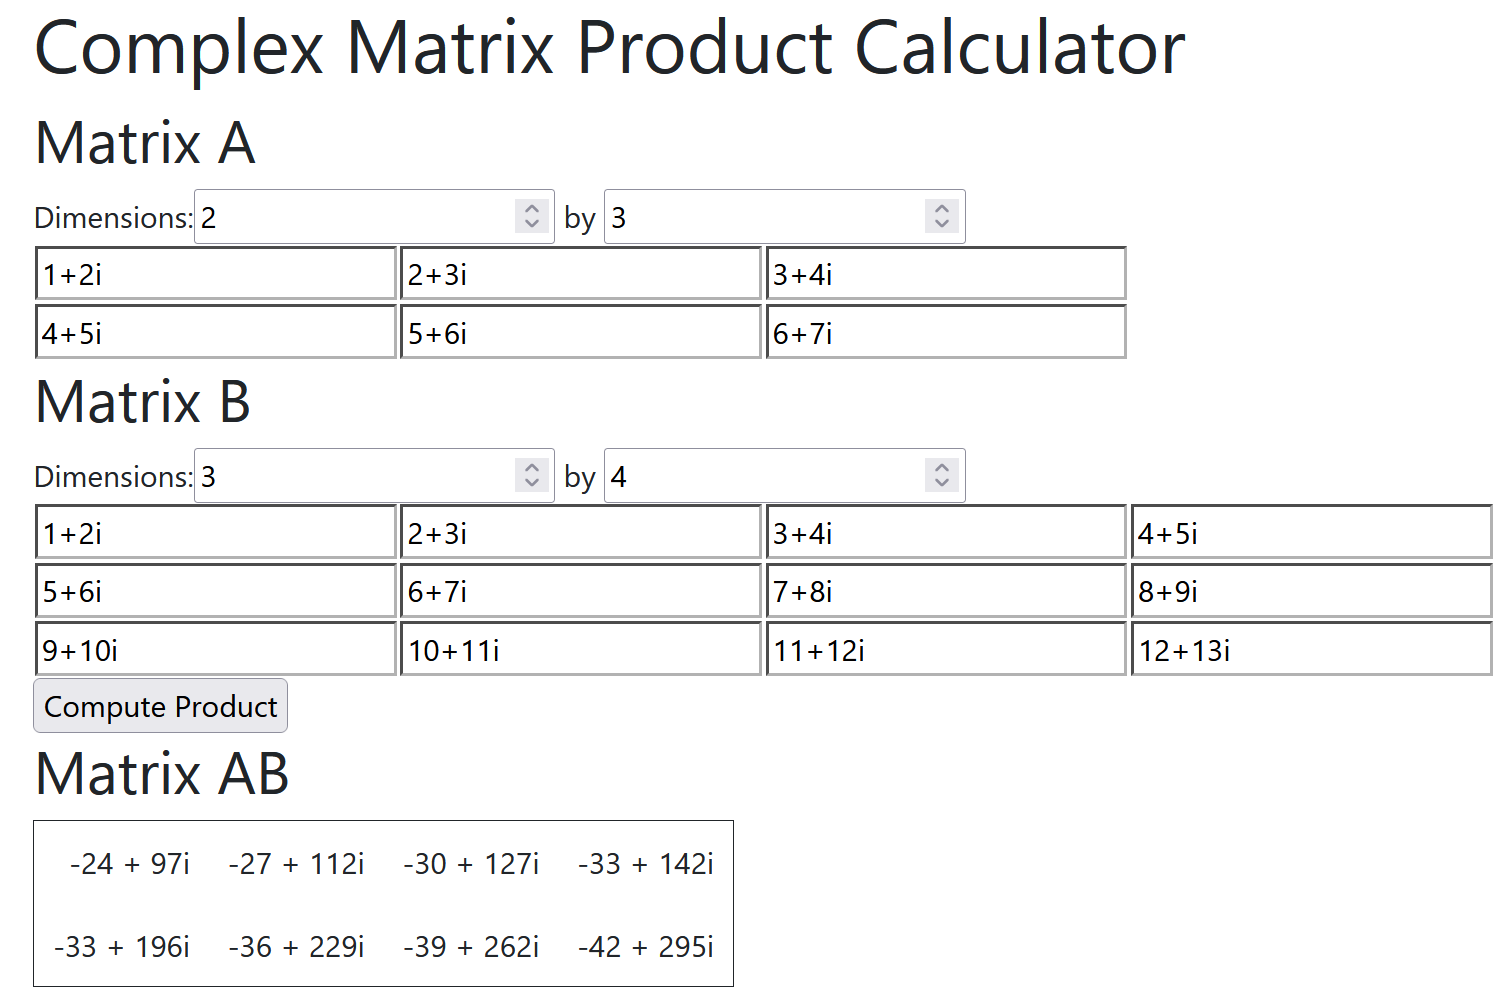
- Complex Matrix Product Calculator
(2X3)(3X4)
complexMatrixMultiplication.cpp
project with MinGW GCC
toolchain in Eclipse IDE
- Launch Eclipse IDE for Java Developers.
Press CTRL N.
Select a wizard panel appears.
Select C/C++ folder then C/C++ Project.
Click Next > button.
New C/C++ Project panel appears.
Select C++ Managed Build.
Click Next > button.
C++ Project panel appears.
Provide the project name: complexMatrixMultiplication
Select Empty Project for Executable.
Select MinGW GCC for Toolchains.
Click Finish button. - The project folder complexMatrixMultiplication appears in Package Explorer of Eclipse.
- Right click the project folder complexMatrixMultiplication.
Select New, then File.
Create New File panel appears.
Provide the File name: complexMatrixMultiplication.cpp
Click Finish button. - Copy and paste the file complexMatrixMultiplication.cpp
into the empty source file.
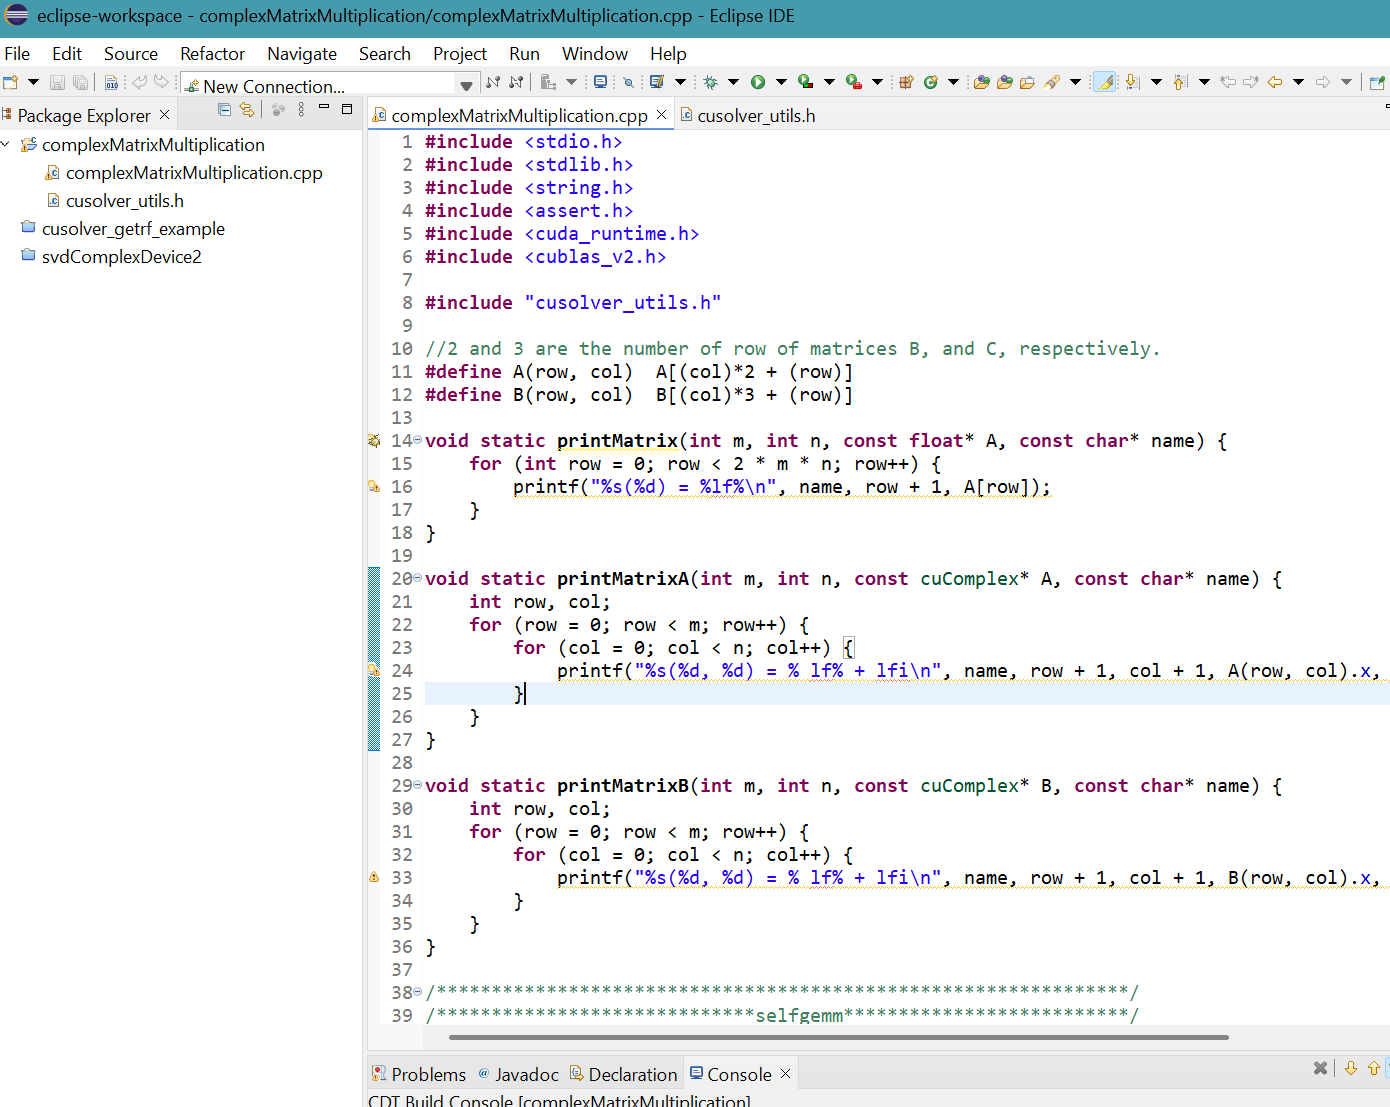
Press Ctrl S to save complexMatrixMultiplication.cpp. - Similarly, create the empty file cusolver_utils.h
- Copy and paste the file cusolver_utils.h provided by
Sijia Zhou
into the newly created file.
Press Ctrl S to save cusolver_utils.h.
- Right click complexMatrixMultiplication project in Package Explorer then select Properties.
Properties for complexMatrixMultiplication panel appears.
Click Settings in C/C++ Build.
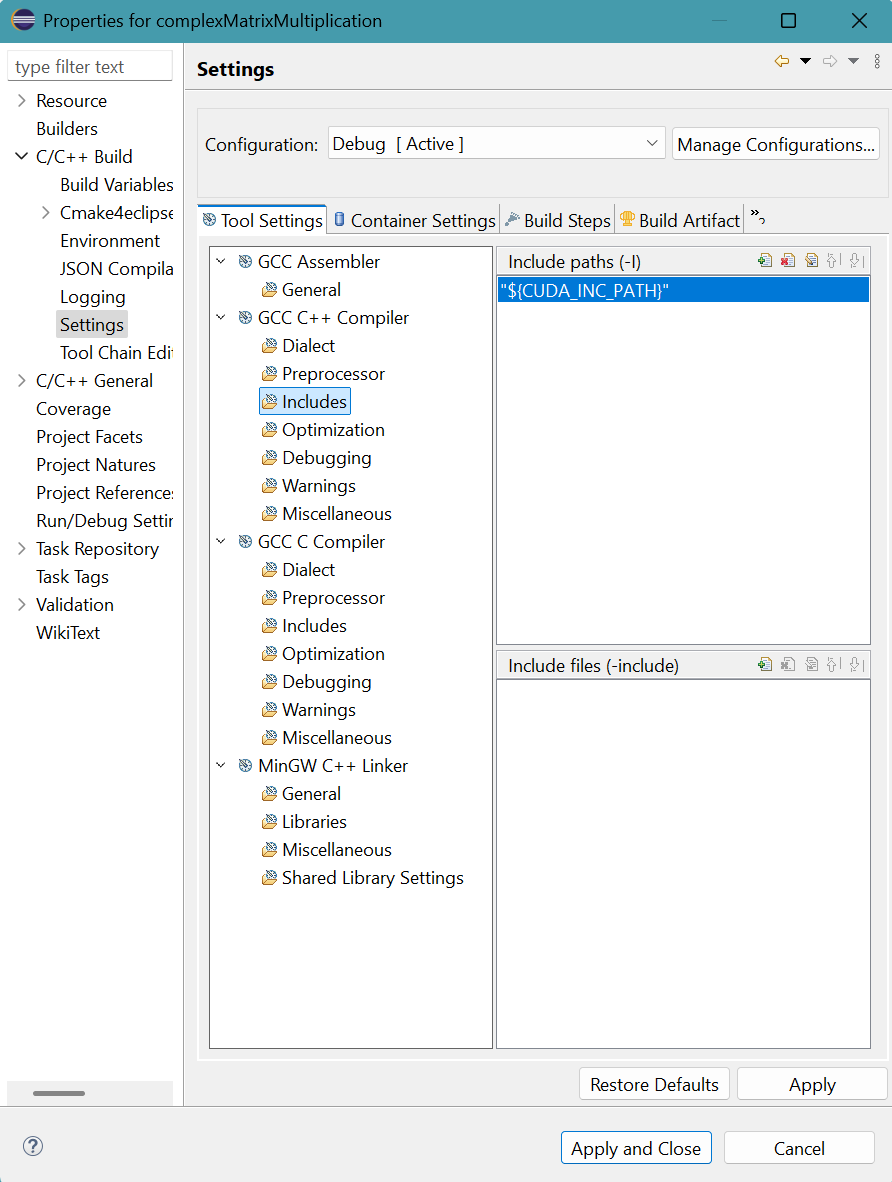
Click Includes for GCC C++ Compiler in Tool Settings tab.
Click + symbol in top part of Include paths (-I). - Add directory path panel appears.
Provide "${CUDA_INC_PATH}" for Directory.
Directory must be enclosed in double quotes because this path contains space characters.Click OK button.
- The result is
Click Apply button.
- A message apears.
Click Rebuild Index button.

- Click Libraries for MinGW C++ Linker in Tool Settings tab.
Provide the three libraries (cusolver.lib, cublas.lib, cudart.lib) and their folder location ("${CUDA_LIB_PATH_64}") to the MinGW C++ Linker.
The result is:Library file names are provided without extension .lib and paths are enclosed in double quotes.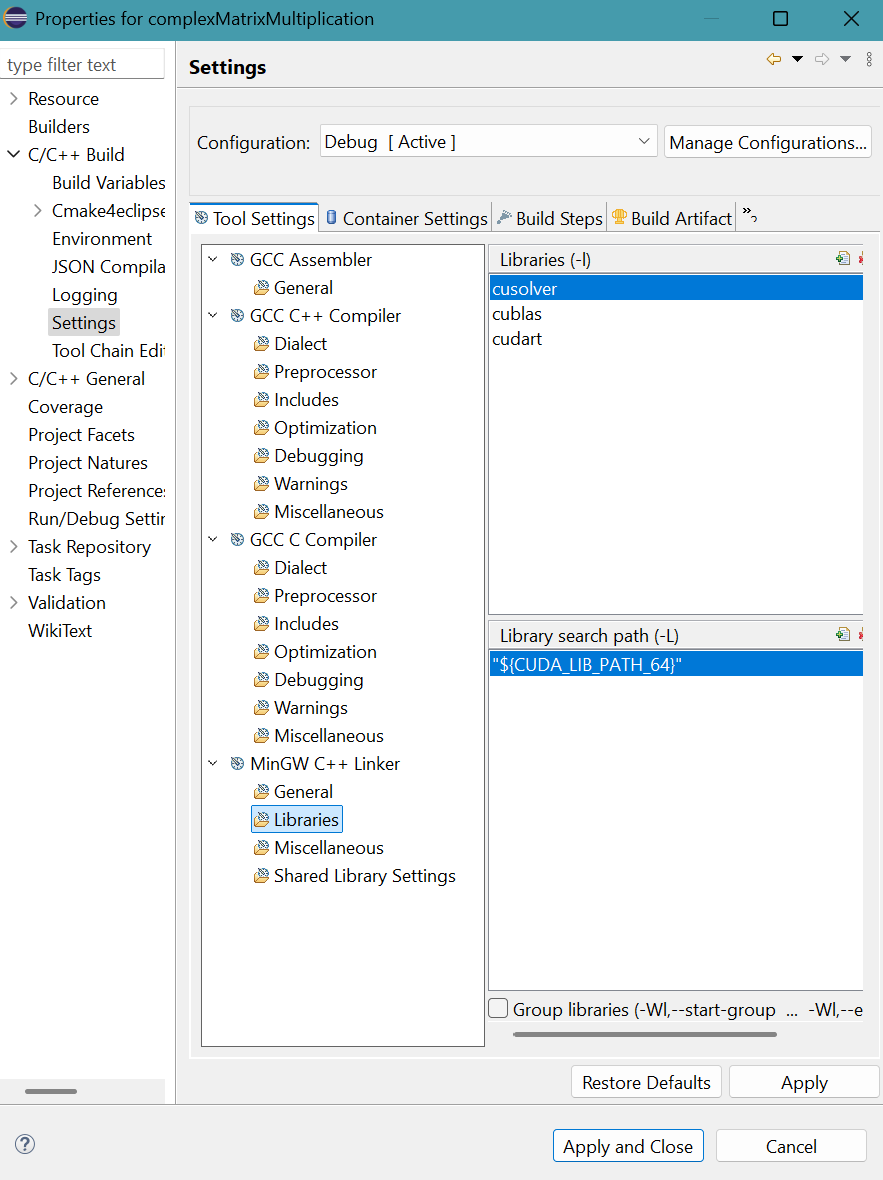
Click Apply and Close button.
- Select Project menu then Build Projet.
A message appears on the CDT Build Console.
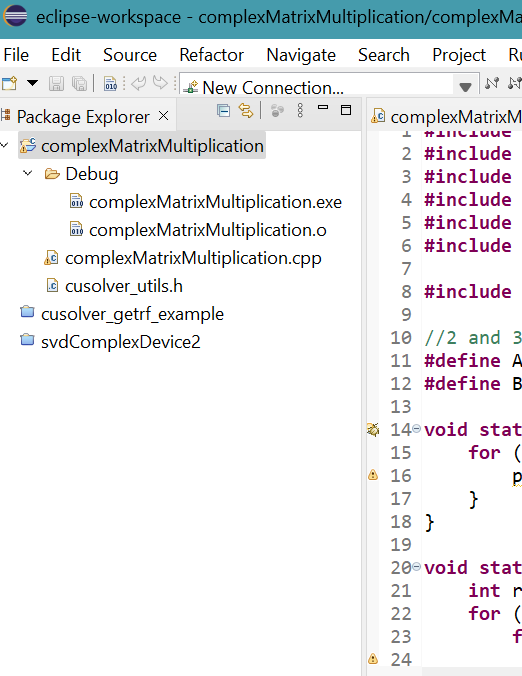
complexMatrixMultiplication.exe is generated in Debug folder. - Select Run menu then Run.
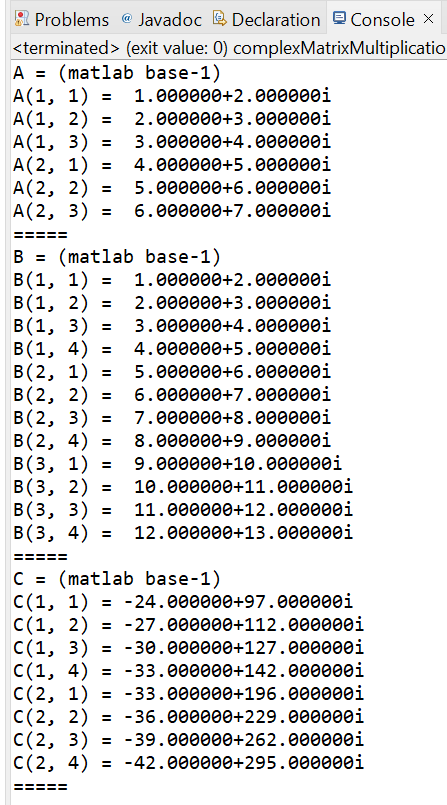
(3X3)(3X2)
DgComplexMatrixMultiplication.cpp
project in MS Visual Studio 2022
- Launch Visual Studio 2022, select Create a new Project.
- In Create a new project panel, select CUDA 12.5 Runtime.
Click Next button. - In Configure your new project panel:
Provid the Project name: DgComplexMatrixMultiplication
Click Create button. - The Visual Studio editor appears.
Right-click kernel.cu in Solution Explorer.
Select Remove, then click Delete button. - Right-click the project folder DgComplexMatrixMultiplication
in Solution Explorer.
Select Add then New Item... - Add New Item panel appears. Select C++ File (.cpp)
Provid the name of the file: DgComplexMatrixMultiplication.cpp
Click Add button. - An empty DgComplexMatrixMultiplication.cpp source file appears for editing.
- Copy and paste the file DgComplexMatrixMultiplication.cpp into the empty source file.
- Right click the project DgComplexMatrixMultiplication in Solution Explorer.
Select Properties. - Select Linker then select Input.
Add cublas.lib; in Additional Dependencies.
Others library files are already added.
Click Apply button then OK button. - Select Build menu then Build Solution.
A message appears on the CDT Build Console.
The file DgComplexMatrixMultiplication.exe is generated in the folderC:\Users\pm\source\repos\DgComplexMatrixMultiplication\x64\Debug - Select Debug menu then Start Without Debugging.
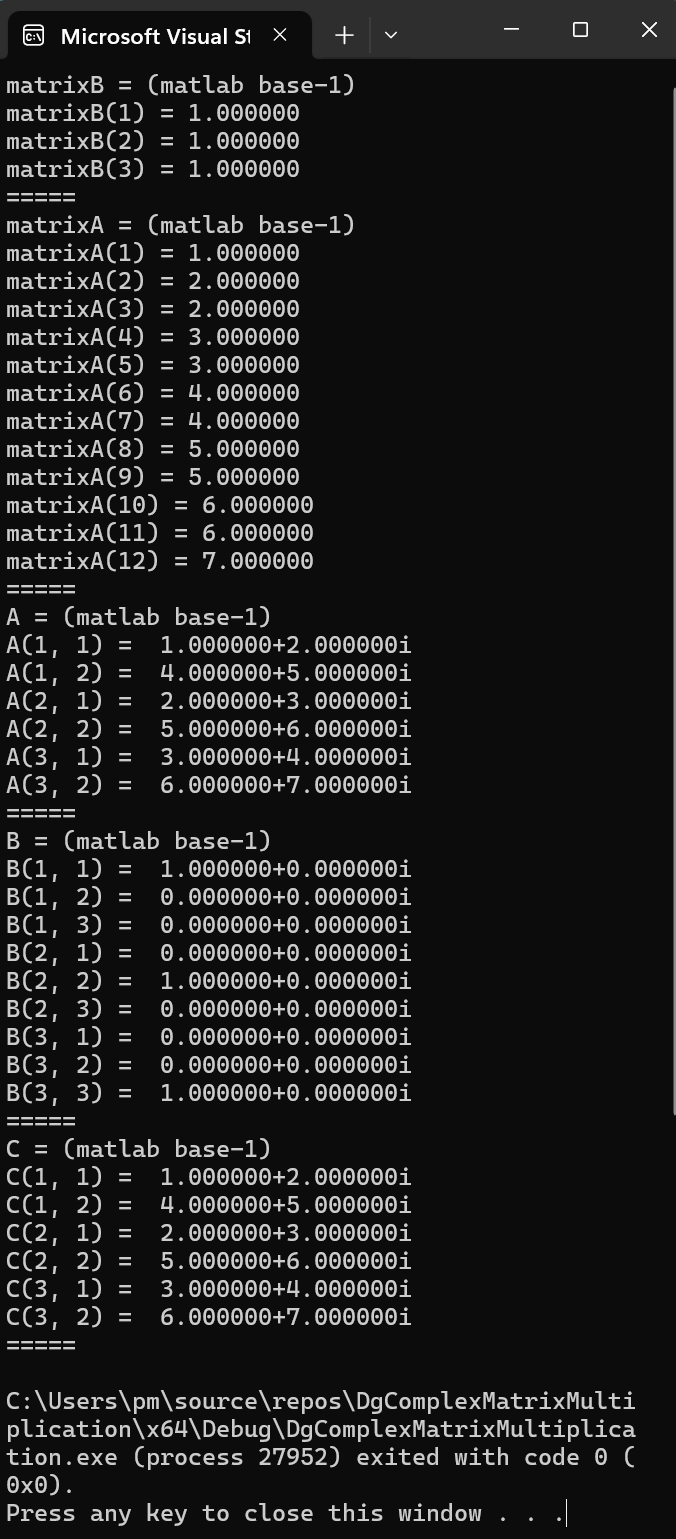
- Complex Matrix Product Calculator
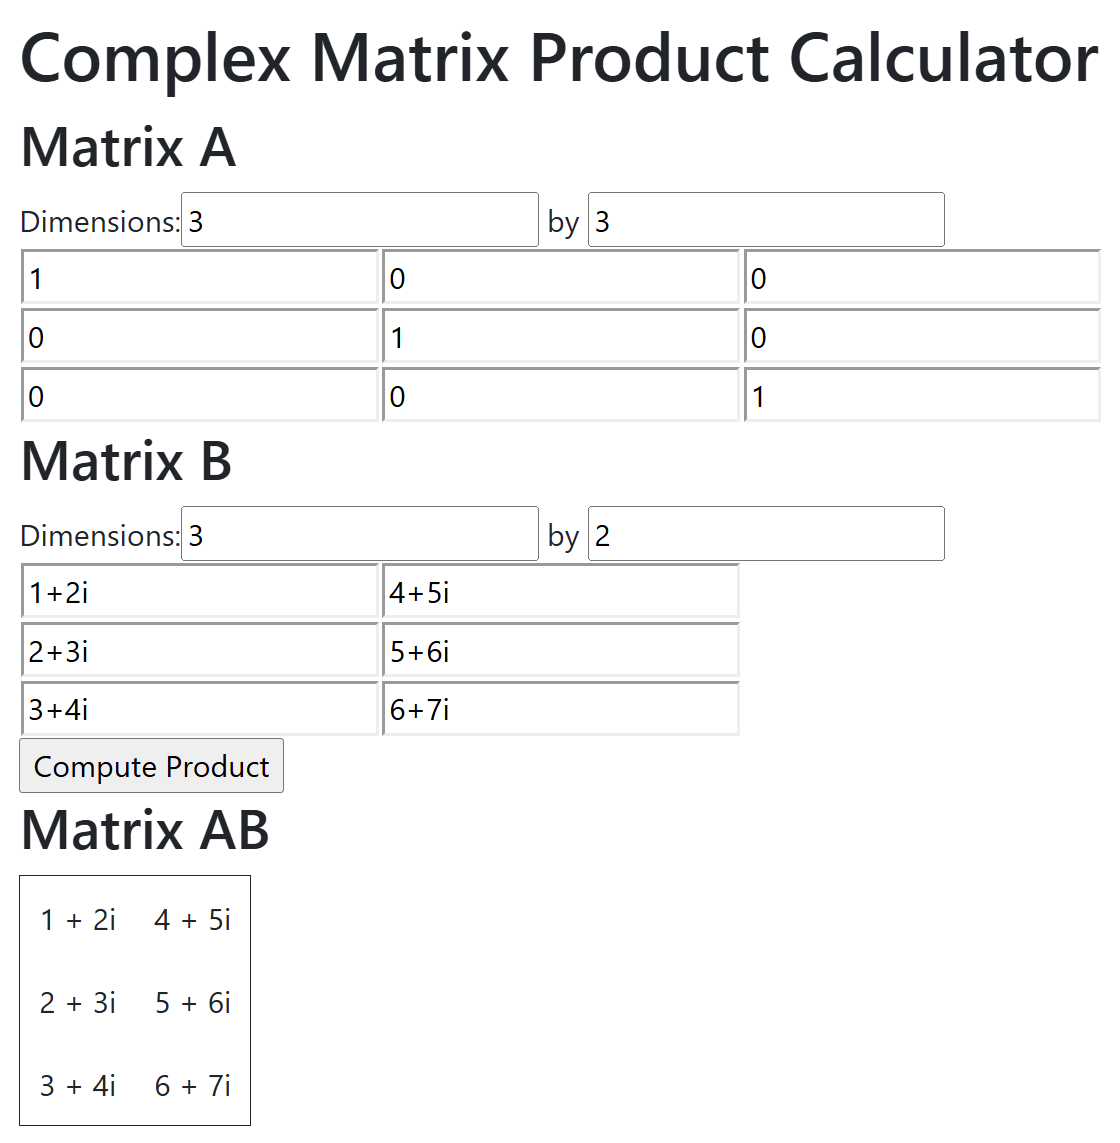
(3X3)(3X2)
DgcomplexMatrixMultiplication.cpp
project with MinGW GCC toolchain in Eclipse IDE
- Launch Eclipse IDE for Java Developers.
Press CTRL N.
Select a wizard panel appears.
Select C/C++ folder then C/C++ Project.
Click Next > button.
New C/C++ Project panel appears.
Select C++ Managed Build.
Click Next > button.
C++ Project panel appears.
Provide the project name: (3X3)(3X2)DgcomplexMatrixMultiplication
Select Empty Project for Executable.
Select MinGW GCC for Toolchains.
Click Finish button. - The project folder (3X3)(3X2)DgcomplexMatrixMultiplication appears in Package Explorer of Eclipse.
- Right click the project folder (3X3)(3X2)DgcomplexMatrixMultiplication.
Select New, then File.
Create New File panel appears.
Provide the File name: (3X3)(3X2)DgcomplexMatrixMultiplication.cppClick Finish button. - Copy and paste the file DgcomplexMatrixMultiplication.cpp
into the empty source file.
Press Ctrl S to save (3X3)(3X2)DgcomplexMatrixMultiplication.cpp. - Similarly, create the empty file cusolver_utils.h
- Copy and paste the file cusolver_utils.h provided by
Sijia Zhou
into the newly created file.
Press Ctrl S to save cusolver_utils.h.
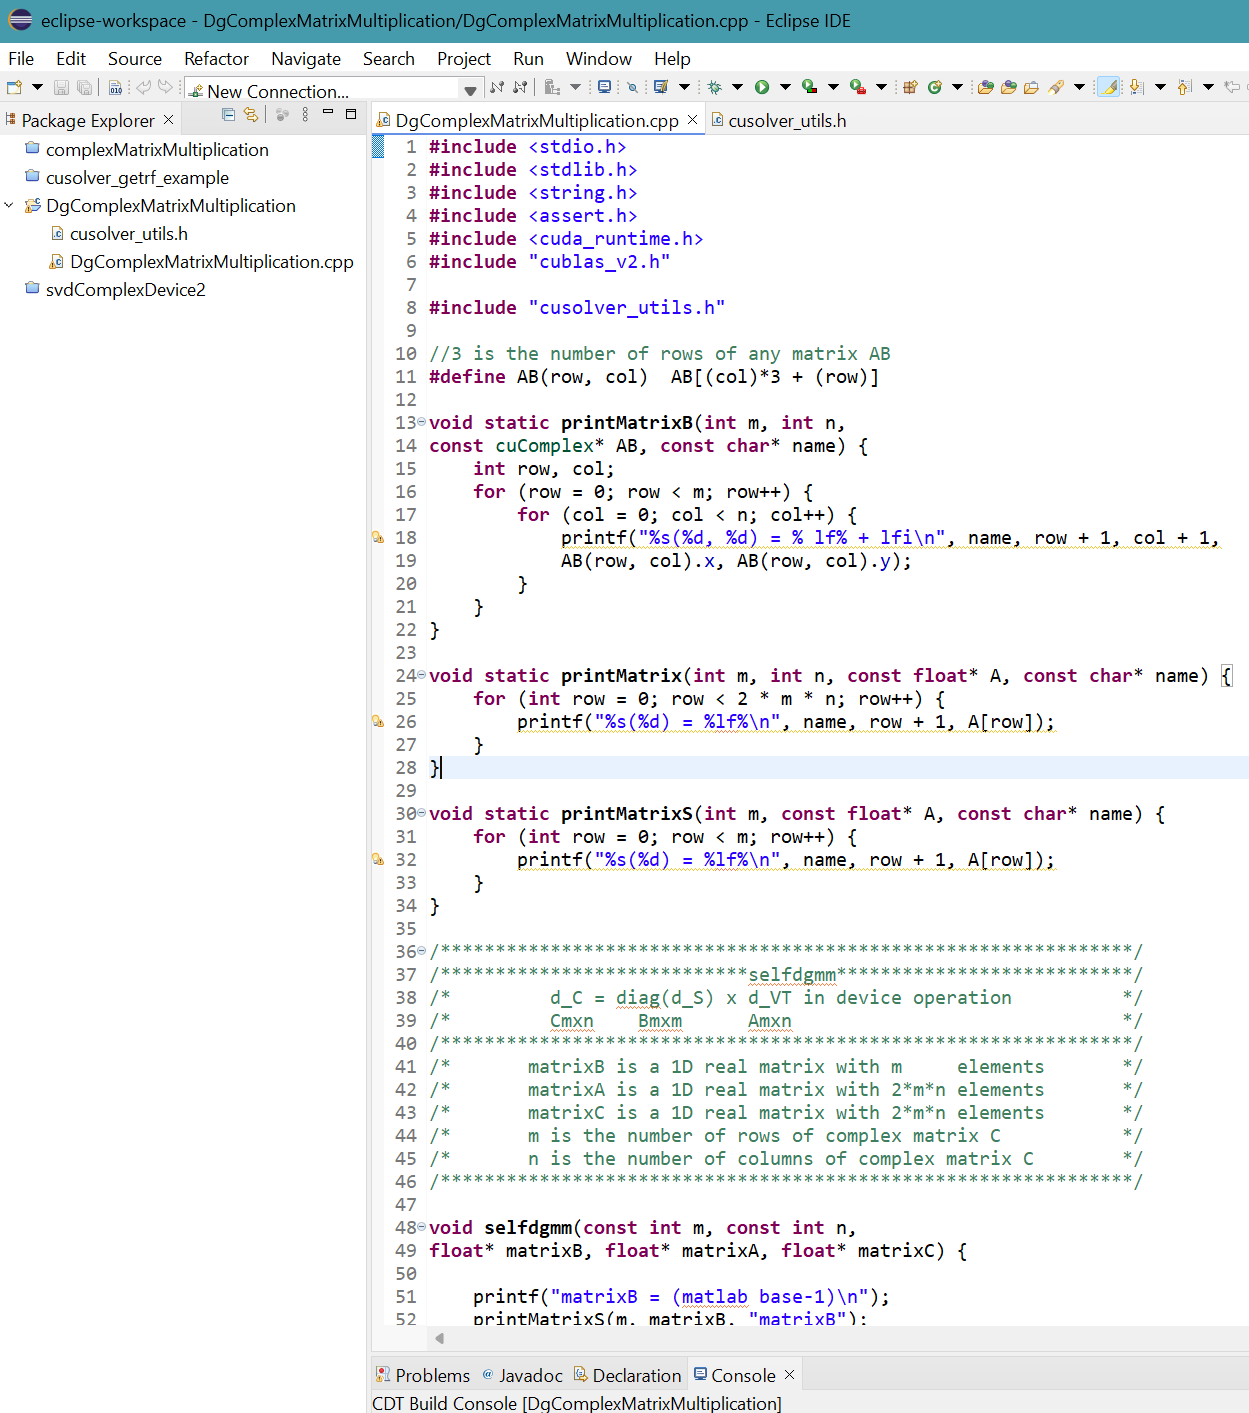
- Right click (3X3)(3X2)DgcomplexMatrixMultiplication project in Package Explorer then select Properties.
Properties for (3X3)(3X2)DgcomplexMatrixMultiplication panel appears.
Click Settings in C/C++ Build.
Click Includes for GCC C++ Compiler in Tool Settings tab.
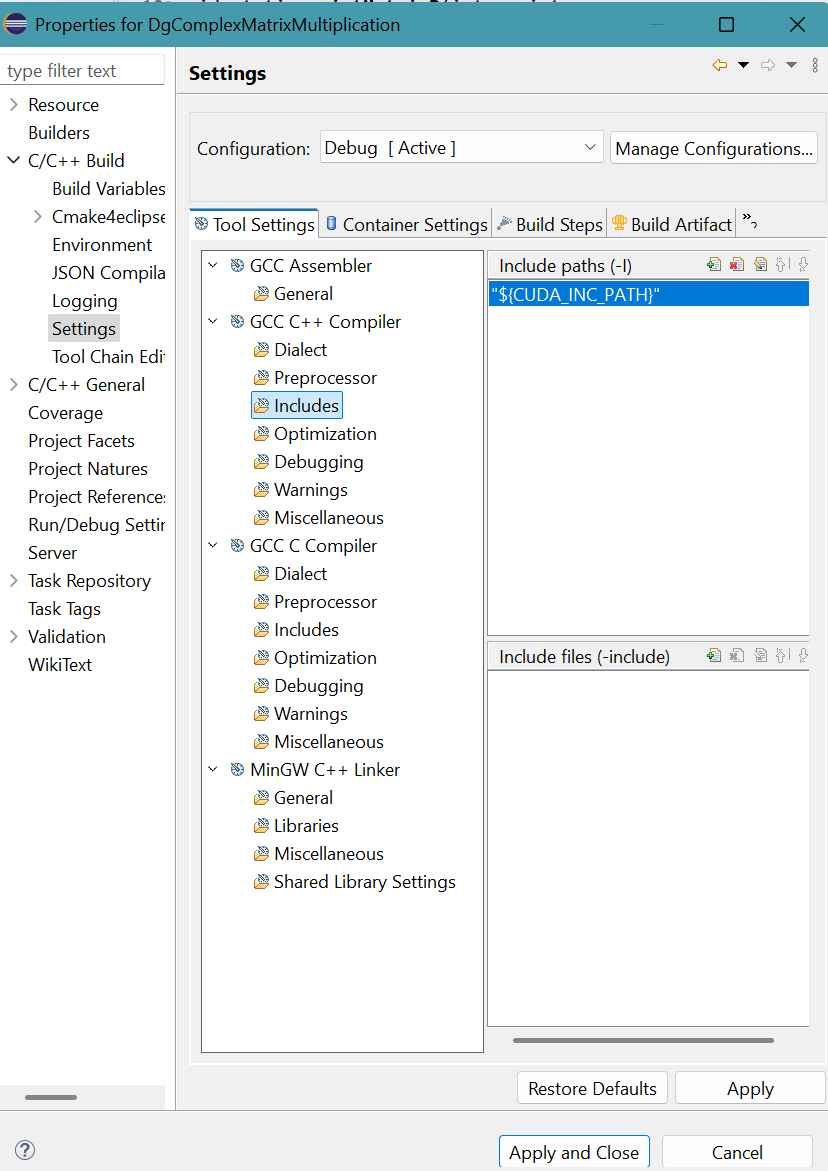
Click + symbol in top part of Include paths (-I). - Add directory path panel appears.
Provide "${CUDA_INC_PATH}" for Directory.
Directory must be enclosed in double quotes because this path contains space characters.Click OK button.
- The result is
Click Apply button.
- A message apears.
Click Rebuild Index button.

- Click Libraries for MinGW C++ Linker in Tool Settings tab.
Provide the three libraries (cusolver.lib, cublas.lib, cudart.lib) and their folder location ("${CUDA_LIB_PATH_64}") to the MinGW C++ Linker.
The result is:Library file names are provided without extension .lib and paths are enclosed in double quotes.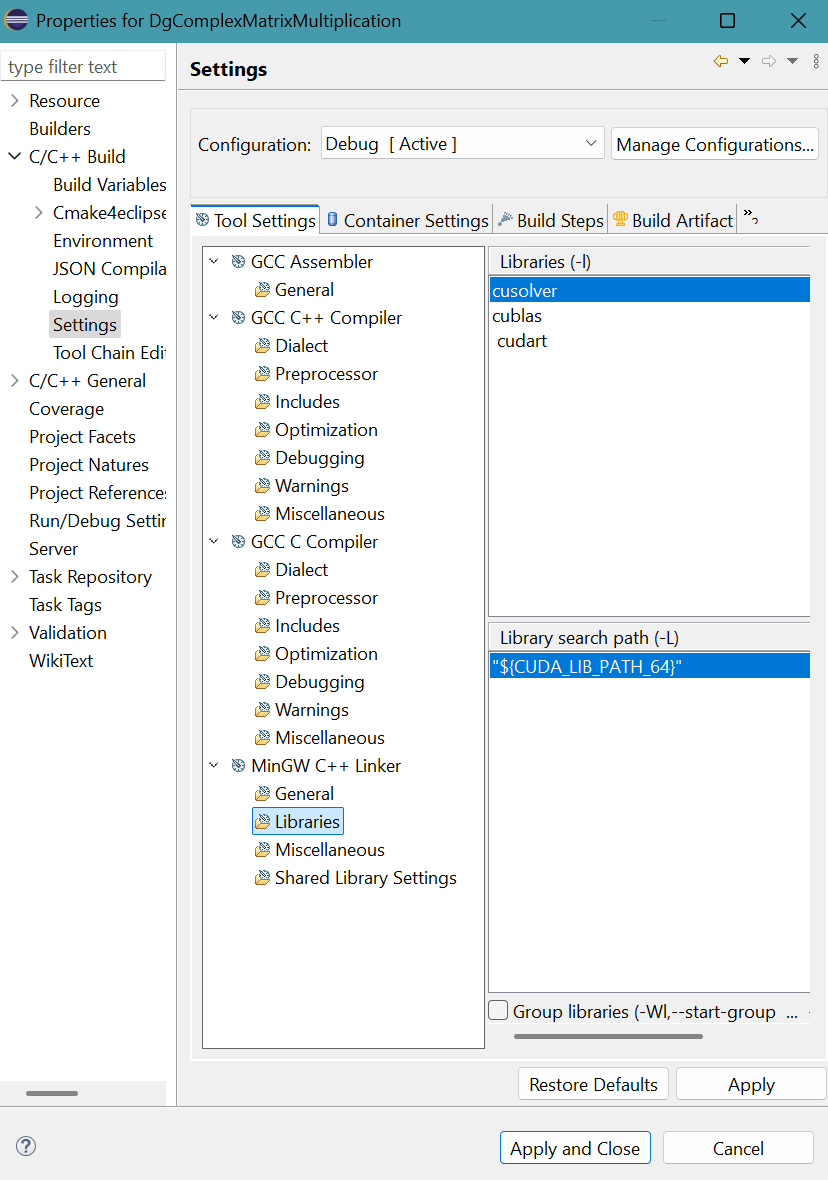
Click Apply and Close button.
- Select Project menu then Build Projet.
A message appears on the CDT Build Console.
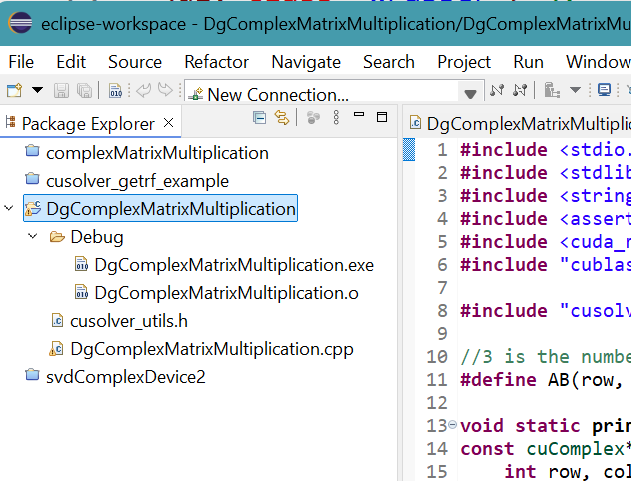 (3X3)(3X2)DgcomplexMatrixMultiplication.exe is generated in Debug folder.
 - Select Run menu then Run.


