NVCC is a proprietary compiler by Nvidia intended
for use with CUDA. CUDA code runs on both the CPU and GPU.
NVCC compiles both *.cu and *.cpp files.
Eclipse IDE in Windows 10 is used for our projects.
Visual Studio Community 2015 with update 3, x64
(Release date: 27/Jun/2016) and
CUDA toolkit 8.0 GA1 (sept 2016) are needed.
*** Outline ***
- User environment variables in Windows 10
- The CUDA C++ 64-bit HelloWorld project with nvcc in MinGW GCC toolchain
- The CUDA C++ 64-bit Sum2Array project with nvcc in MinGW GCC toolchain
- The CUDA C 64-bit bandwidth project with nvcc in MinGW GCC toolchain
- The C++ 64-bit shared library svdComplexDevice1.dll project with nvcc in Microsoft Visual C++ toolchain
- The Mandelbrot project with nvcc in Microsoft Visual C++ toolchain
- Various references
User environment variables in Windows 10
To reduce the numbers of messages during the setup of any 64-bit project, we have already included the six paths into user environment variables (INCLUDE, Path, and LIB) of Windows 10:
-
C:\Program Files (x86)\Microsoft Visual Studio 14.0\VC\include
for cancelling wavy underlines (iostream)
C:\Program Files (x86)\Windows Kits\10\Include\10.0.17763.0\ucrt
for corecrt.h -
C:\Program Files (x86)\Microsoft Visual Studio 14.0\VC\bin\amd64
for the compiler cl.exe -
C:\Program Files (x86)\Microsoft Visual Studio 14.0\VC\lib\amd64
for msvcprt.lib
C:\Program Files (x86)\Windows Kits\10\Lib\10.0.17763.0\um\x64
for kernel32.lib
C:\Program Files (x86)\Windows Kits\10\Lib\10.0.17763.0\ucrt\x64
for ucrt.lib
CUDA C++ 64-bit HelloWorld project with nvcc in MinGW GCC toolchain
- Launch Eclipse IDE for Java Developers.
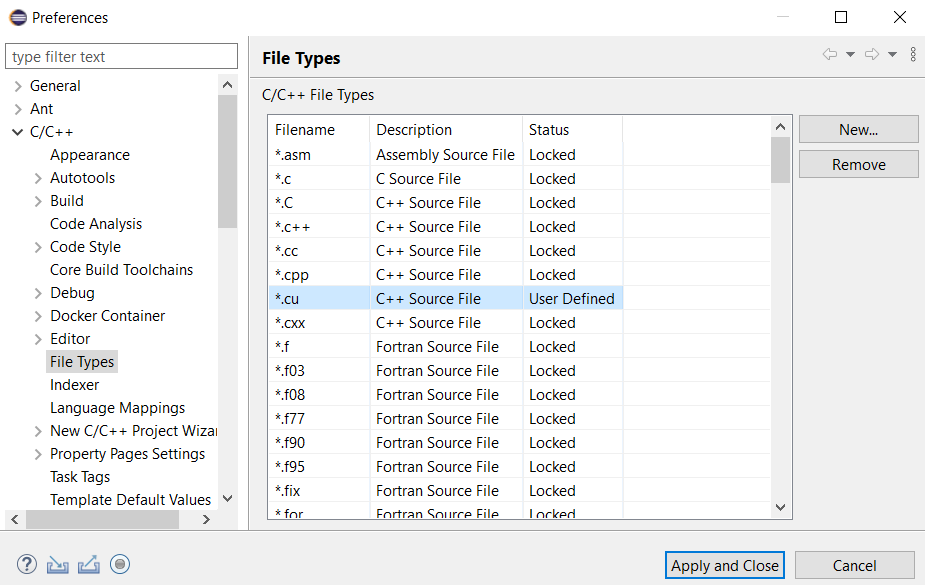
Generation of source file extension .cu. for the eclipse-workspace
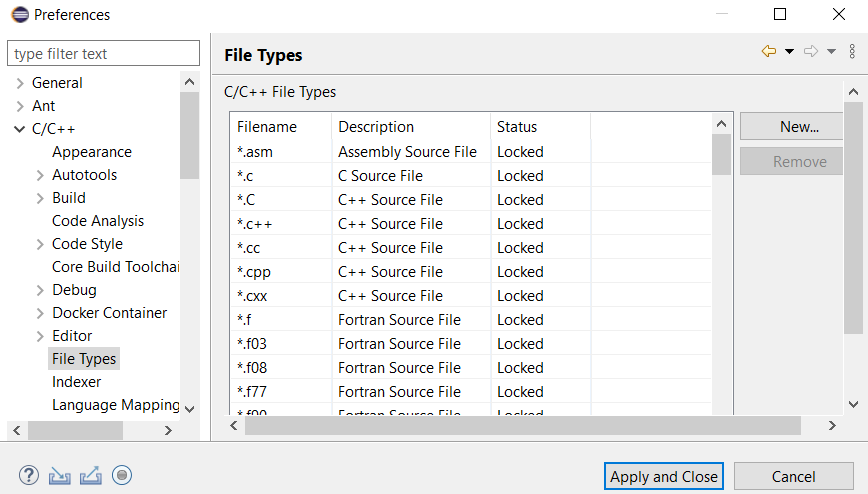
Select Window menu, then Preferences.
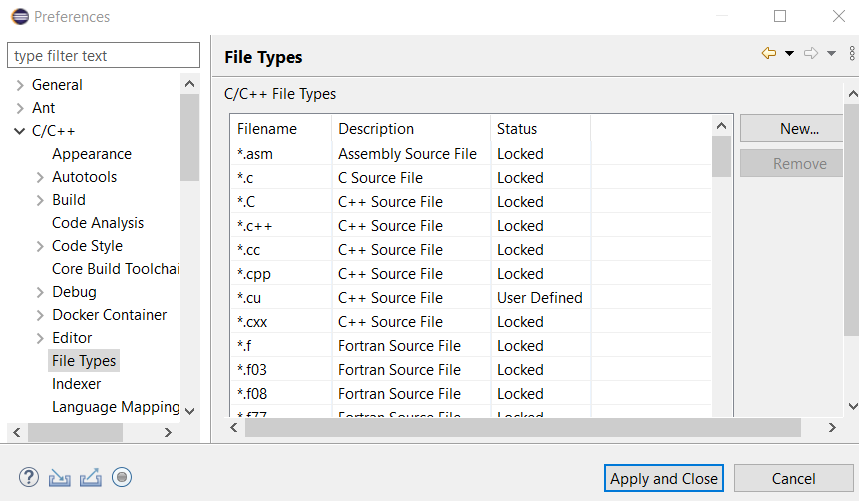
- Click C/C++ then File Types.
- Click New... button.
C/C++ File Type panel appears.Provide *.cu for Pattern.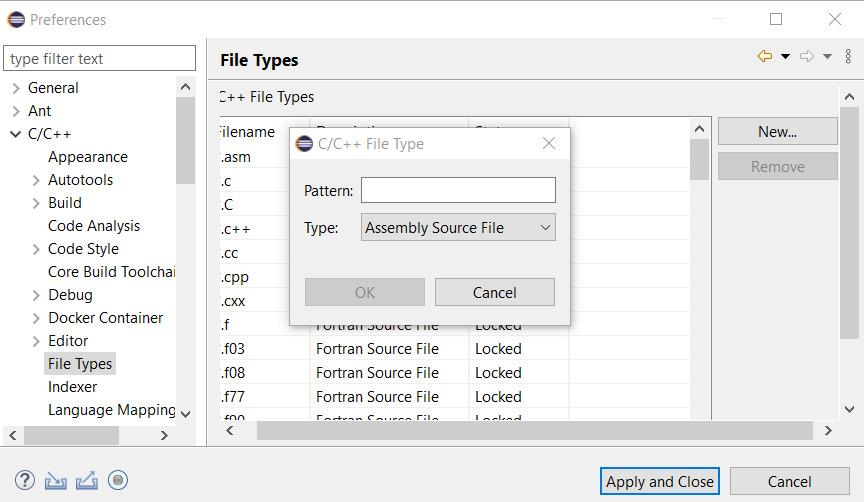
Select C++ Source File for Type choice box.
Click OK button. - Click Apply and Close button.
- Select File menu, then New, finally C/C++ Project.
New C/C++ Project panel appears.
Select C++ Managed Build.Click Next > button.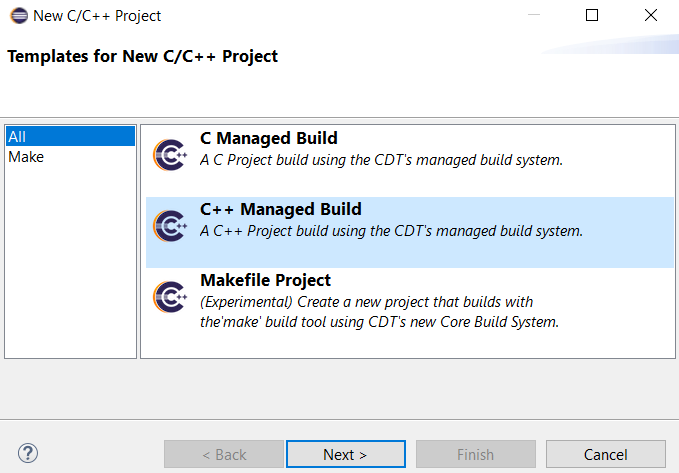
- C++ Project panel appears.
Provide Project name: CppMingw64HWnvcc.
Select Empty Project for Executable.
Select MinGW GCC in toolchains.
Click Finish button. - Project folder CppMingw64HWnvcc appears in Project Explorer.
It contains Includes folder.

- Right click project folder CppMingw64HWnvcc. Select New then Source Folder.
New Source Folder panel appears.
Provide src for Folder name.
Click Finish button. - src folder appears in project folder.
Right click source folder src. Select New then Source File.
New Source File panel appears.
Provide helleocu.cu for Source file.
Click Finish button.
- Copy and paste Hello World program of
Ingemar Ragnemalm
into helleocu.cu.

- Add three include statements:
#include <cuda_runtime.h>
#include <cuda.h>
#include "device_launch_parameters.h"
Press CTRL S for save.Most wavy underlines in the source code desappear.
- Right click CppMingw64HWnvcc project folder in Project Explorer then select Properties.
Properties for CppMingw64HWnvcc panel appears.
Click C/C++ Build then Build Variables.
Provide data using Add... button.
NVCC
File
C:\Program Files\NVIDIA GPU Computing Toolkit\CUDA\v8.0\bin\nvccClick Apply button.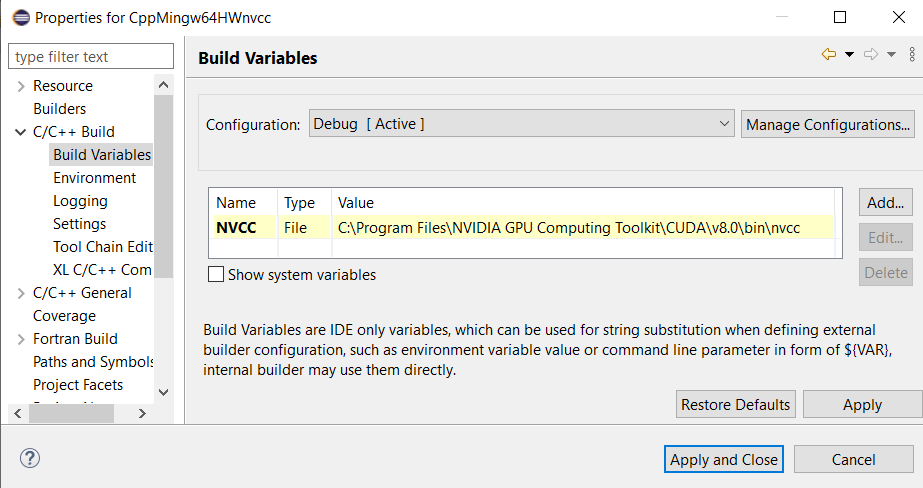
Click Apply and Close button.
- Right click the source file helleocu.cu in Project Explorer, then select Properties.
Properties for helleocu.cu panel appears.
Select C/C++ Build then Settings.
Click Build Steps tab.
Select Apply Custom Build Step Overriding Other Tools in Custom Build Step Applicability choice box.
Provide helleocu.obj for Output file name(s).
Provide ${NVCC} -I "C:\Program Files (x86)\Windows Kits\10\Include\10.0.17763.0\ucrt" "..\src\helleocu.cu" --output-file "src\helleocu.obj" for Command.Click Apply button.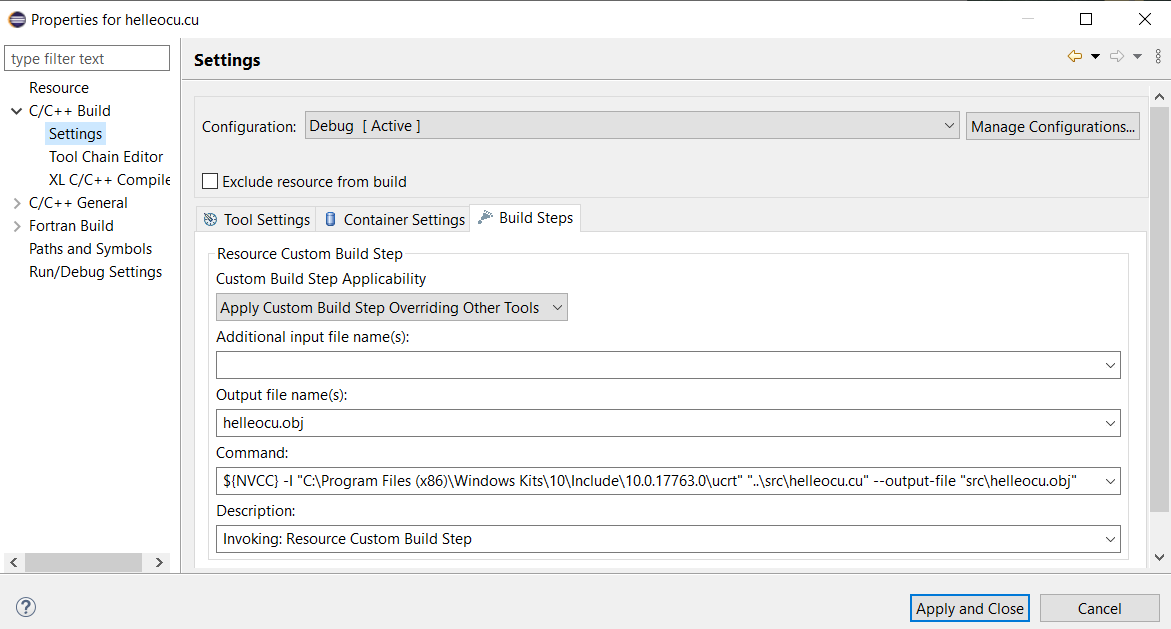
Click Apply and Close button. - Select Project menu then Build Project, or press the hammer icon.
Binaries and Debug folders appear in project folder.A message generated by nvcc compiler is shown on CDT Build Console.
- Right click CppMingw64HWnvcc project in Project Explorer then select Refresh.
More folder and files appear.

- Select Run menu then Run.
Hello World! appears on Console tab.

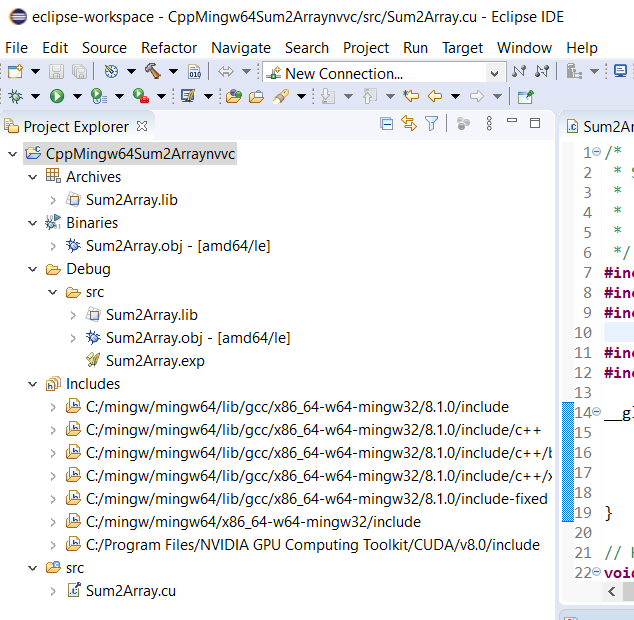
CUDA C++ 64-bit Sum2Array project with nvcc in MinGW GCC toolchain
- Launch Eclipse IDE for Java Developers.
Select File menu, then New, finally C/C++ Project.
New C/C++ Project panel appears.
Select C++ Managed Build.Click Next > button. - C++ Project panel appears.
Provide Project name: CppMingw64Sum2Arraynvcc.
Select Empty Project for Executable.
Select MinGW GCC in toolchains.
Click Finish button. - Project folder CppMingw64Sum2Arraynvcc appears in Project Explorer. It contains Includes folder.
- Right click project folder CppMingw64Sum2Arraynvcc. Select New then Source Folder.
New Source Folder panel appears.
Provide src for Folder name.
Click Finish button. - src folder appears in project folder.
Right click source folder src. Select New then Source File.
New Source File panel appears.
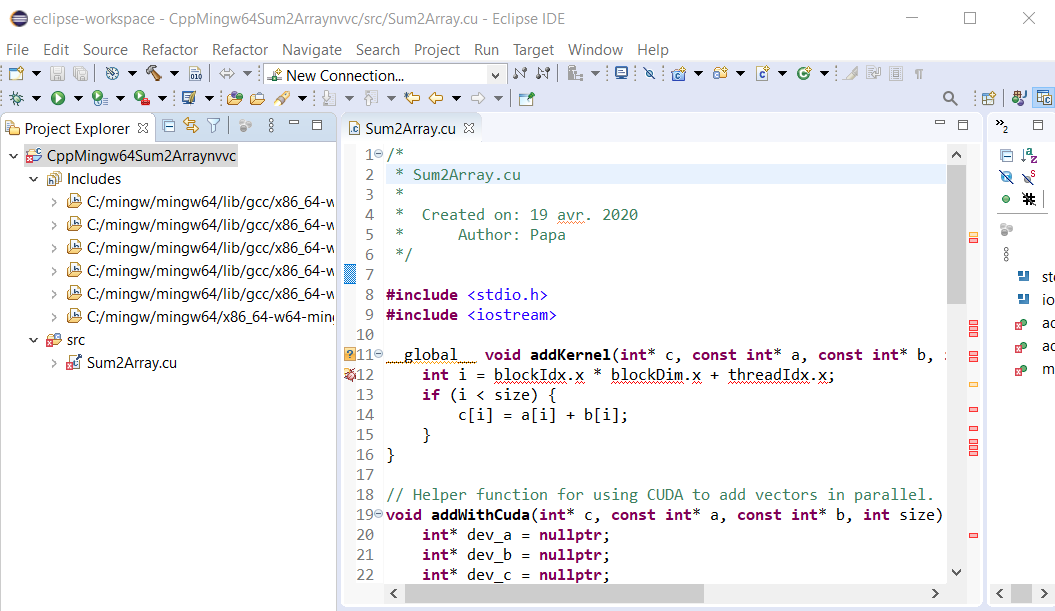
Provide Sum2Array.cu for Source file.
Click Finish button. - Copy and paste Sum2Array program from
RTP Tutorial
into Sum2Array.cu.
- Right click CppMingw64Sum2Arraynvcc project folder in Project Explorer then select Properties.
Properties for CppMingw64Sum2Arraynvcc panel appears.
Click C/C++ Build then Build Variables.
Provide data using Add... button.
CUDA_INC_PATH
Path
C:\Program Files\NVIDIA GPU Computing Toolkit\CUDA\v8.0\include
NVCC
File
C:\Program Files\NVIDIA GPU Computing Toolkit\CUDA\v8.0\bin\nvcc
INCLUDE
Path
C:\Program Files (x86)\Windows Kits\10\Include\10.0.17763.0\ucrtClick Apply button.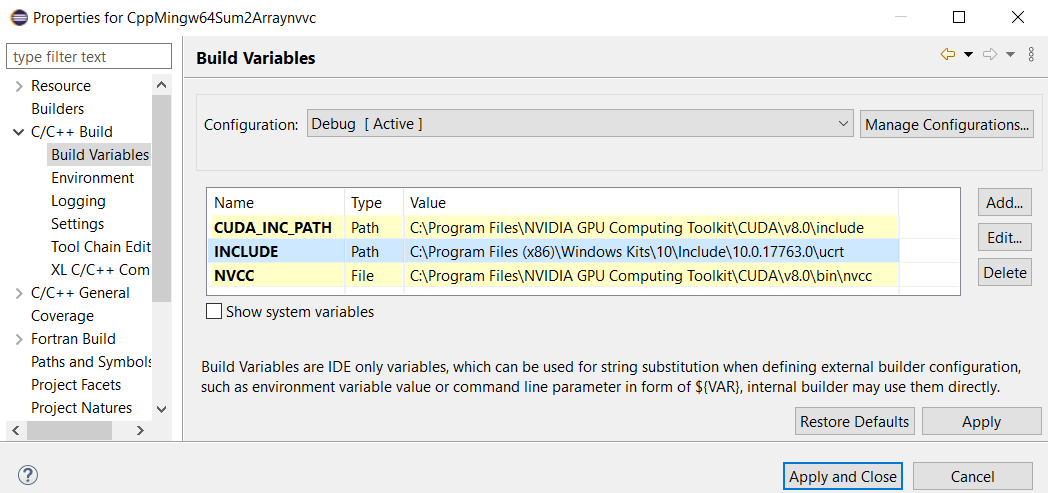
-
Click Settings in C/C++ Build.
Click Includes for GCC C++ Compiler in Tool Settings tab.
Add "${CUDA_INC_PATH}" in Include paths (-I).Click Apply button.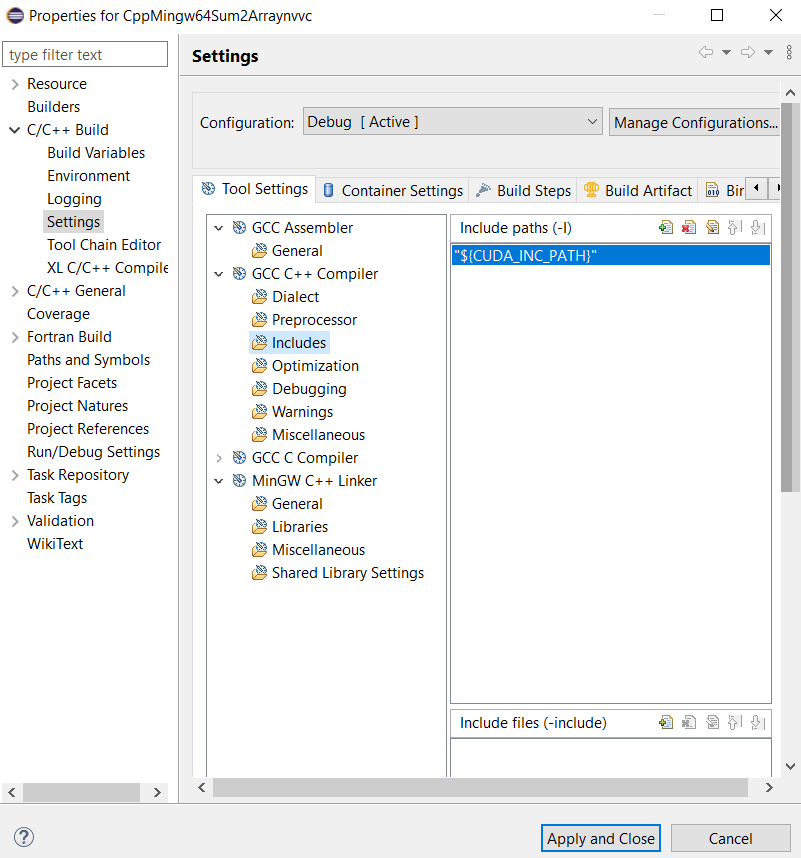
Click Apply and Close button. - Add three include statements:
#include <cuda_runtime.h>
#include <cuda.h>
#include "device_launch_parameters.h"
Press CTRL S for save.Thanks to the four include statements (one in Settings and three in the source code), most wavy underlines in source code desappear.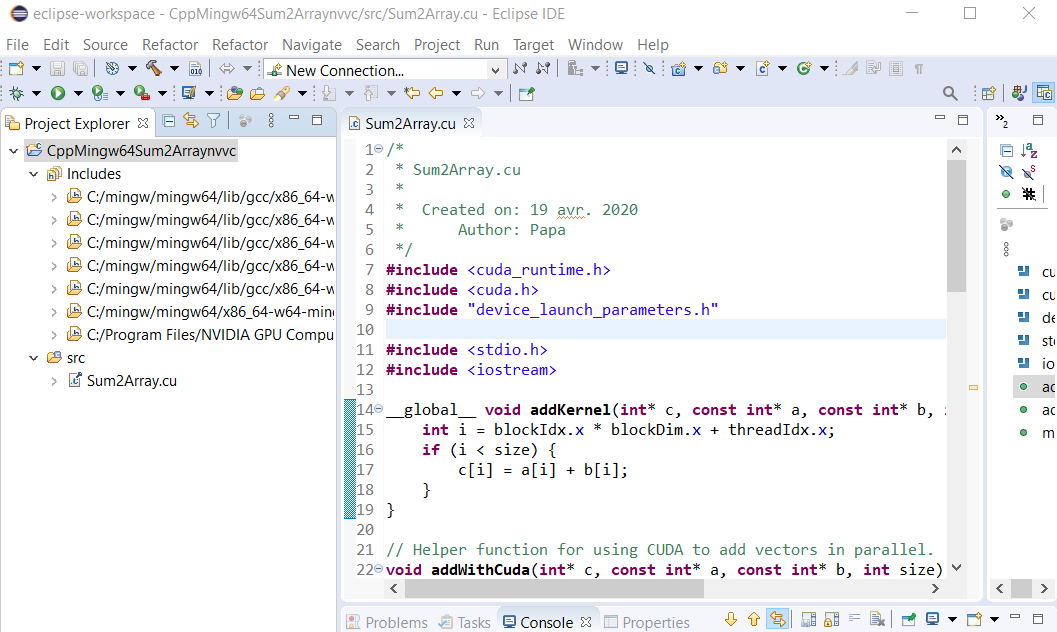
- Right click the source file Sum2Array.cu in Project Explorer,
then select Properties.
Properties for Sum2Array.cu panel appears.
Select C/C++ Build then Settings.
Click Build Steps tab.
Select Apply Custom Build Step Overriding Other Tools in Custom Build Step Applicability choice box.
Provide Sum2Array.obj for Output file name(s).
Provide ${NVCC} -I "${INCLUDE}" "..\src\Sum2Array.cu" -o "src\Sum2Array.obj" for Command.Click Apply button.
Click Apply and Close button. - Select Project menu then Build Project, or press the hammer icon.
Binaries and Debug folders appear in project folder.A message generated by nvcc compiler is shown on CDT Build Console.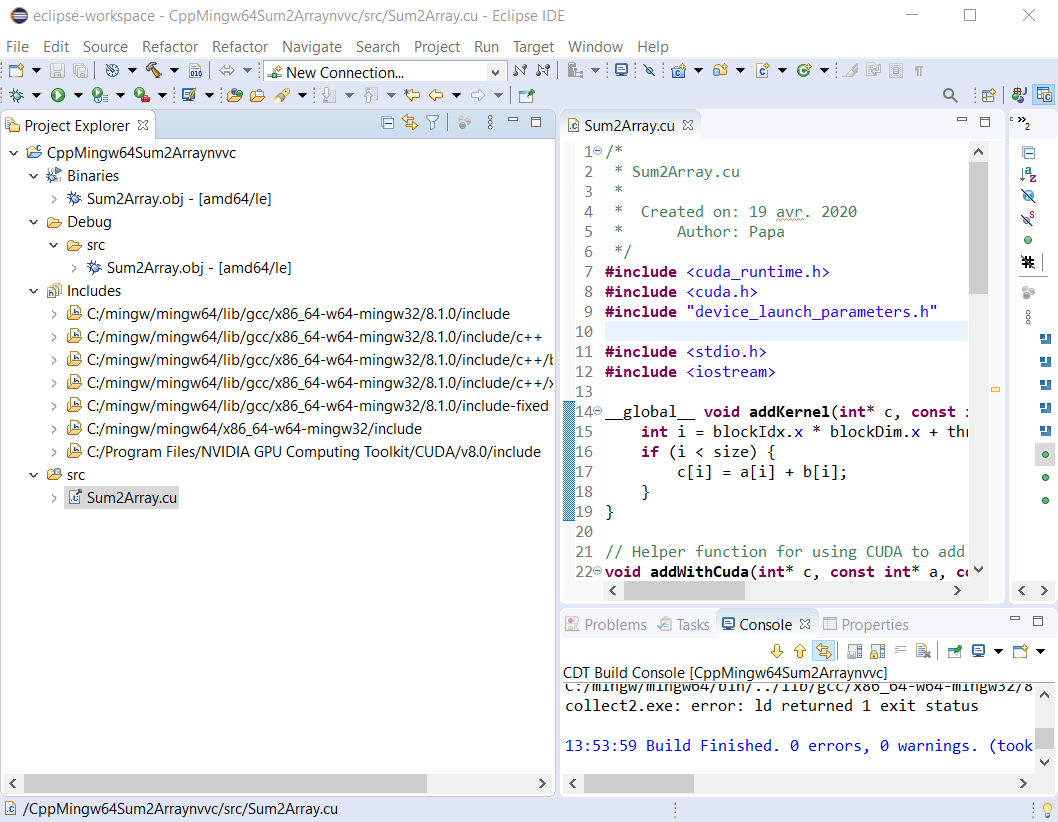
- Right click CppMingw64HWnvcc project in Project Explorer then select Refresh.
More folder and files appear.
- Select Run menu then Run.
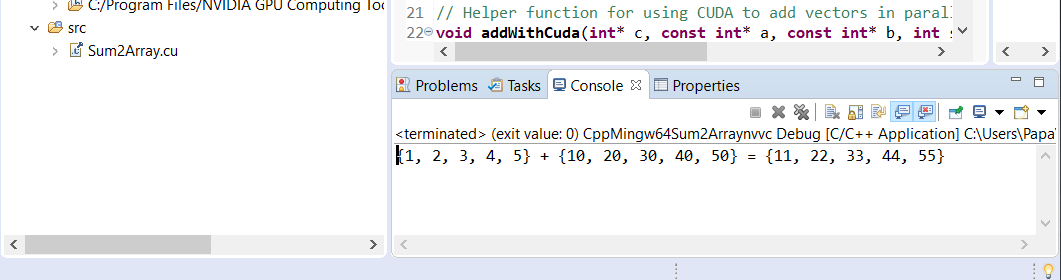
Array addition appears on Console tab.
CUDA C 64-bit bandwidth project with nvcc in MinGW GCC toolchain
- Launch Eclipse IDE for Java Developers.
Select File menu, then New, finally C/C++ Project.
New C/C++ Project panel appears.
Select C Managed Build.Click Next > button.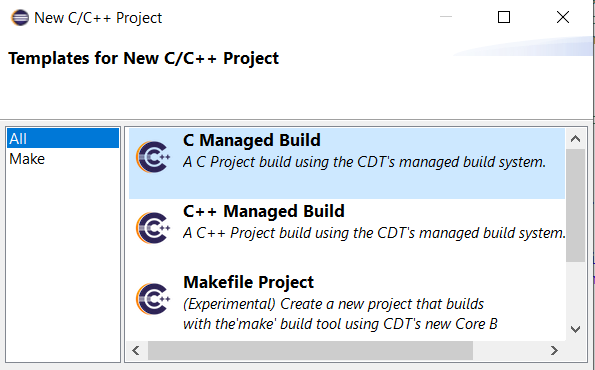
- C Project panel appears.
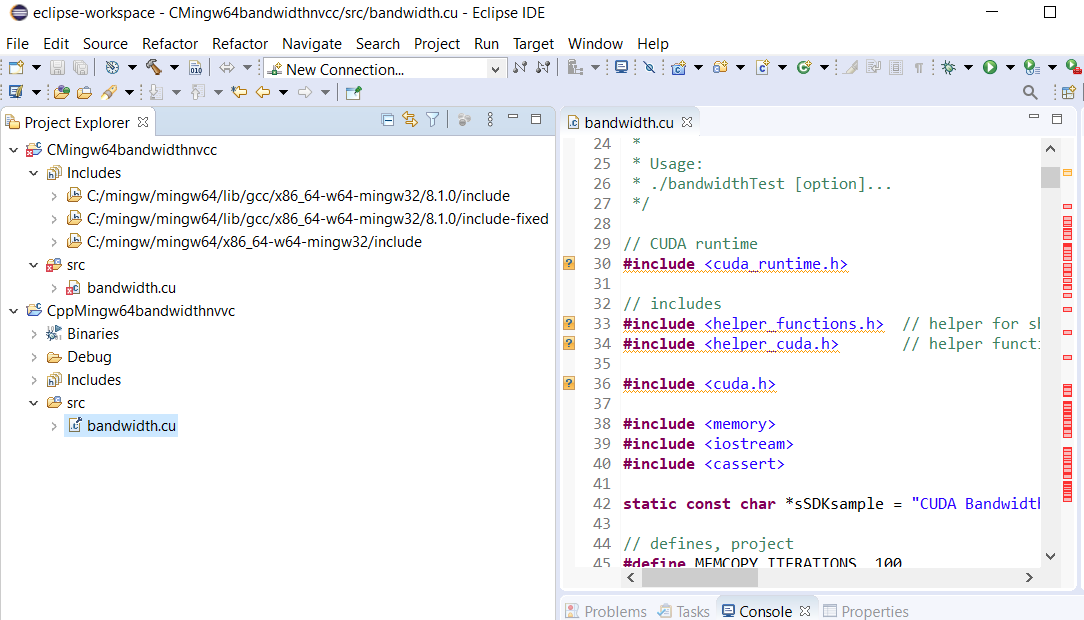
Provide Project name: CMingw64bandwidthnvcc.
Select Empty Project for Executable.
Select MinGW GCC in Toolchains.
Click Finish button. - Project folder CMingw64bandwidthnvcc appears in Project Explorer. It contains Includes folder.
- Right click project folder CMingw64bandwidthnvcc. Select New then Source Folder.
New Source Folder panel appears.
Provide src for Folder name.
Click Finish button. - src folder appears in project folder.
Right click source folder src. Select New then Source File.
New Source File panel appears.
Provide bandwidth.cu for Source file.
Click Finish button. - Copy and paste the file C:\ProgramData\NVIDIA Corporation\CUDA Samples\v8.0\1_Utilities\bandwidthTest\bandwidthTest.cu into the empty source file.
- Right click CMingw64bandwidthnvcc project folder in Project Explorer then select Properties.
Properties for CMingw64bandwidthnvcc panel appears.
Click C/C++ Build then Build Variables.
Provide data using Add... button.
NVCC
File
C:\Program Files\NVIDIA GPU Computing Toolkit\CUDA\v8.0\bin\nvcc
INCLUDE
INCLUDE1
Path
C:\ProgramData\NVIDIA Corporation\CUDA Samples\v8.0\common\inc
CUDA_INC_PATH
Path
C:\Program Files\NVIDIA GPU Computing Toolkit\CUDA\v8.0\include
CUDA_LIB_PATH_64
Path
C:\Program Files\NVIDIA GPU Computing Toolkit\CUDA\v8.0\lib\x64Click Apply button.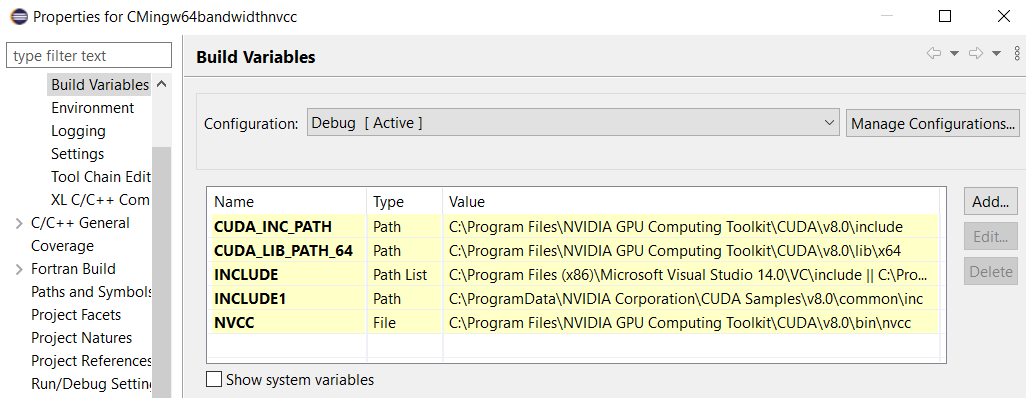
- Click Settings in C/C++ Build.
Click Includes for GCC C Compiler in Tool Settings tab.
Add "${CUDA_INC_PATH}", "${INCLUDE}", and "${INCLUDE1}" in Include paths (-I).Click Apply button.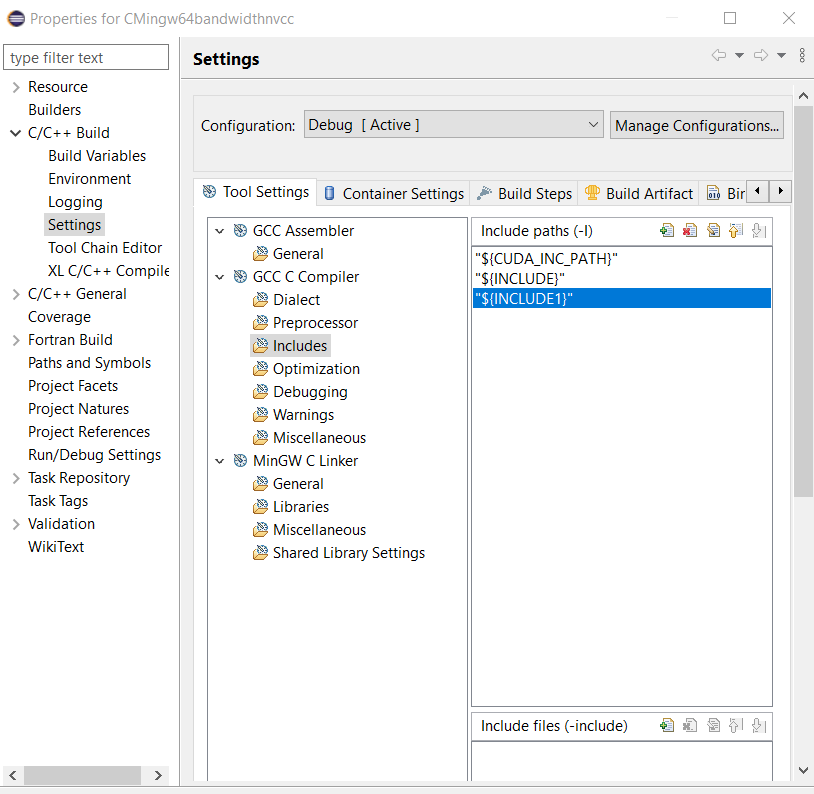
- Click Libraries for MinGW C Linker in Tool Settings tab.
Add cudart_static in Libraries (-I).
Add "${CUDA_LIB_PATH_64}" in Library search path paths (-L).
Click Apply button.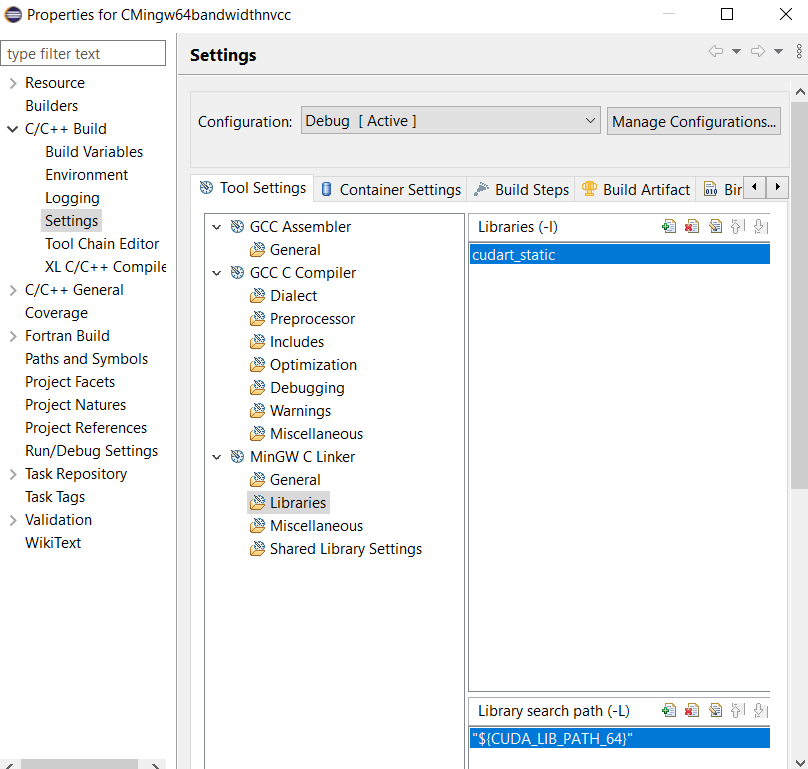
Click Apply and Close button. - Right click the source file bandwidth.cu in Project Explorer,
then select Properties.
Properties for bandwidth.cu panel appears.
Select C/C++ Build then Settings.
Click Build Steps tab.
Select Apply Custom Build Step Overriding Other Tools in Custom Build Step Applicability choice box.
Provide bandwidth.o for Output file name(s).
Provide ${NVCC} -Wno-deprecated-gpu-targets -I "${INCLUDE}" -I "${INCLUDE1}" "..\src\bandwidth.cu" -o "src\bandwidth.o" for Command.Click Apply button.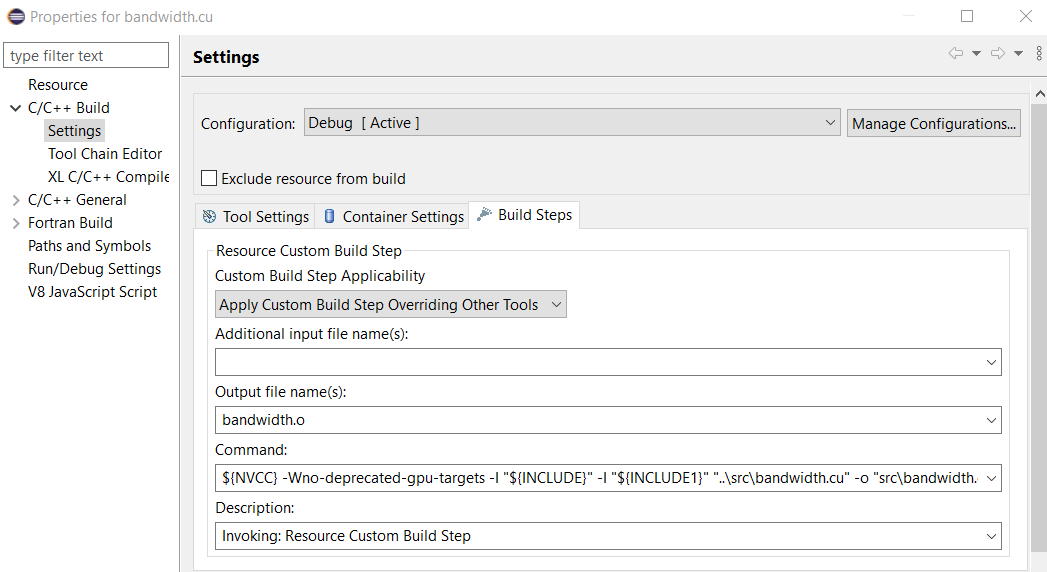
Click Apply and Close button. - Select Project menu then Build Project, or press the hammer icon.
Binaries and Debug folders appear in project folder.A message generated by nvcc compiler is shown on CDT Build Console.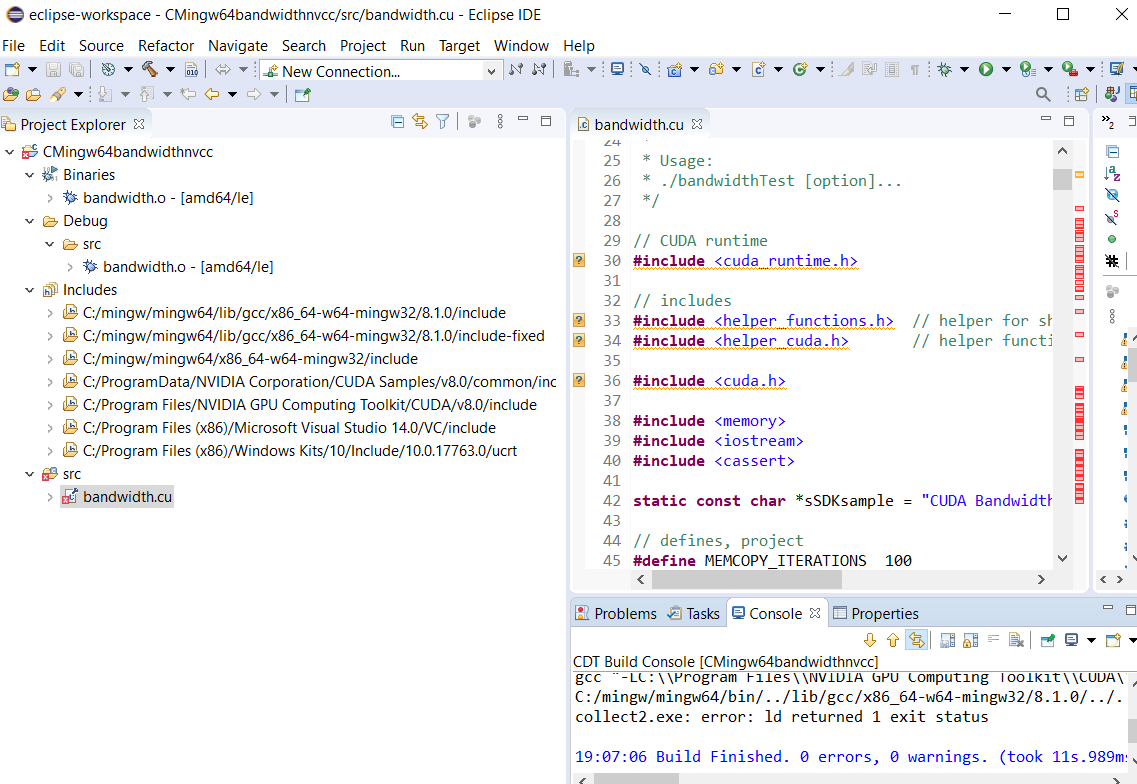
- Right click CMingw64bandwidthnvcc project in Project Explorer then select Refresh.
More folder and files appear.
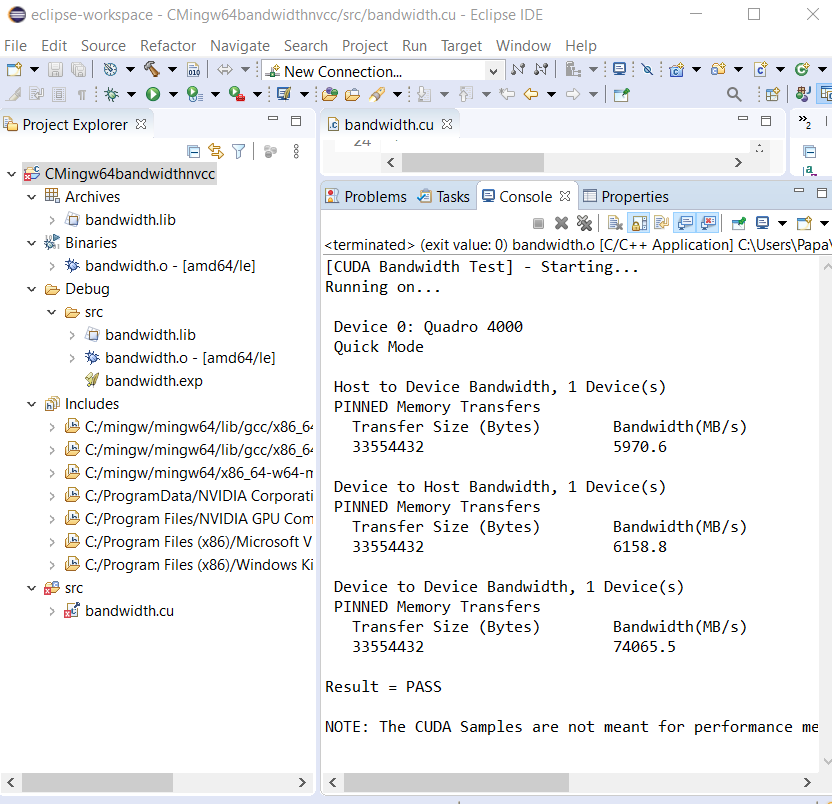
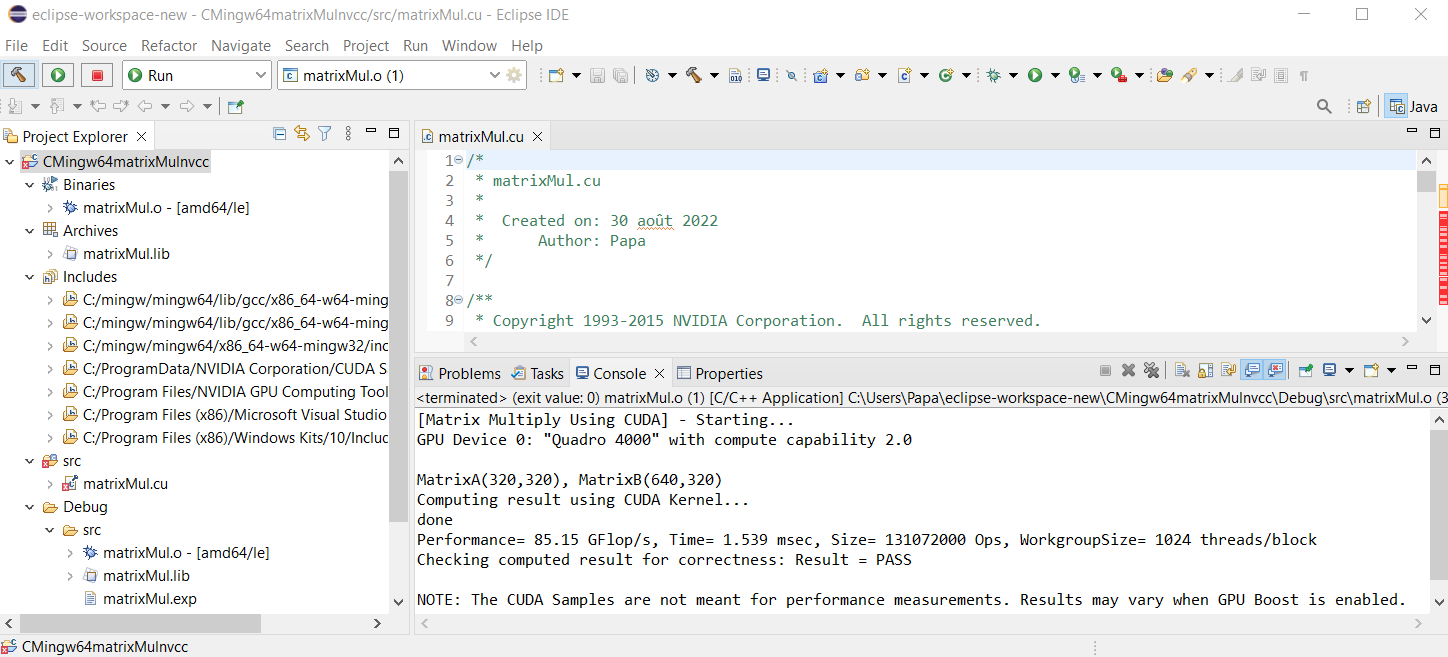
- Select Run menu then Run.
Click Local C/C++ Application.

Click OK button. - Data appear on Console tab.
- Identical procedure applied to matrixMul.cu generates:
- Right click the source file matrixMul.cu in Project Explorer,
then select Properties.
Properties for matrixMul.cu panel appears.
Select C/C++ Build then Settings.
Click Build Steps tab.
Select Apply Custom Build Step Overriding Other Tools in Custom Build Step Applicability choice box.
Provide matrixMul.o for Output file name(s).
Provide ${NVCC} -Wno-deprecated-gpu-targets -I "${INCLUDE}" -I "${INCLUDE1}" "..\src\matrixMul.cu" -o "src\matrixMul.o" for Command.Click Apply button.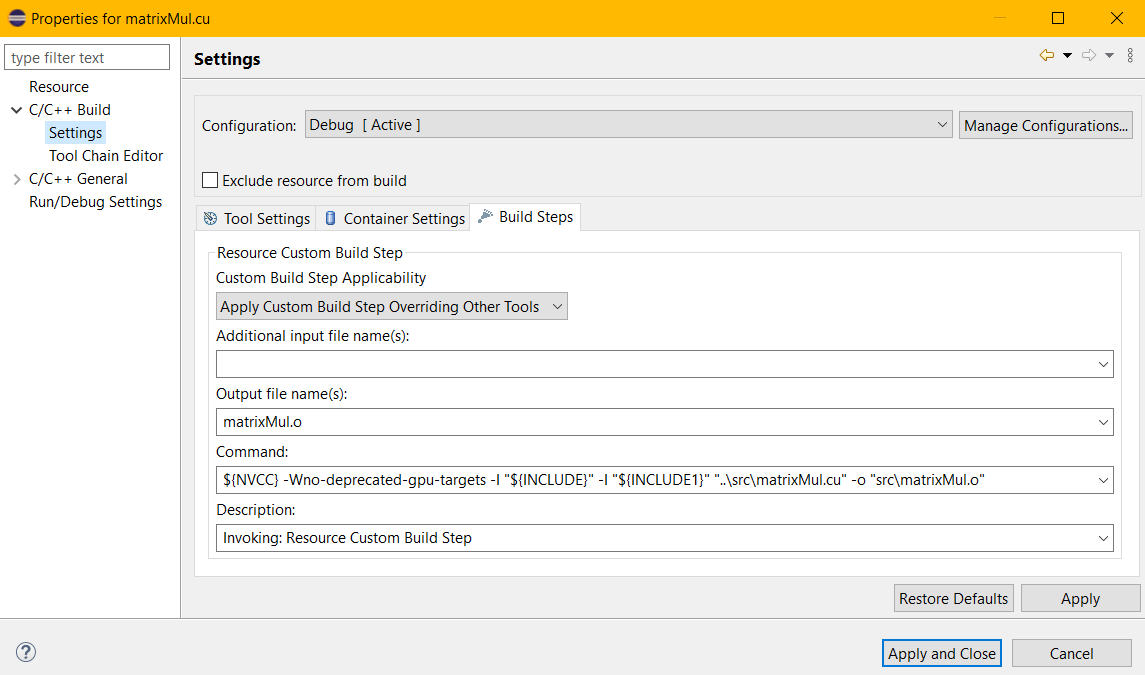
Click Apply and Close button. - Select Project menu then Build Project, or press the hammer icon.
Binaries and Debug folders appear in project folder.A message generated by nvcc compiler is shown on CDT Build Console.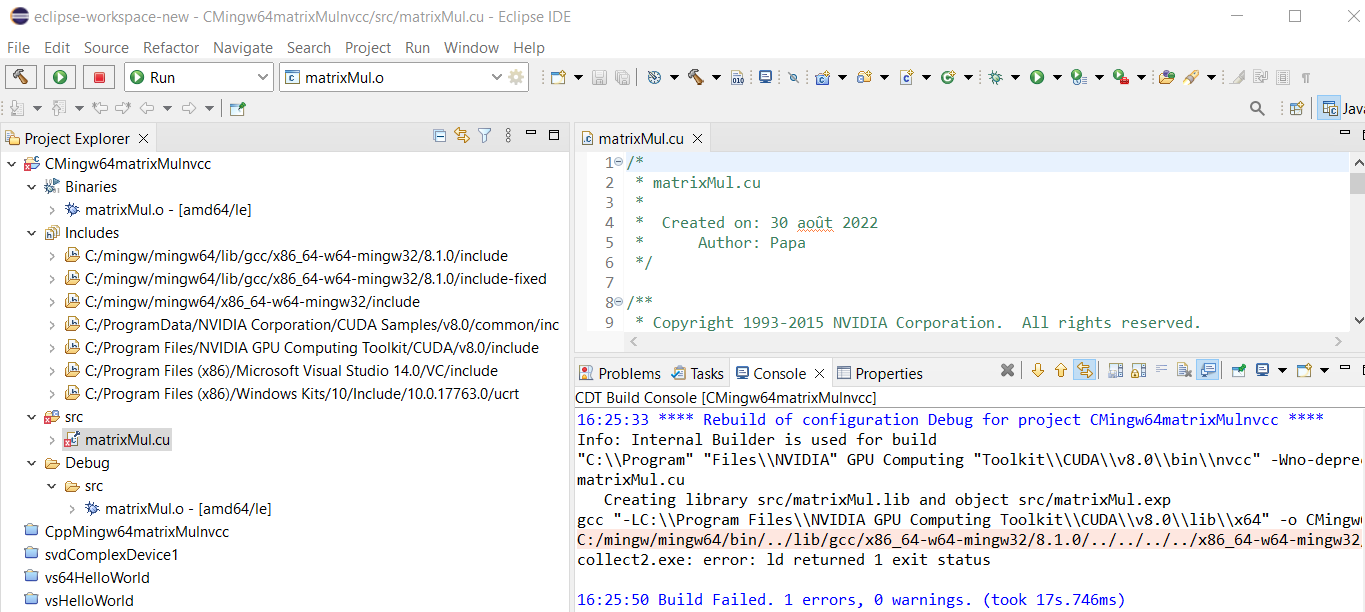
- Select Run menu then Run.
Click Local C/C++ Application.
Click OK button.
Data appear on Console tab.
C++ 64-bit shared library svdComplexDevice1.dll project with nvcc in Microsoft Visual C++ toolchain
- The svdComplexDevice1.dll project is that
obtained with Microsoft Visual C++ toolchain in Eclipe IDE for Java Developers:
Now, we use Nvidia nvcc compiler to rebuild this project.

- Right click svdComplexDevice1 project in Explorer Project then select Properties.
Properties for svdComplexDevice1 panel appears.
Click C/C++ Build then Build Variables.
Click Add... button.
Add NVCC
File
C:\Program Files\NVIDIA GPU Computing Toolkit\CUDA\v8.0\bin\nvccClick Apply button.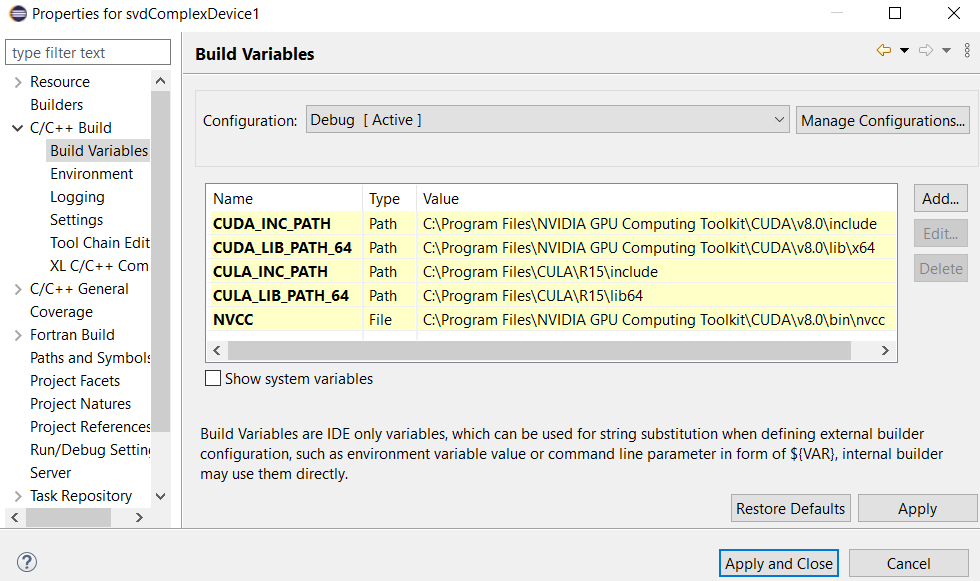
- Click Settings.
The four include folders are shown: "${CULA_INC_PATH}", "${CUDA_INC_PATH}", "C:\Program Files (x86)\Microsoft Visual Studio 14.0\VC\include", and "C:\Program Files (x86)\Windows Kits\10\Include\10.0.17763.0\ucrt"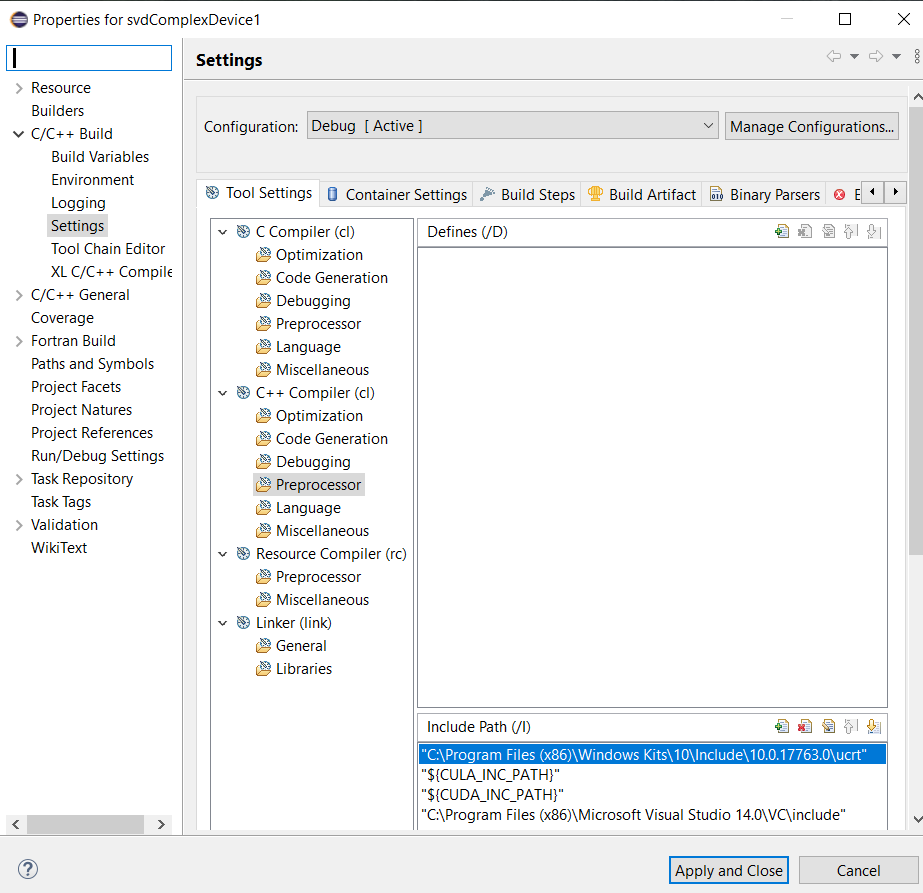
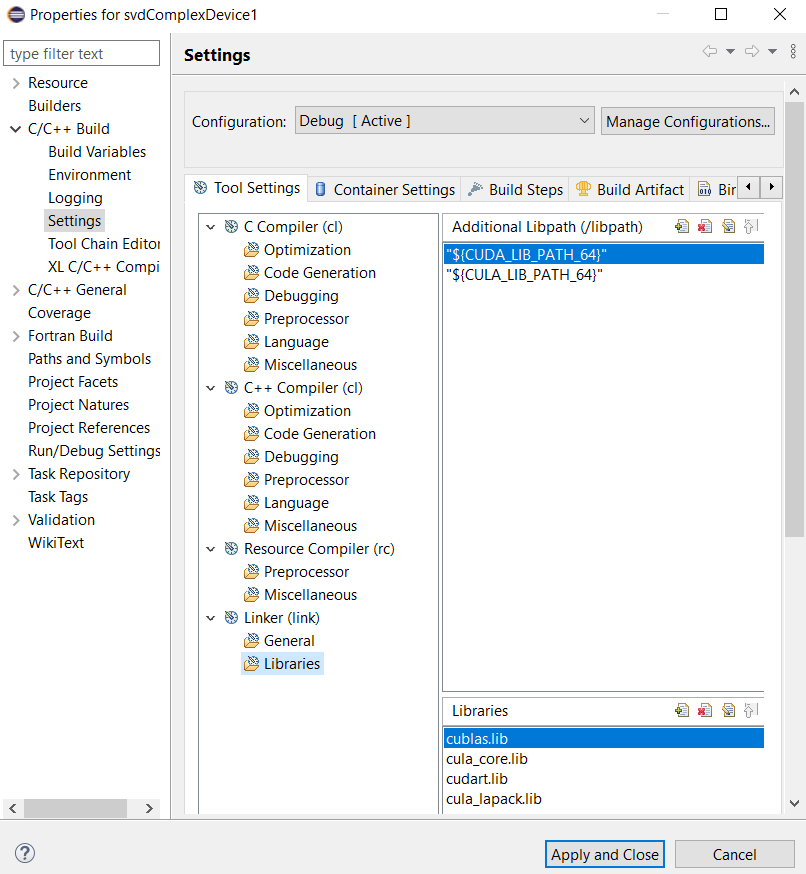
- Similarly, files and paths associated with Linker (link) remain unchanged:
Click Apply and Close button.
- The project must be cleaned. Select Project menu, then Clean...
Clean panel appears.
Tick the project.Click Clean button.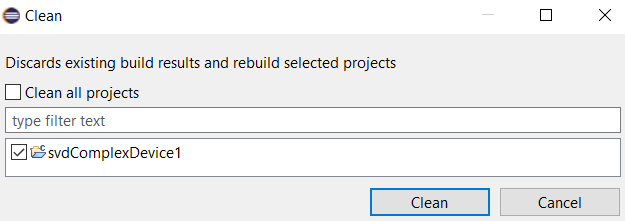
- The project folder contains two files only.

- Right click the source file svdComplexDevice1.cpp in Project Explorer, then select Properties.
Properties for svdComplexDevice1.cpp panel appears.
Select C/C++ Build then Settings.
Click Build Steps tab.
Select Apply Custom Build Step Overriding Other Tools in Custom Build Step Applicability choice box.
Provide svdComplexDevice1.obj for Output file name(s).
Provide ${NVCC} -I "${CULA_INC_PATH}" -I "${CUDA_INC_PATH}" -c "..\svdComplexDevice1.cpp" -o "svdComplexDevice1.obj" for Command.Click Apply button.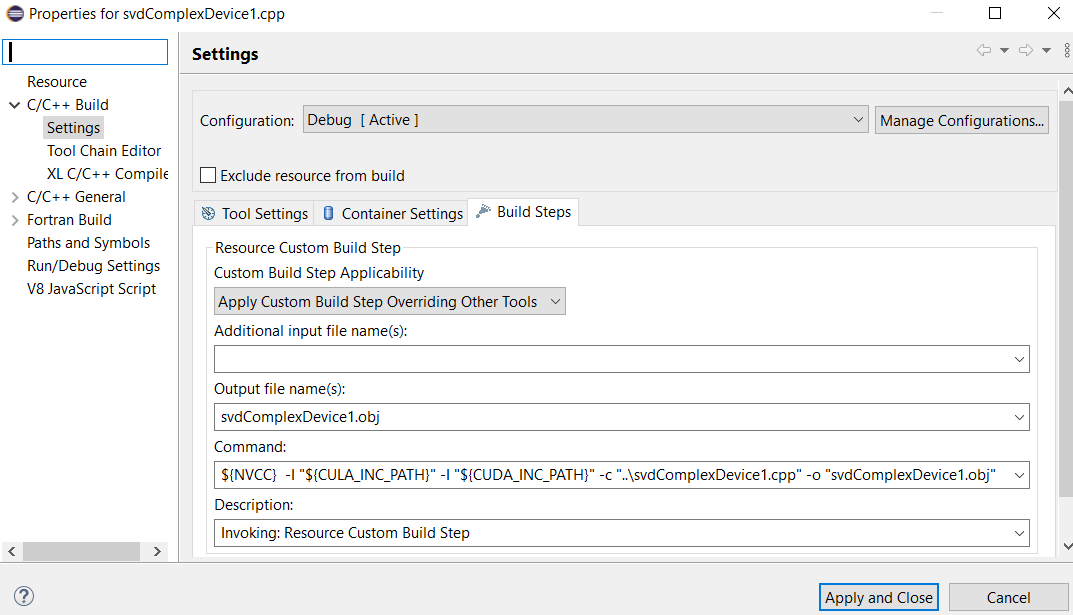
Click Apply and Close button. - Select Project menu then Build Project, or press the hammer icon.
Archives, Binaries, and Debug folders appear in project folder.
There is no Include folder.
64-bit shared library svdComplexDevice1.dll is in Debug folder.The message generated by the compiler is shown on CDT Build Console.
Mandelbrot project with nvcc in Microsoft Visual C++ toolchain
- Launch Eclipse IDE for C/C++ Developers.
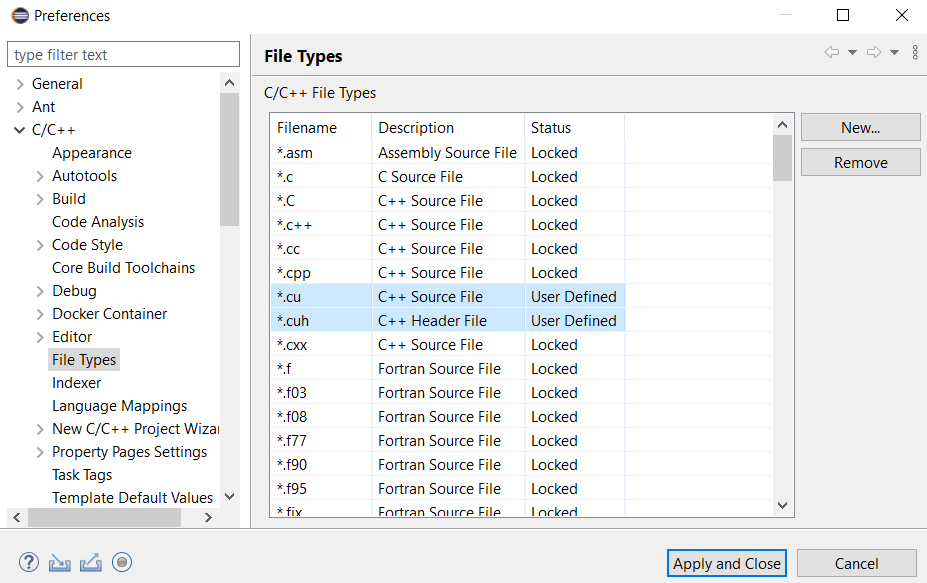
Generation of header file extension .cuh. for the eclipse-workspace
Select Window menu, then Preferences. - Click C/C++ then File Types.
- Click New... button.
C/C++ File Type panel appears.Provide *.cuh for Pattern.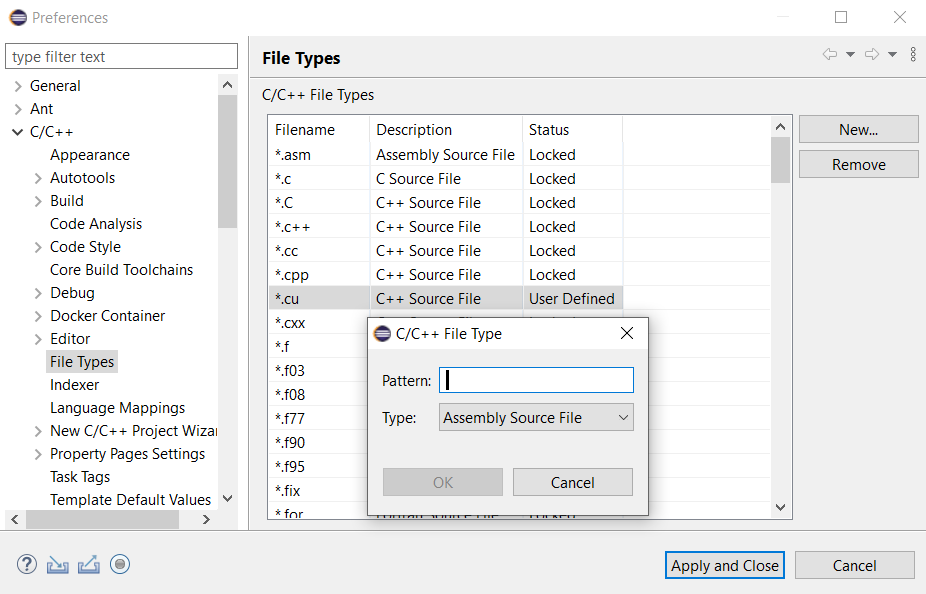
Select C++ Header File for Type choice box.
Click OK button. - Click Apply and Close button.
- Select File menu, then New, finally C/C++ Project.
New C/C++ Project panel appears. Select C++ Managed Build.Click Next > button.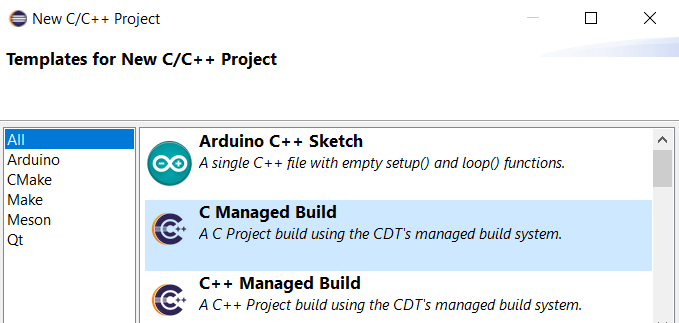
- C++ Project panel appears.
Provide Project name: CppVS64Mandelbrotnvcc
Select Empty Project in Executable.
Select Microsoft Visual C++ in Toolchains.
Click Finish button. - Right click the folder of CppVS64Mandelbrotnvcc in Project Explorer.
Select New, then Source Folder.
Provide the name src for Folder name.
Click Finish button. - Right click the folder src of CppVS64Mandelbrotnvcc in Project Explorer.
Select New, then Source File.
Provide the name for Source file: Mandelbrot_cuda.cu
Click Finish button. - Copy and paste the file C:\ProgramData\NVIDIA Corporation\CUDA Samples\v8.0\2_Graphics\Mandelbrot\Mandelbrot_cuda.cu into the empty source file.Press Ctrl S to save Mandelbrot_cuda.cu.
- Right click the folder src of CppVS64Mandelbrotnvcc in Project Explorer.
Select New, then Source File.
Provide the name for Source file: Mandelbrot.cpp
Click Finish button. - Copy and paste the file C:\ProgramData\NVIDIA Corporation\CUDA Samples\v8.0\2_Graphics\Mandelbrot\Mandelbrot.cpp into the empty source file.Press Ctrl S to save Mandelbrot.cpp.
- Right click the folder src of CppVS64Mandelbrotnvcc in Project Explorer.
Select New, then Source File.
Provide the name for Source file: Mandelbrot_gold.cpp
Click Finish button. - Copy and paste the file C:\ProgramData\NVIDIA Corporation\CUDA Samples\v8.0\2_Graphics\Mandelbrot\Mandelbrot_gold.cpp into the empty source file.Press Ctrl S to save Mandelbrot_gold.cpp.
- Right click the folder src of CppVS64Mandelbrotnvcc in Project Explorer.
Select New, then Header File.
Provide the name for Header file: Mandelbrot_kernel.cuh
Click Finish button. - Copy and paste the file C:\ProgramData\NVIDIA Corporation\CUDA Samples\v8.0\2_Graphics\Mandelbrot\Mandelbrot_kernel.cuh into the empty header file.Press Ctrl S to save Mandelbrot_kernel.cuh.
- Right click the folder src of CppVS64Mandelbrotnvcc in Project Explorer.
Select New, then Header File.
Provide the name for Header file: Mandelbrot_gold.h
Click Finish button. - Copy and paste the file C:\ProgramData\NVIDIA Corporation\CUDA Samples\v8.0\2_Graphics\Mandelbrot\Mandelbrot_gold.h into the empty header file.Press Ctrl S to save Mandelbrot_gold.h.
- Right click the folder src of CppVS64Mandelbrotnvcc in Project Explorer.
Select New, then Header File.
Provide the name for Header file: Mandelbrot_kernel.h
Click Finish button. - Copy and paste the file C:\ProgramData\NVIDIA Corporation\CUDA Samples\v8.0\2_Graphics\Mandelbrot\Mandelbrot_kernel.h into the empty header file.Press Ctrl S to save Mandelbrot_kernel.h.

- Right click CppVS64Mandelbrotnvcc project folder in Project Explorer, then select Properties.
Properties for CppVS64Mandelbrotnvcc panel appears.
Click C/C++ Build then Build Variables.
Provide data using Add... button.
CUDA_INC_PATH
Path
C:\Program Files\NVIDIA GPU Computing Toolkit\CUDA\v8.0\include
CUDA_LIB_PATH_64
Path
C:\Program Files\NVIDIA GPU Computing Toolkit\CUDA\v8.0\lib\x64
INCLUDE2
Path
C:\ProgramData\NVIDIA Corporation\CUDA Samples\v8.0\common\inc
LIB1
Path
C:\ProgramData\NVIDIA Corporation\CUDA Samples\v8.0\common\lib\x64
NVCC
File
C:\Program Files\NVIDIA GPU Computing Toolkit\CUDA\v8.0\bin\nvccClick Apply button.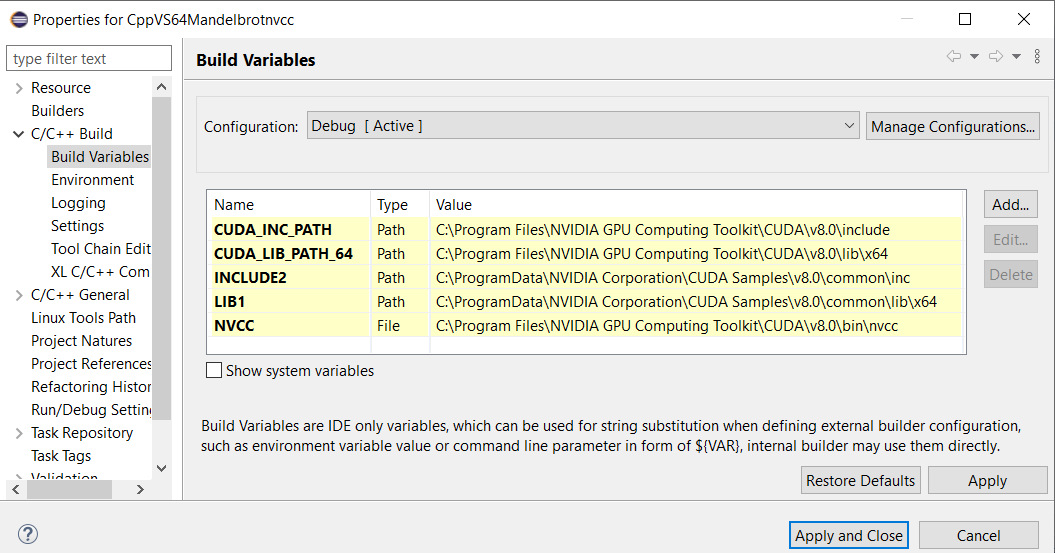
- Click Settings in C/C++ Build.
Click Libraries for Linker (link) in Tool Settings tab.
Provide three libraries (cudart_static.lib, glew64.lib, and freeglut.lib) and their folder location ("${CUDA_LIB_PATH_64}" and "${LIB1}") to the linker.Click Apply button.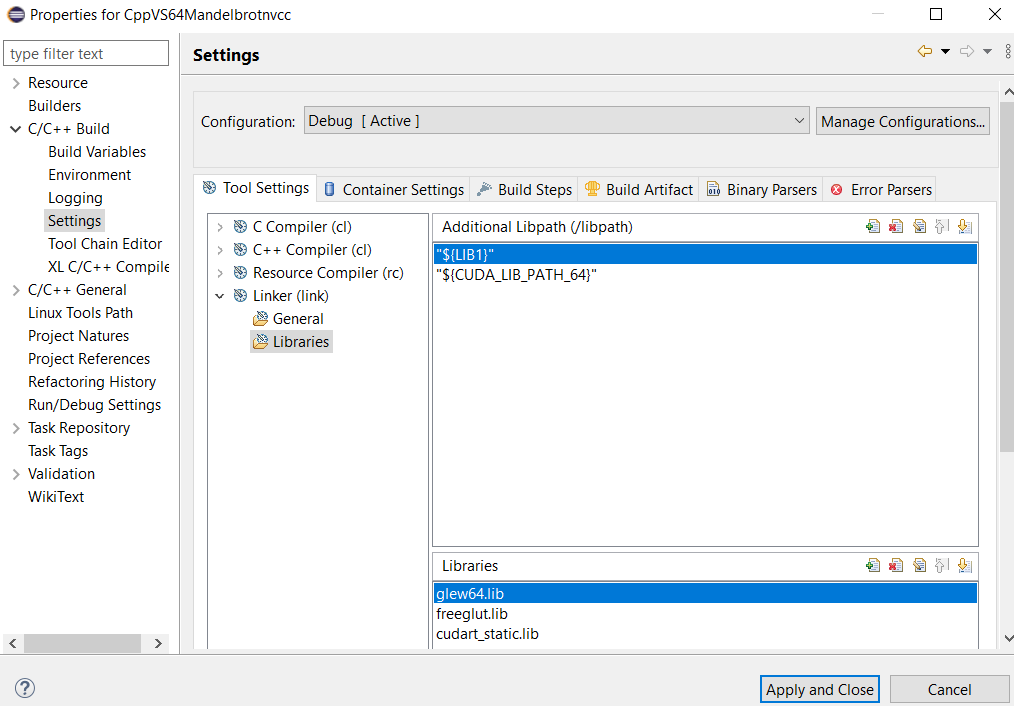
Click Apply and Close button. - Right click the source file Mandelbrot_cuda.cu in Project Explorer, then select Properties.
Properties for Mandelbrot_cuda.cu panel appears.
Select C/C++ Build then Settings.
Click Build Steps tab.
Select Apply Custom Build Step Overriding Other Tools in Custom Build Step Applicability choice box.
Provide Mandelbrot_cuda.obj for Output file name(s).
Provide ${NVCC} -I "${INCLUDE2}" -c "..\src\Mandelbrot_cuda.cu" -o "src\Mandelbrot_cuda.obj" for Command.Click Apply button.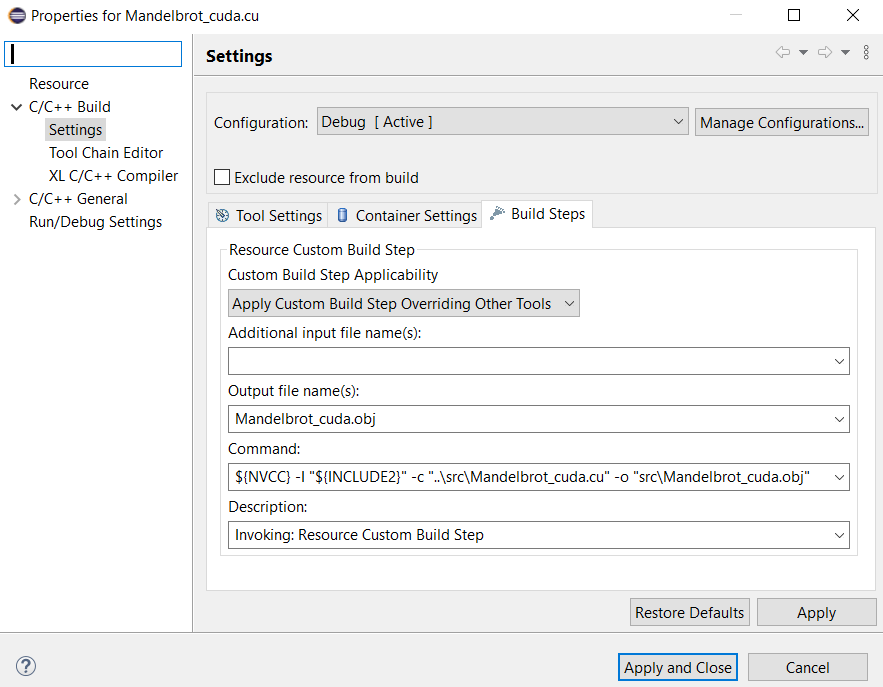
Click Apply and Close button. - Right click the source file Mandelbrot.cpp in Project Explorer, then select Properties.
Properties for Mandelbrot.cpp panel appears.
Select C/C++ Build then Settings.
Click Build Steps tab.
Select Apply Custom Build Step Overriding Other Tools in Custom Build Step Applicability choice box.
Provide Mandelbrot.obj for Output file name(s).
Provide ${NVCC} -I "${INCLUDE2}" -c "..\src\Mandelbrot.cpp" -o "src\Mandelbrot.obj" for Command.
Click Apply button.
Click Apply and Close button. - Right click the source file Mandelbrot_gold.cpp in Project Explorer, then select Properties.
Properties for Mandelbrot_gold.cpp panel appears.
Select C/C++ Build then Settings.
Click Build Steps tab.
Select Apply Custom Build Step Overriding Other Tools in Custom Build Step Applicability choice box.
Provide Mandelbrot_gold.obj for Output file name(s).
Provide ${NVCC} -I "${INCLUDE2}" -c "..\src\Mandelbrot_gold.cpp" -o "src\Mandelbrot_gold.obj" for Command.
Click Apply button.
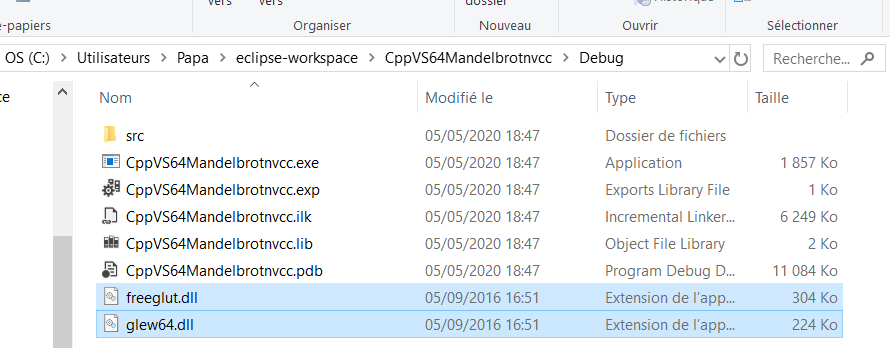
Click Apply and Close button. - Select Project menu then Build Project, or press the hammer icon.
Binaries, Archives, and Debug folders appear in project folder.64-bit CppVS64Mandelbrotnvcc.exe is available in Debug folder.
The message on CDT Build Console is avalable as text file. - Copy and paste the two files glew64.dll and freeglut.dll from the folder C:\Program Files\NVIDIA GPU Computing Toolkit\CUDA\v8.0\extras\demo_suite into the folder C:\Users\Papa\eclipse-workspace\CppVS64Mandelbrotnvcc\Debug, the folder containing CppVS64Mandelbrotnvcc.exe.
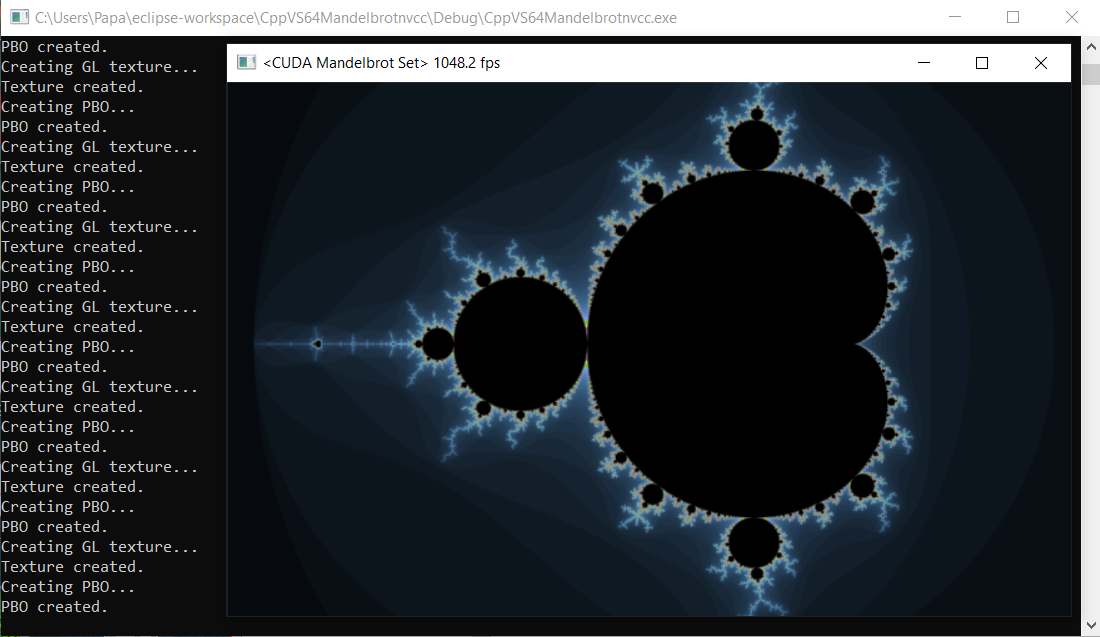
- Double click CppVS64Mandelbrotnvcc.exe in Debug folder to launch the program.
Various references
- ProgrammerSought: Windows 10 installation CUDA10.2
- Code Yarns: How to build CUDA programs using CMake
- Ingemar Ragnemalm: The real "Hello World!" for CUDA, OpenCL, and GLSL!
- Nvidia: CUDA toolkit documentation
- Nvidia: Nvcc compiler options on Eclipse
- Pizzoli: Tools for building CUDA C files
- StackOverflow: How do I tell NVCC to generate an x64 obj?
- StackOverflow: Creating DLL from CUDA using nvcc
- Microsoft: Compiler options
- HelpManual: nvcc help
- RPN: man nvcc
- MATLAB: 64-bit compile of .cu to .ptxw64 --> 'cannot execute c1xx.dll' (error D8027)
- StackOverflow: Cannot open stdio.h
- Awasiljew: Eclipse with CUDA
- CUDA-Wianki: Eclipse with CUDA
- A tingiblog by Thomas Diakos: Getting ready to develop with CUDA in Eclipse under Ubuntu
- RIP Tutorial: Sum two arrays with CUDA