Your computer has a CUDA enabled Nvidia graphic processing unit (GPU).
Three projects (deviceQuery.cpp, bandwidthTest.cu, and Mandelbrot.cu)
are presented for checking the installation of CUDA in MS Visual Studio 2022.
*** Outline ***
- Installation of MS Visual Studio 2022 and Nvidia CUDA toolkit
- Installation checking with deviceQuery
- deviceQuery.cpp project
- bandwidthTest.cu project
- Mandelbrot.cu project
- CUDA and Visual Studio references
Installation of MS Visual Studio 2022 and Nvidia CUDA toolkit
CUDA12.4 was the first version to recognize and support MSVC19.40 (aka VS2022 17.10).
CUDA / Microsoft Visual C++ compatibility: In Windows, the NVIDIA CUDA compiler nvcc uses a Visual C/C++ compiler behind the scenes.
- Install
Visual Studio Community 2022.
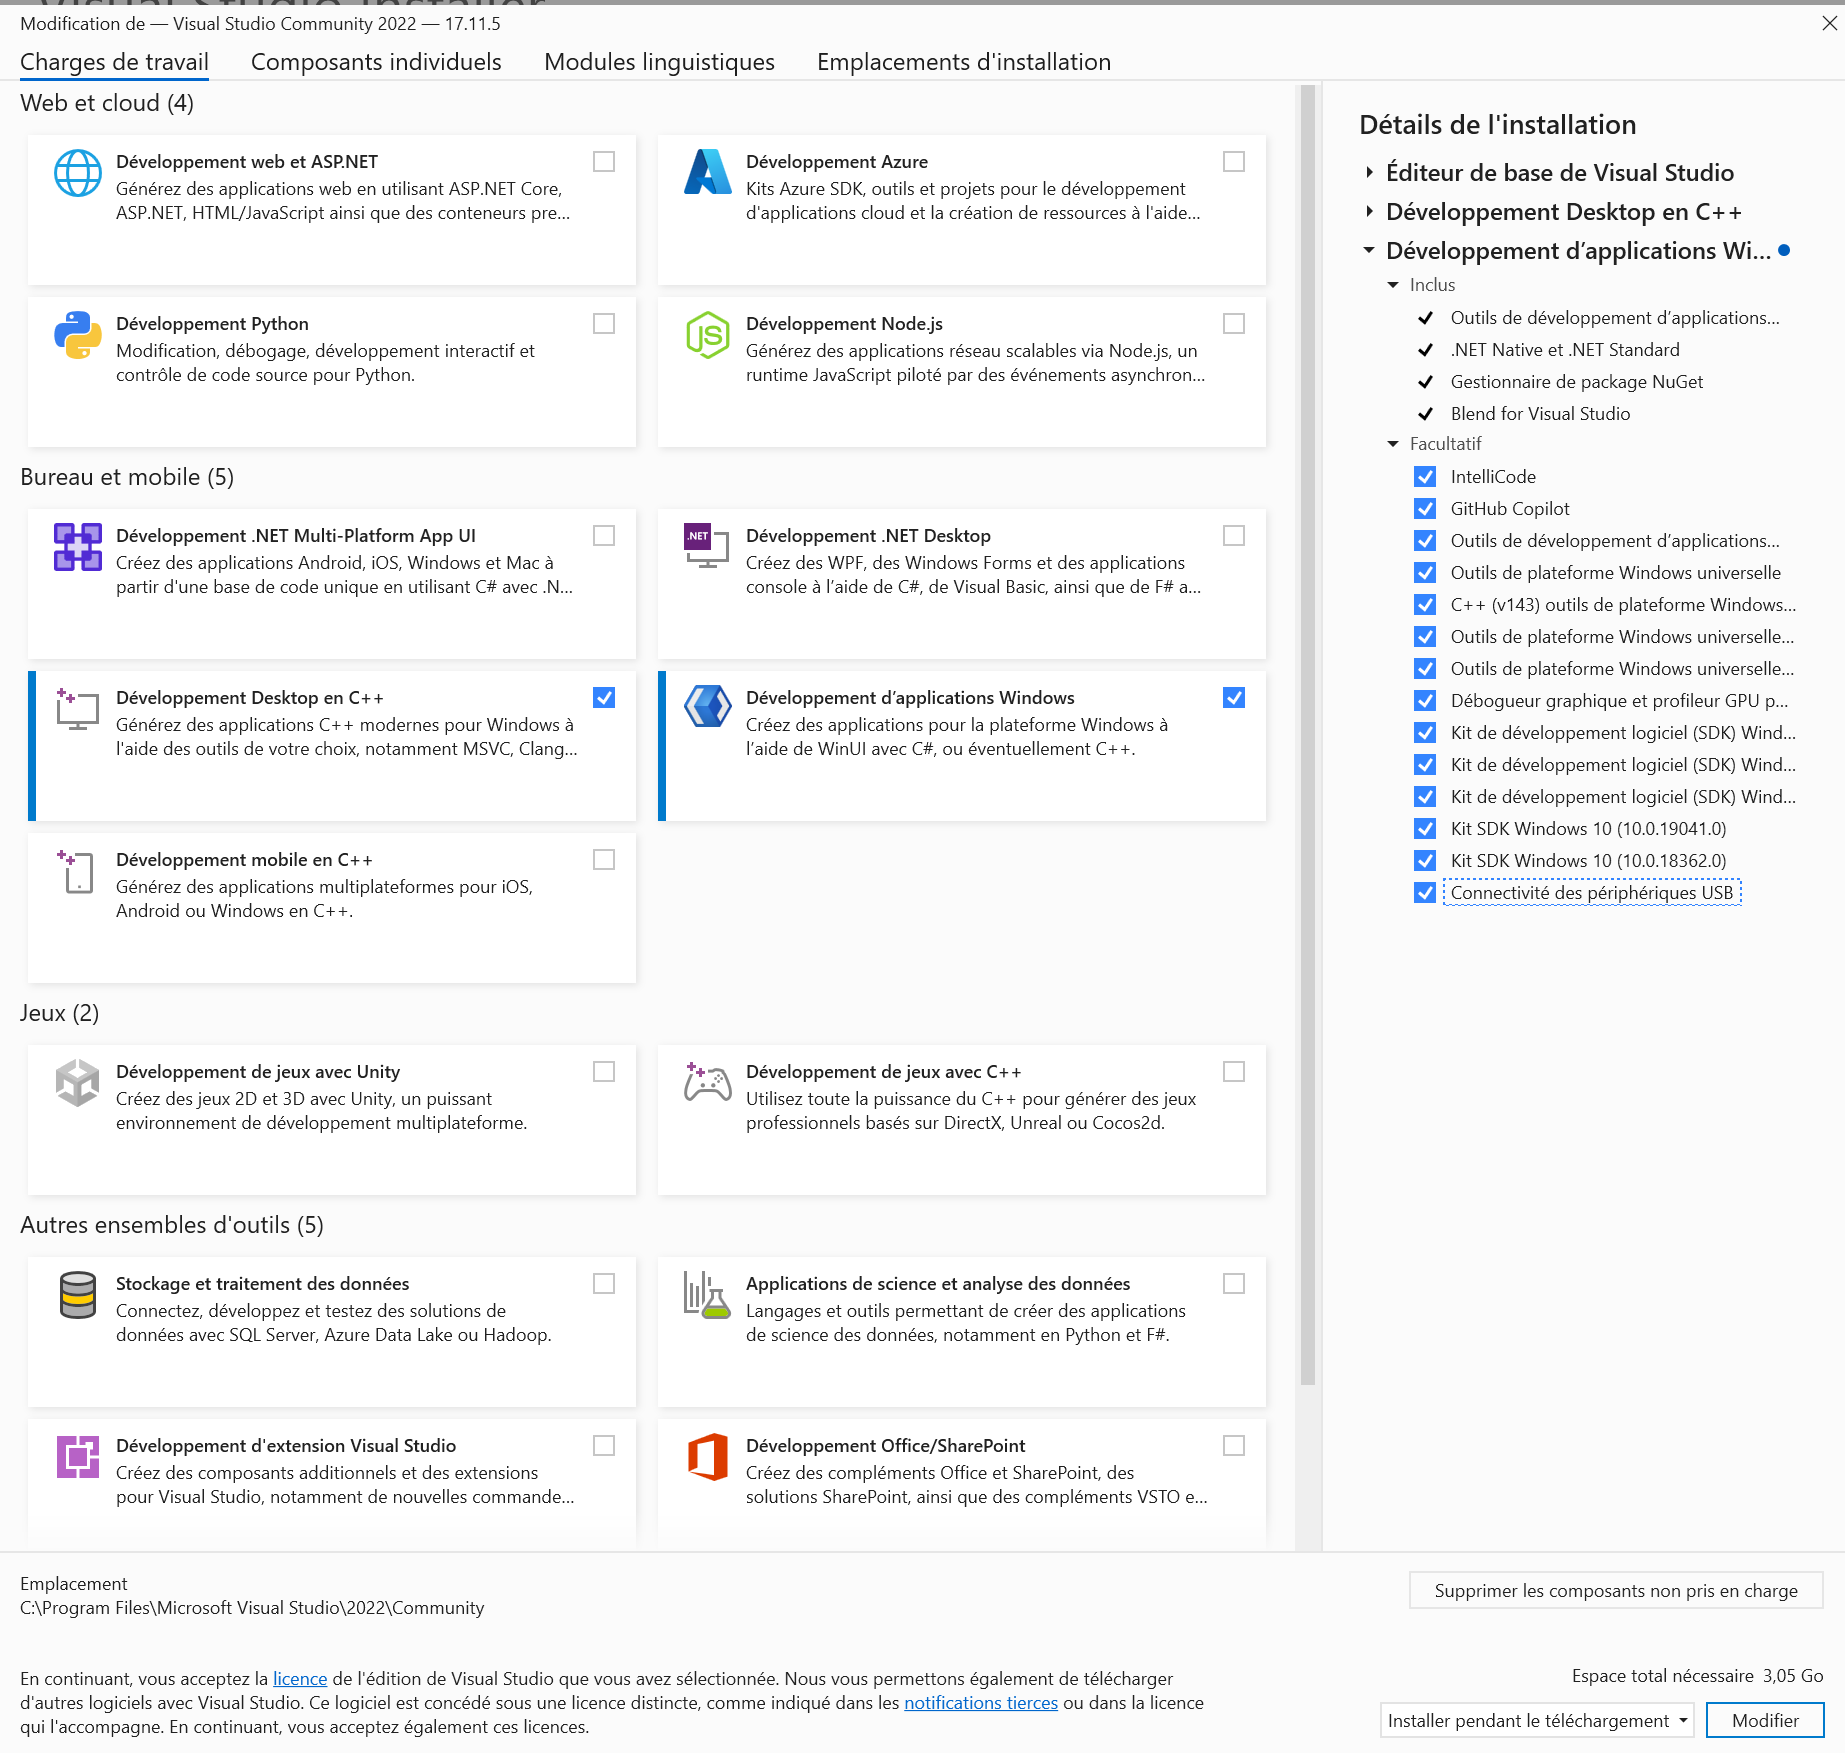
I ticked "Desktop development with C++" workload,
and "Universal Windows Platform developement" workload.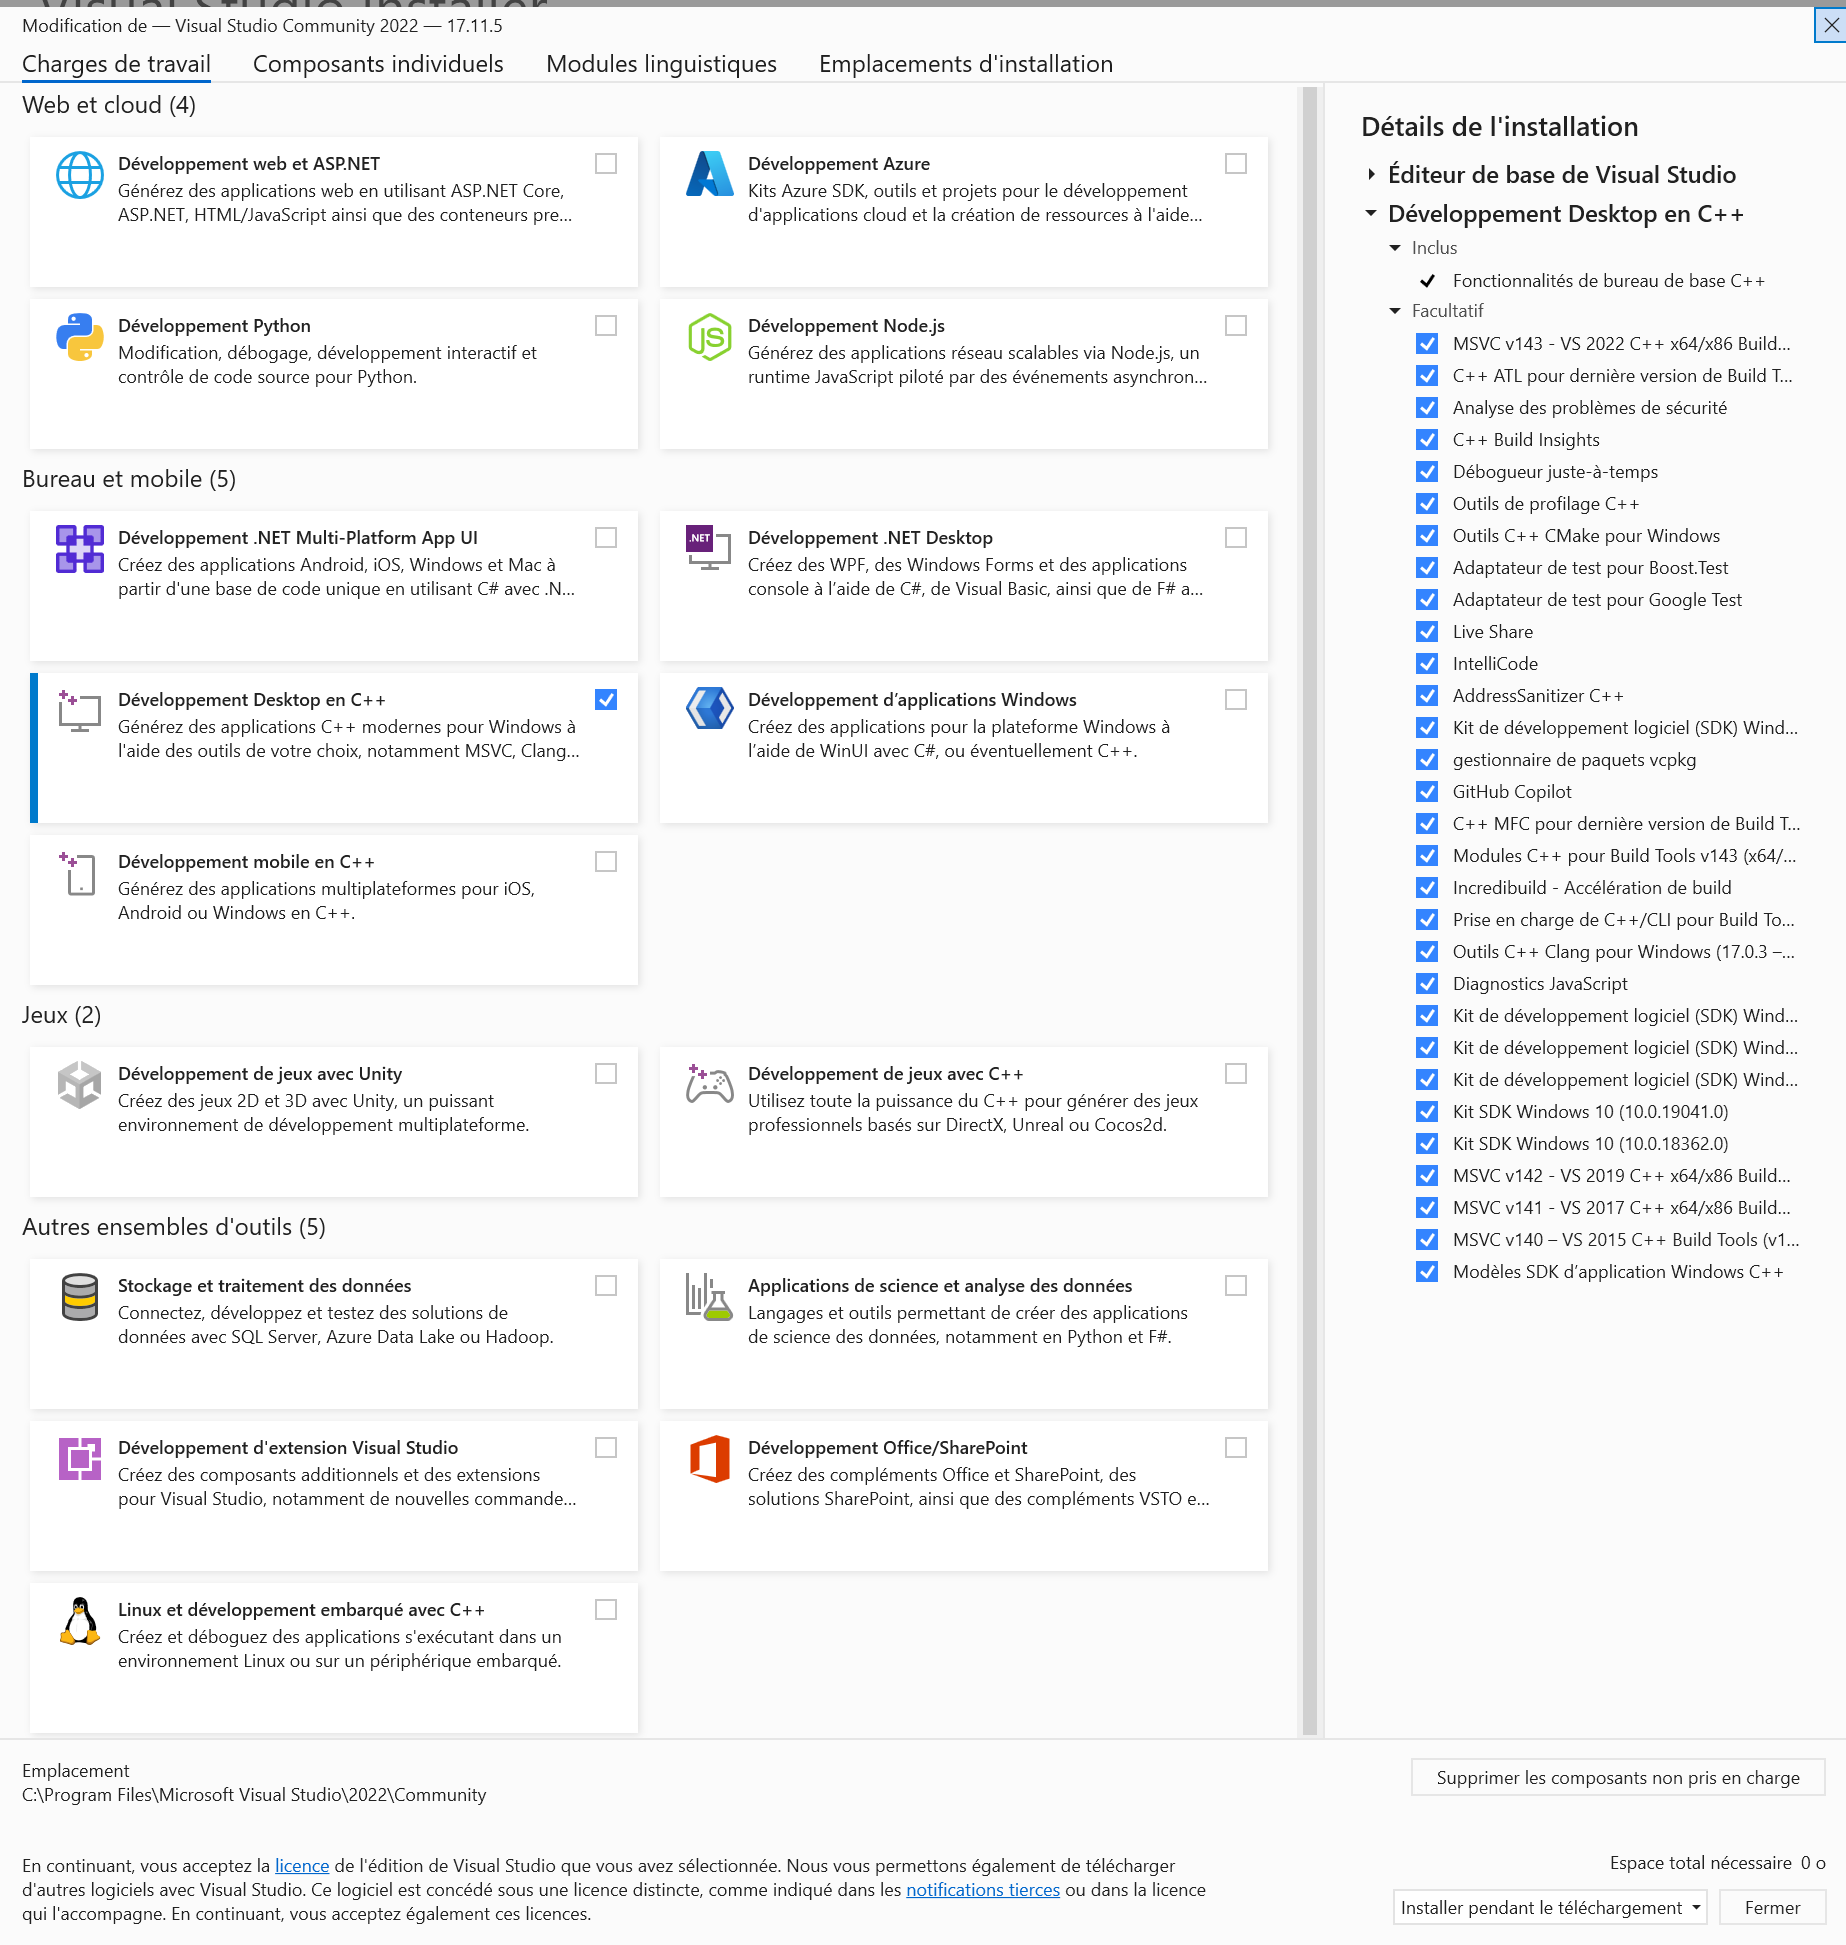
- Install the lastest
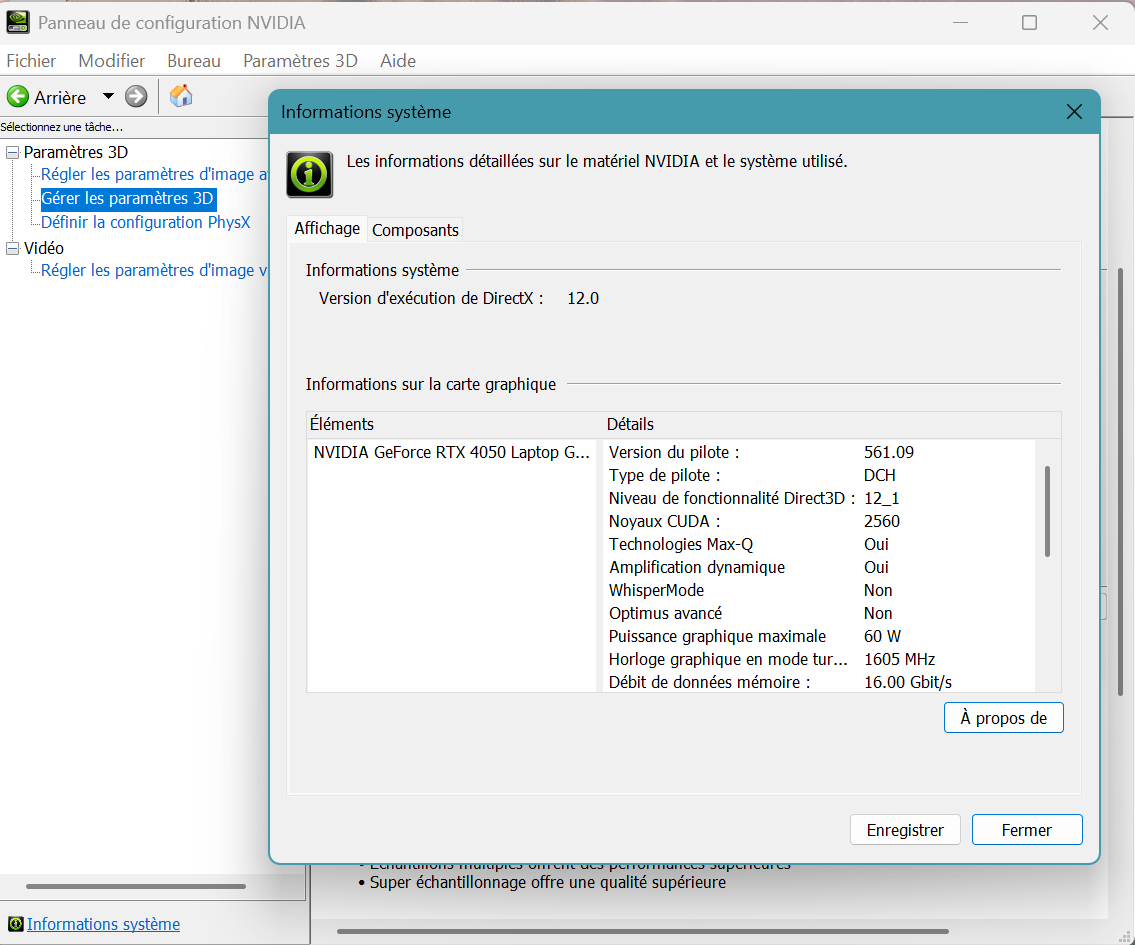
NVIDIA Driver. You need to ensure that your driver version matches or exceeds your CUDA Toolkit version.

- Driver version in Windows 11
- Install CUDA toolkit 12.5.0 (May 2024).
Folder locations:
(1) CUDA SDK:
C:\Program Files\NVIDIA GPU Computing Toolkit\CUDA\v12.5
Its include folder contains the cuda_xx.h files of CUDA.
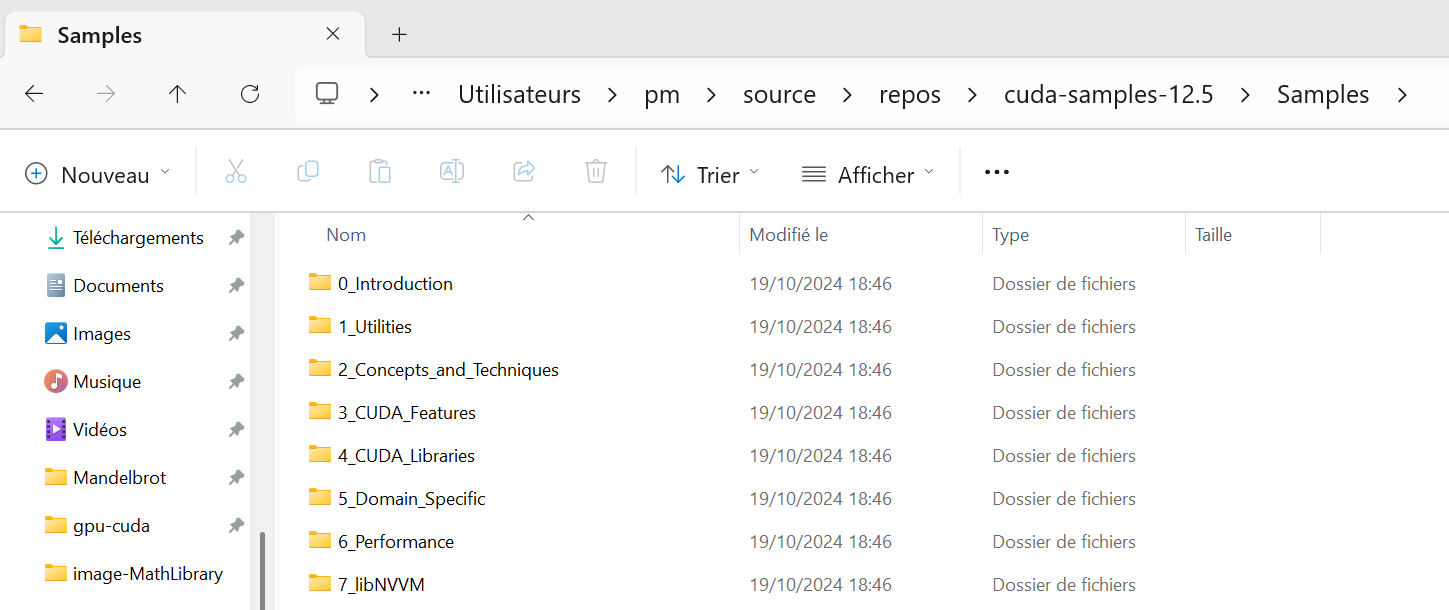
(2) CUDA Samples:
C:\Users\pm\source\repos\cuda-samples-12.5\Samples
(3) My Visual Studio 2022 project folder:
C:\Users\pm\source\repos
Installation checking with deviceQuery
The best way to check your computer environment is to run an existing Nvidia sample project: deviceQuery.
- Copy the folder
C:\Users\pm\source\repos\cuda-samples-12.5\Samples\1_Utilities\deviceQuery into the Projects folder C:\Users\pm\source\repos - Launch Visual Studio 2022.
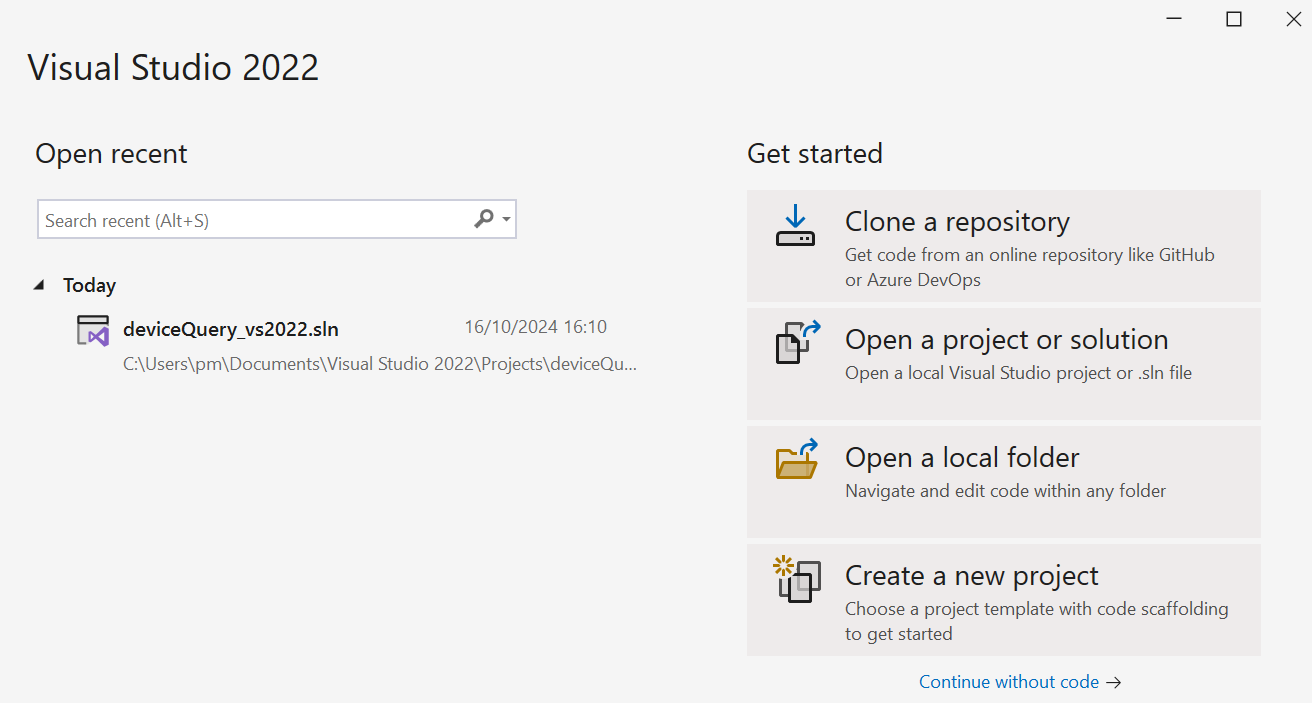
In Get started sub-panel, click Open a project or solution.
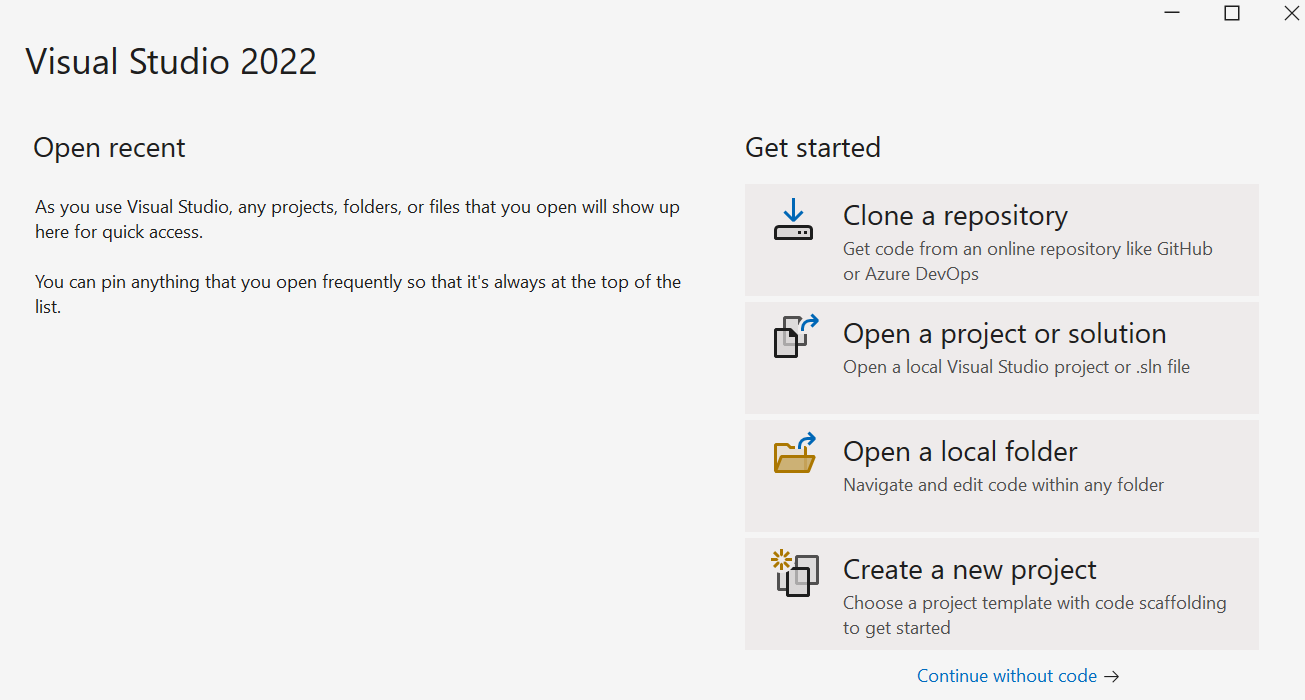
- In Open Project/Solution panel, open deviceQuery_vs2022.sln of deviceQuery folder
in my Visual Studio 2022 project folder.
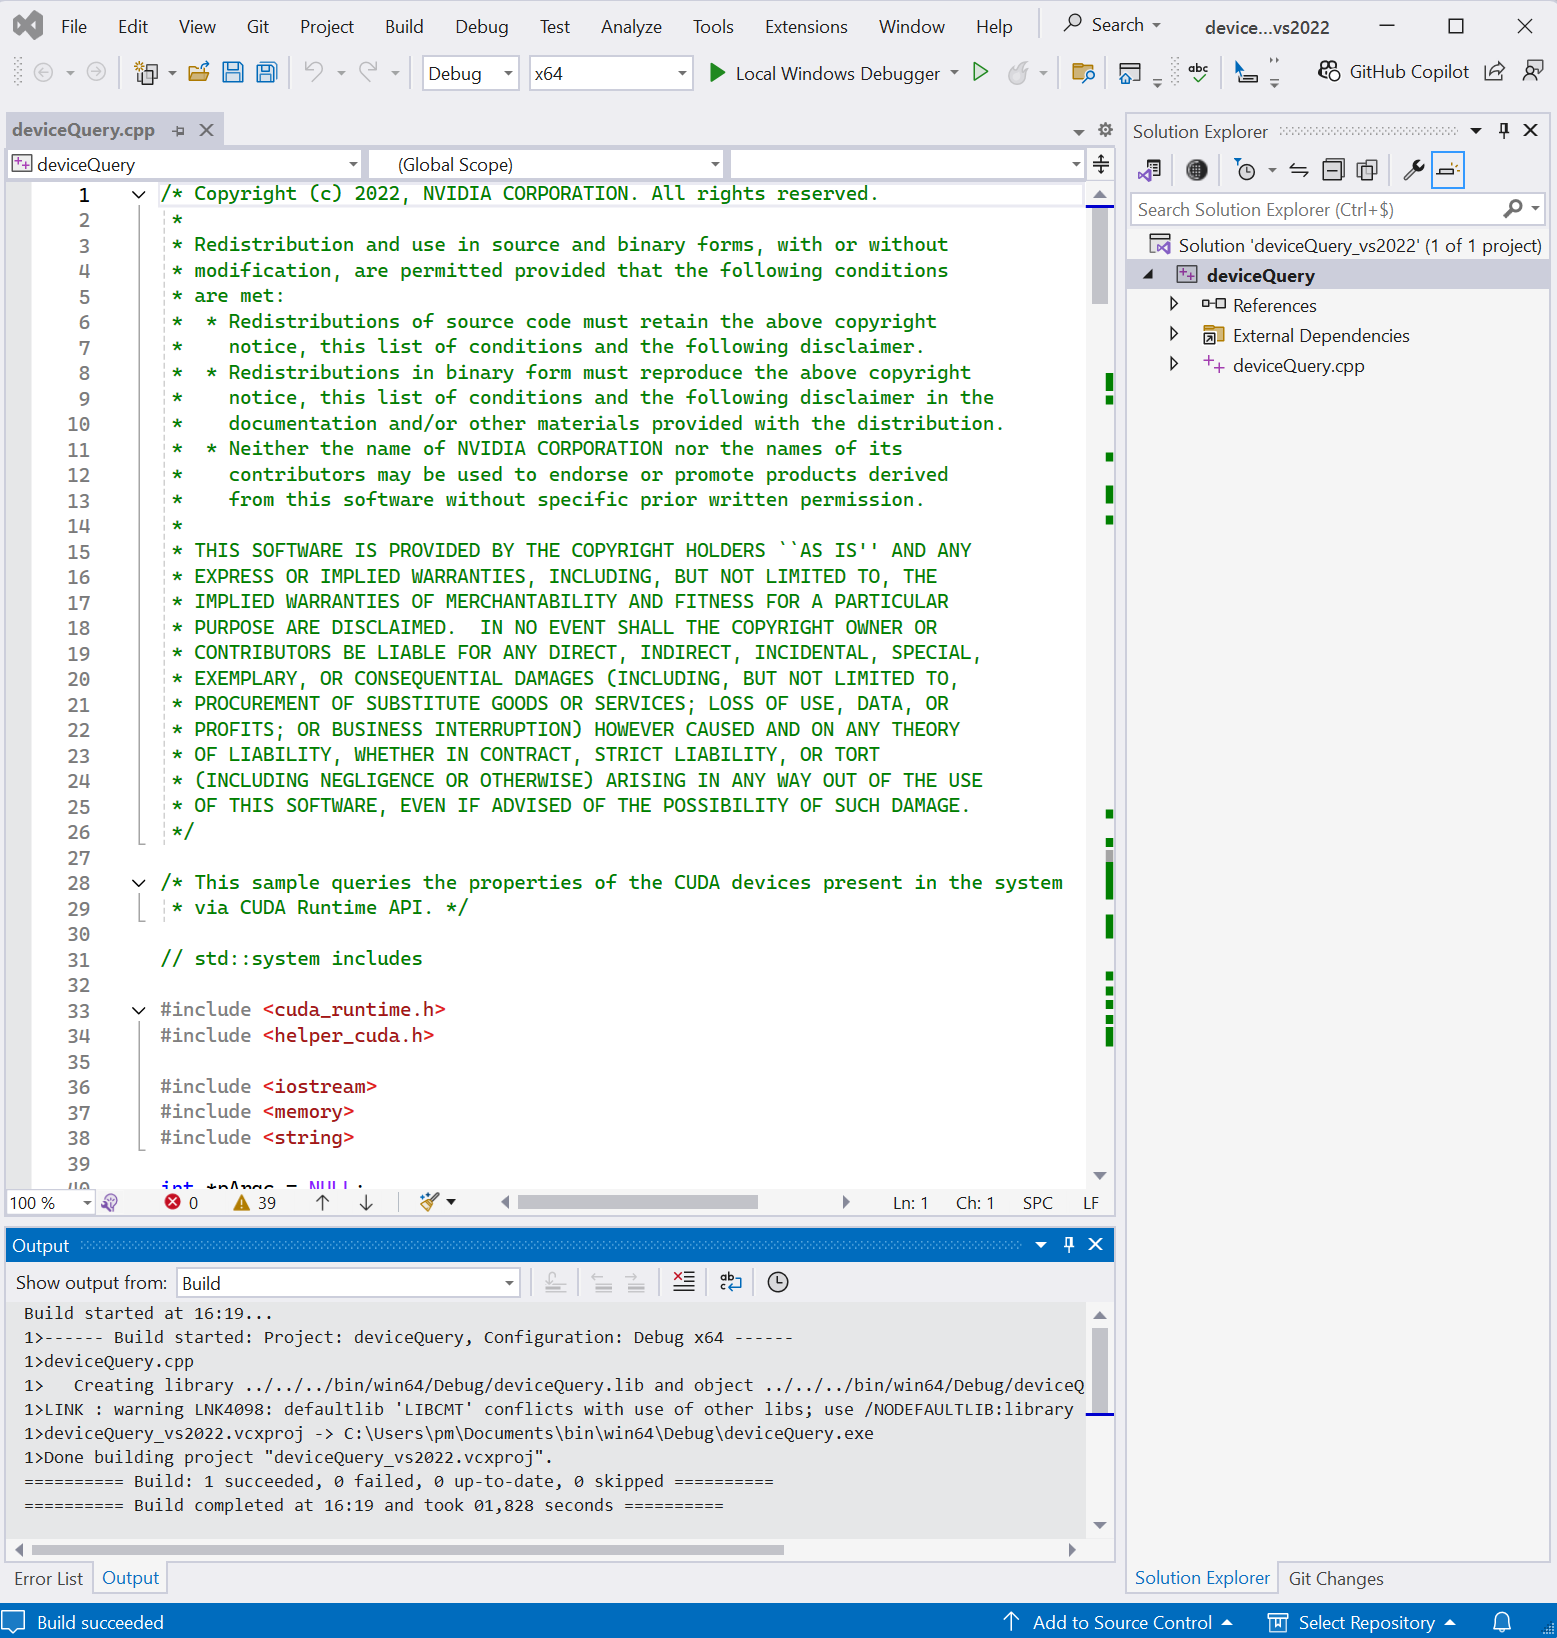
Click deviceQuery.cpp file in Solution Explorer to open it.The Solution Platform x64 is shown near Debug.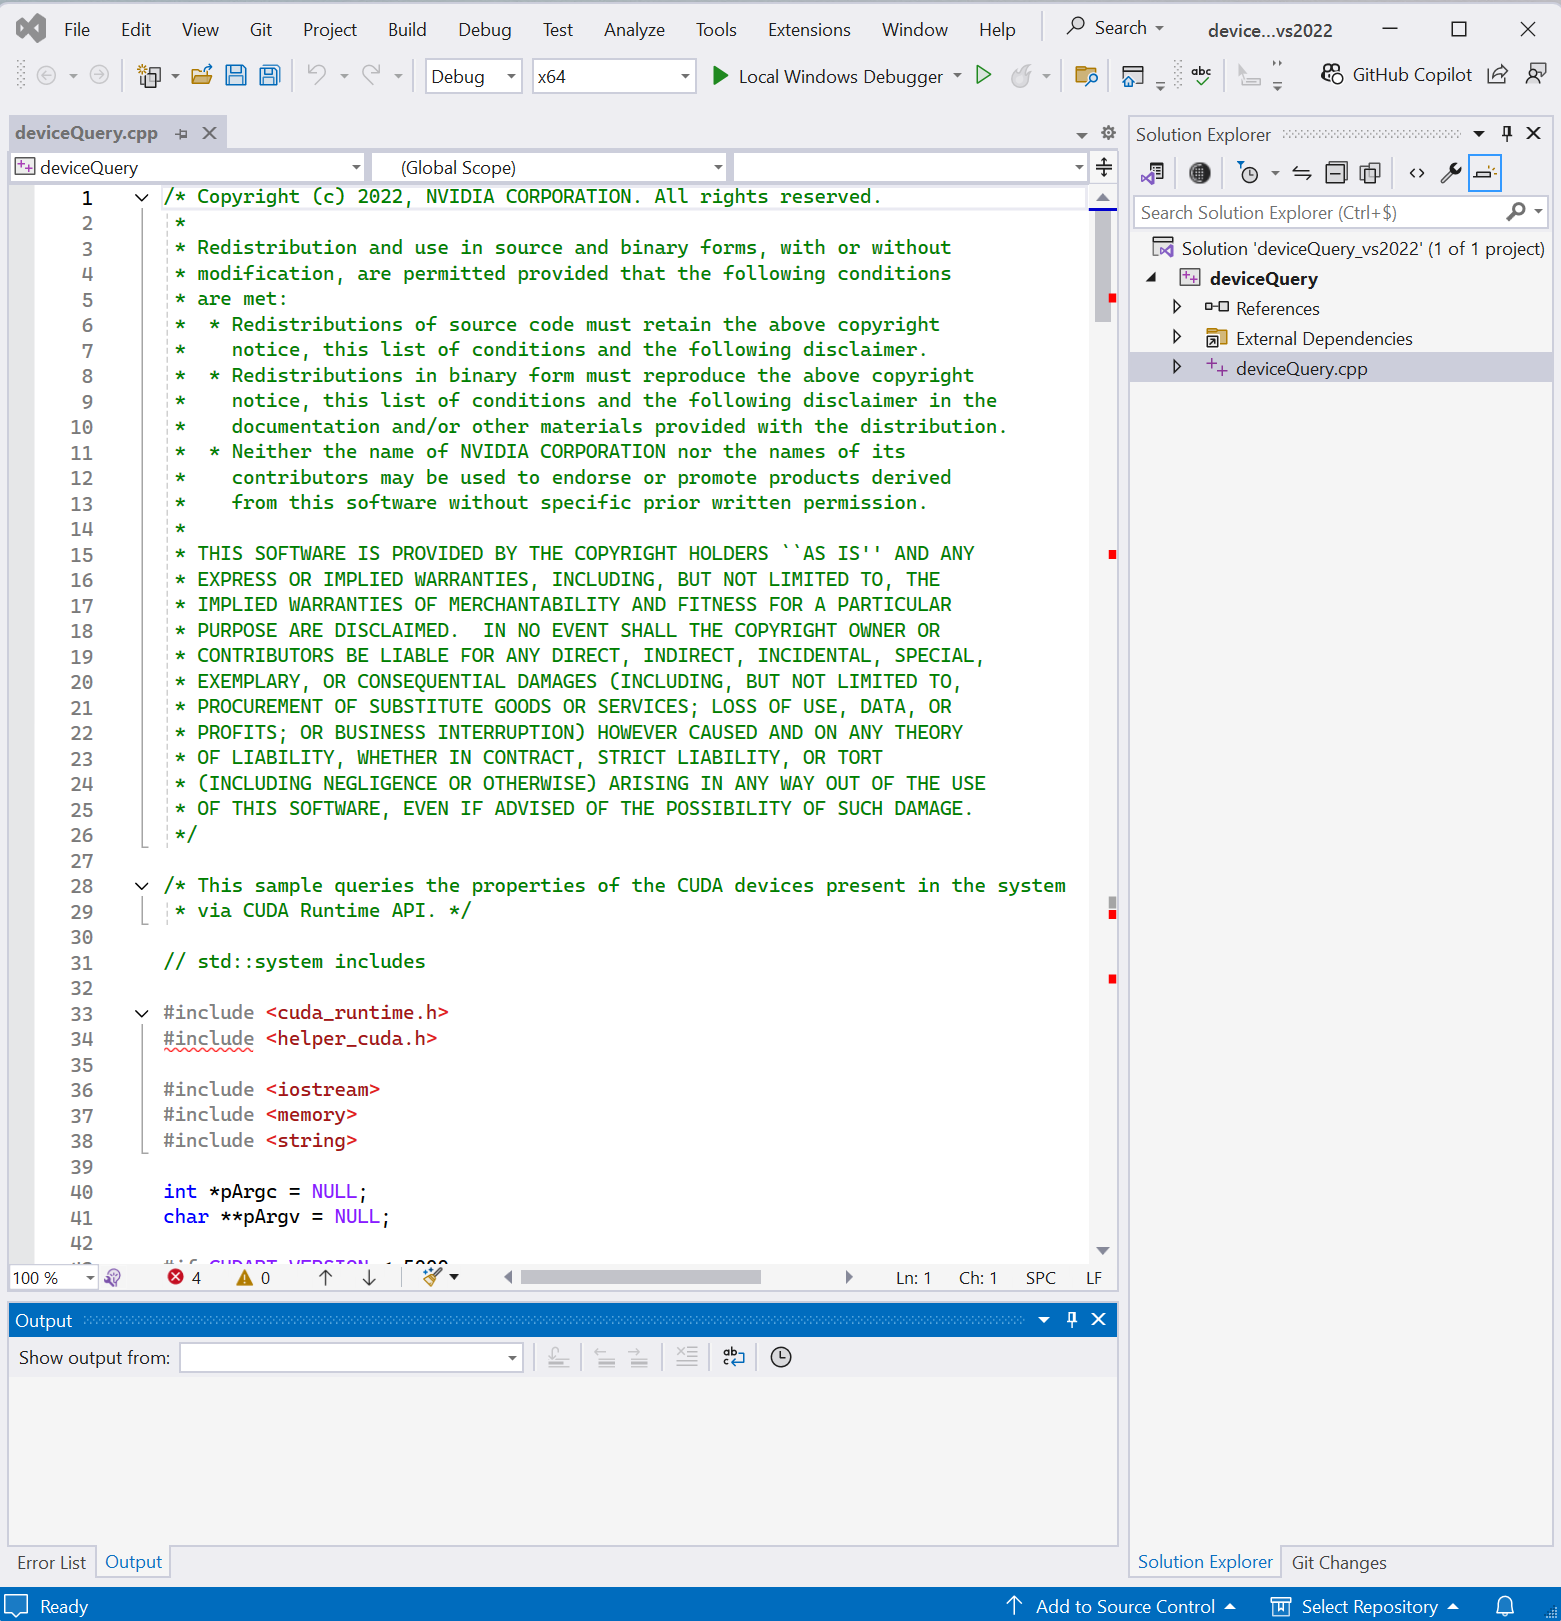
The word #include before < helper_cuda.h> is wave-underlined in red. - Right click the project name deviceQuery in Solution Explorer,
then select Properties.
The panel of deviceQuery Property Pages appears.
Under Configuration Properties, select VC++ Directories.
Add an extra ; at the end of $(IncludePath), then add C:\Users\pm\source\repos\cuda-Samples-12.5\commonClick Apply button then OK button.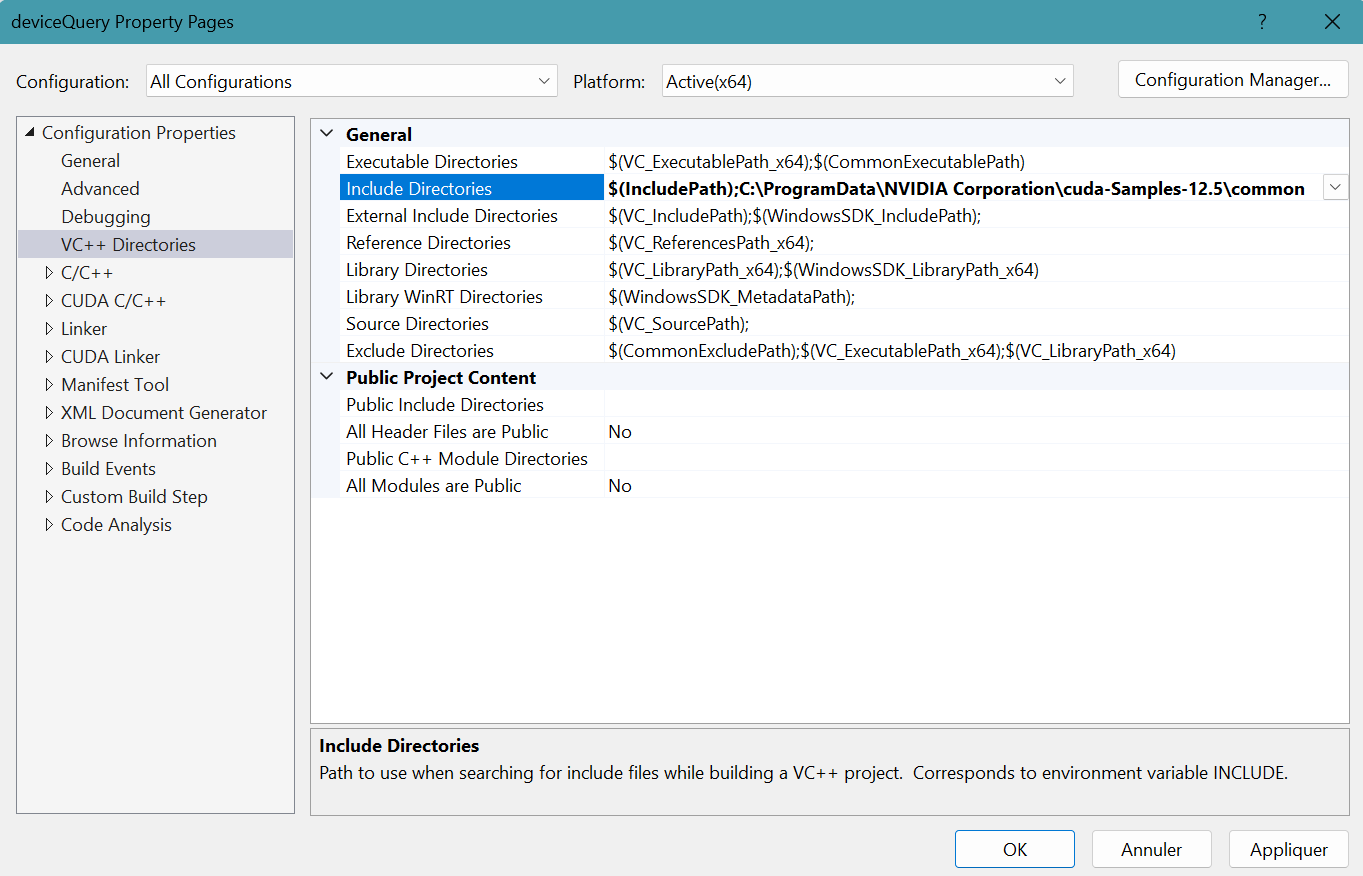
- The red wave line under #include before < helper_cuda.h> has disappeared.
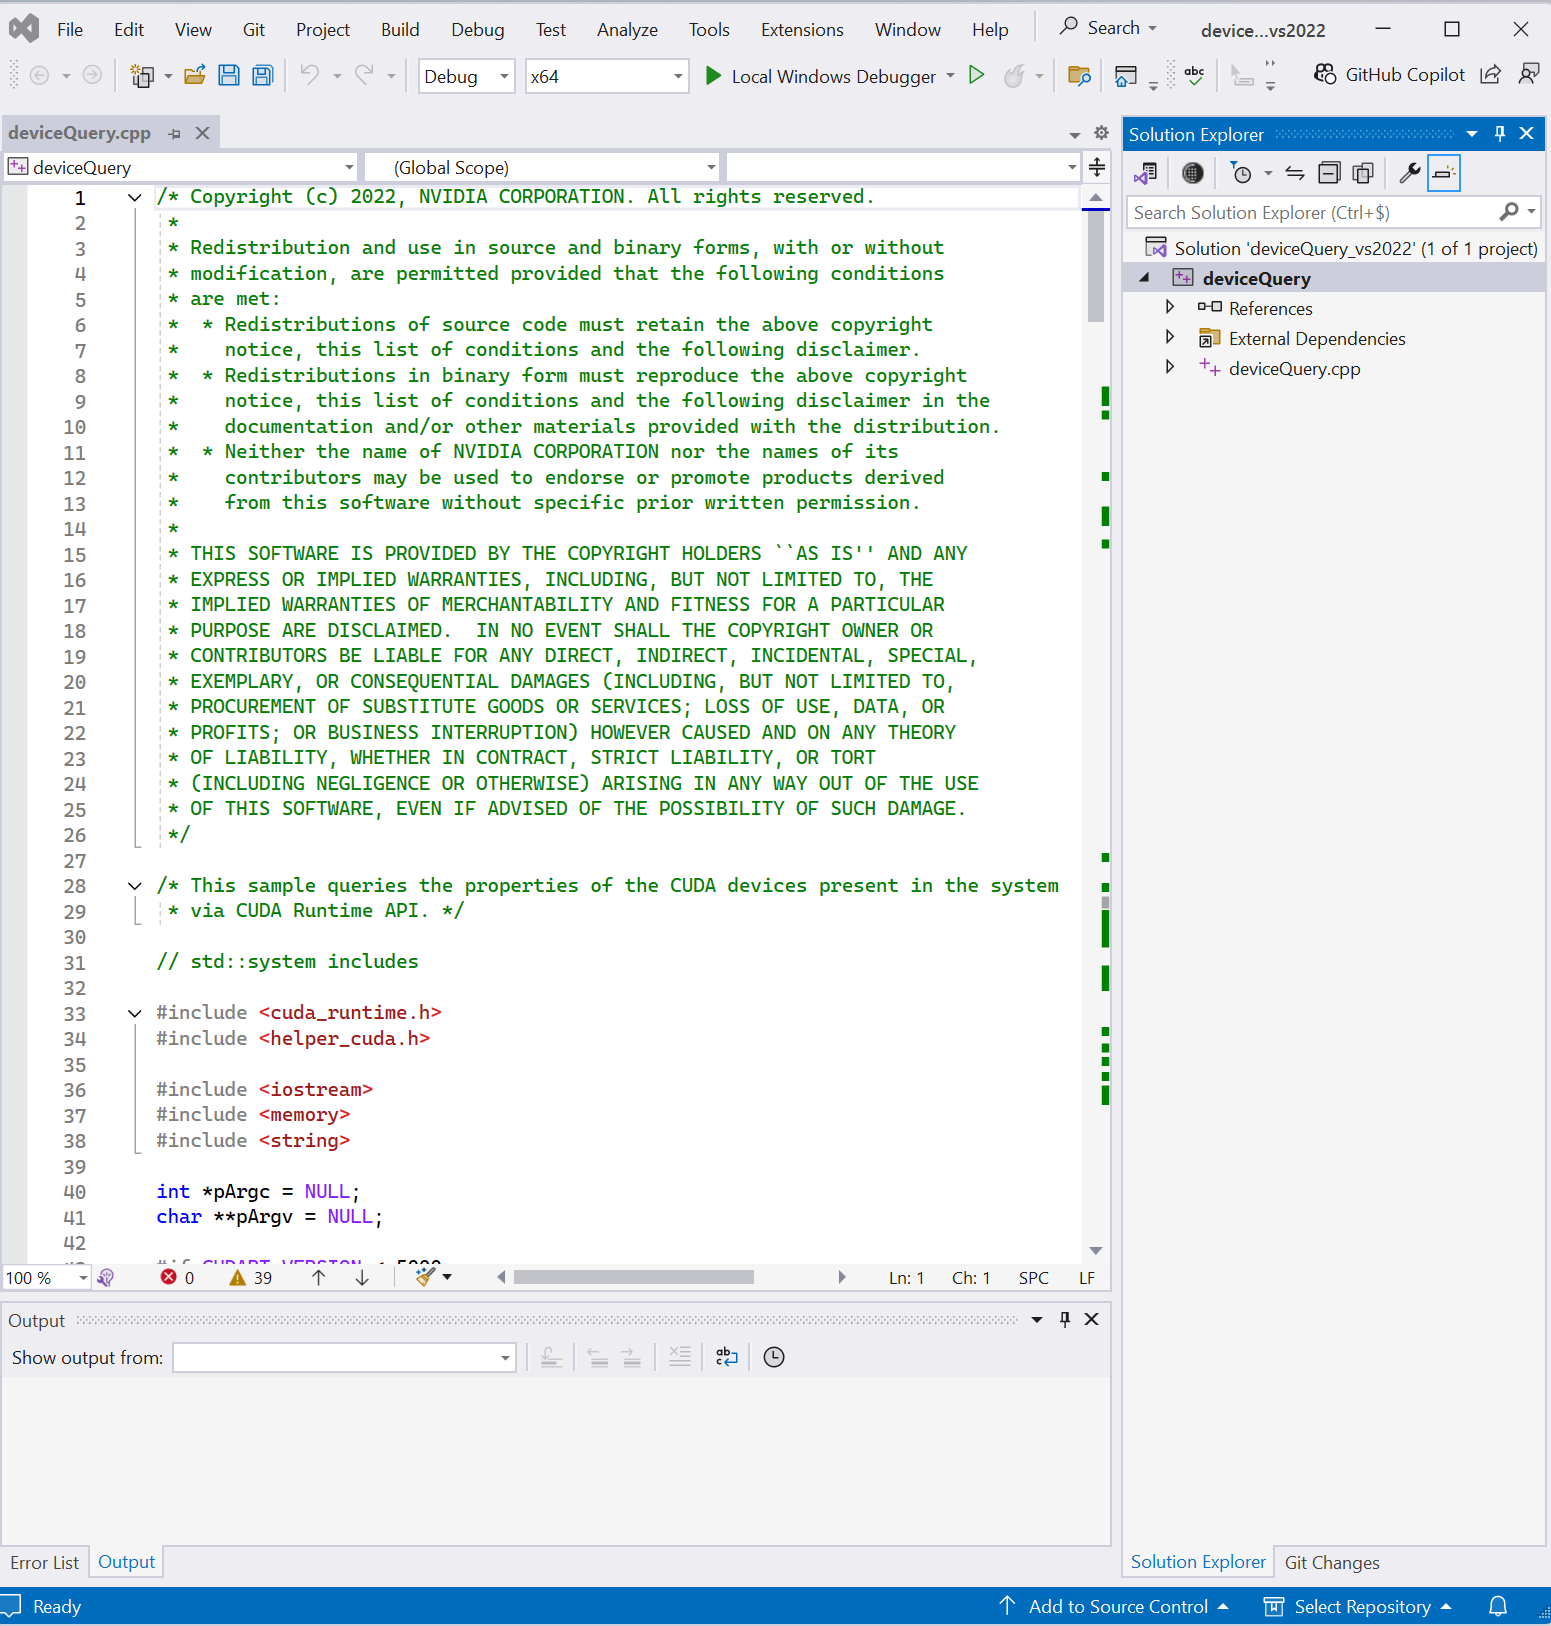
- Select Build menu then Build Solution.
Four files (deviceQuery.exe, deviceQuery.lib, deviceQuery.exp, and deviceQuery.pdb) are generated in the folder
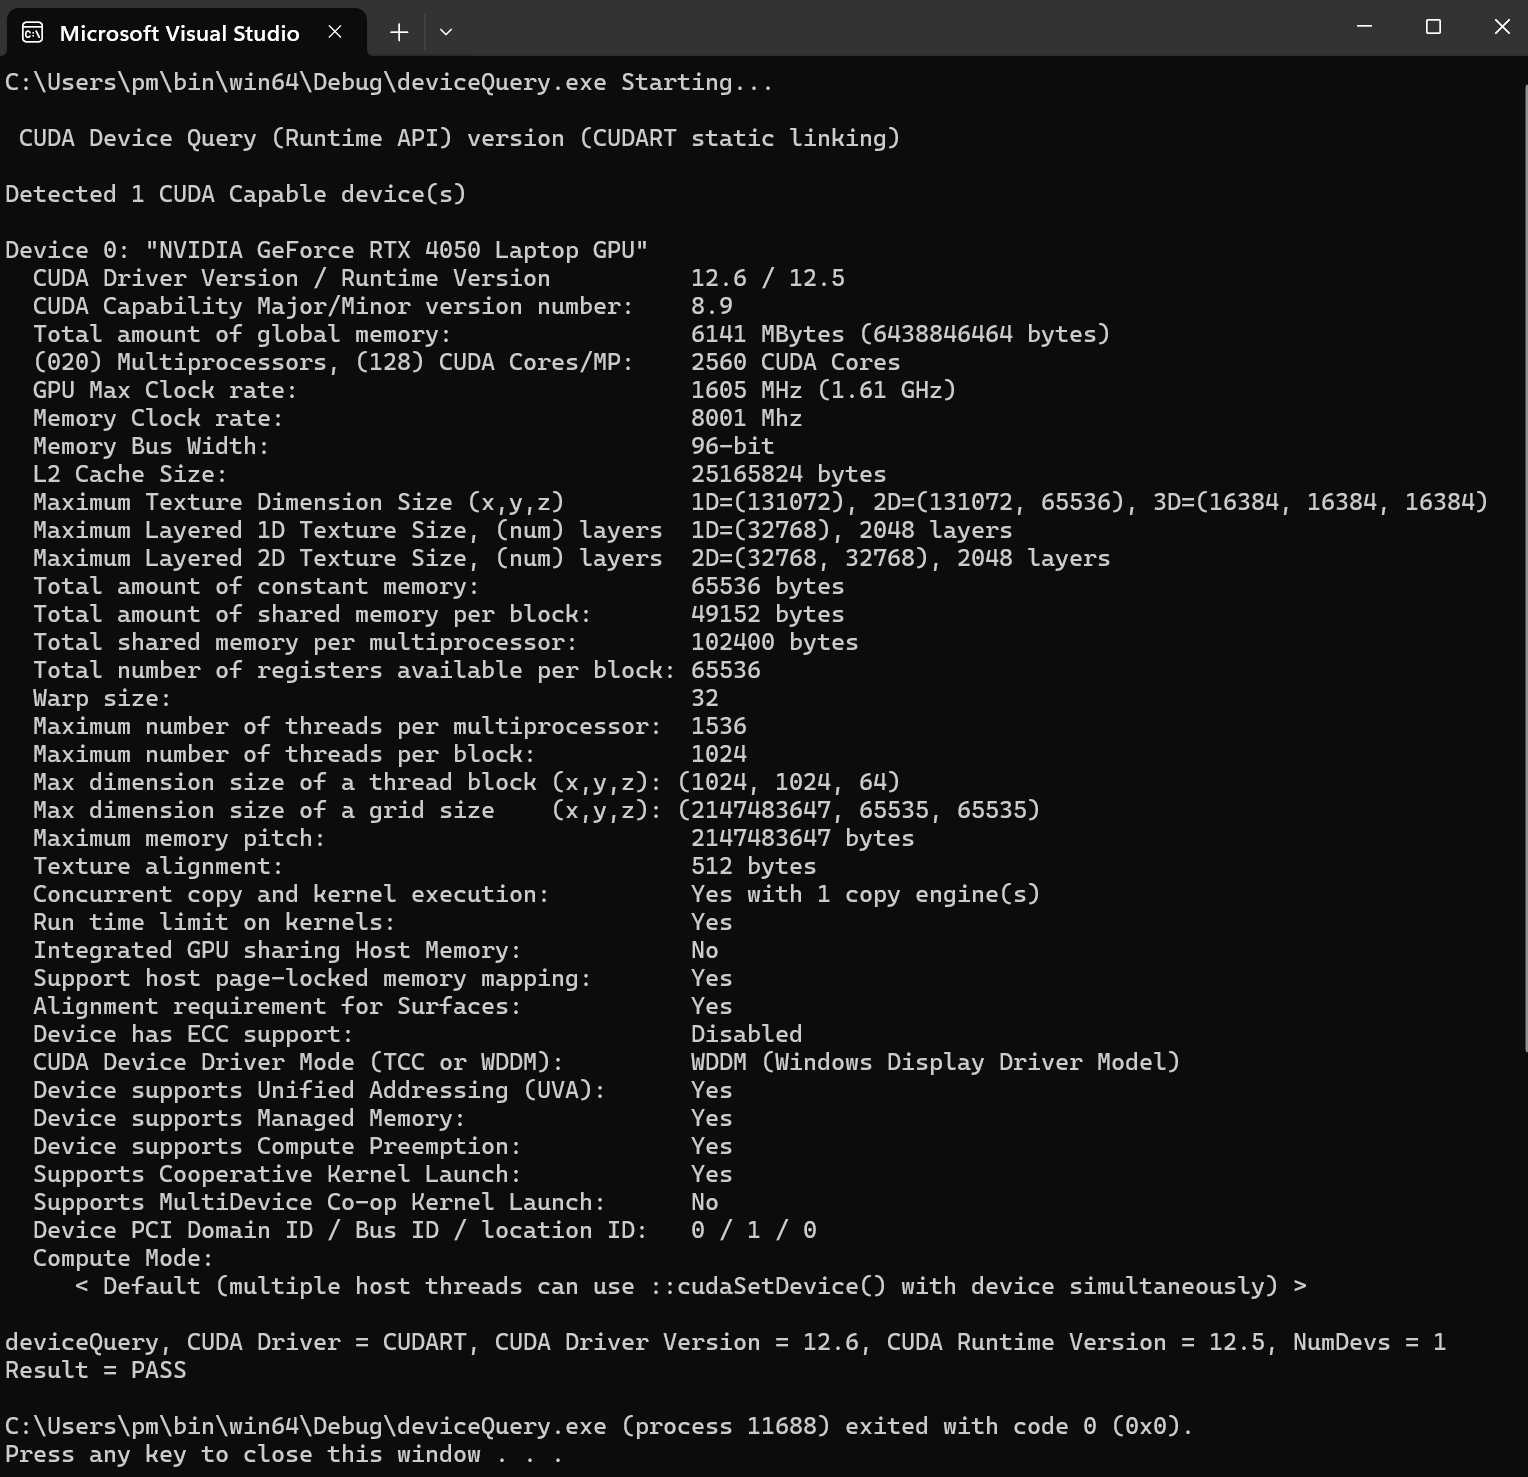
C:\Users\pm\bin\win64\Debug - Select Debug menu then Start Without Debugging.
deviceQuery.cpp project
Create your own deviceQuery project.
- In Visual Studio 2022 panel, click Create a new project.
- In Create a new project panel, select Empty Project.
Click Next button.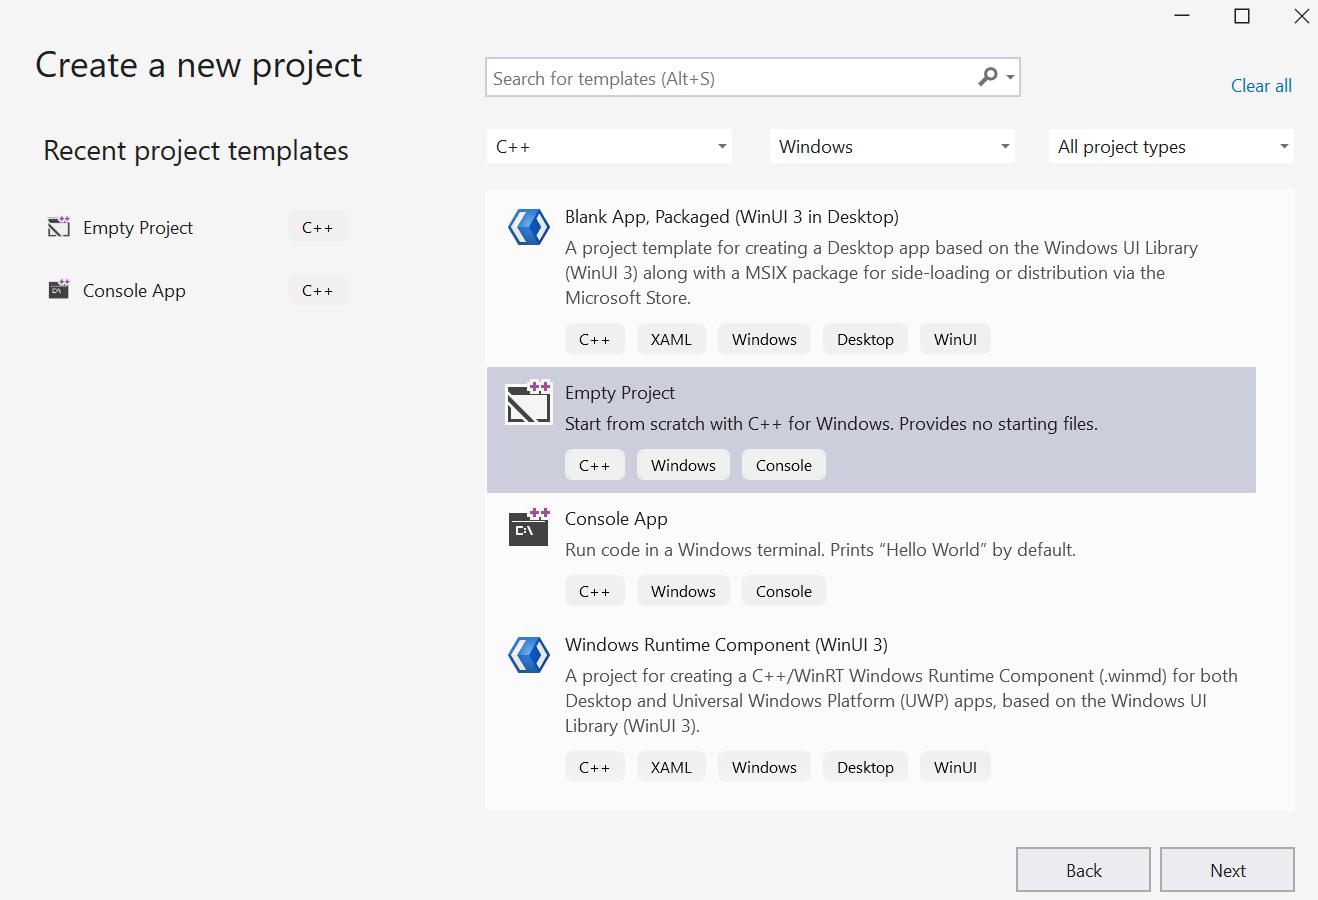
- In Configure your new project panel:
Provid the Project name: ConsoleApplication-deviceQuery
Click Create button.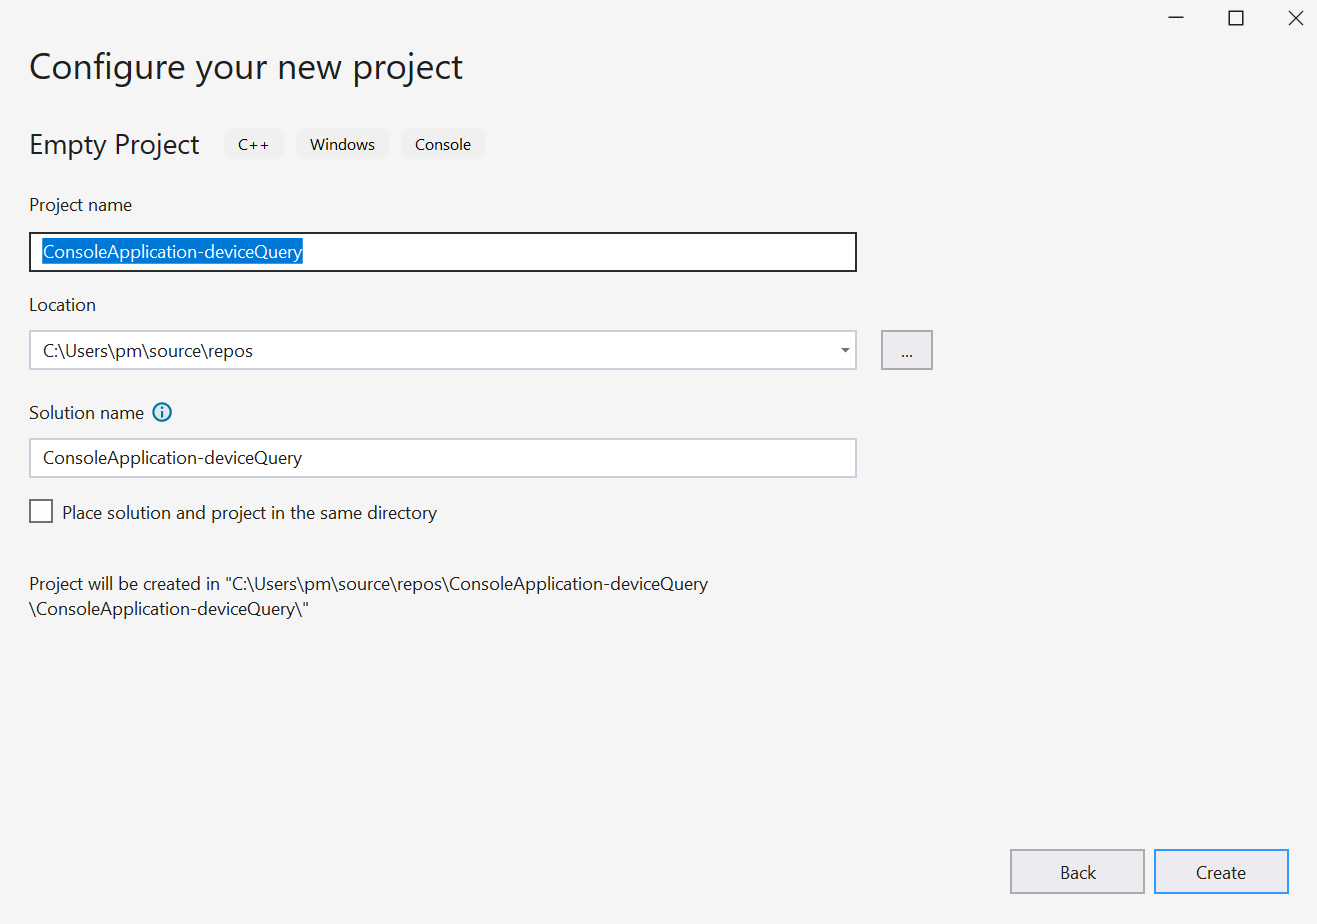
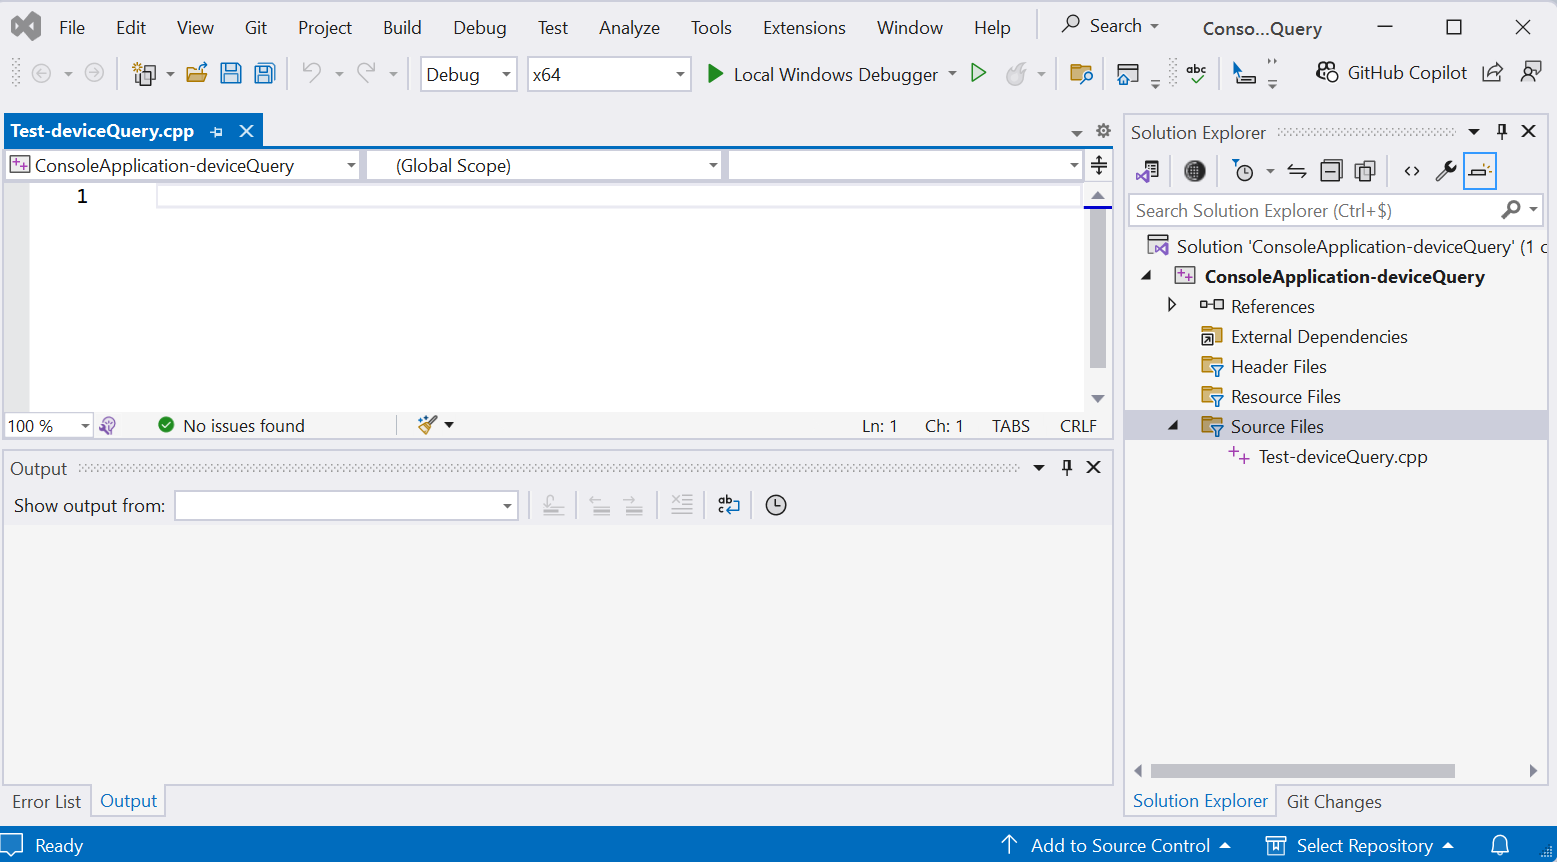
- The Visual Studio editor appears.
Right-click the folder of Source Files in Solution Explorer. Select Add then New Item...

- Add New Item panel appears. Select C++ File (.cpp).
Provid the name of the file: Test-deviceQuery.cpp
Click Add button.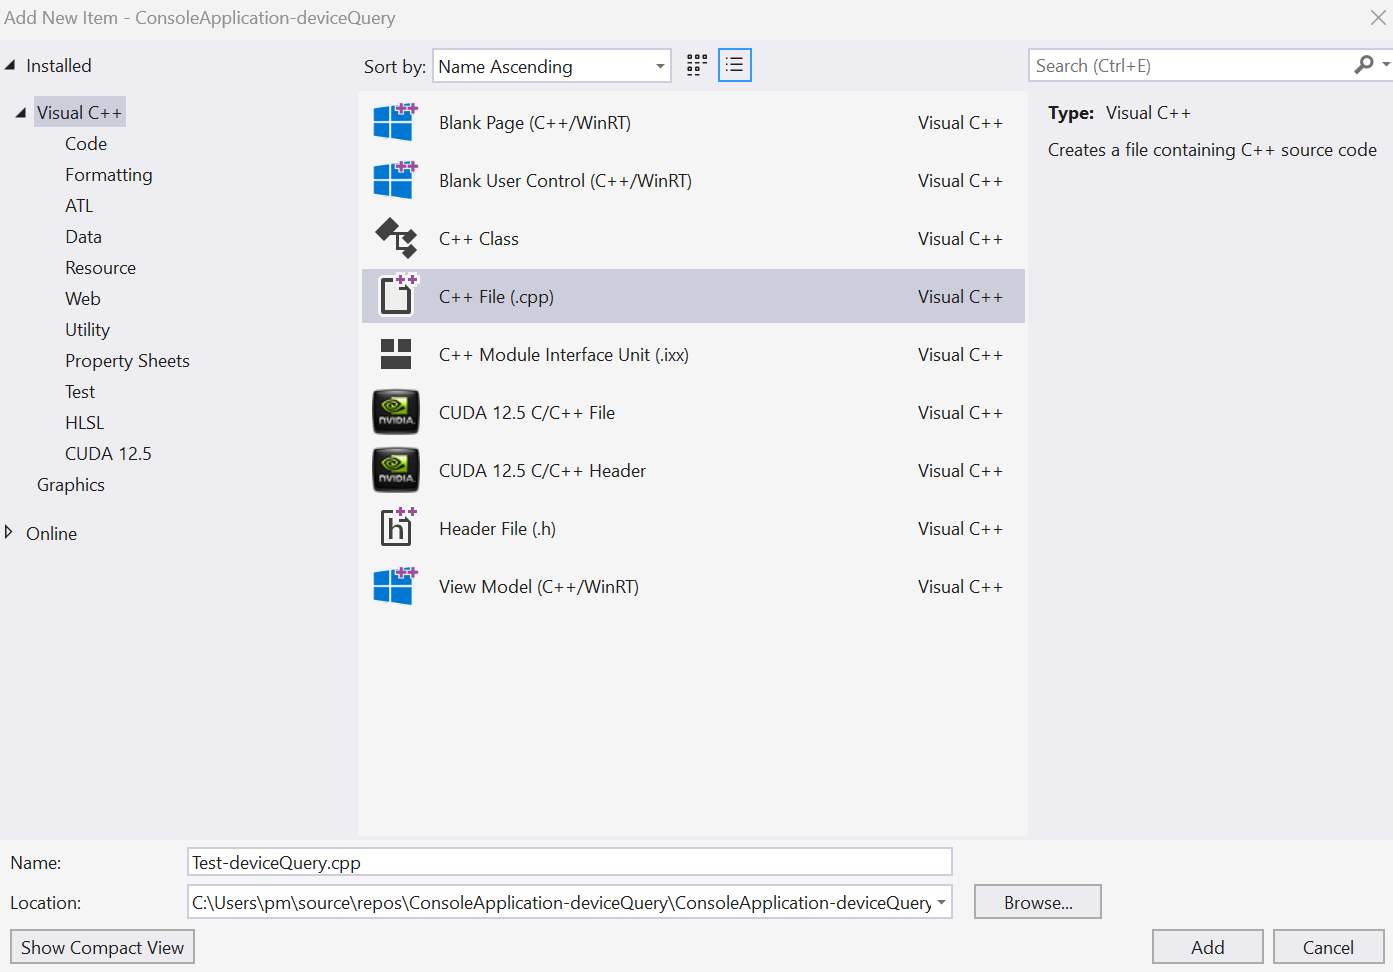
- An empty source file appears for editing.
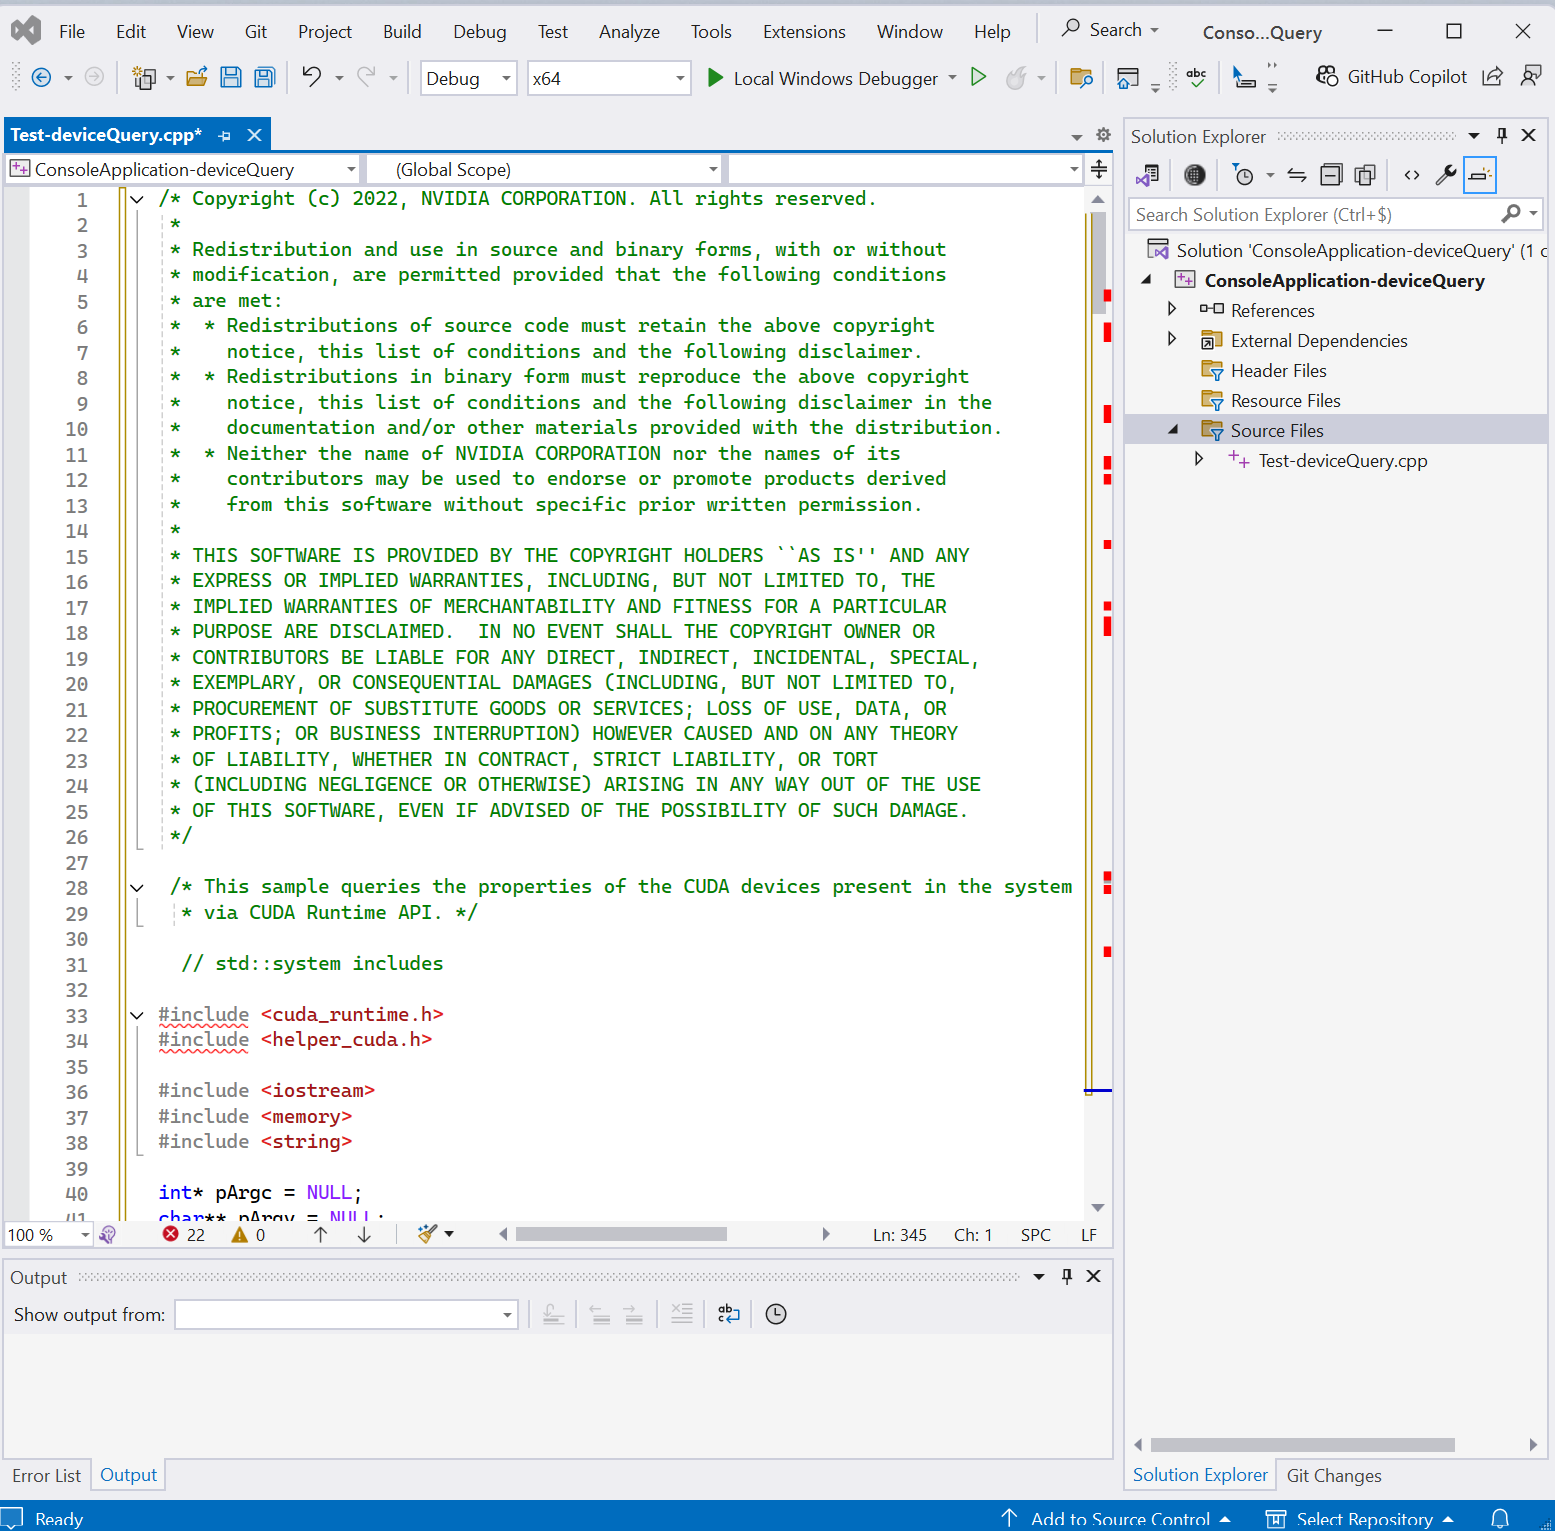
- Copy and paste the file
C:\Users\pm\source\repos\cuda-samples-12.5\Samples\1_Utilities\deviceQuery\deviceQuery.cpp into the empty source file.Many words are wavy-underlined in red.
- Right-click the project ConsoleAplication-deviceQuery in Solution Explorer.
Choose Build Dependencies then Build Customizations...
The Visual C++ Build Customizations Files dialog appears.
Tick CUDA 12.5(.targets, .props). As a result, VC++ knows that CUDA C/C++ is required.Click OK button.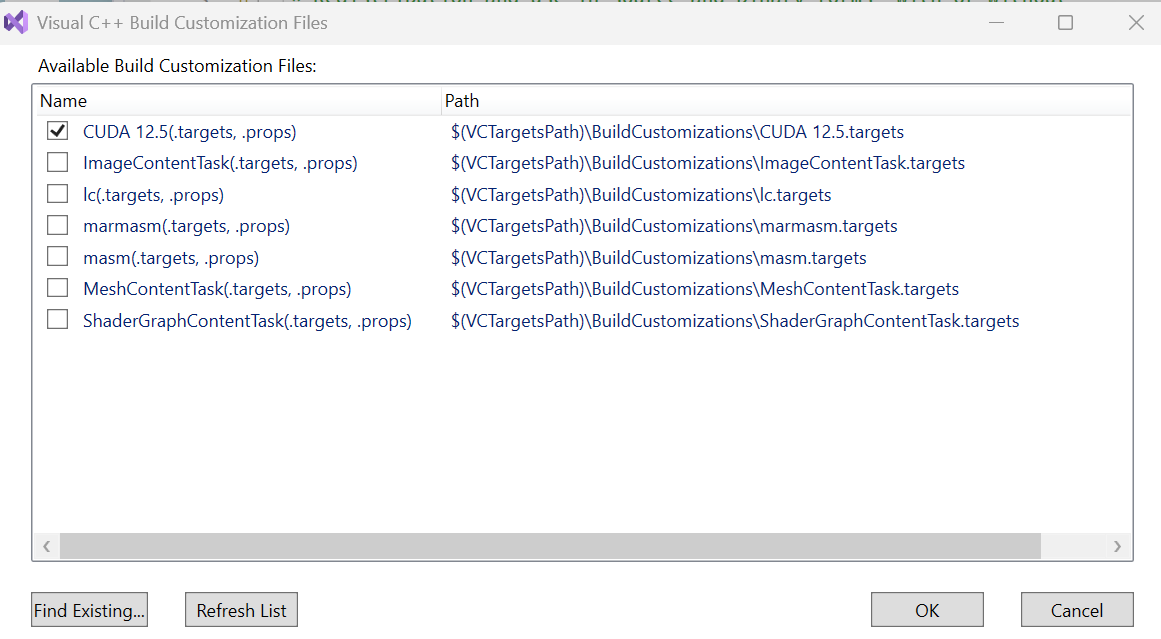
- Right click the project ConsoleAplication-deviceQuery in Solution Explorer.
Select Properties.
Select VC++ Directories.
Add C:\Users\pm\source\repos\cuda-samples-12.5\Common;C:\Program Files\NVIDIA GPU Computing Toolkit\CUDA\v12.5\include; in Include Directories.Click Apply button then OK button.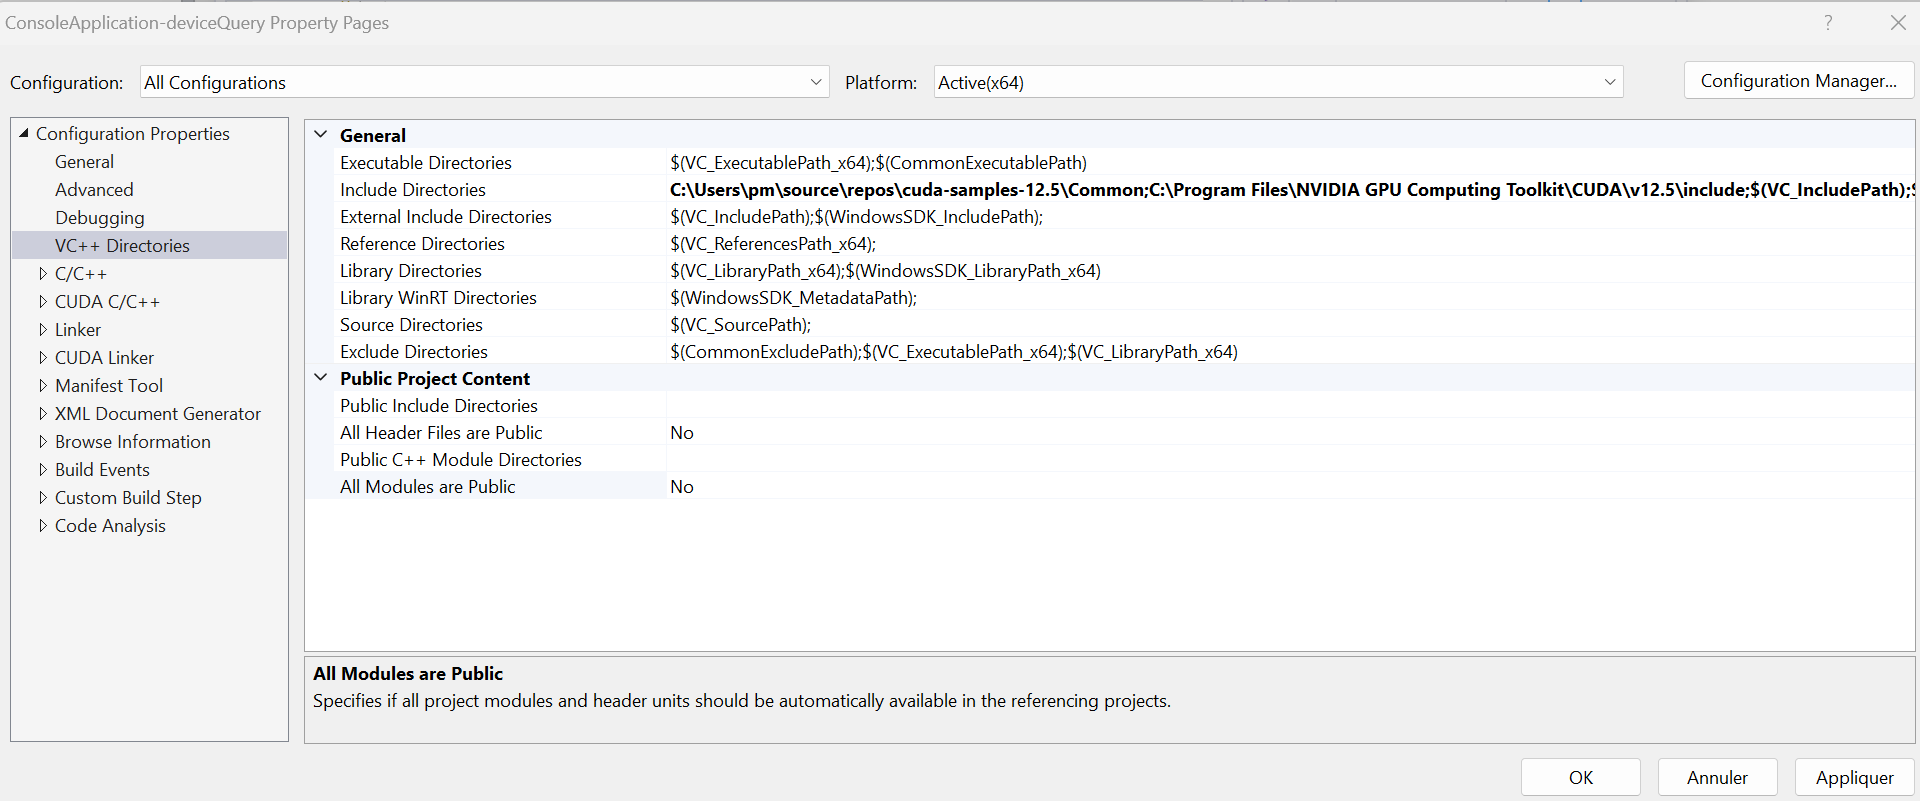
- The words #include before <cuda_runtime.h> and <helper_cuda.h> are not wavy-underlined.
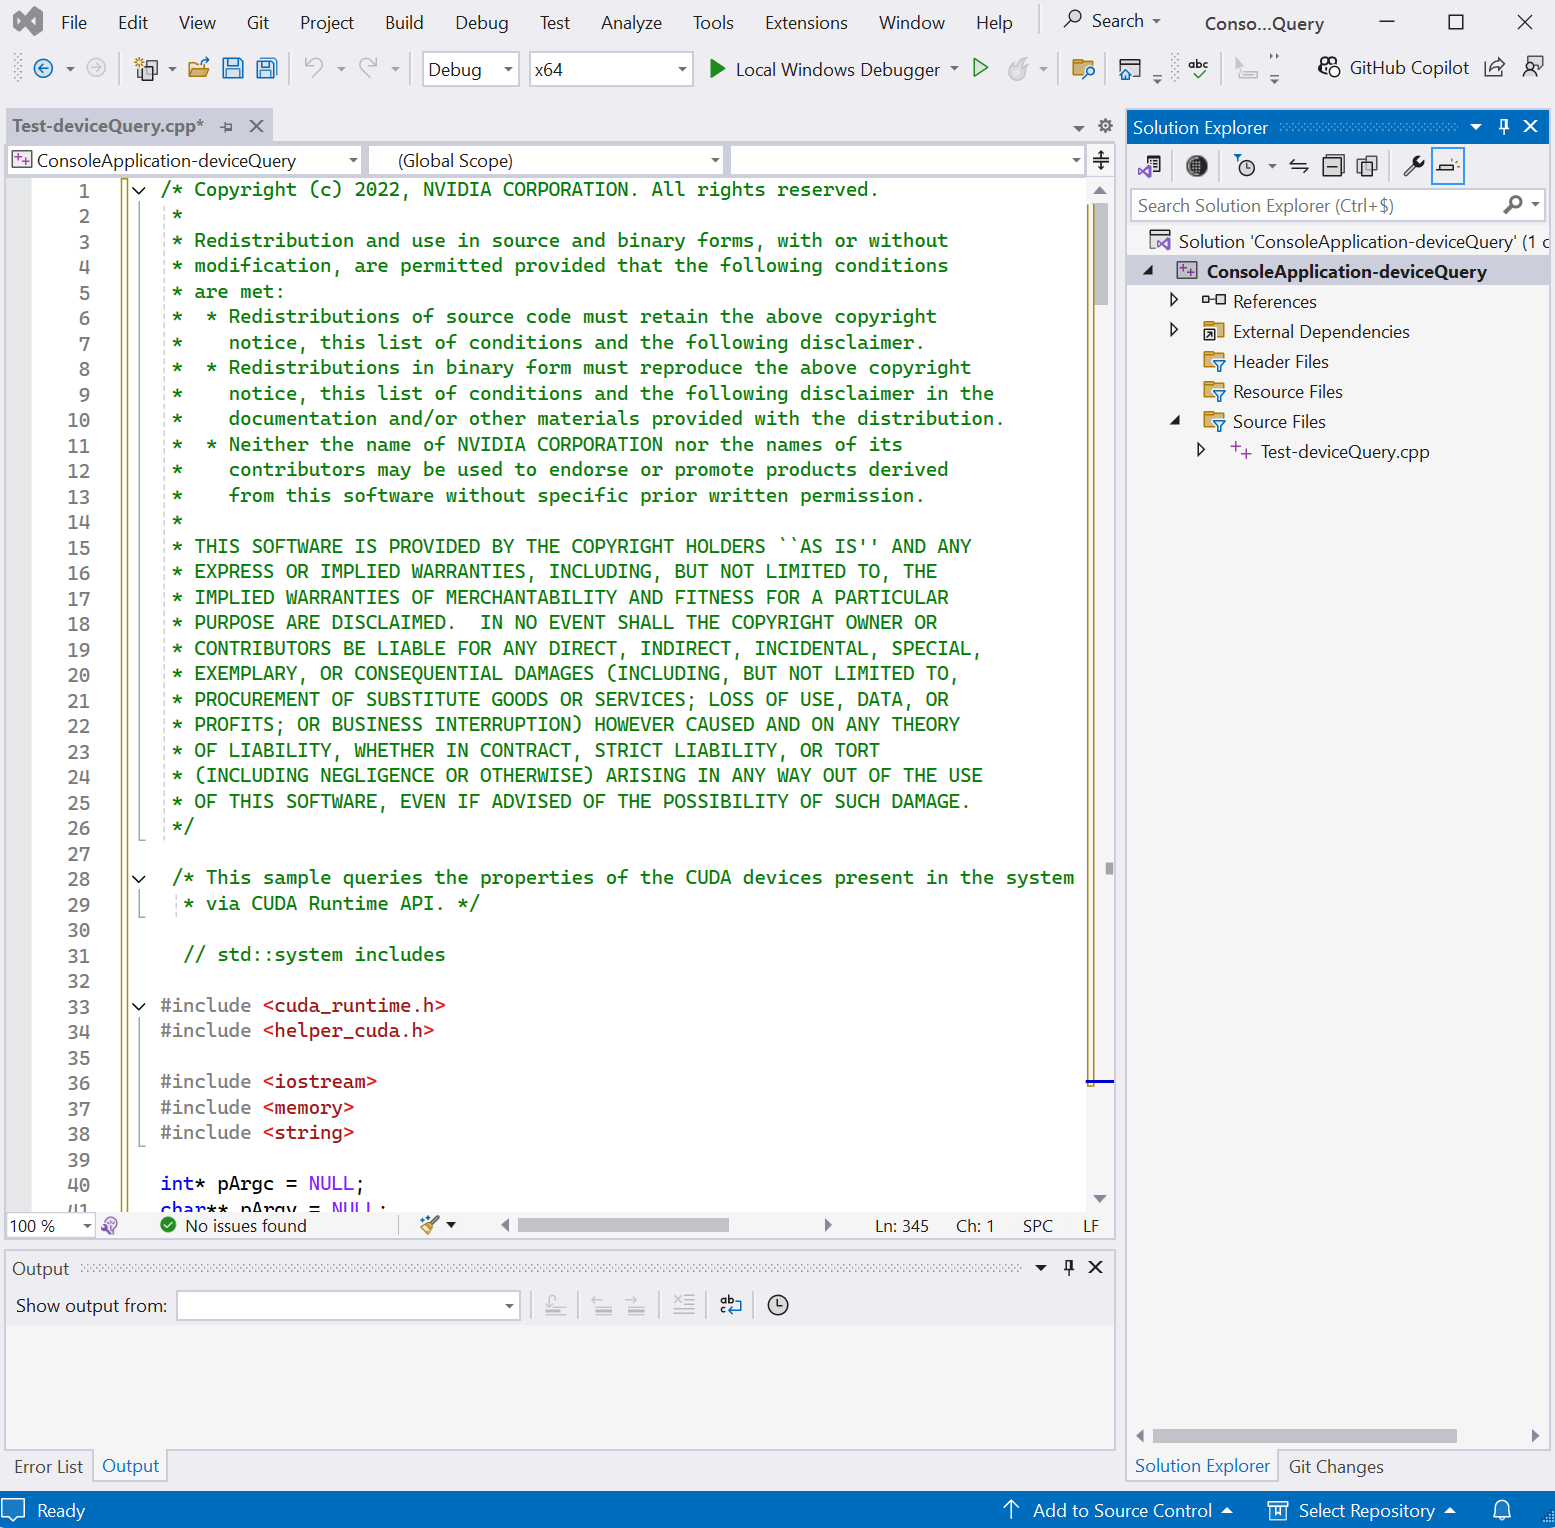
- Select Build menu then Build Solution.
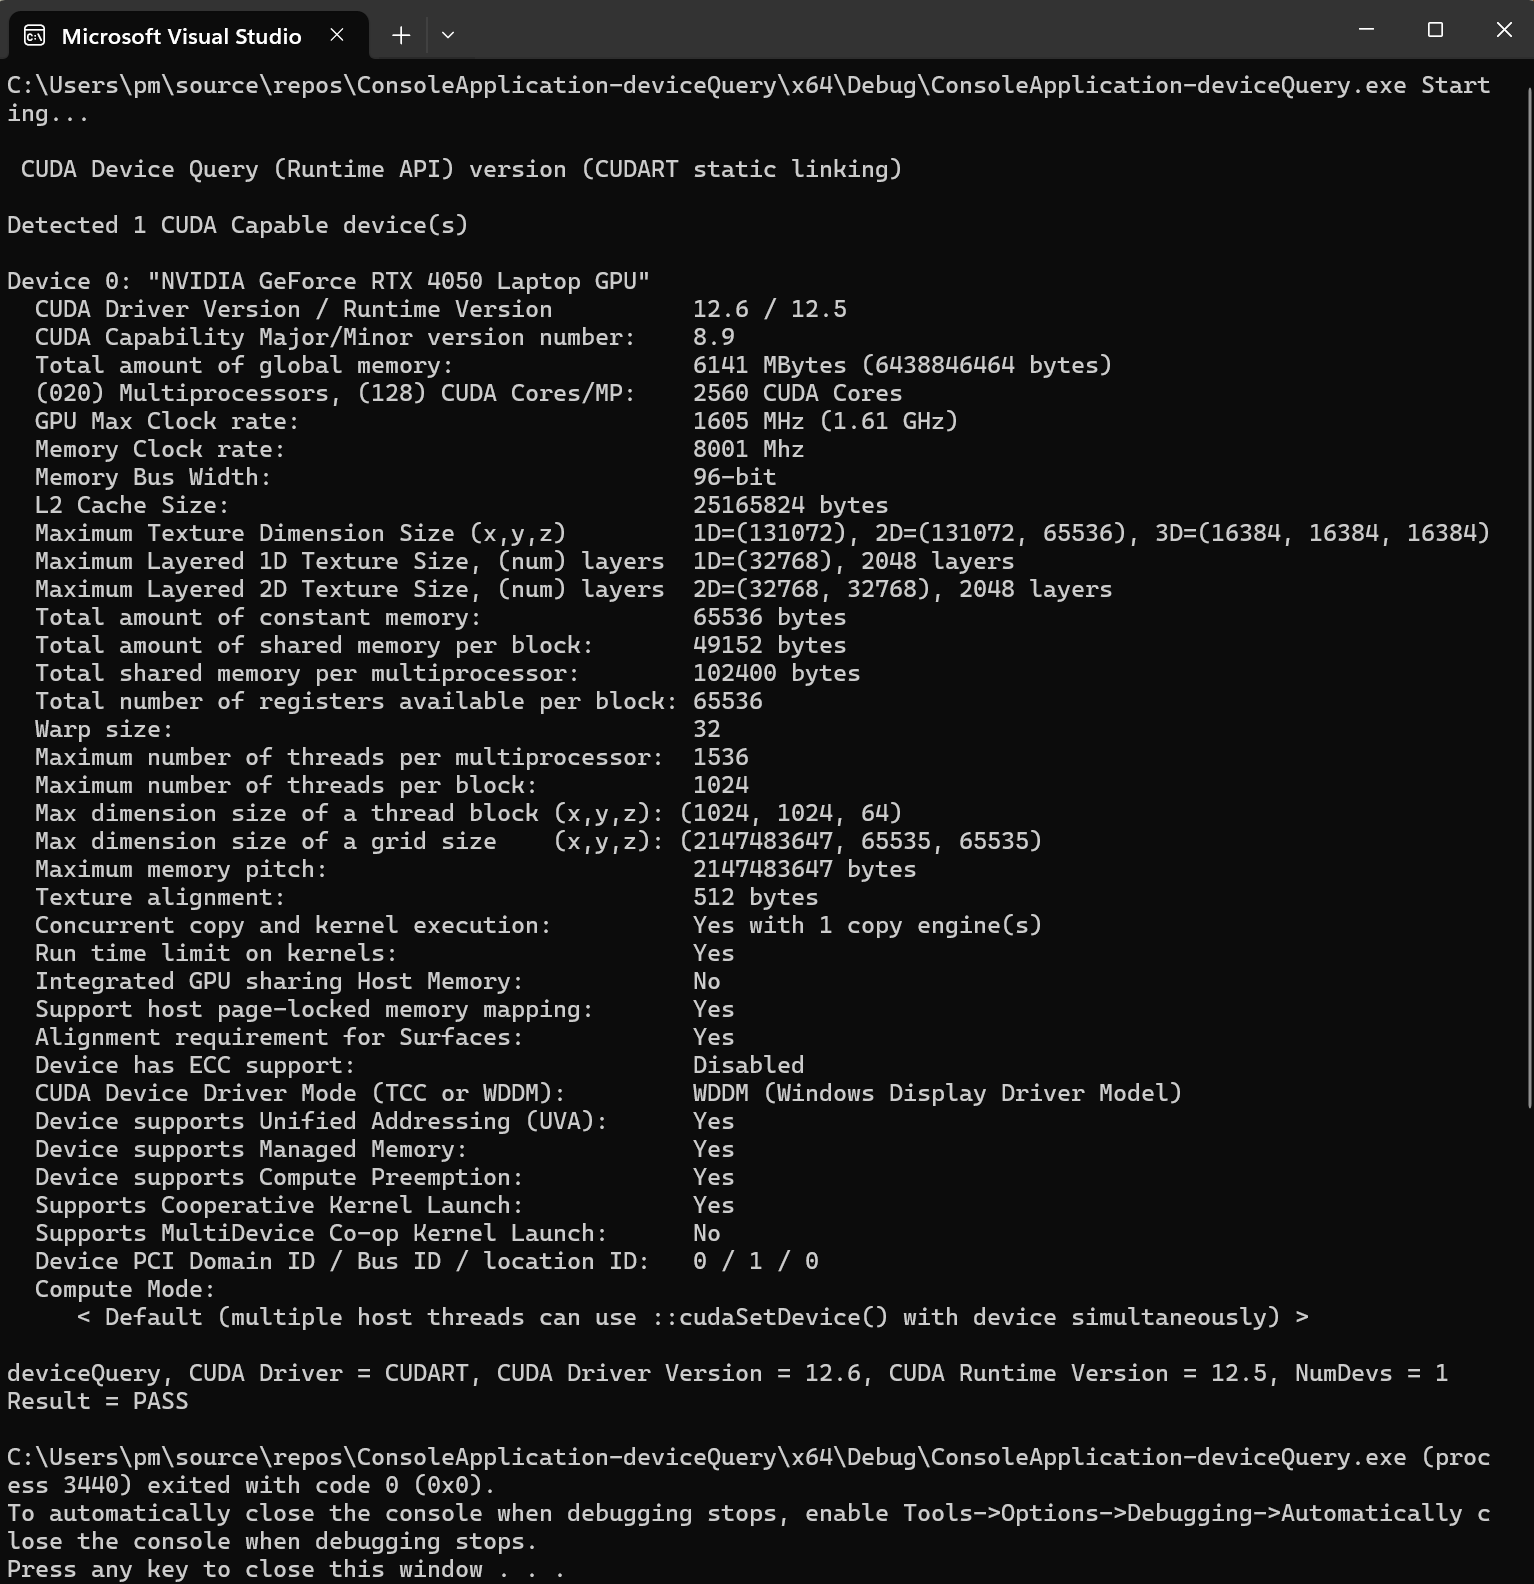
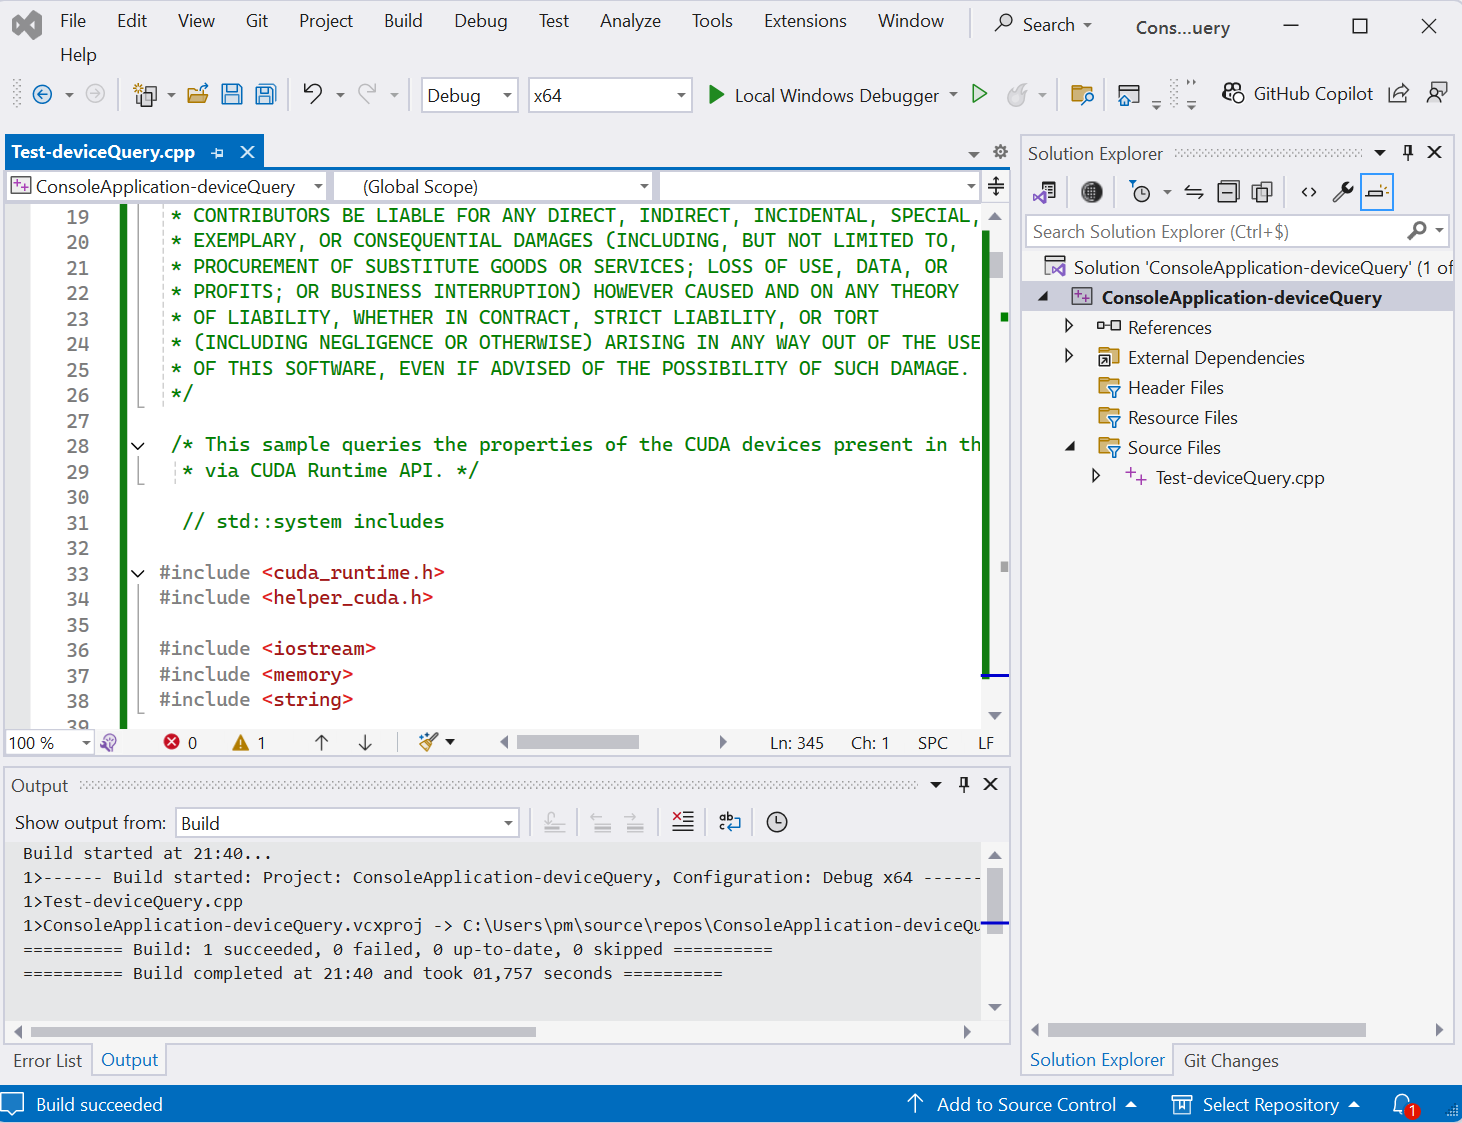 Two files (ConsoleApplication-deviceQuery.exe and ConsoleApplication-deviceQuery.pdb) are generated. This time, they are located in the folder
C:\Users\pm\source\repos\ConsoleApplication-deviceQuery\x64\Debug. - Select Debug menu then Start Without Debugging.
bandwidthTest.cu project
Create your our bandwidthTest project.
- In Visual Studio 2022 panel, click Create a new project.
- In Create a new project panel, select Empty Project.
Click Next button. - Configure your new project panel appears.
Fill the Project name: ConsoleApplication-bandwidthTest
Click Create button.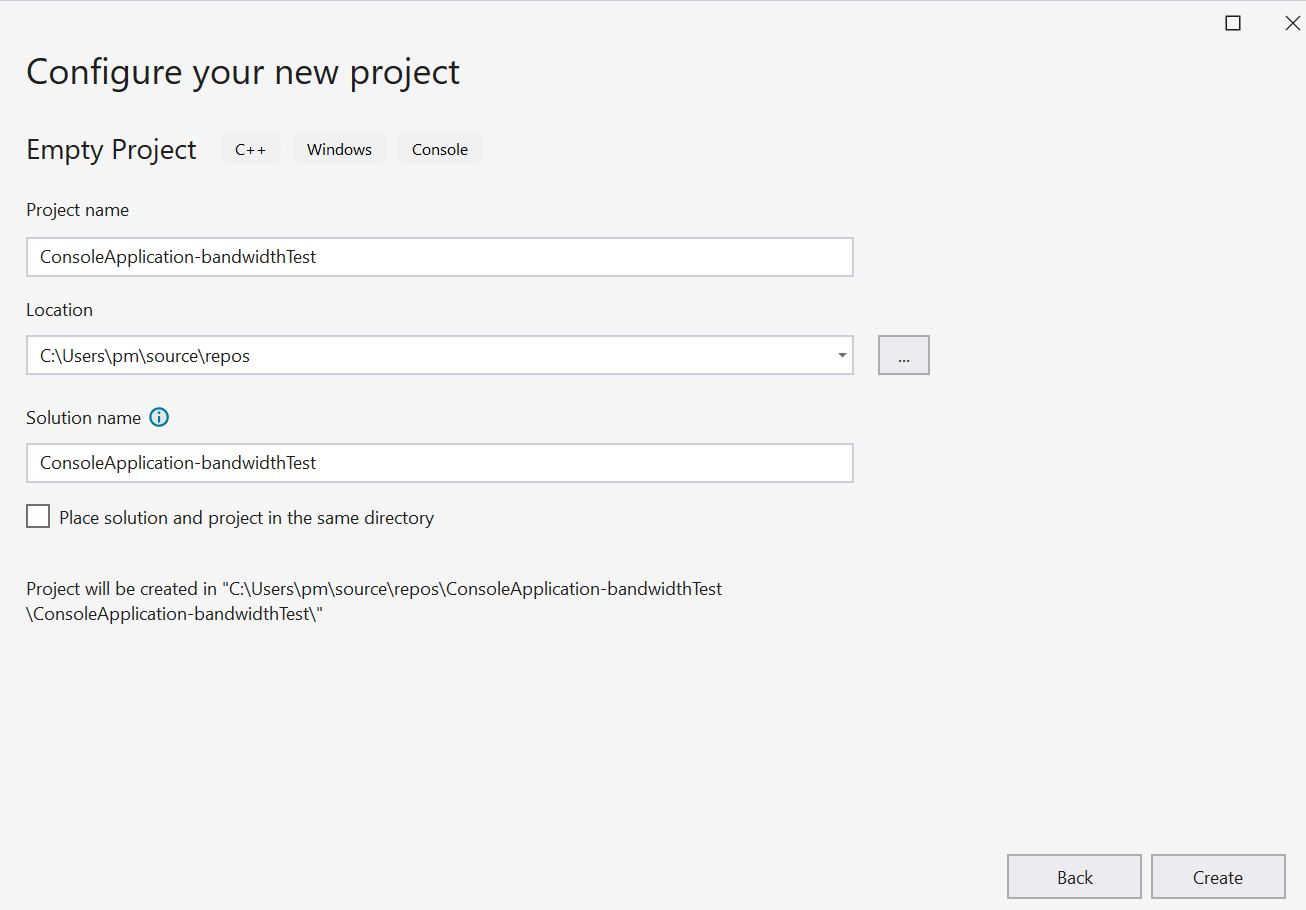
- The Visual Studio editor appears.
Right click the folder of Source Files in Solution Explorer.
Select Add then New Item... - Add New Item - ConsoleApplication-bandwidthTest panel appears.
Select C++ File (.cpp)
Provid the name of Visual C++ File(.cpp): test-bandwidthTest.cu
The file extension is .cu instead of .cpp. VC++ knows that this is a CUDA source file, which must be compiled with nvcc.Click Add button.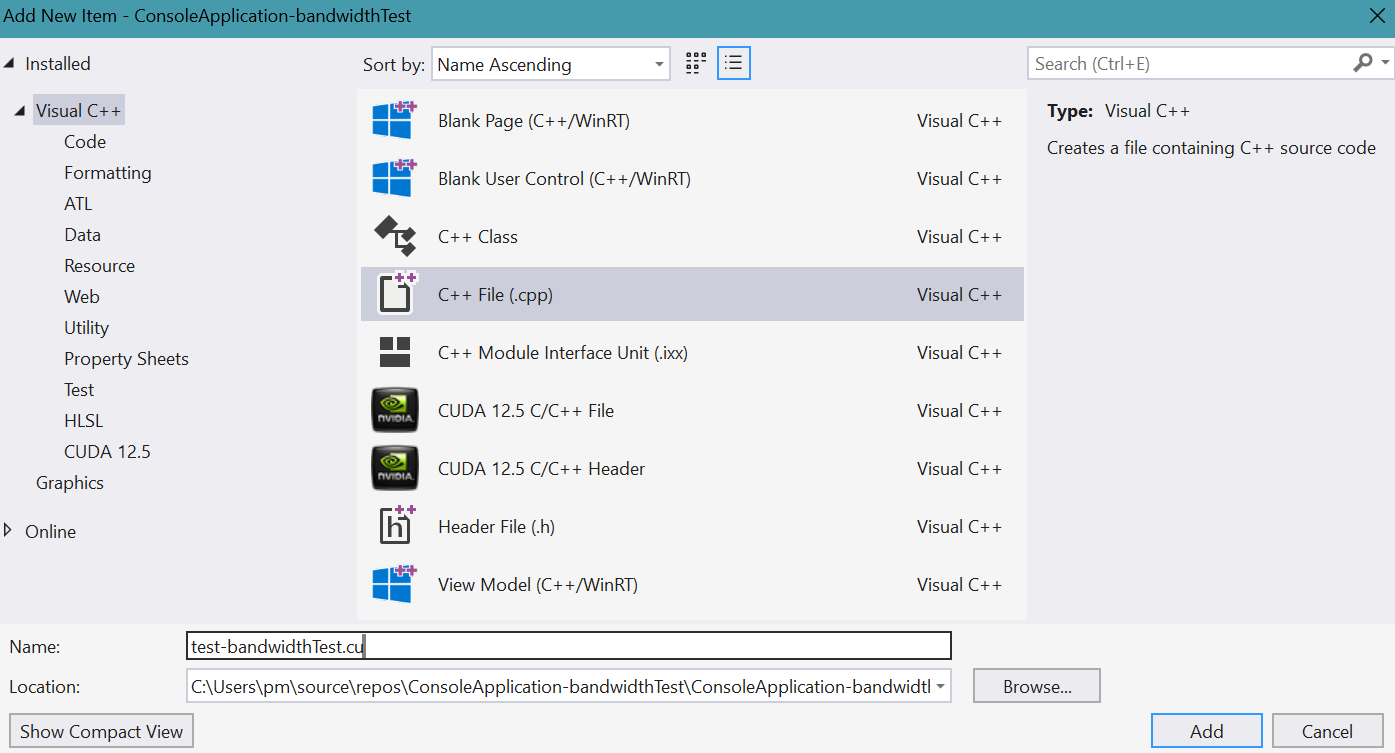
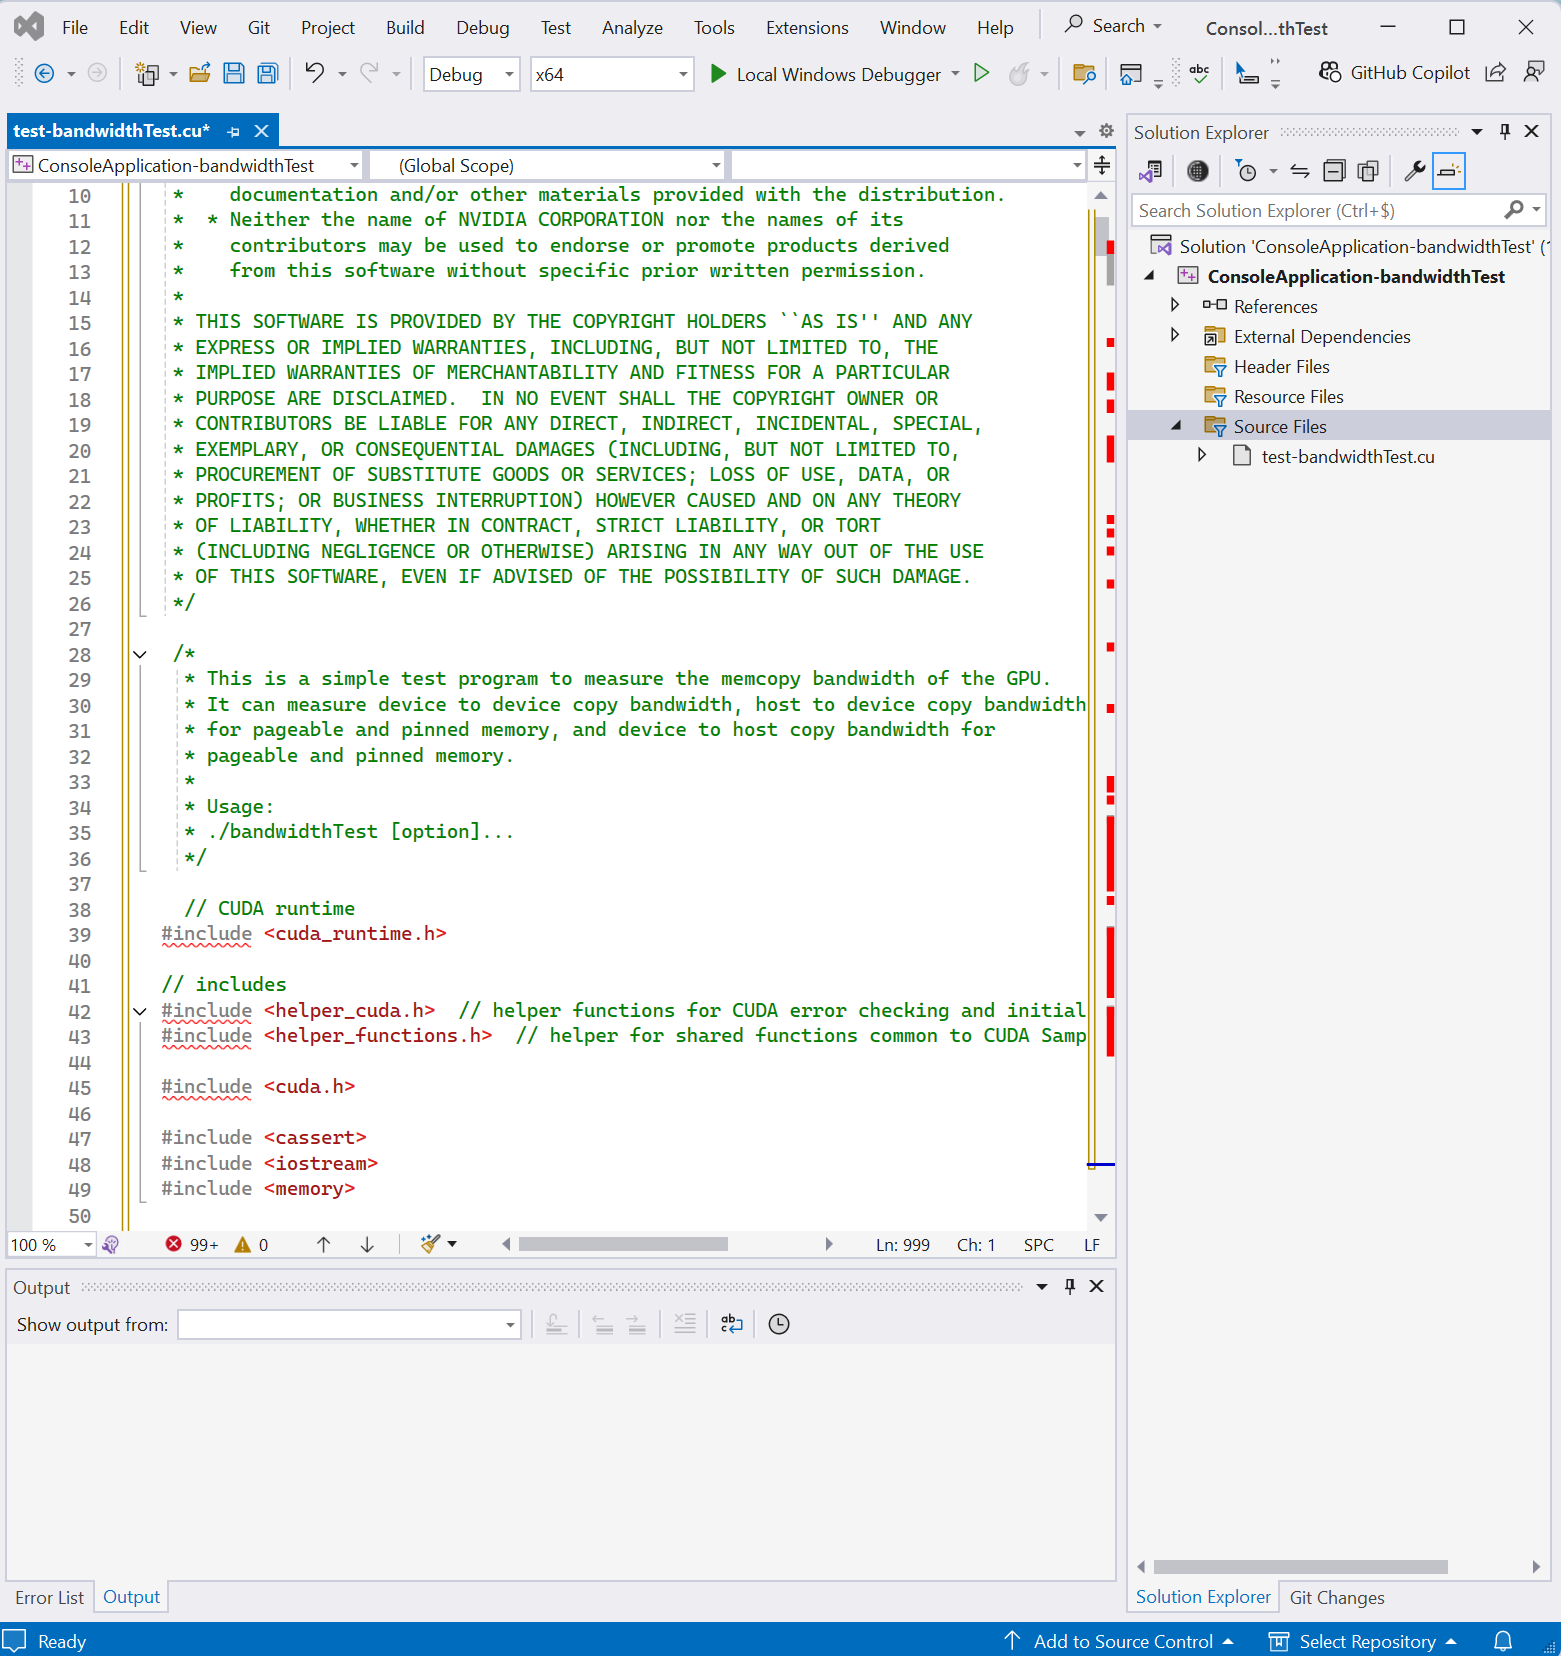
- An empty source file with title test-bandwidthTest.cu appears for editing.
- Copy and paste the file
C:\Users\pm\source\repos\cuda-samples-12.5\Samples\1_Utilities\bandwidthTest\bandwidthTest.cu into the empty source file.Several include words are wave-underlined in red.
- Right click the file test-bandwidthTest.cu in Solution Explorer.
Select Properties.
Check that the Item Type is Does not participate in build. The choice box does not contain CUDA C/C++. Close the panel.
- Right click the project ConsoleAplication-bandwidthTest in
Solution Explorer. Select Build Dependencies then Build Customizations...
Tick CUDA 12.5(.targets, .props).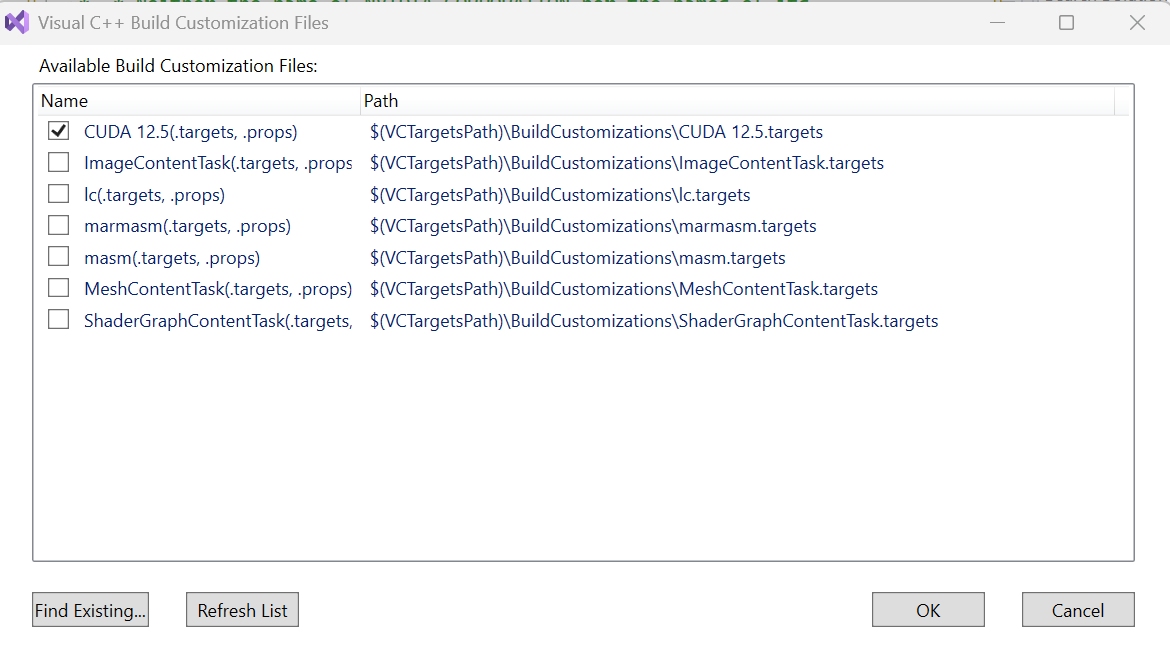
Click OK button. - Right click again the file test-bandwidthTest.cu in Solution Explorer.
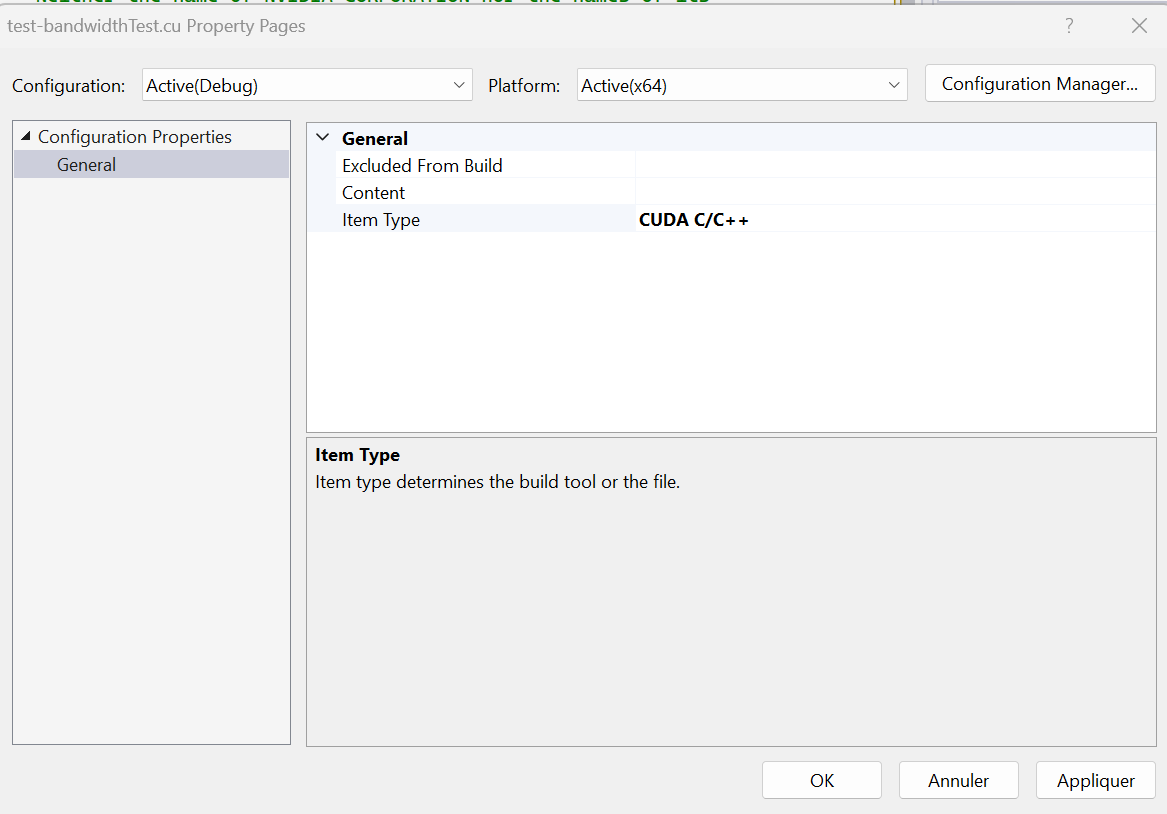
Select Properties.
This time, the choice box contains CUDA C/C++.
- Select CUDA C/C++.
Click Appy button then OK button.
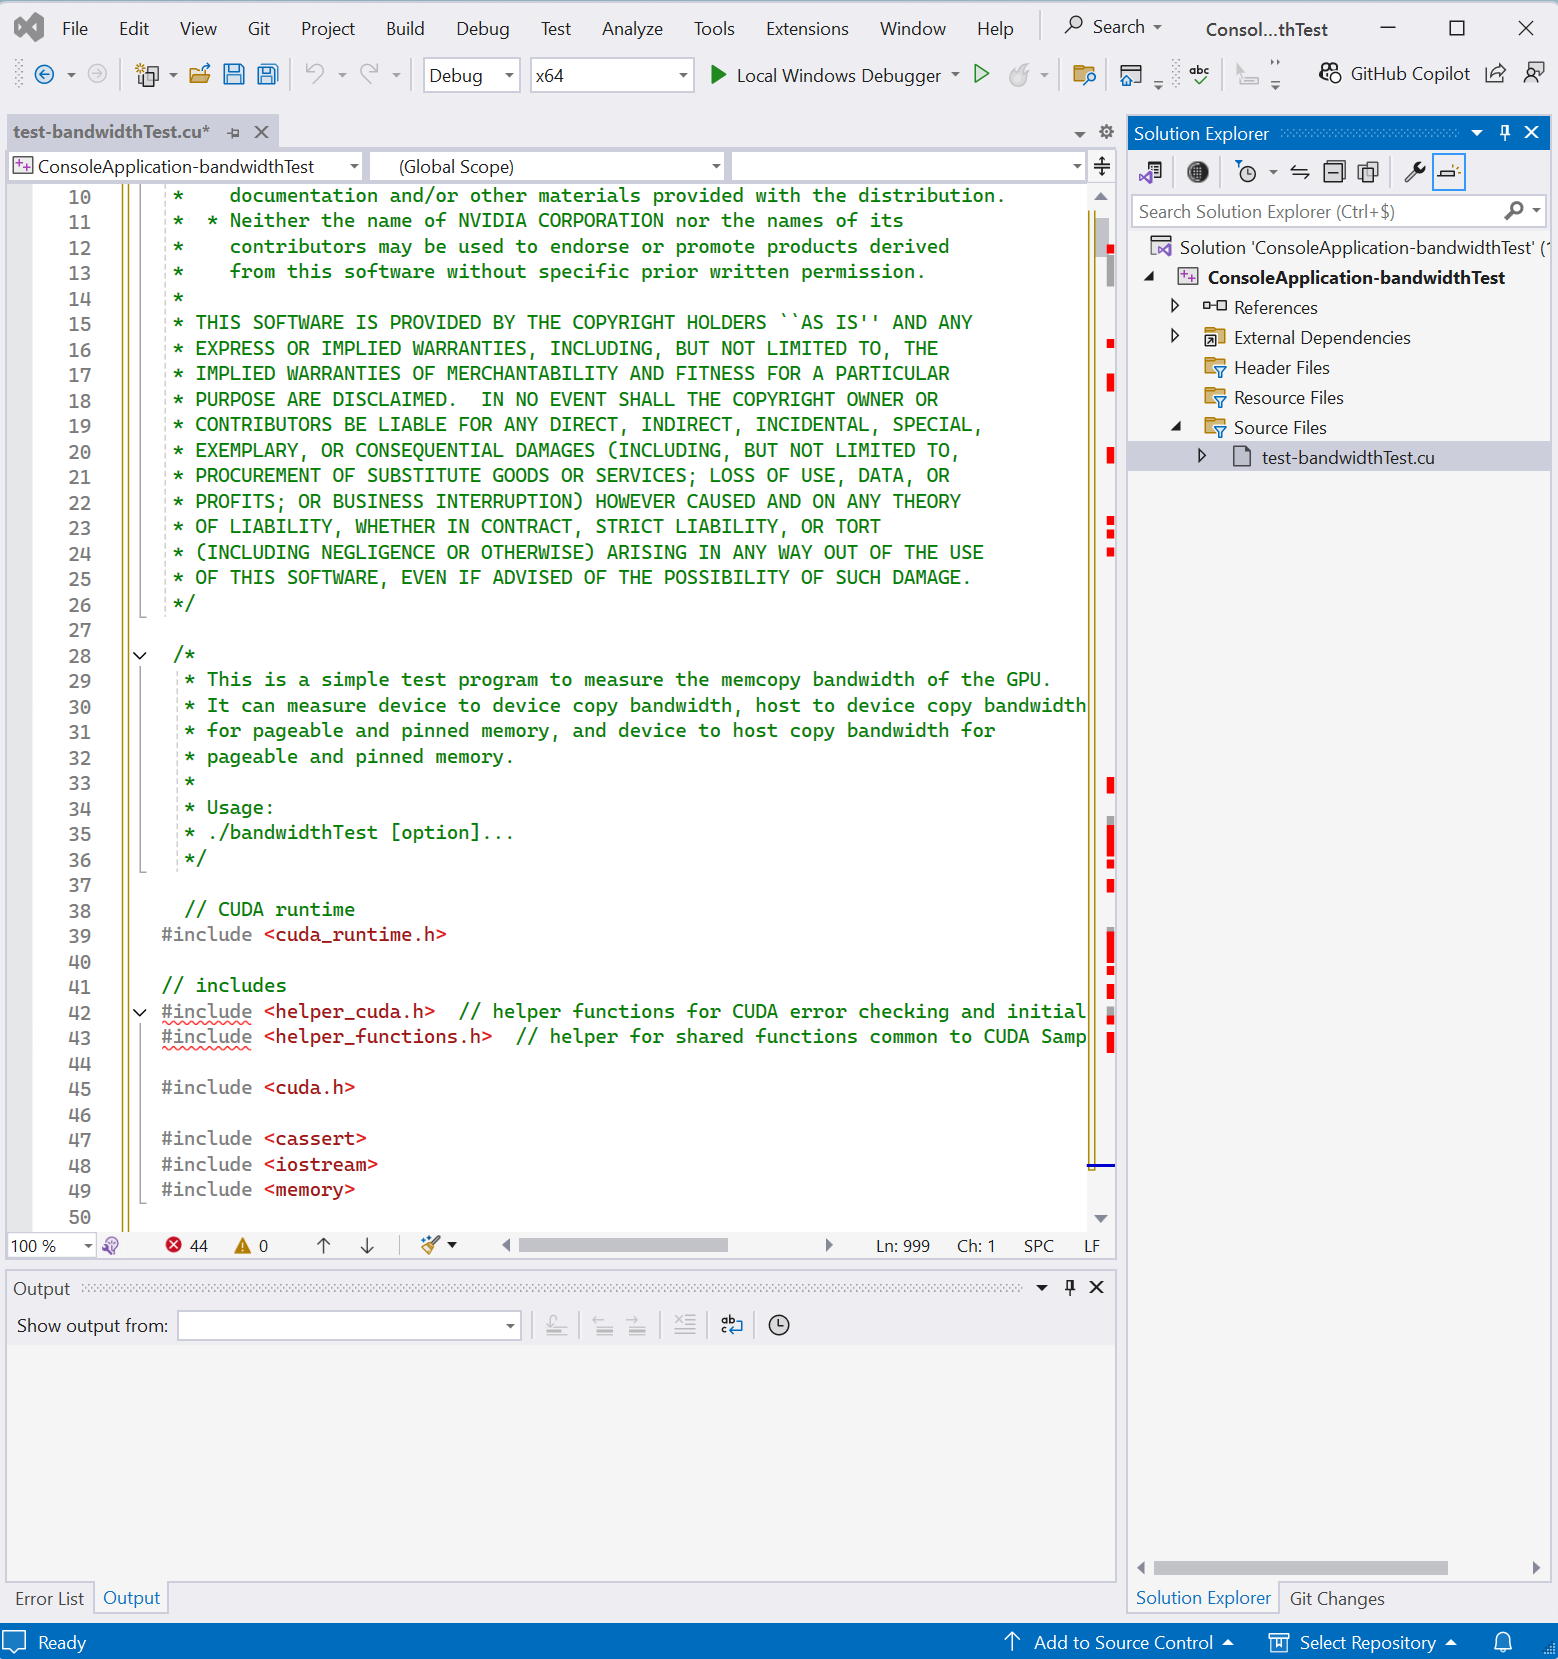
- The word #include before <cuda_runtime.h> and that before <cuda.h> are not wave-underlined.
- Right click the project ConsoleAplication-bandwidthTest in Solution Explorer.
Select Properties, then VC++ Directories.
Add C:\Users\pm\source\repos\cuda-samples-12.5\Common; in Include Directories.Click Apply button then OK button.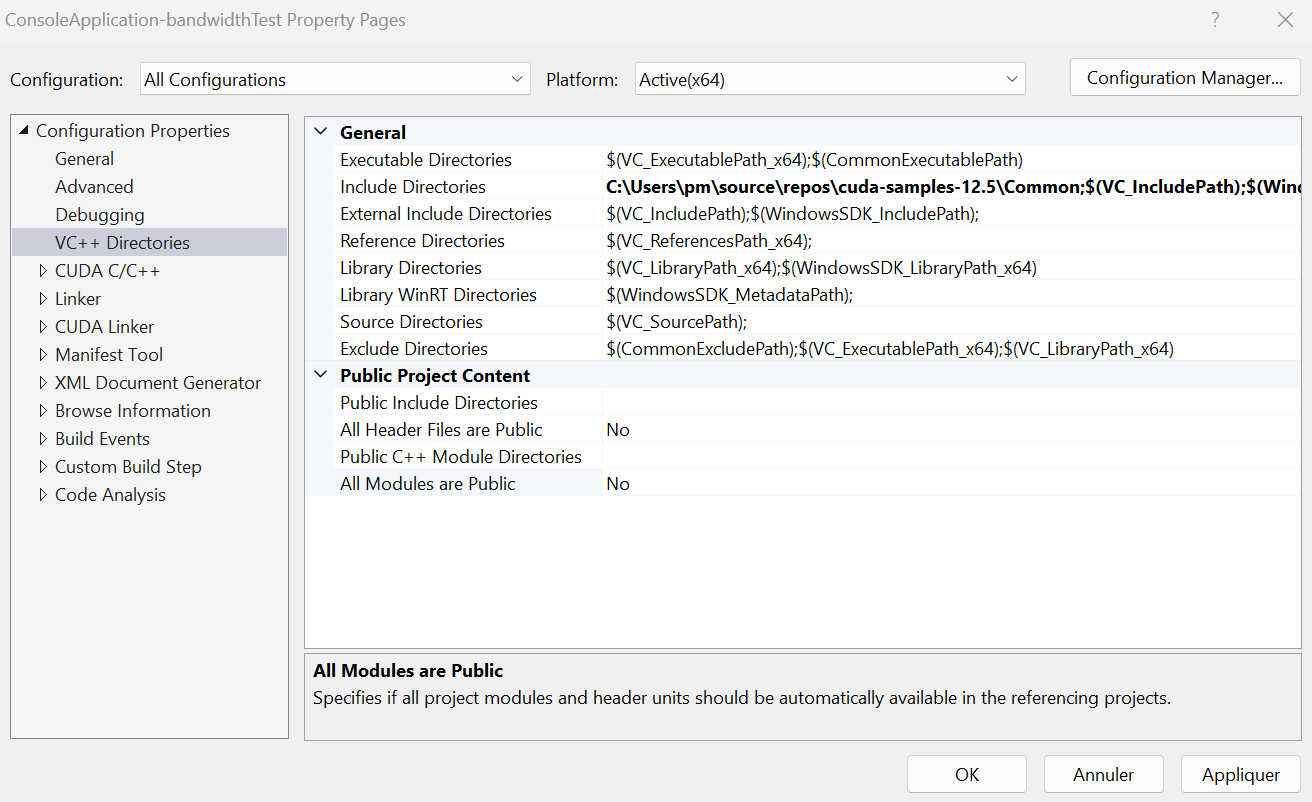
- The word include before <helper_functions.h> and that before before <helper_cuda.h> are not wave-underlined.
- Select Build menu then Build Solution.
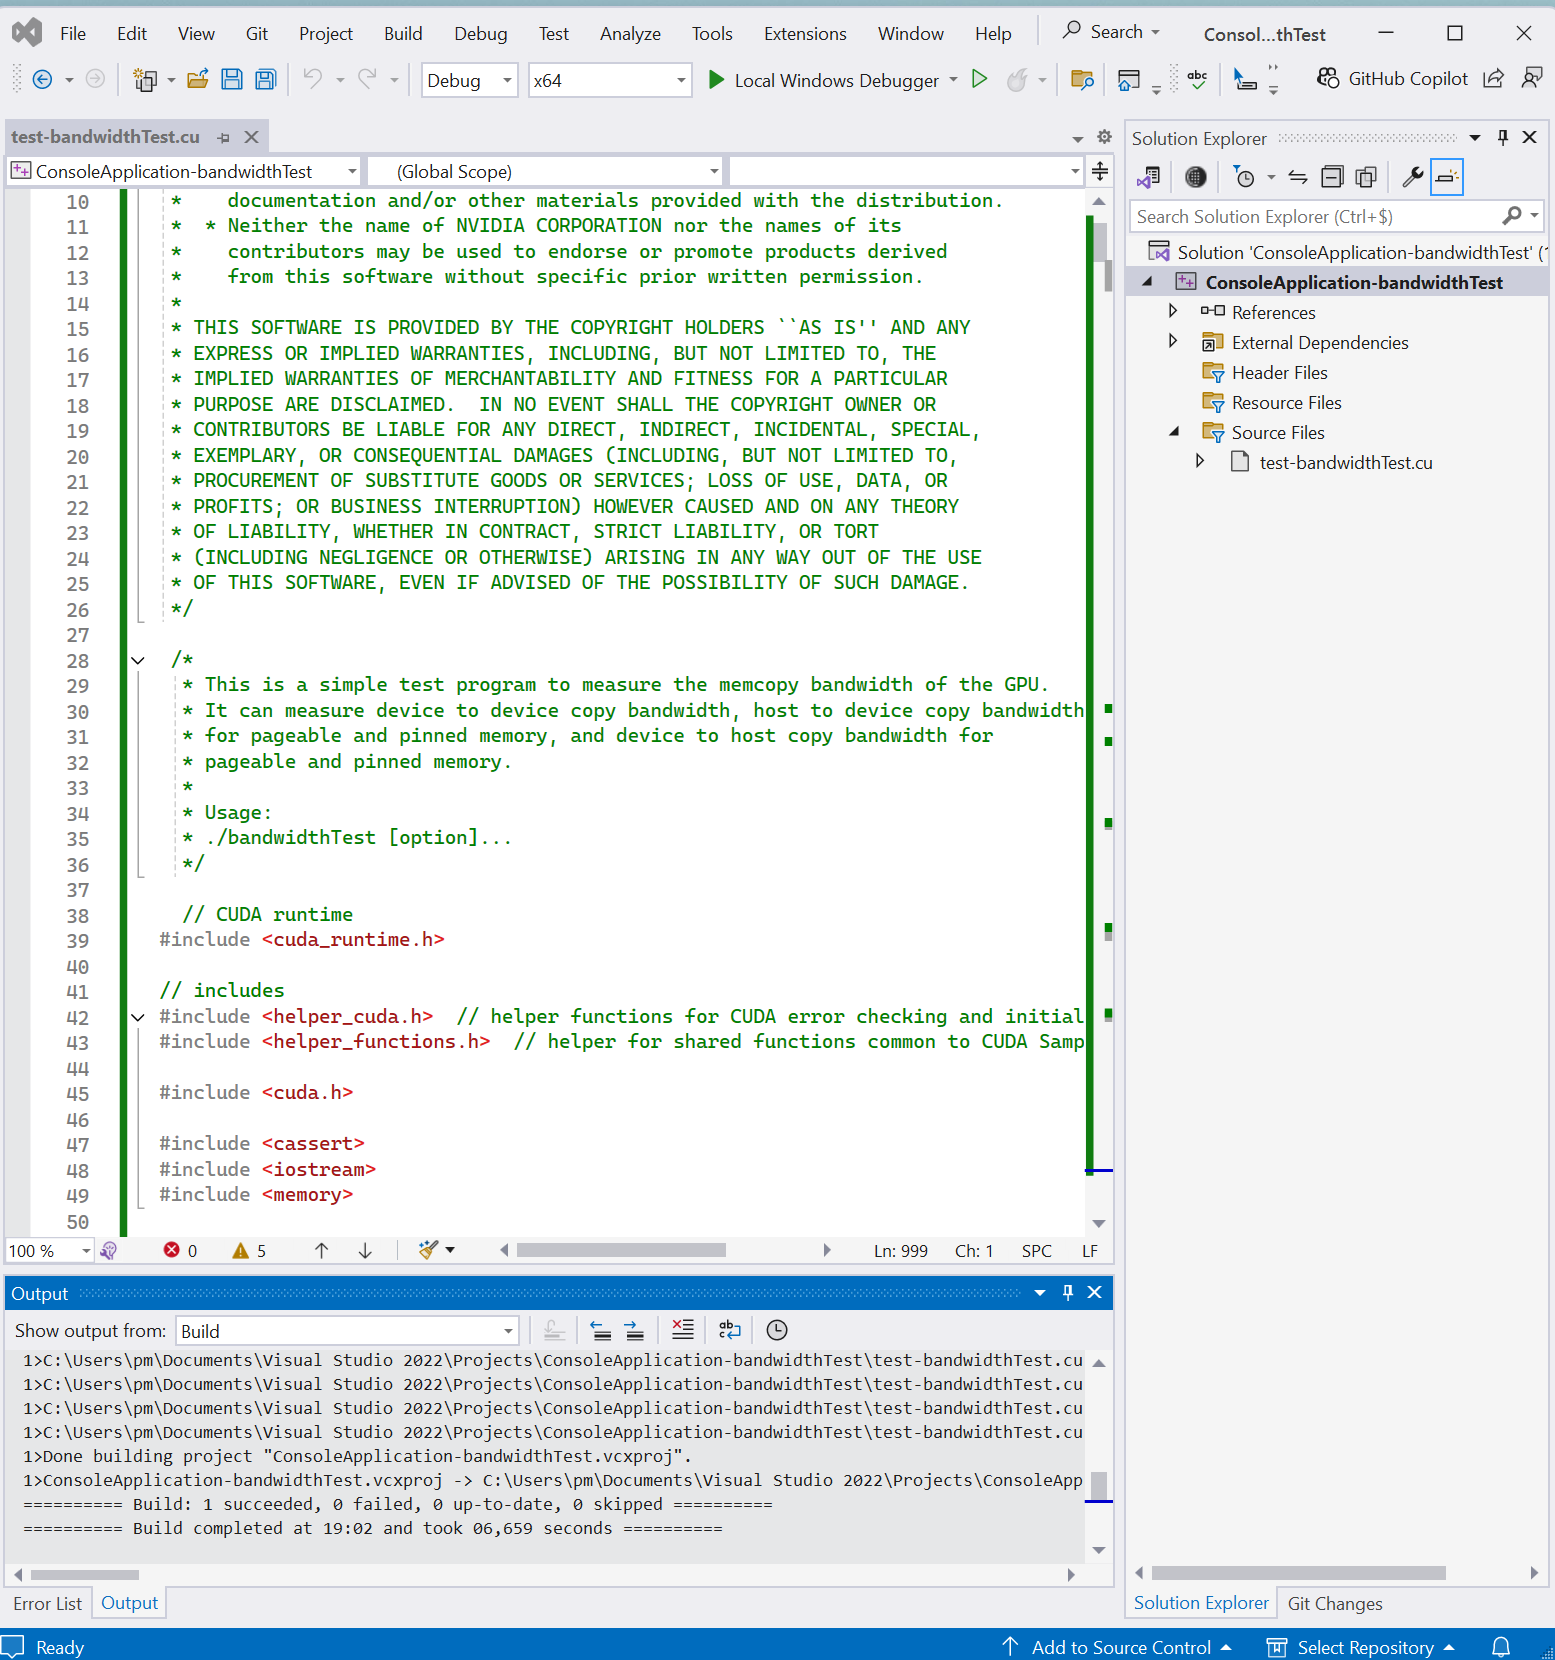
- Select Debug menu then Start Without Debugging
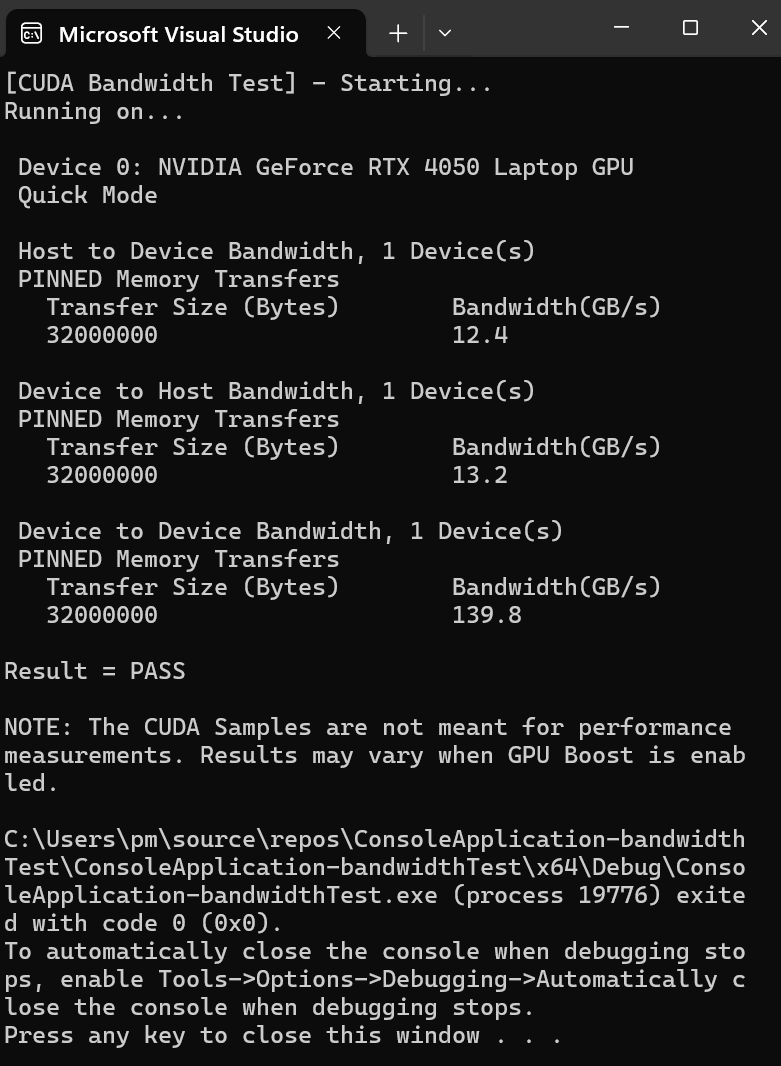
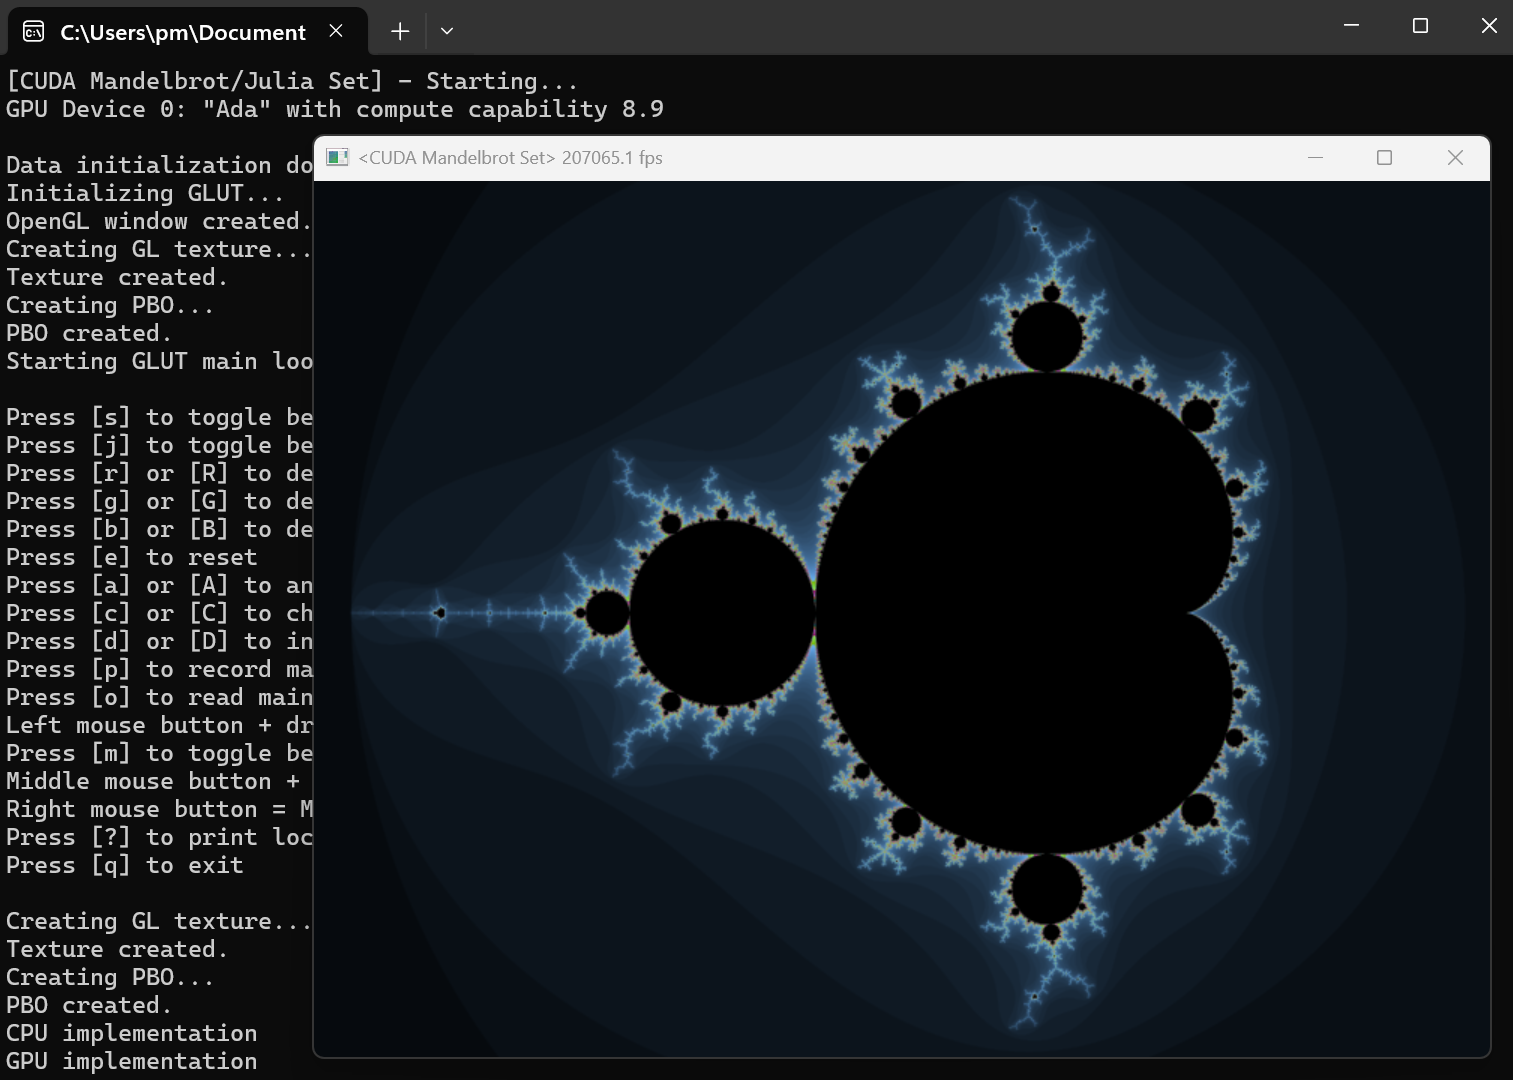
Mandelbrot.cu project
Create your Mandelbrot project.
- In Visual Studio 2022 panel, click Create a new project.
- In Create a new project panel, select Empty Project. Click Next button.
- Configure your new project panel appears.
Fill the Project name: ConsoleApplication1-Mandelbrot
Click Create button. - The Visual Studio editor appears.
***************** - Right click the folder of Source Files in Solution Explorer for adding a new item. Select Add then New Item...
- Add New Item panel appears. Select C++ File (.cpp).
Provid the name of C++ File(.cpp): Mandelbrot_cuda.cu
The file extension is .cu instead of .cpp. VC++ knows that this is a CUDA source file, which must be compiled with nvcc.
Click Add button. - An empty source file appears for editing.
- Copy and paste the file
C:\Users\pm\source\repos\cuda-samples-12.5\Samples\5_Domain_Specific\Mandelbrot\Mandelbrot_cuda.cu into the empty source file.
***************** - Right click the folder of Source Files in Solution Explorer for adding a new item. Select Add then New Item...
- Add New Item panel appears. Select C++ File (.cpp).
Provid the name of C++ File(.cpp): Mandelbrot.cpp
Click Add button. - An empty source file appears for editing.
- Copy and paste the file
C:\Users\pm\source\repos\cuda-samples-12.5\Samples\5_Domain_Specific\Mandelbrot\Mandelbrot.cpp into the empty source file.
***************** - Right click the folder of Source Files in Solution Explorer for adding a new item. Select Add then New Item...
- Add New Item panel appears. Select C++ File (.cpp).
Provid the name of C++ File(.cpp): Mandelbrot_gold.cpp
Click Add button. - An empty source file appears for editing.
- Copy and paste the file
C:\Users\pm\source\repos\cuda-samples-12.5\Samples\5_Domain_Specific\Mandelbrot\Mandelbrot_gold.cpp into the empty source file.
***************** - Right click the folder of Source Files in Solution Explorer for adding a new item. Select Add then New Item...
- Add New Item panel appears. Select C++ File (.cpp).
Provid the name of C++ File(.cpp): Mandelbrot_kernel.cuh
The file extension is .cuh.
Click Add button. - An empty source file appears for editing.
- Copy and paste the file
C:\Users\pm\source\repos\cuda-samples-12.5\Samples\5_Domain_Specific\Mandelbrot\Mandelbrot_kernel.cuh into the empty source file.
***************** - Right click the folder of Header Files in Solution Explorer for adding a new item. Select Add then New Item...
- Add New Item panel appears. Select Header File(.h).
Provid the name of Header File(.h): Mandelbrot_gold.h
The file extension is .h.
Click Add button. - An empty source file appears for editing.
- Copy and paste the file
C:\Users\pm\source\repos\cuda-samples-12.5\Samples\5_Domain_Specific\Mandelbrot\Mandelbrot_gold.h into the empty source file.
***************** - Right click the folder of Header Files in Solution Explorer for adding a new item. Select Add then New Item...
- Add New Item panel appears. Select Header File(.h).
Provid the name of Header File(.h): Mandelbrot_kernel.h
Click Add button. - An empty source file appears for editing.
- Copy and paste the file
C:\Users\pm\source\repos\cuda-samples-12.5\Samples\5_Domain_Specific\Mandelbrot\Mandelbrot_kernel.h into the empty source file.
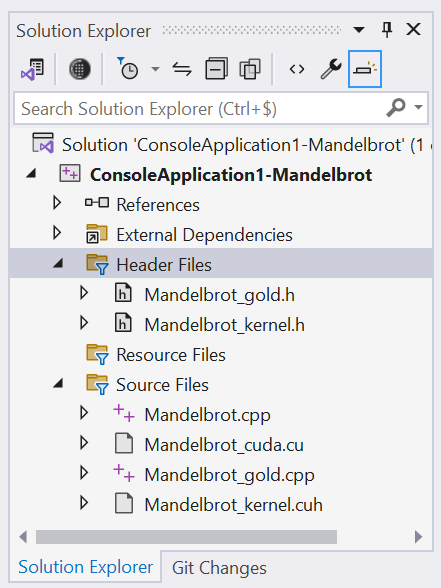
*****************
- Right click the project ConsoleApplication1-Mandelbrot in
Solution Explorer. Select Build Dependencies then Build Customizations...
Tick CUDA 12.5(.targets, .props).
Click OK button.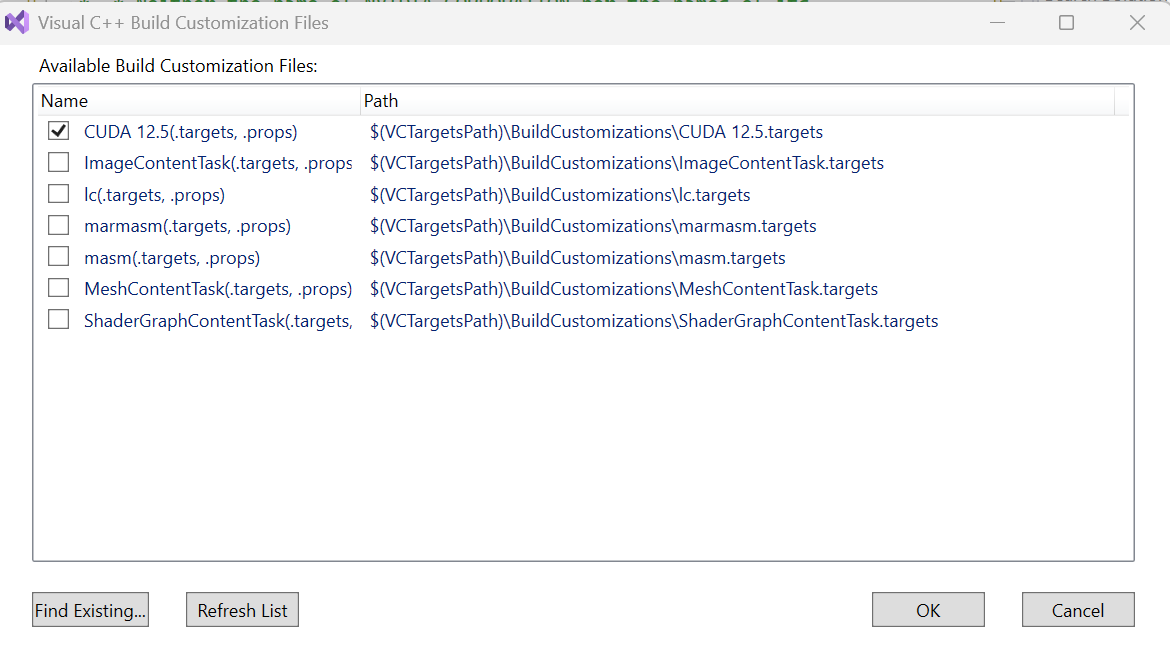
***************** - Right click the file Mandelbrot_kernel.cuh in Solution Explorer. Select Properties.
The Item Type is Does not participate in build. Close the panel.
***************** - Right click the file Mandelbrot_cuda.cu in Solution Explorer. Select Properties.
Click Item Type, an arrow appears near Does not participate in build.
Click the arrow, a choice list appears. Select CUDA C/C++ for Item Type.
Click Apply button then OK button.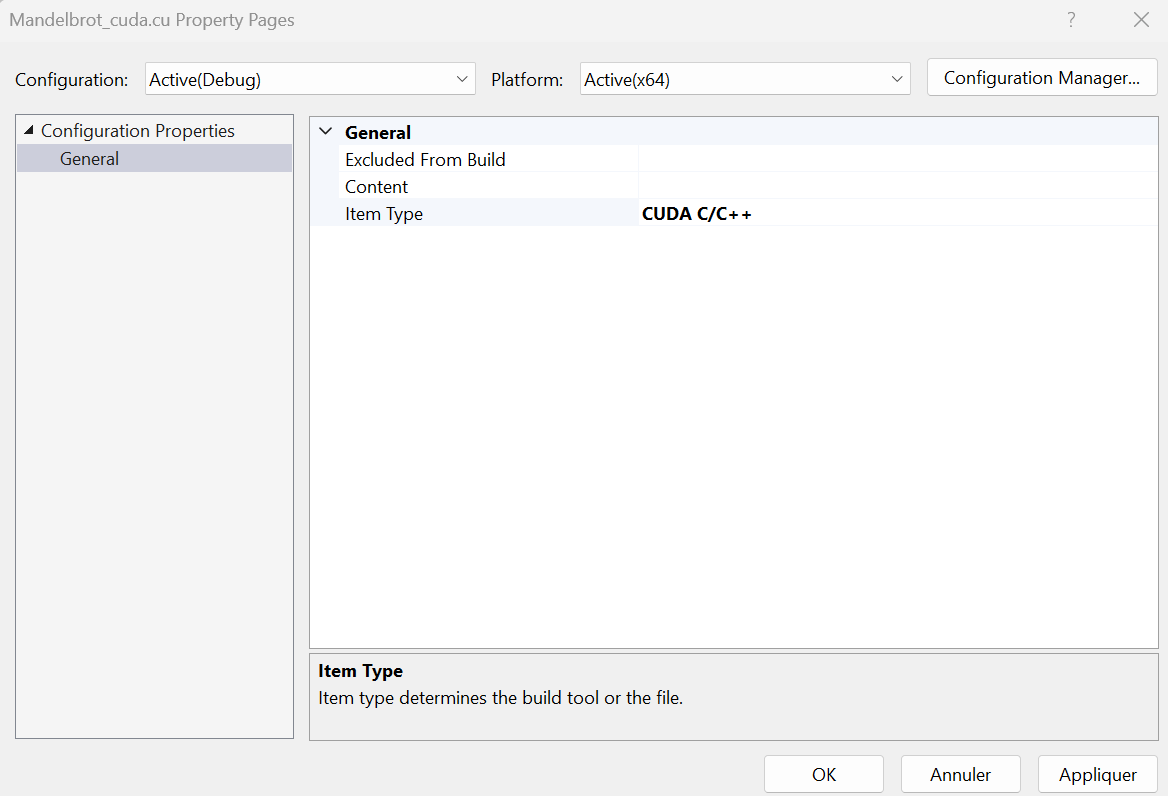
- Right click the file Mandelbrot.cpp in Solution Explorer. Select Properties.
The Item Type is C/C++ compiler. Close the panel.
***************** - Right click the file Mandelbrot_gold.cpp in Solution Explorer. Select Properties.
The Item Type is C/C++ compiler. Close the panel.
***************** - Right click the file Mandelbrot_gold.h in Solution Explorer. Select Properties.
The Item Type is C/C++ header. Close the panel.
***************** - Right click the file Mandelbrot_kernel.h in Solution Explorer. Select Properties.
The Item Type is C/C++ header. Close the panel.
***************** - Right click the project ConsoleAplication1-Mandelbrot in
Solution Explorer. Select Properties.
In Configuration Properties sub-panel, select VC++ Directories.
Add C:\Users\pm\source\repos\cuda-samples-12.5\common; in Include Directories. It contains some XXX.h files.
Add C:\Users\pm\source\repos\cuda-samples-12.5\common\lib\x64; in Library Directories. It contains glew64.lib.Click Apply button then OK button.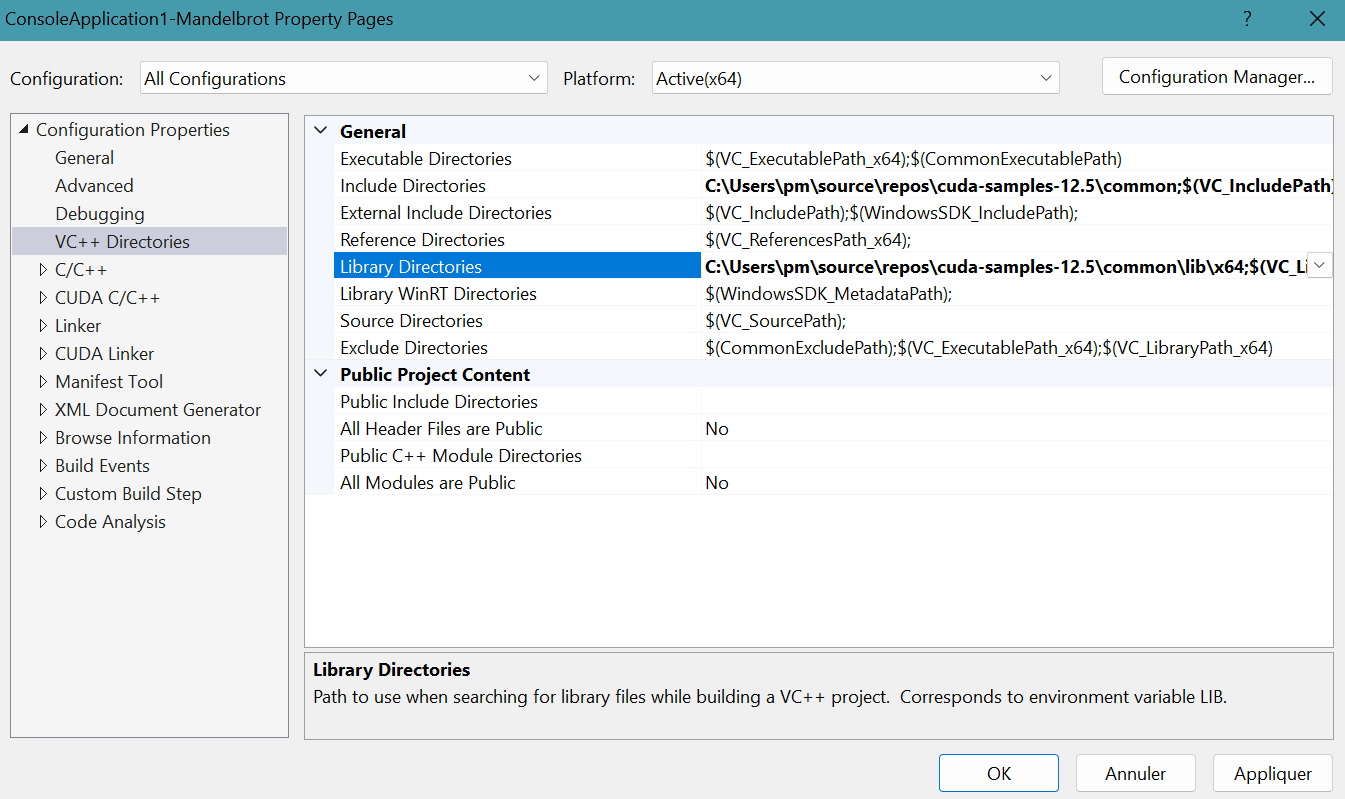
- Right click the project ConsoleAplication1-Mandelbrot in
Solution Explorer. Select Properties.
In Configuration Properties sub-panel, select Linker then Input.
Add cudart_static.lib; glew64.lib; in Additional Dependencies.
Click Apply button then OK button.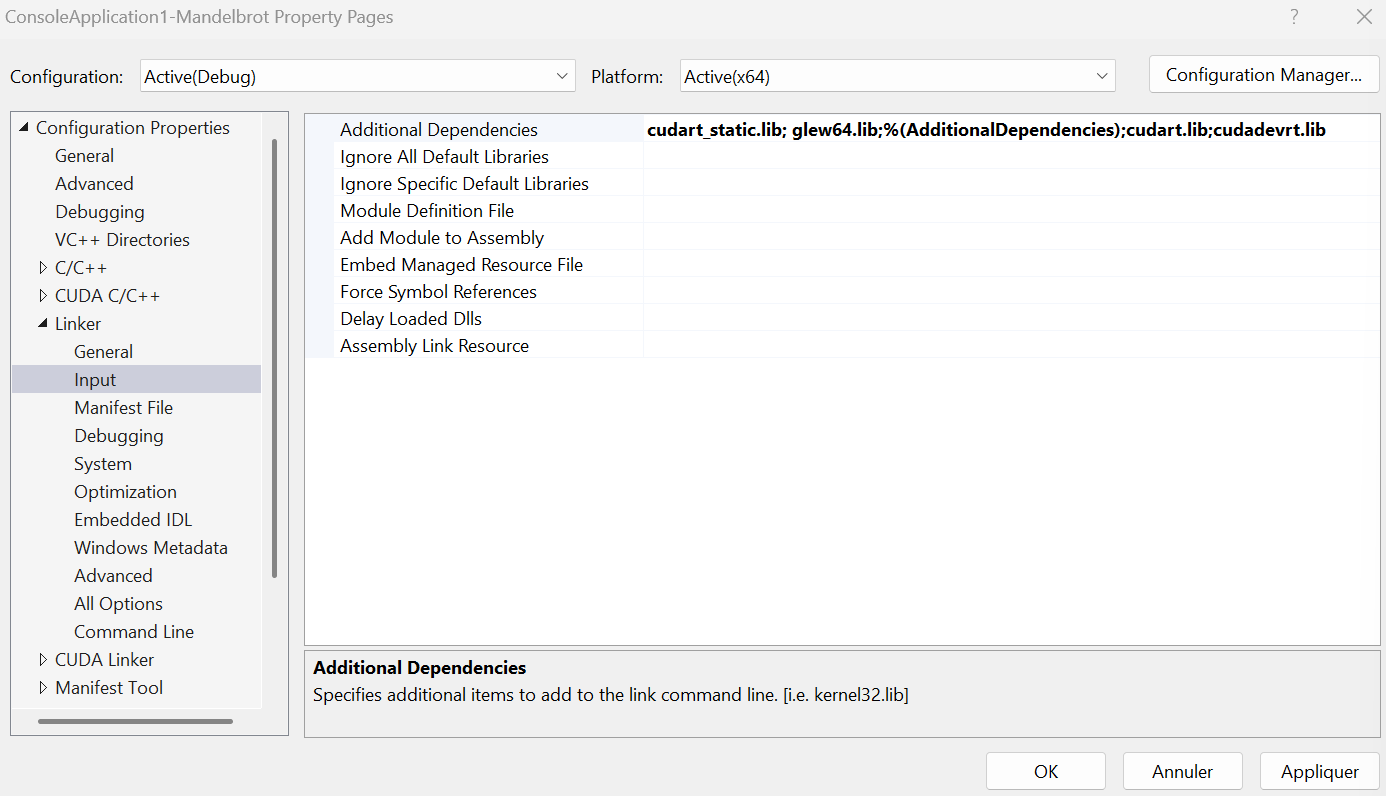
- Select Build menu then Build Solution.
Four files (ConsoleApplication1-Mandelbrot.exe, ConsoleApplication1-Mandelbrot.lib, ConsoleApplication1-Mandelbrot.exp, and ConsoleApplication1-Mandelbrot.pdb) are generated in the folder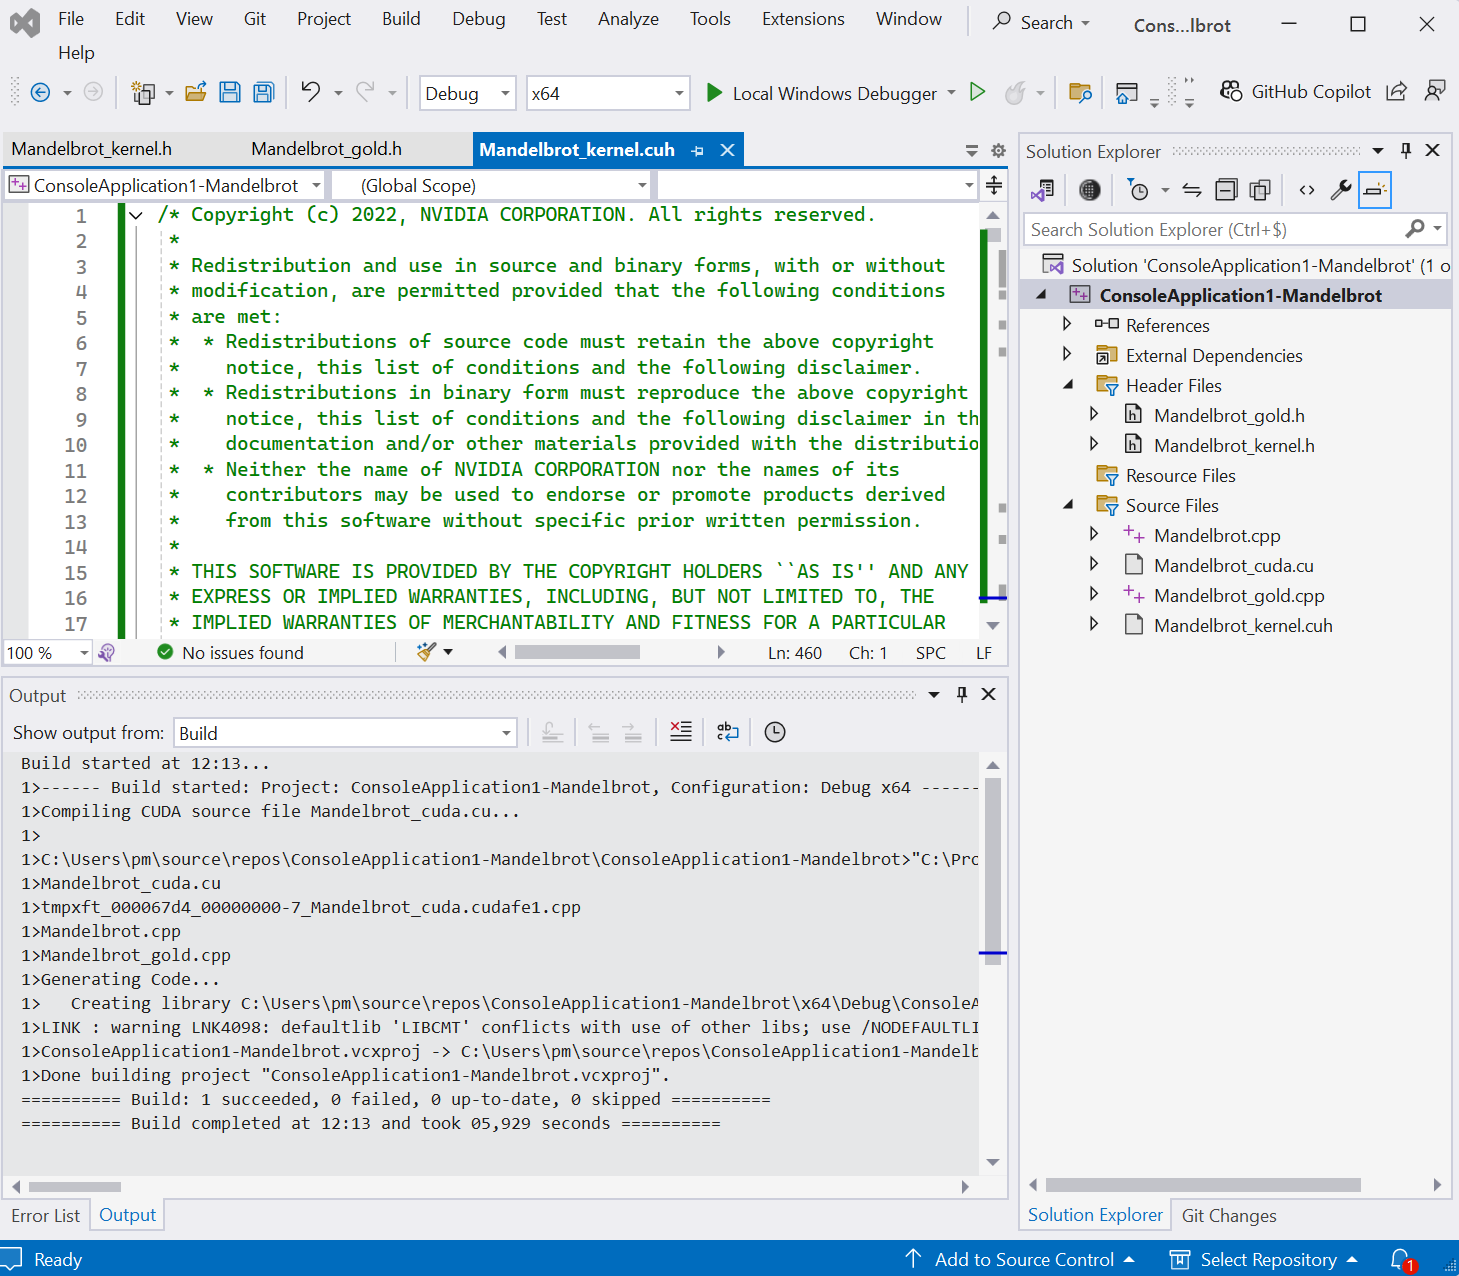 C:\Users\pm\source\repos\ConsoleApplication1-Mandelbrot\x64\Debug.
 - Copy and paste the two files glew64.dll and freeglut.dll from the folder
C:\Program Files\NVIDIA GPU Computing Toolkit\CUDA\v12.5\extras\demo_suite into the folder C:\Users\pm\source\repos\ConsoleApplication1-Mandelbrot\x64\Debug, the folder containing ConsoleApplication1-Mandelbrot.exe.
- Select Debug menu then Start Without Debugging.
CUDA and Visual Studio references
- Will Buik: Getting started with Visual Studio for C and C++ development
- Nilton Cesar Rojas Vales: Install CUDA on Windows: The definitive guide
- Learn: Install C and C++ support in Visual Studio
- Microsoft: Getting started with Visual Studio for C and C++ development
- Microsoft: VC++ directories property page (Windows)
- Microsoft: Create a C++ console app project
- Developpez: Une introduction à CUDA
- Learn: Create a console calculator in C++
- CUDA: CUDA installation guide for Microsoft Windows
