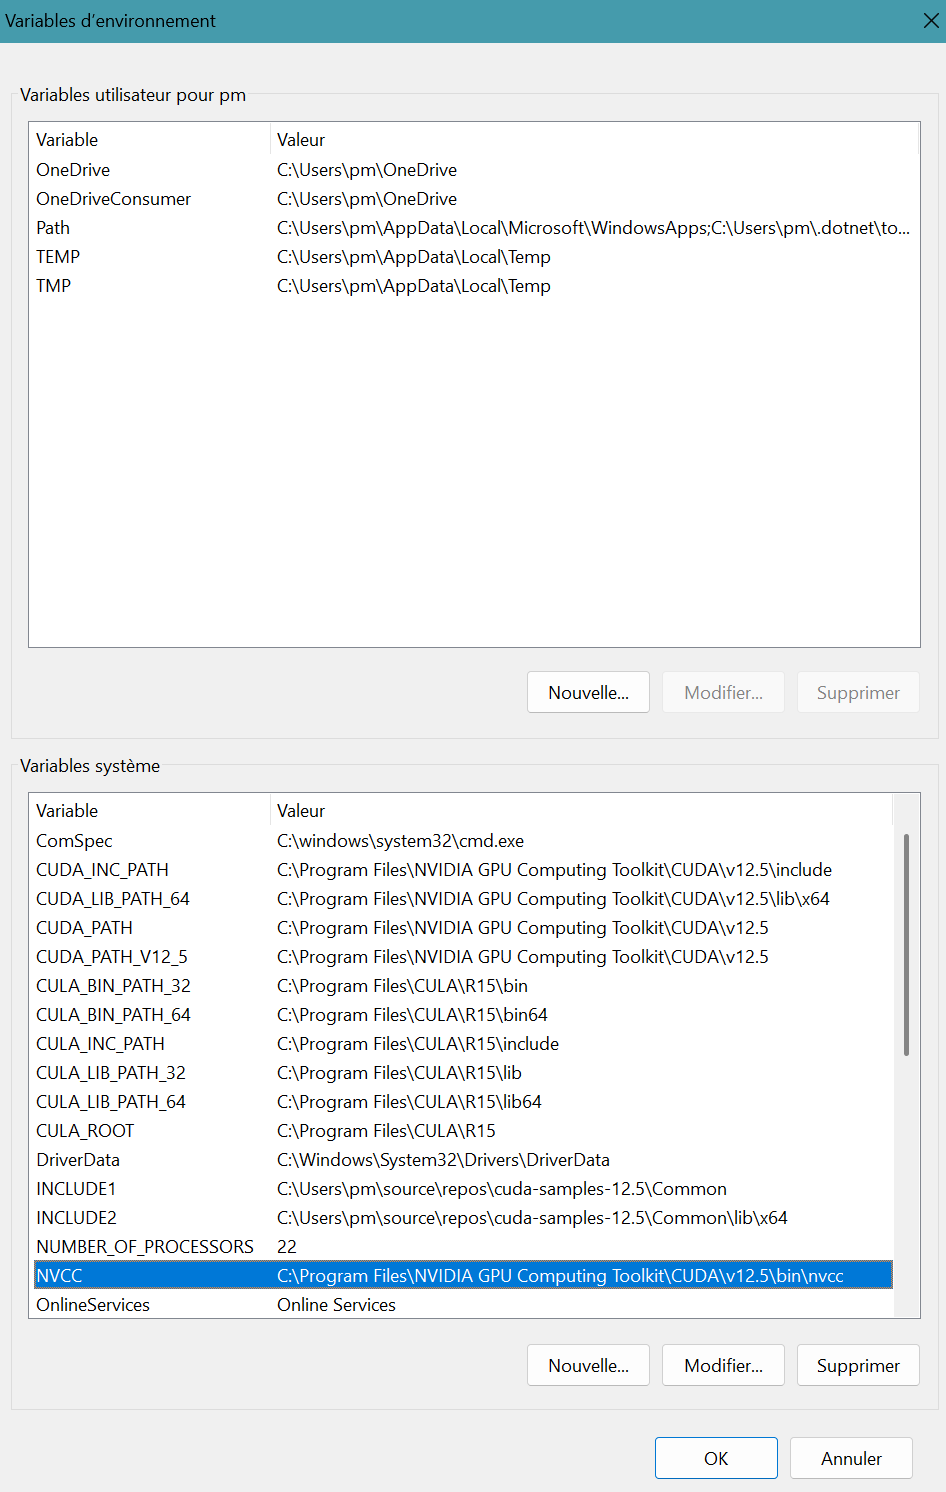
NVCC is a proprietary compiler by Nvidia intended
for use with CUDA. CUDA code runs on both the CPU and GPU.
NVCC compiles both *.cu and *.cpp files.
Eclipse IDE for Java developers in Windows 11 is used for our projects.
Visual Studio Community 2022 and
CUDA toolkit 12.5.0 (May 2024) are needed.
*** Outline ***
- The CUDA C++ 64-bit HelloWorld project with nvcc in MinGW GCC toolchain
- The CUDA C++ 64-bit Sum2Array project with nvcc in MinGW GCC toolchain
- The CUDA C 64-bit bandwidth project
with nvcc in MinGW GCC toolchain
- The Mandelbrot project with nvcc in Microsoft Visual C++ toolchain
- The Mandelbrot project
with nvcc
in MinGW GCC toolchain
- The C++ 64-bit shared library svdComplexDevice1.dll project with nvcc in Microsoft Visual C++ toolchain
- Various references
CUDA C++ 64-bit HelloWorld project with nvcc in MinGW GCC toolchain
- Launch Eclipse IDE for Java Developers.
Generation of source file extension .cu. for the eclipse-workspace
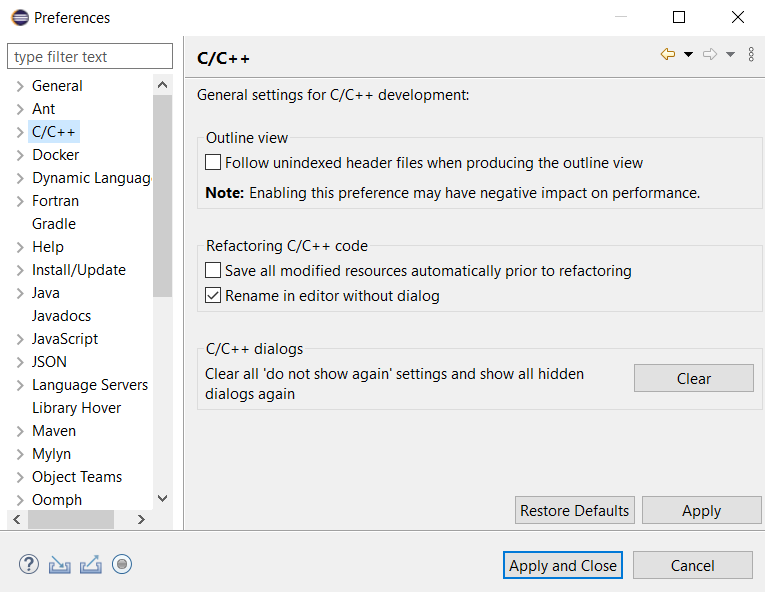
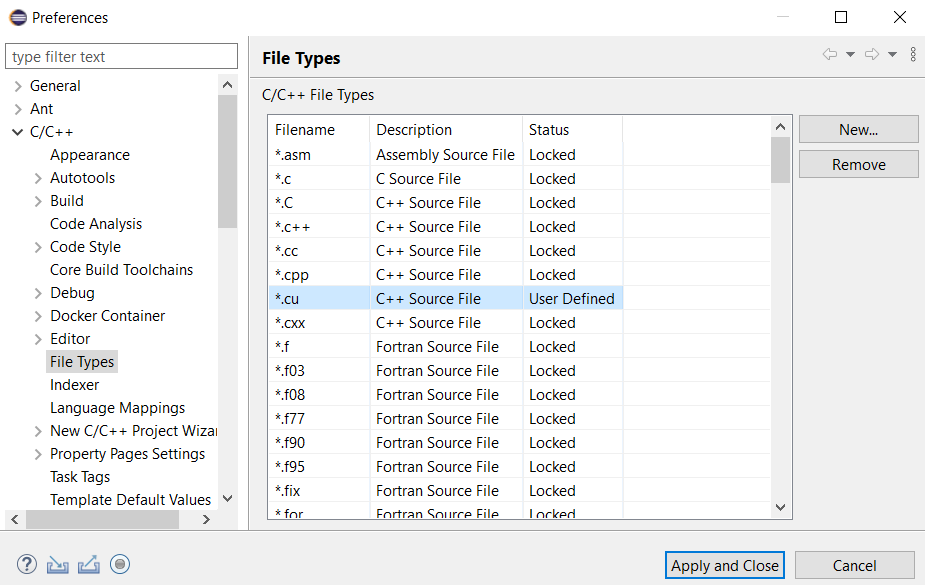
Select Window menu, then Preferences. - Preferences panel appears.
Click C/C++ then File Types.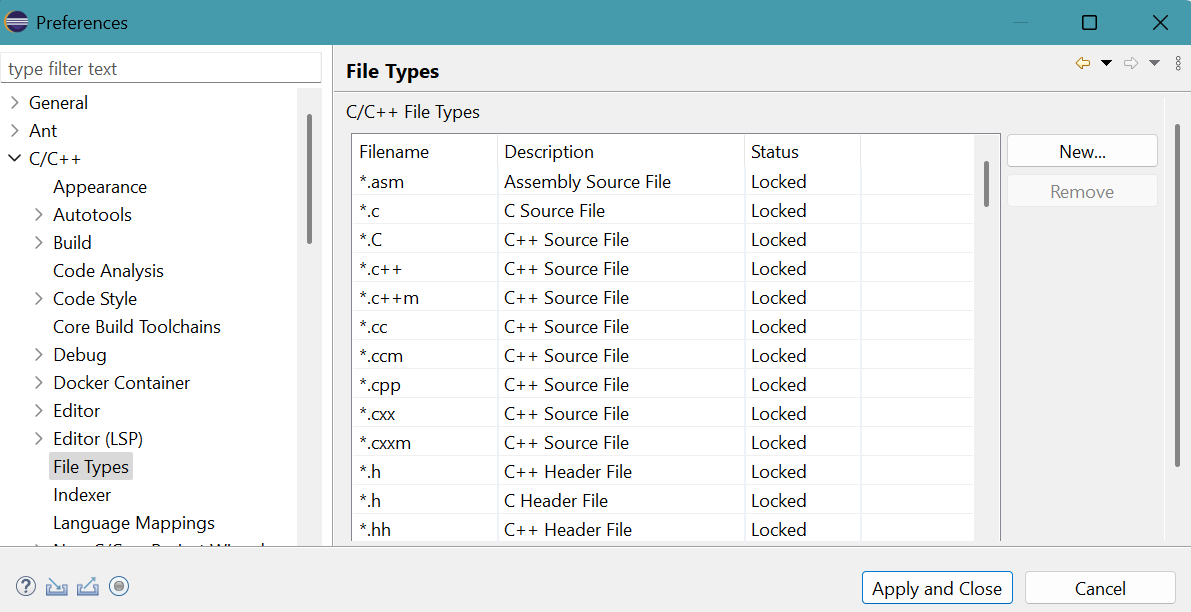
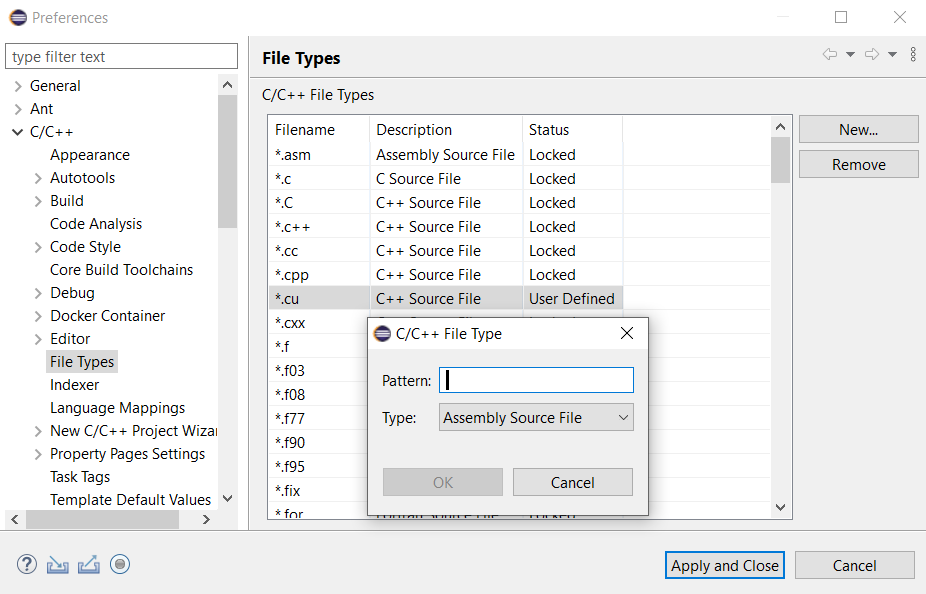
- Click New... button.
C/C++ File Type panel appears.Provide *.cu for Pattern.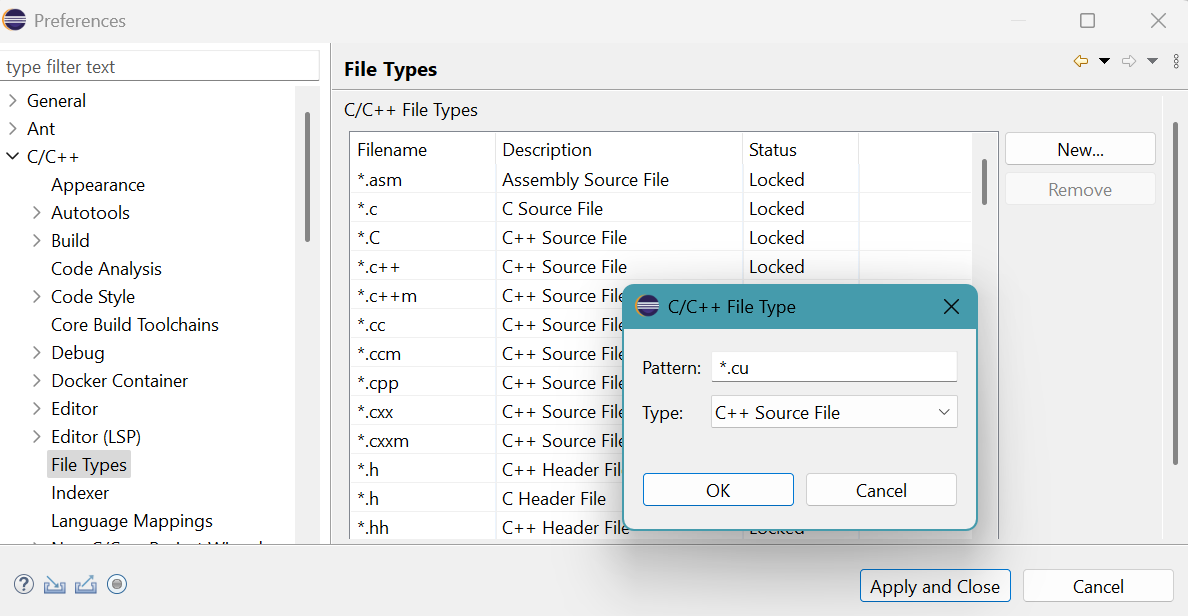
Select C++ Source File for Type choice box.
Click OK button. - The result is
Click Apply and Close button.
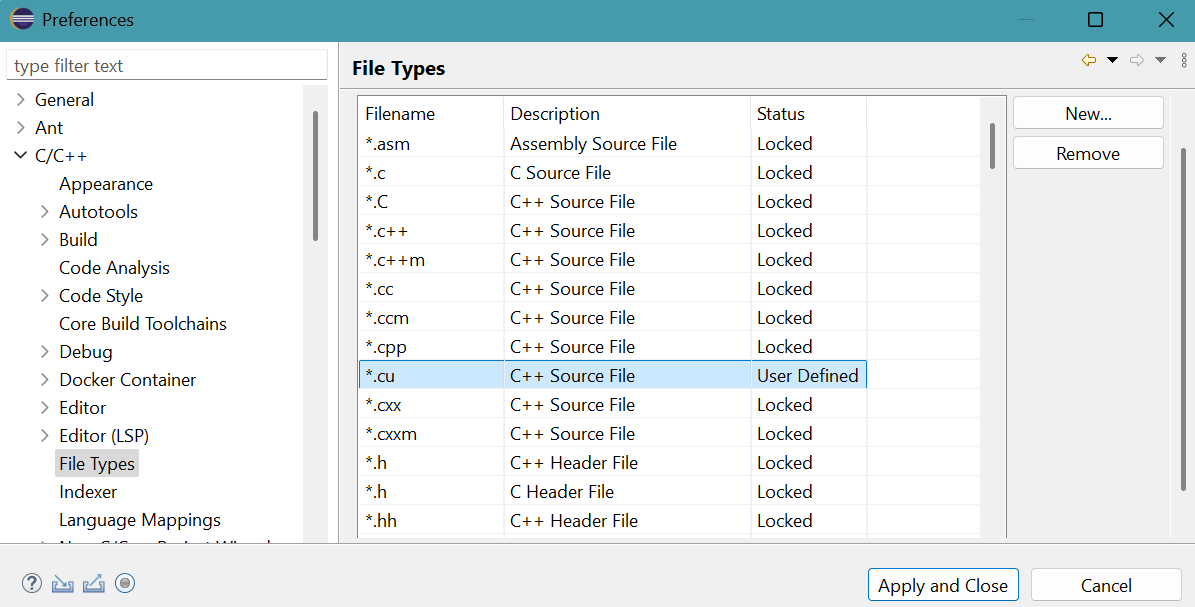
- Eclipe IDE for Java developers appears.
Press CTRL N
Select a wizard panel appears.
Select C/C++ folder then C/C++ Project.
Click Next > button.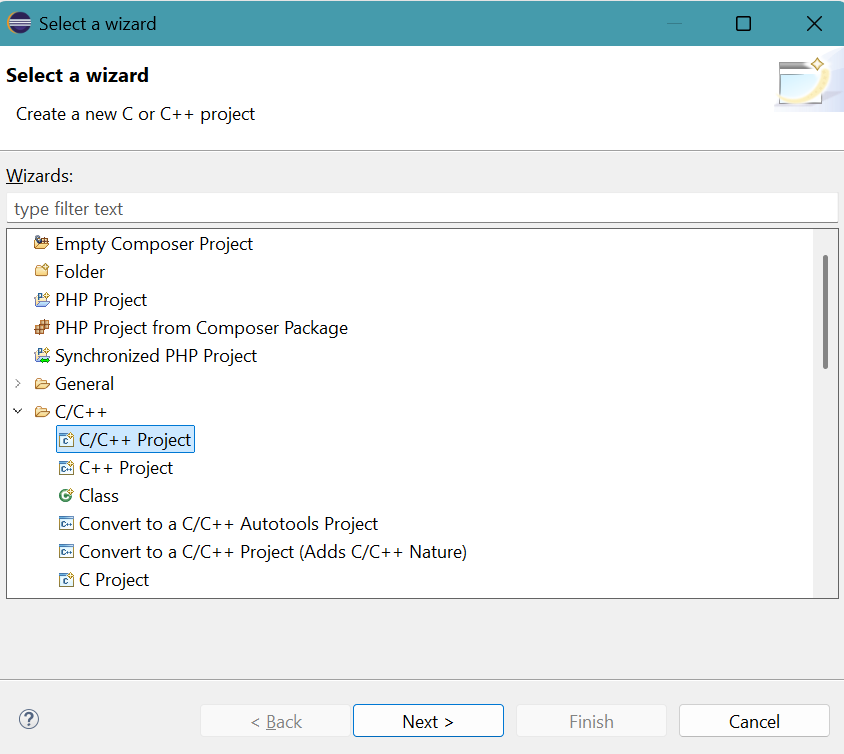
- New C/C++ Project panel appears.
Select C++ Managed Build.Click Next > button.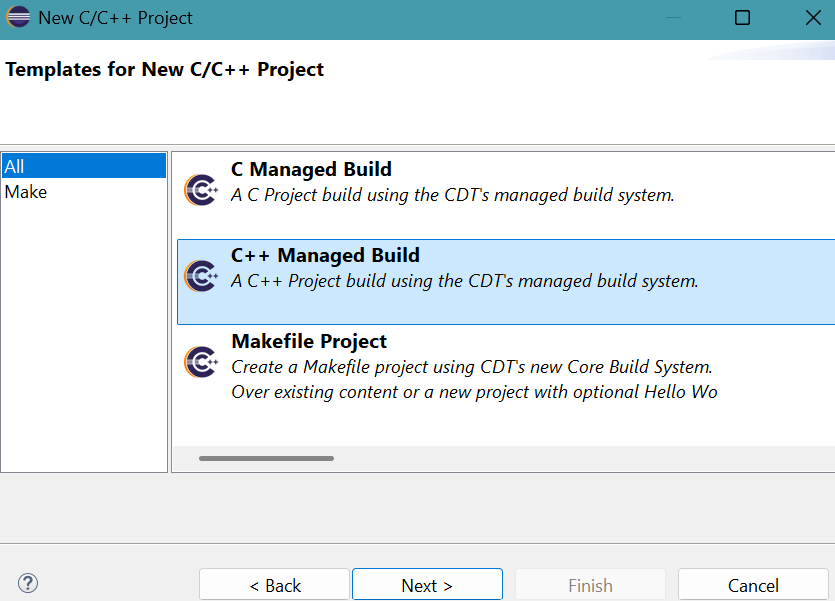
- C++ Project panel appears.
Provide Project name: CppMingw64HWnvcc
Select Empty Project for Executable.
Select MinGW GCC in toolchains.
Click Finish button. - Project folder CppMingw64HWnvcc appears in Package Explorer.
- Right click project folder CppMingw64HWnvcc. Select New then Folder.
New Folder panel appears.
Provide Folder name: src
Click Finish button.
src folder appears in project folder. - Right click the folder src. Select New then File.
Create New File panel appears.
Provide File name: helleocu.cu
Click Finish button.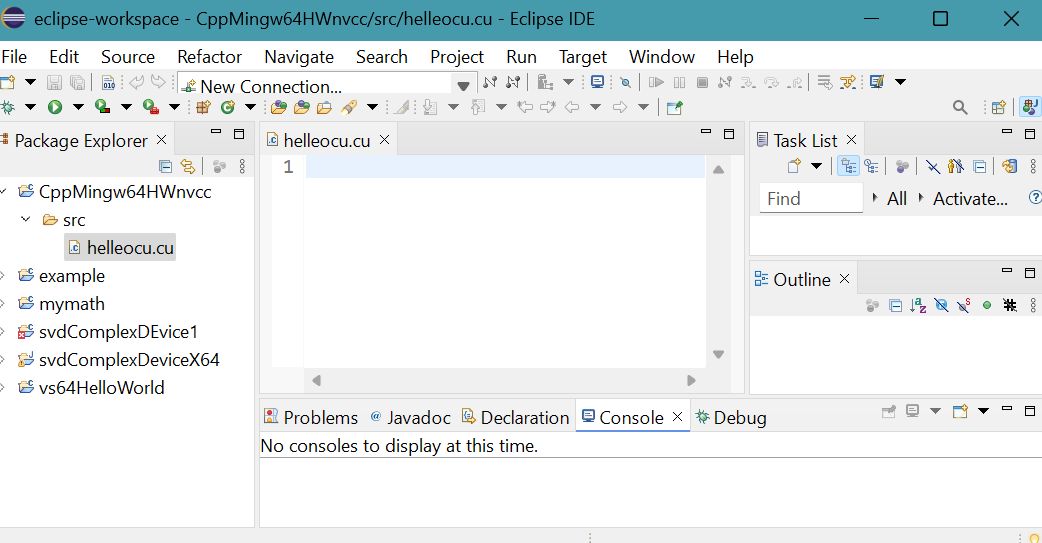
- Copy and paste Hello World program of
Ingemar Ragnemalm
into helleocu.cu.
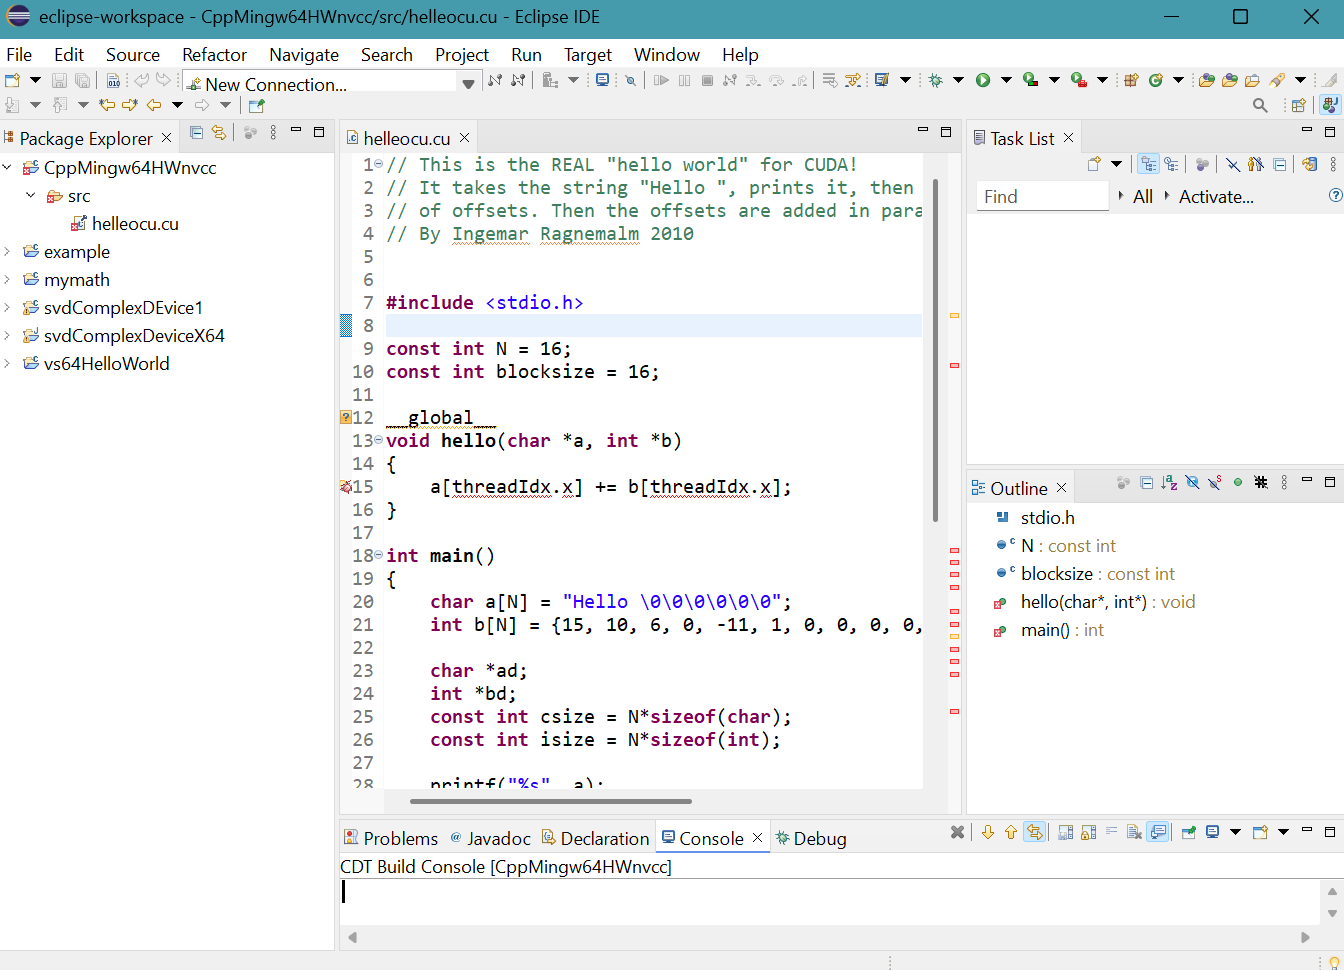
- Right click the source file helleocu.cu in Package Explorer,
then select Properties.
Properties for helleocu.cu panel appears.
Select C/C++ Build then Settings.
Click Build Steps tab.
Select Apply Custom Build Step Overriding Other Tools in Custom Build Step Applicability choice box.
Provide helleocu.obj for Output file name(s).
Provide NVCC "..\src\helleocu.cu" --output-file "src\helleocu.obj" for Command.Click Apply and Close button.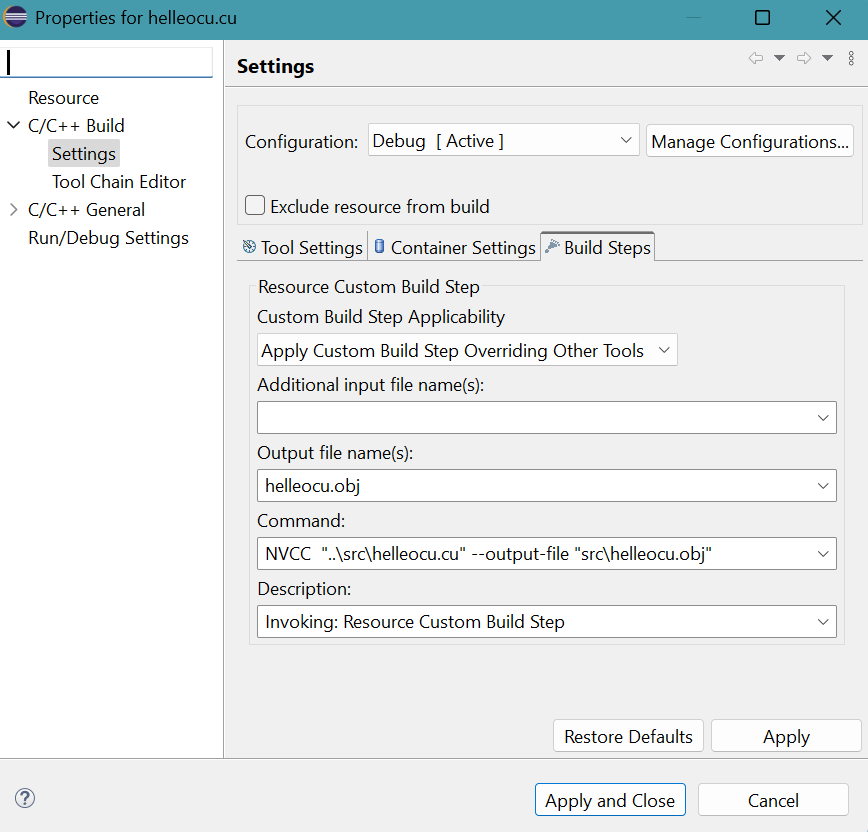
- Select Project menu then Build Project.
Debug folder appears in project folder.A message generated by nvcc compiler is shown on CDT Build Console.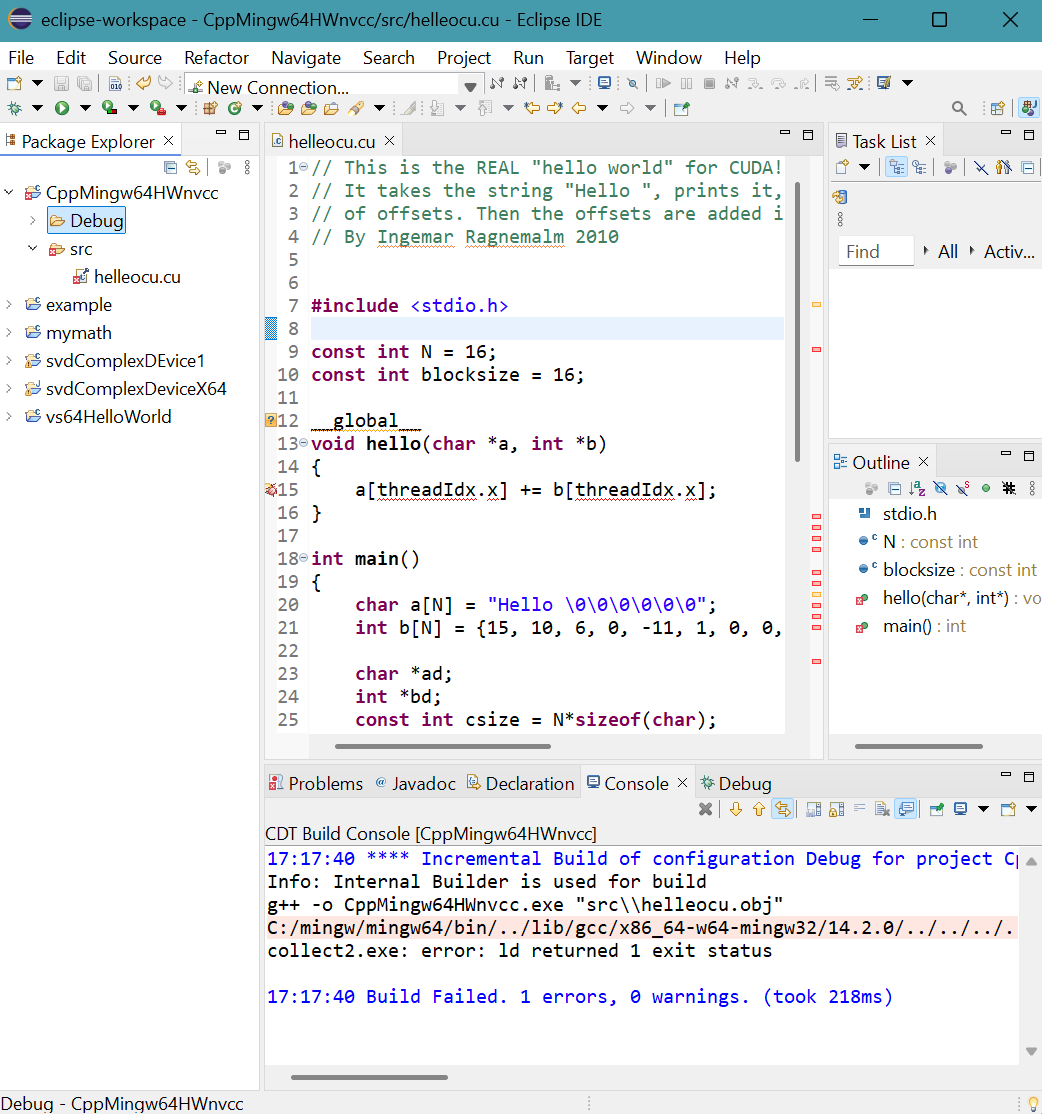
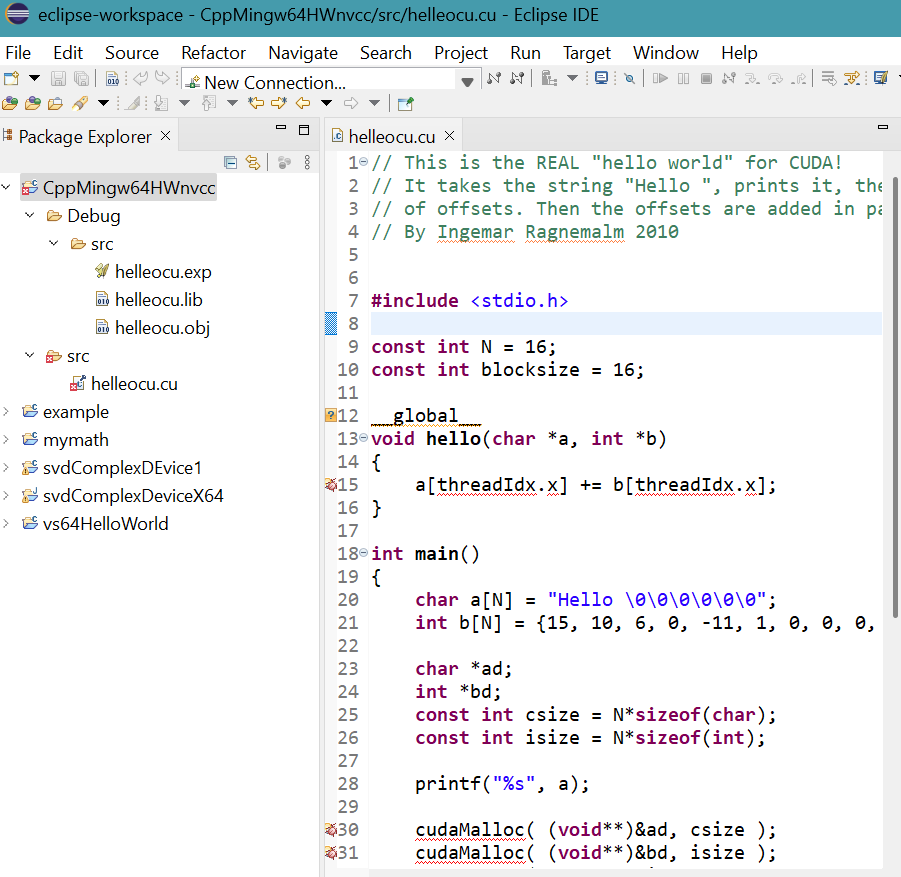
- Right click CppMingw64HWnvcc project in Package Explorer then select Refresh.
More files appear in src folder.
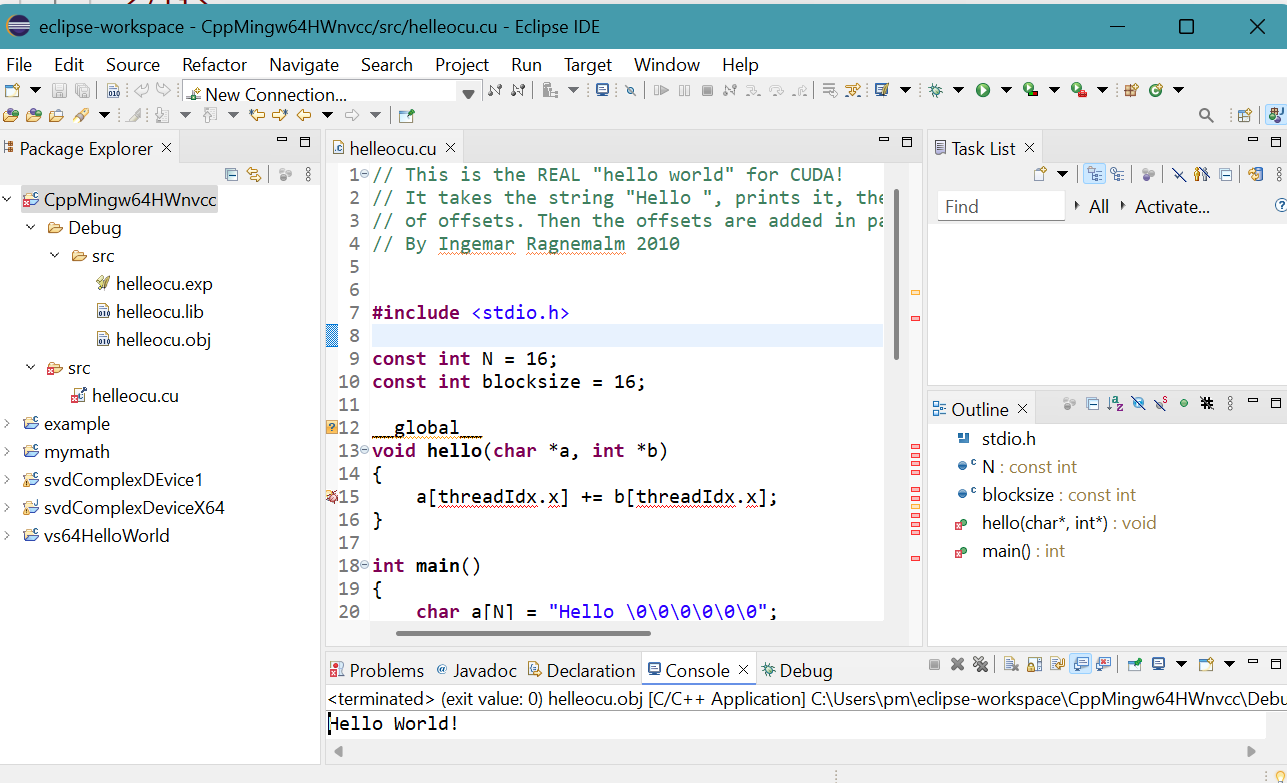
- Select Run menu then Run.
Errors in Workspace panel appears.
Click Proceed button. Hello World! appears on Console tab.
CUDA C++ 64-bit Sum2Array project with nvcc in MinGW GCC toolchain
- Launch Eclipe IDE for Java developers.
Press CTRL N
Select a wizard panel appears.
Select C/C++ folder then C/C++ Project.Click Next > button.
- New C/C++ Project panel appears.
Select C++ Managed Build.Click Next > button.
- C++ Project panel appears.
Provide Project name: CppMingw64Sum2Arraynvcc
Select Empty Project for Executable.
Select MinGW GCC in toolchains.
Click Finish button. - Project folder CppMingw64Sum2Arraynvcc appears in Package Explorer.
Right click project folder CppMingw64Sum2Arraynvcc. Select New then Folder.
New Folder panel appears.
Provide src for Folder name.
Click Finish button.
src folder appears in project folder. - Right click folder src. Select New then File.
Create New File panel appears.
Provide Sum2Array.cu for File name.
Click Finish button. - An empty Sum2Array.cu file is generated.
Copy and paste Sum2Array program from RIP Tutorial into Sum2Array.cu.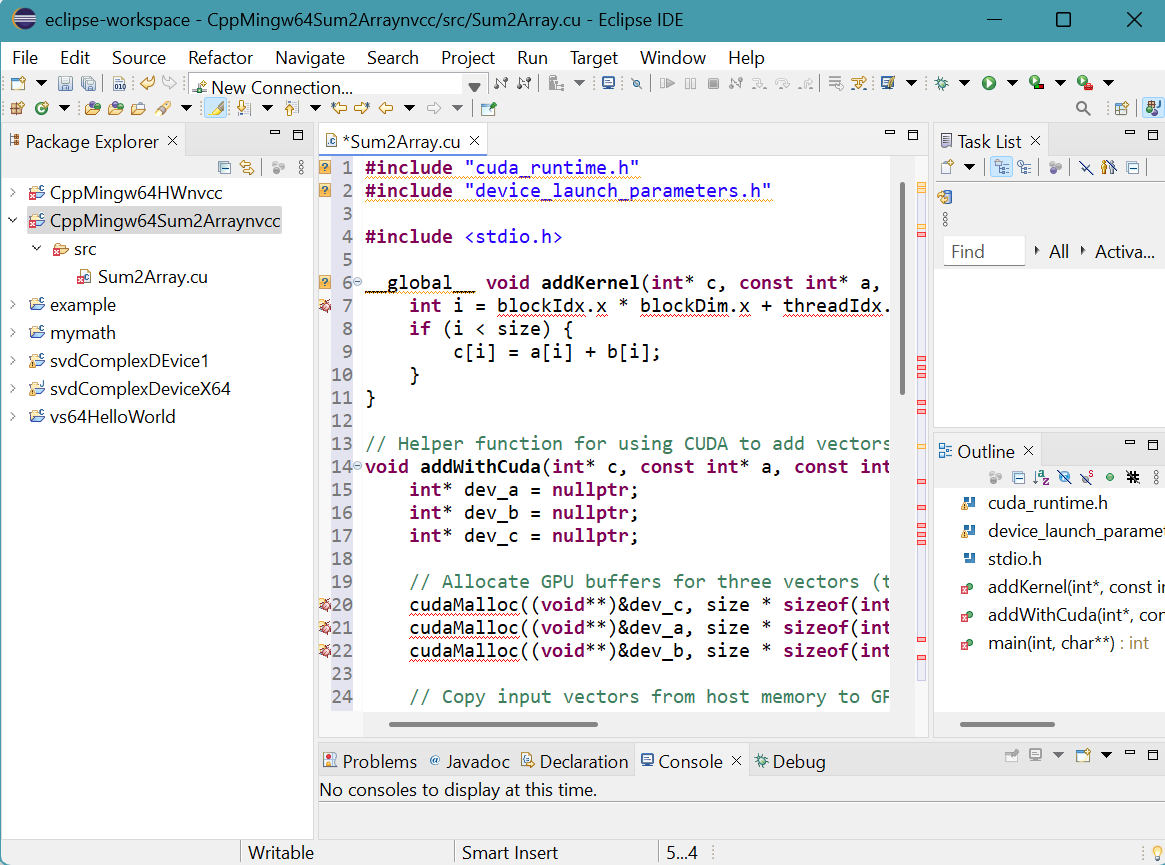
- Right click the source file Sum2Array.cu in Package Explorer,
then select Properties.
Properties for Sum2Array.cu panel appears.
Select C/C++ Build then Settings.
Click Build Steps tab.
Select Apply Custom Build Step Overriding Other Tools in Custom Build Step Applicability choice box.
Provide Sum2Array.obj for Output file name(s).
Provide NVCC "..\src\Sum2Array.cu" -o "src\Sum2Array.obj" for Command.Click Apply and Close button.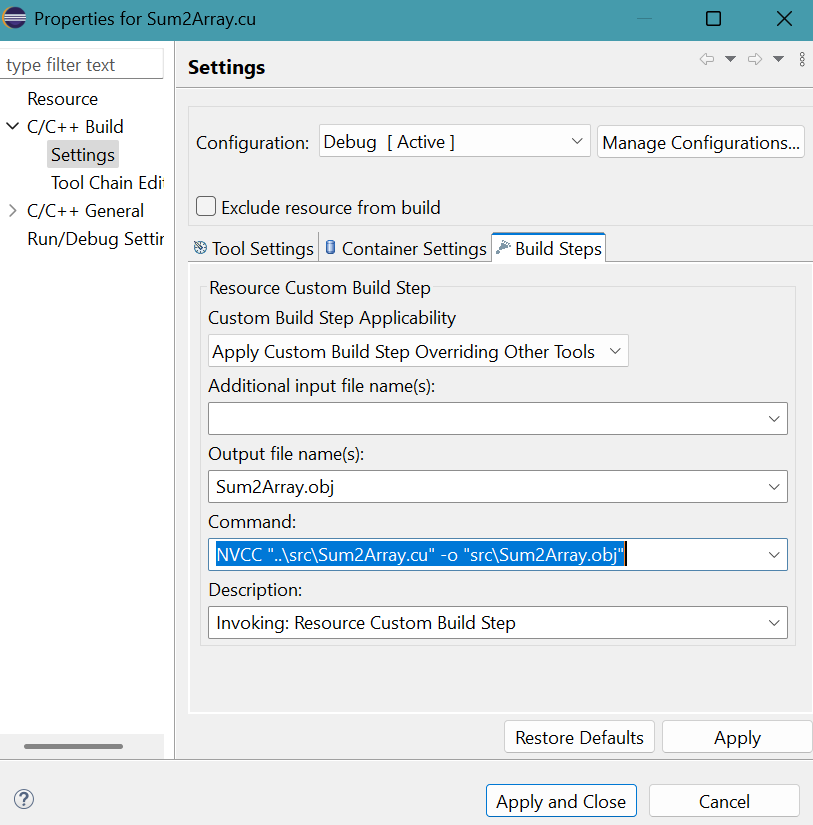
- Select Project menu then Build Project.
Debug folder appears in project folder.A message generated by nvcc compiler is shown on CDT Build Console.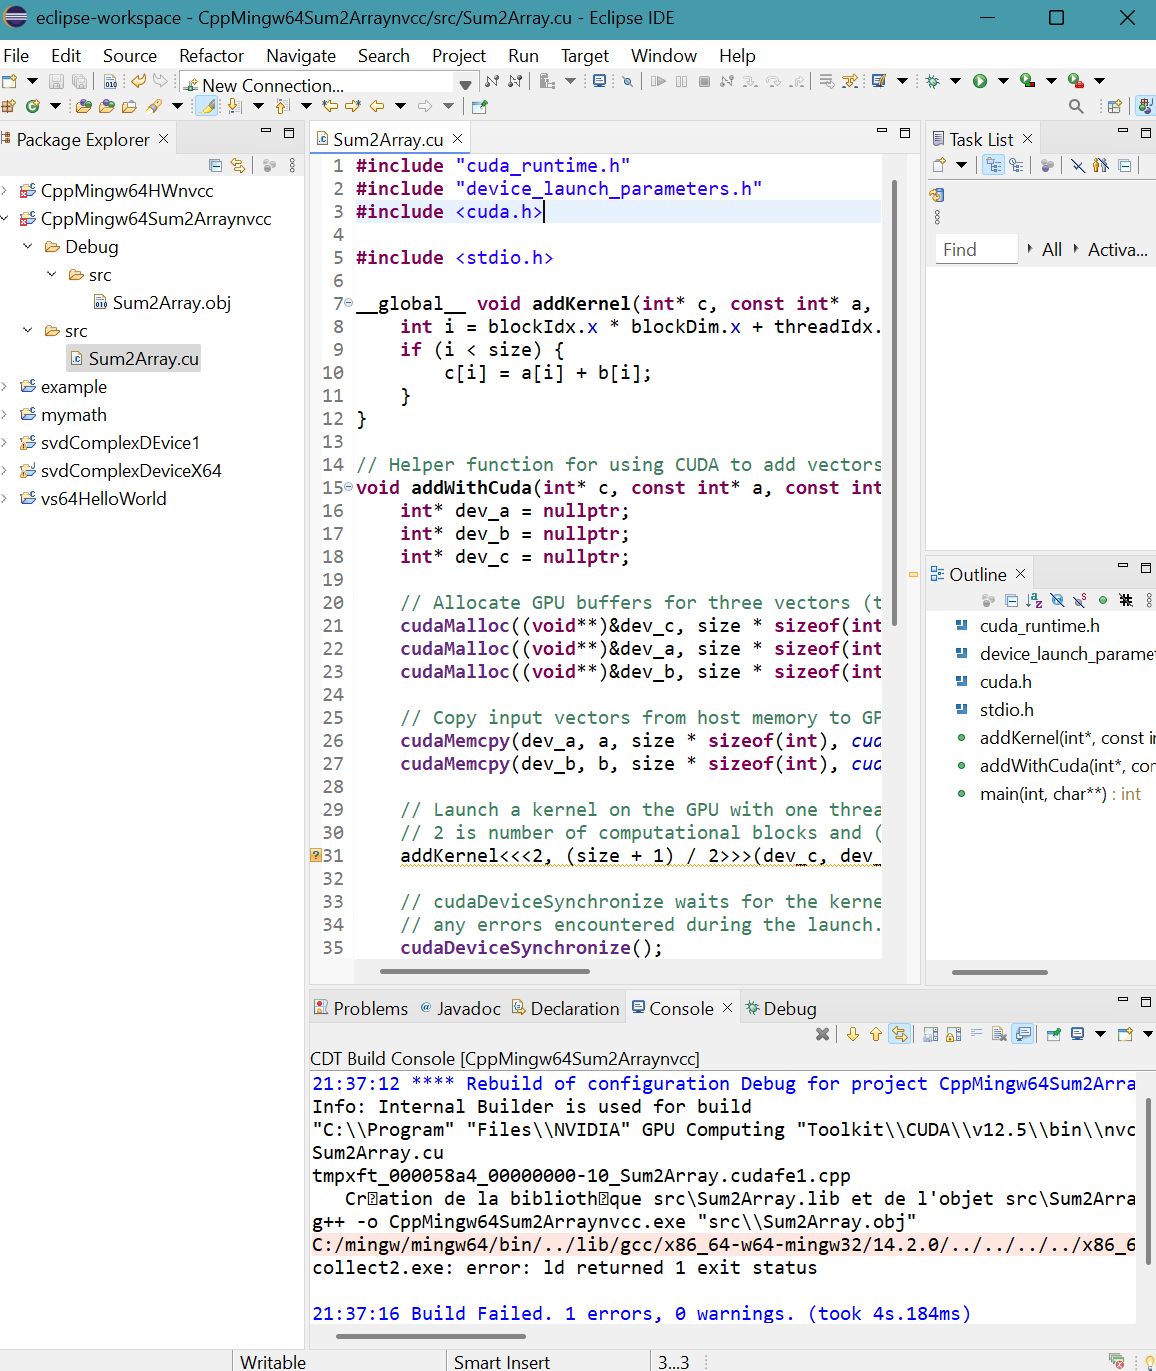
- Right click CppMingw64HWnvcc project in Package Explorer
then select Refresh.
More files appear in src folder.
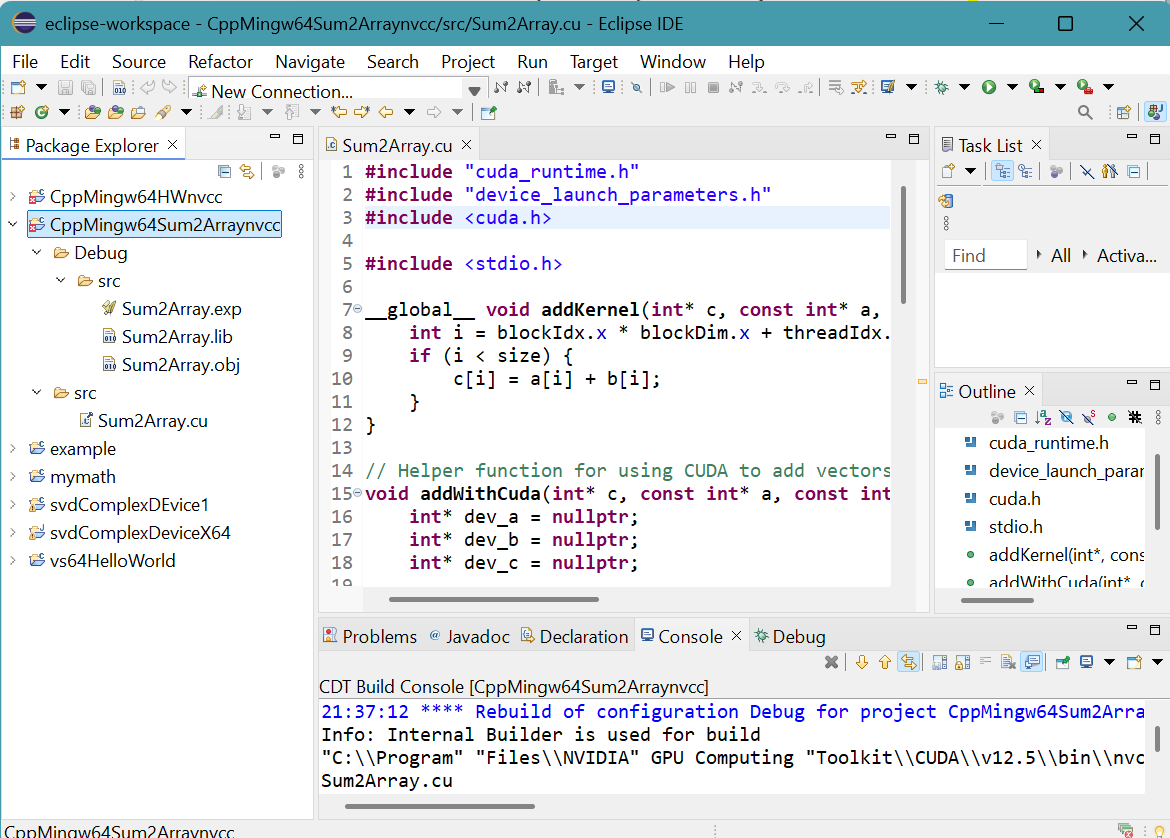
- Select Run menu then Run.
Errors in Workspace Panel appears.
Click Proceed button.Array addition appears on Console tab.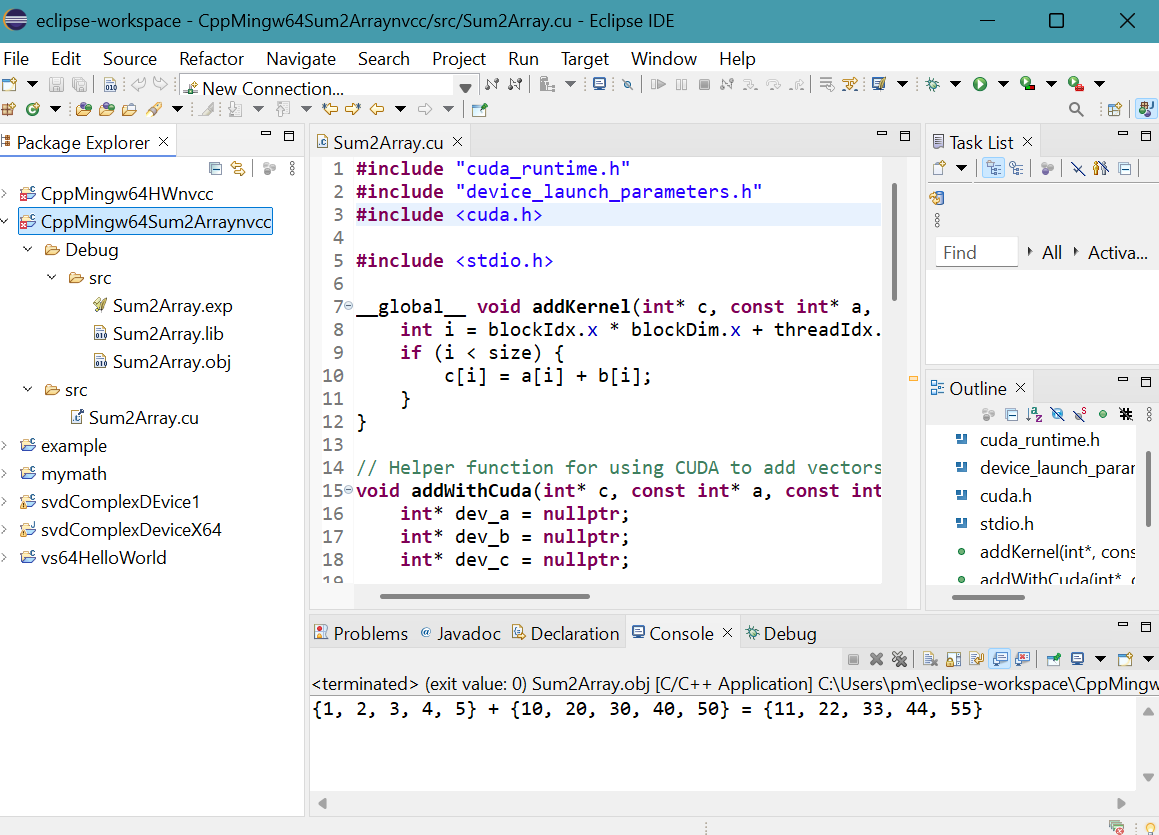
CUDA C 64-bit bandwidth project with nvcc in MinGW GCC toolchain
- Launch Eclipe IDE for Java developers.
Press CTRL N
Select a wizard panel appears.
Select C/C++ folder then C/C++ Project.Click Next > button.
- New C/C++ Project panel appears.
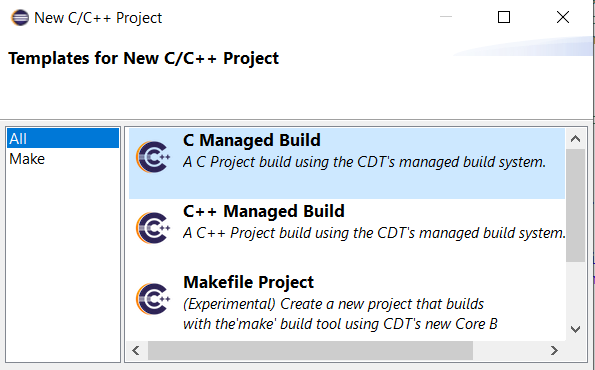
Select C Managed Build.Click Next > button. - C Project panel appears.
Provide Project name: CMingw64bandwidthnvcc
Select Empty Project for Executable.
Select MinGW GCC in Toolchains.
Click Finish button. - Project folder CMingw64bandwidthnvcc appears in Package Explorer. It contains Includes folder.
- Right click project folder CMingw64bandwidthnvcc. Select New then Folder.
New Folder panel appears.
Provide src for Folder name.
Click Finish button.
src folder appears in project folder. - Right click folder src. Select New then File.
Create New File panel appears.
Provide bandwidth.cu for File name.
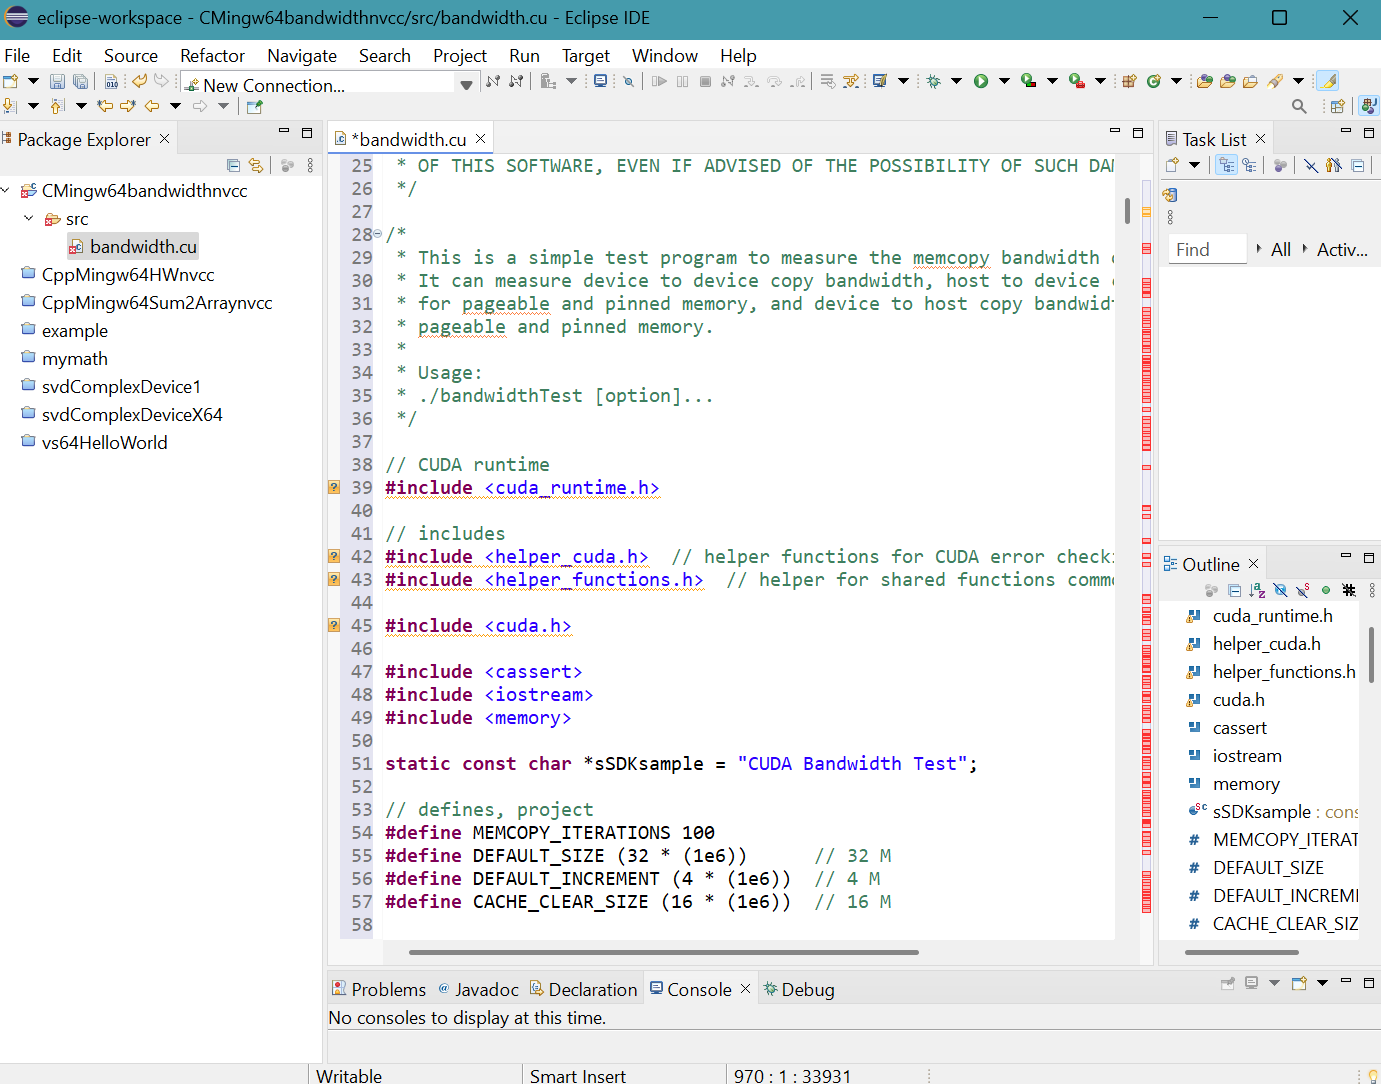
Click Finish button. - Copy and paste the file
C:\Users\pm\source\repos\cuda-samples-12.5\Samples\1_Utilities\bandwidthTest\bandwidthTest.cu into the empty source file.
- Right click CMingw64bandwidthnvcc project folder in Package Explorer
then select Properties.
Properties for CMingw64bandwidthnvcc panel appears.
Click Settings in C/C++ Build.
Click Includes for GCC C Compiler in Tool Settings tab.
Add "${CUDA_INC_PATH}" and "${INCLUDE1}" in Include paths (-I).Click Apply button.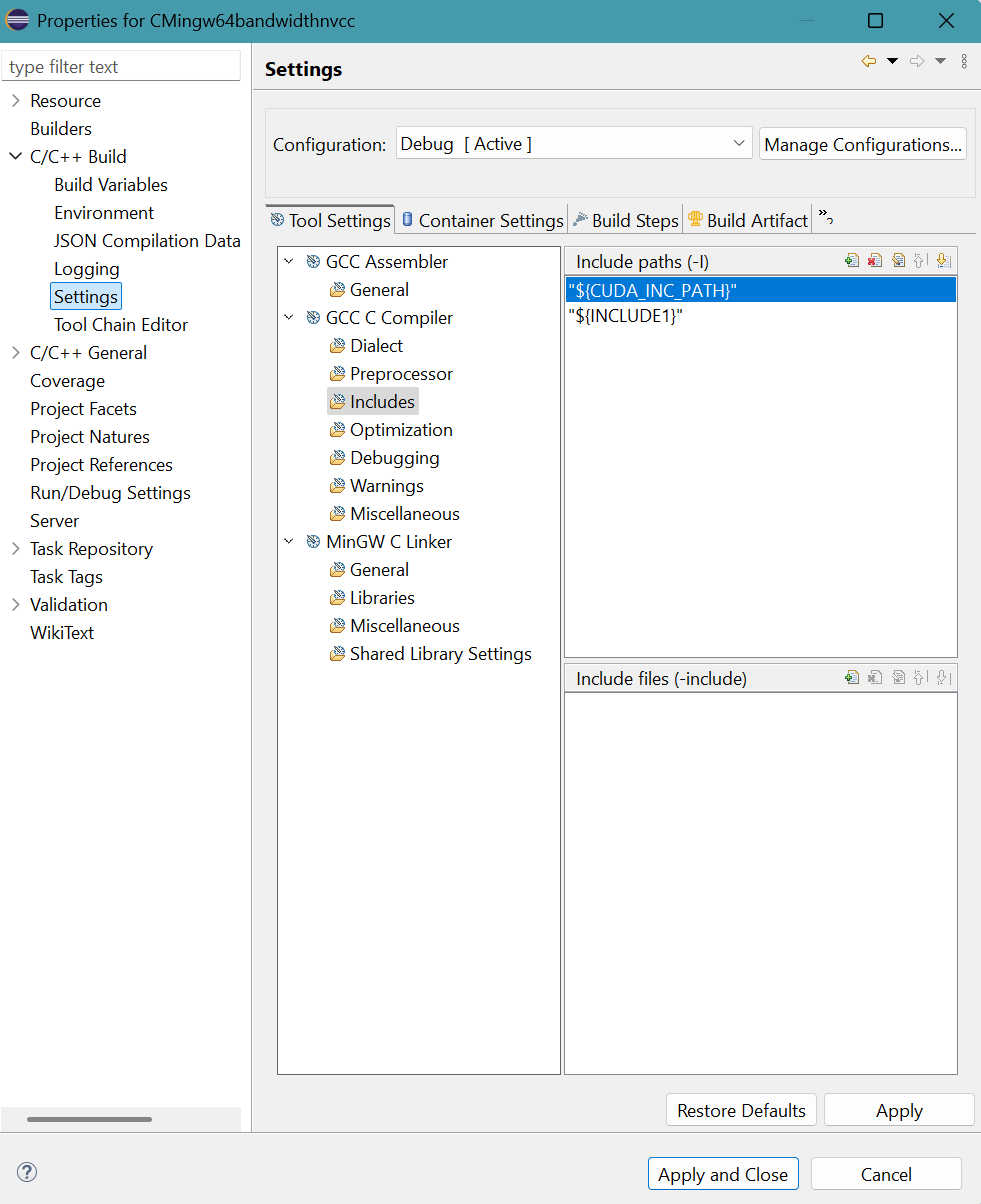
-
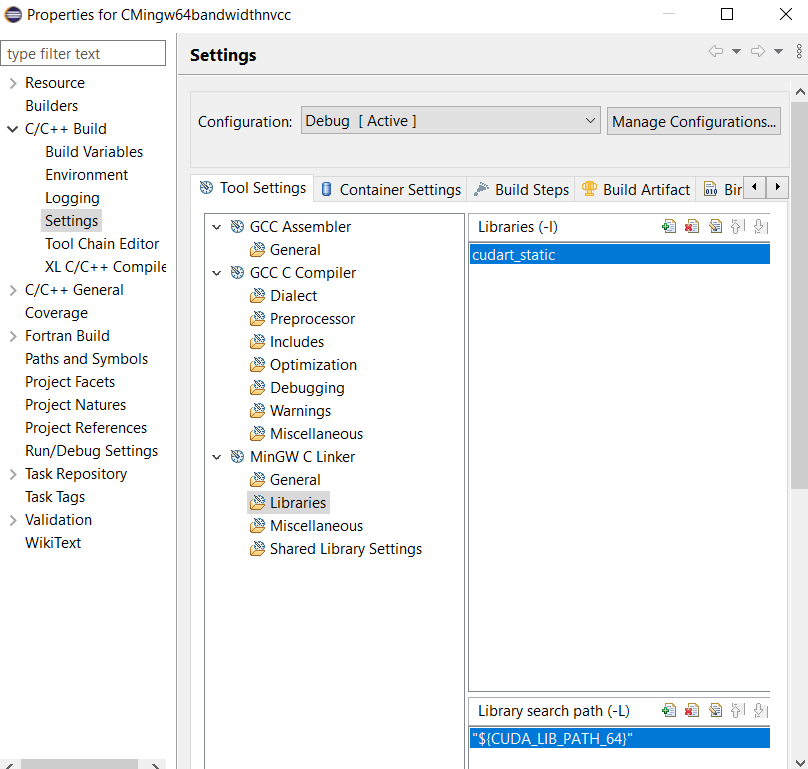
Click Libraries for MinGW C Linker in Tool Settings tab.
Add cudart_static in Libraries (-I).
Add "${CUDA_LIB_PATH_64}" in Library search path paths (-L).
Click Apply and Close button. - Right click the source file bandwidth.cu in Package Explorer,
then select Properties.
Properties for bandwidth.cu panel appears.
Select C/C++ Build then Settings.
Click Build Steps tab.
Select Apply Custom Build Step Overriding Other Tools in Custom Build Step Applicability choice box.
Provide bandwidth.o for Output file name(s).
Provide NVCC -Wno-deprecated-gpu-targets -I "${INCLUDE1}" "..\src\bandwidth.cu" -o "src\bandwidth.o" for Command.Click Apply and Close button.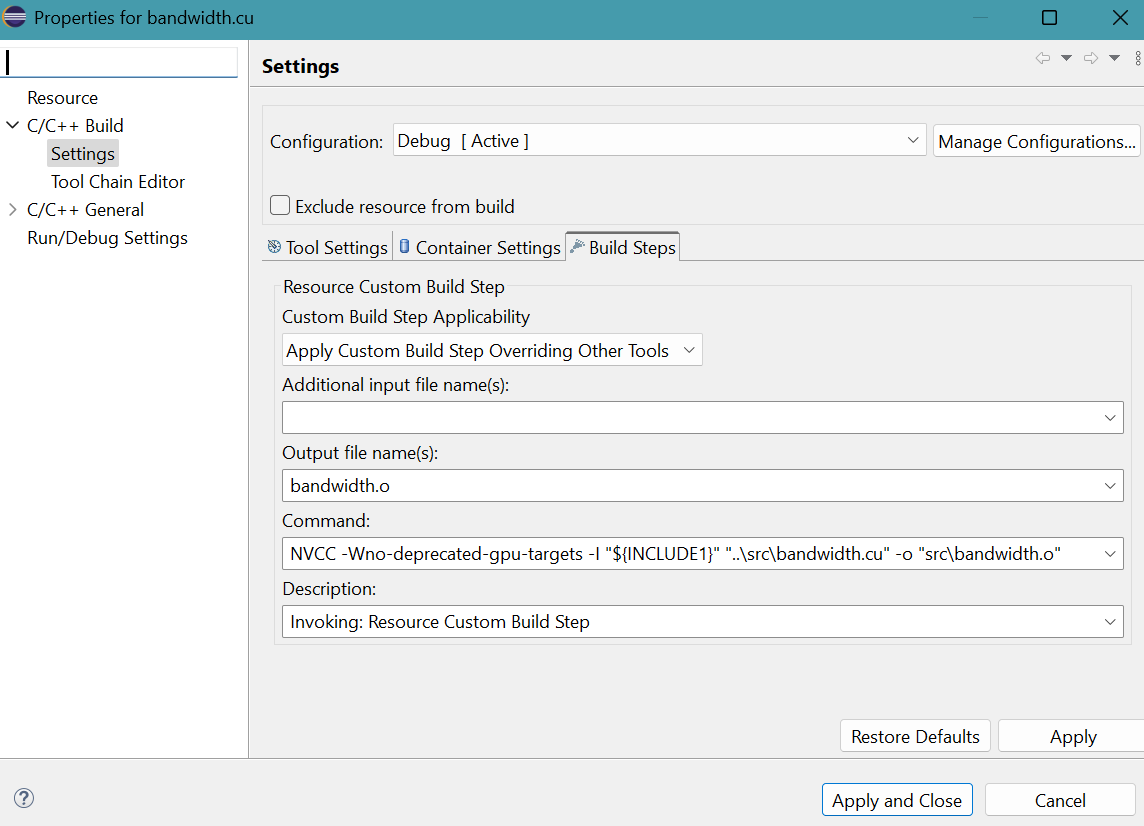
- Select Project menu then Build Project.
Debug folder appears in project folder.A message generated by nvcc compiler is shown on CDT Build Console.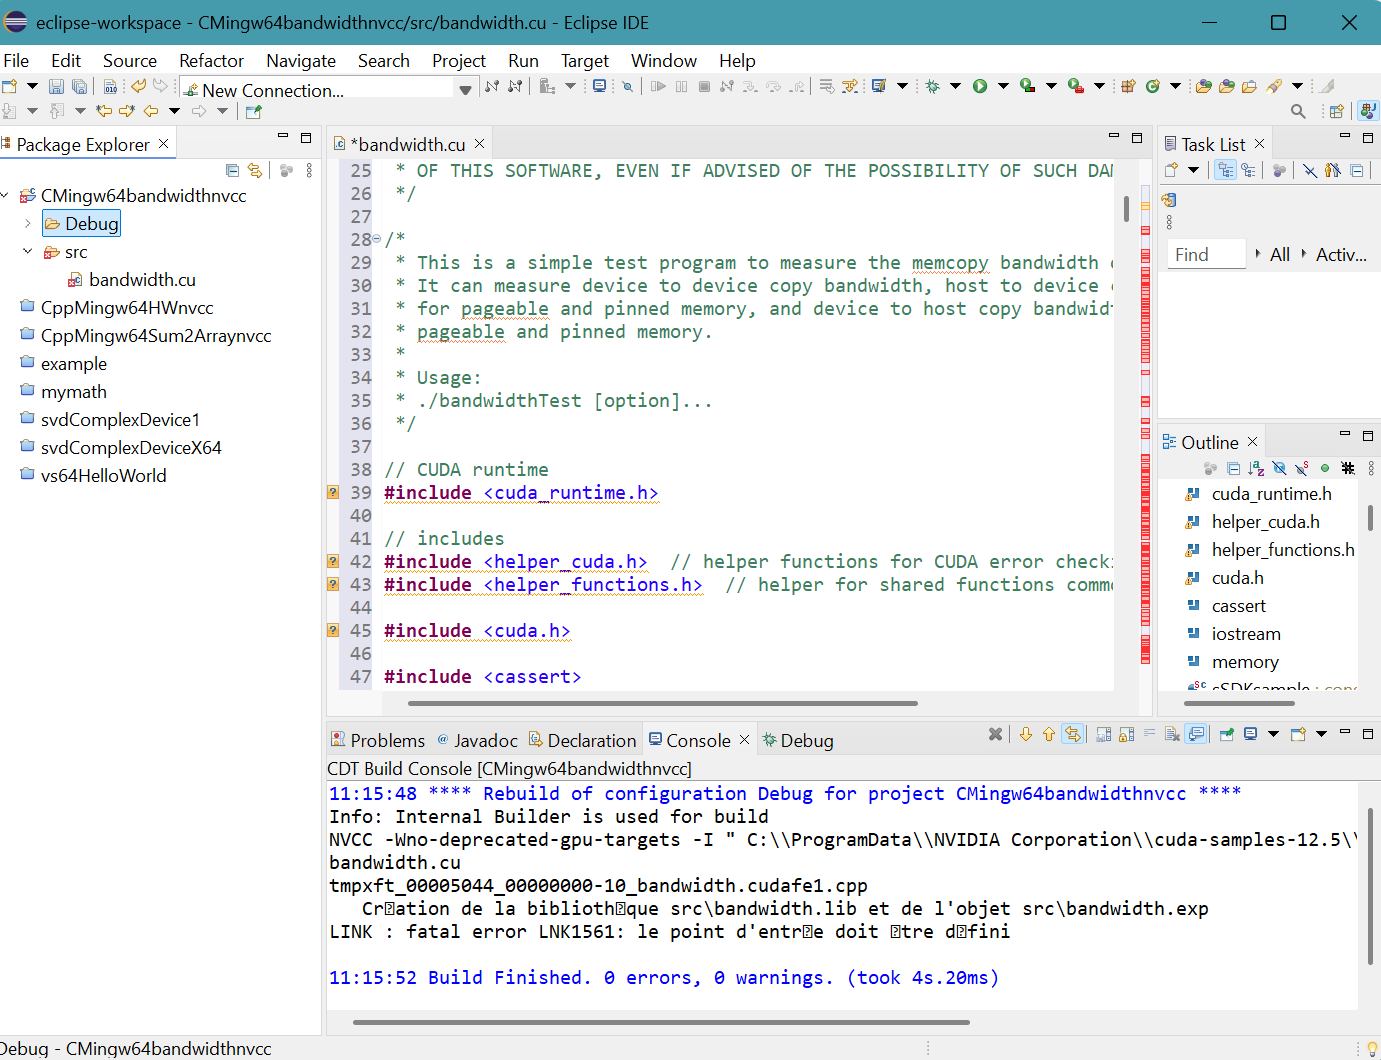
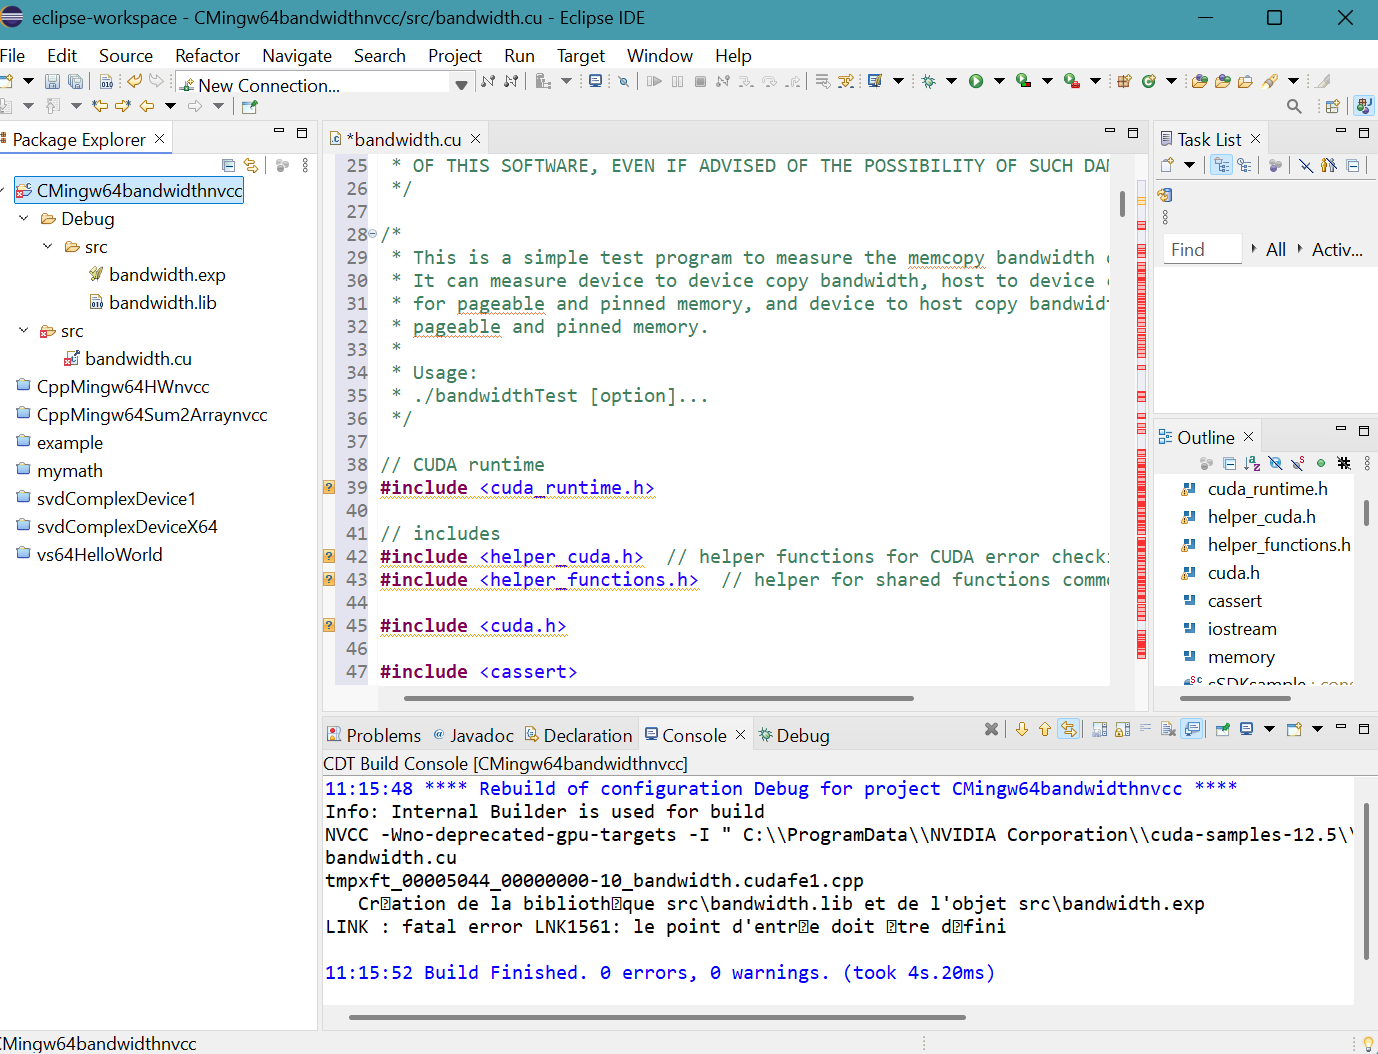
- Right click CMingw64bandwidthnvcc project in Package Explorer then select Refresh.
More files appear.
- Select Run menu then Run.
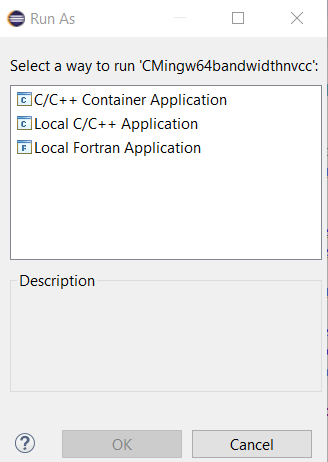
Click Local C/C++ Application.
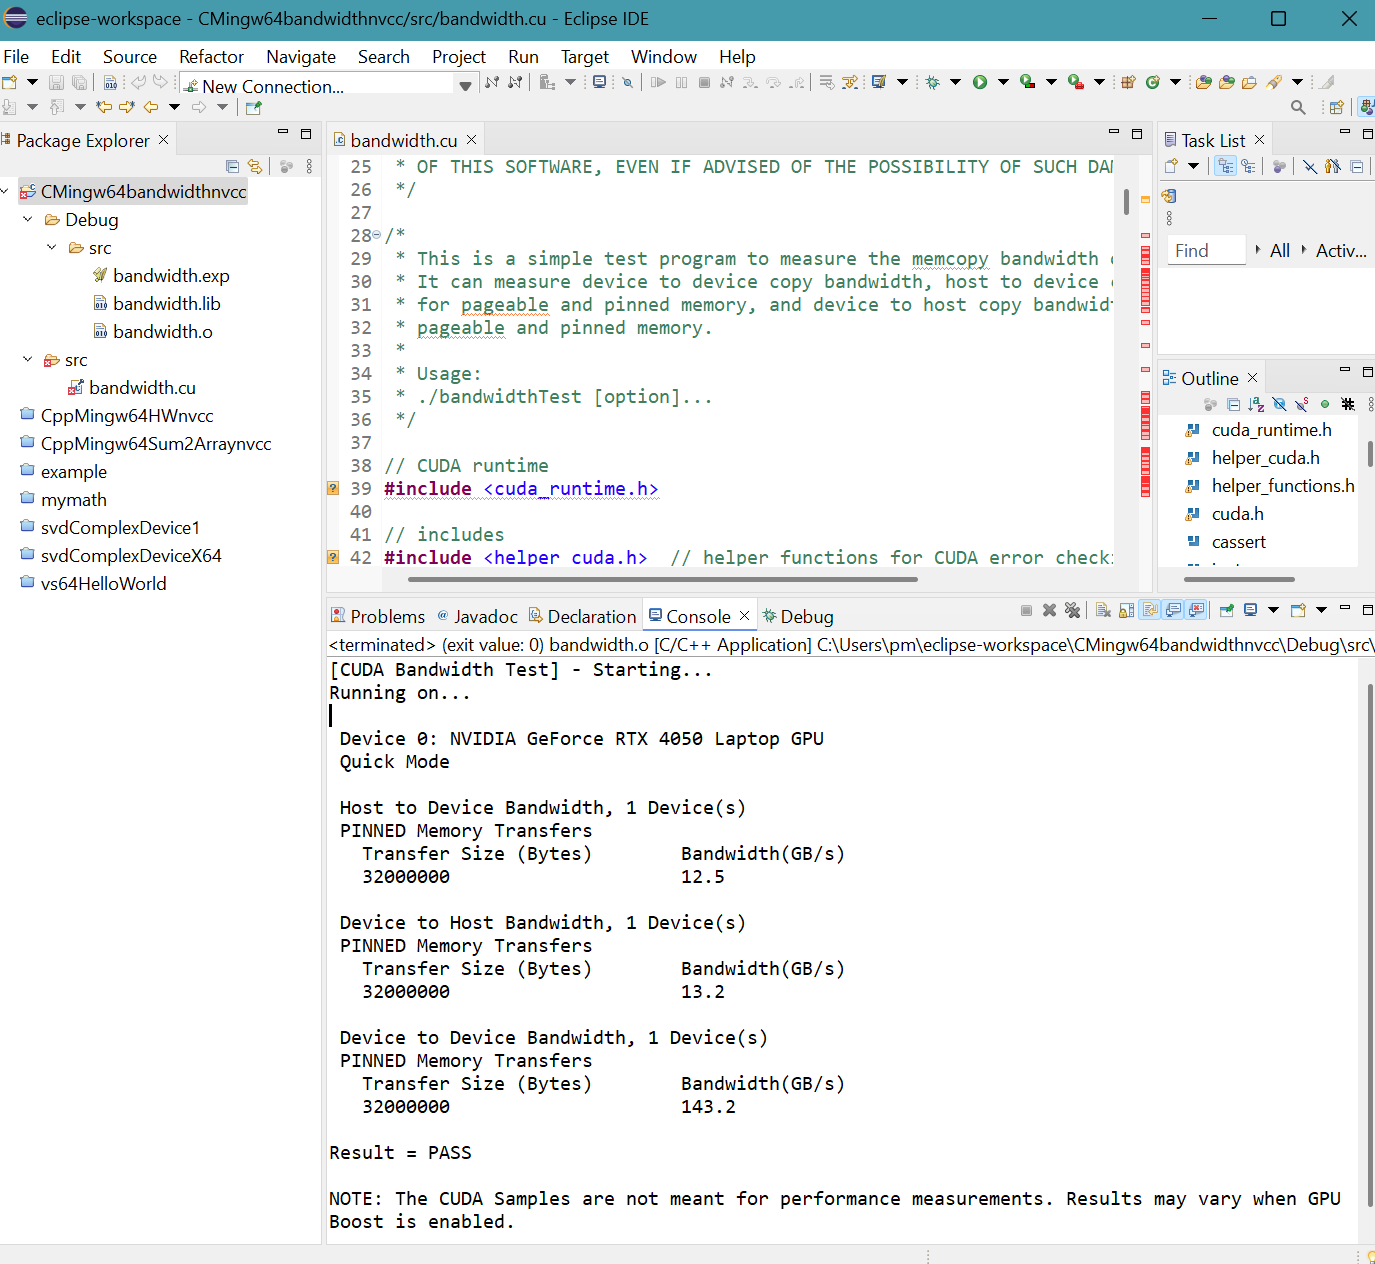
Click OK button. - Data appear on Console tab.
Mandelbrot project with nvcc in Microsoft Visual C++ toolchain
- Launch Eclipse IDE for Java Developers.
Generation of header file extension .cuh. for the eclipse-workspace
Select Window menu, then Preferences. - Click C/C++ then File Types.
- Click New... button.
C/C++ File Type panel appears.Provide *.cuh for Pattern.
Select C++ Header File for Type choice box.
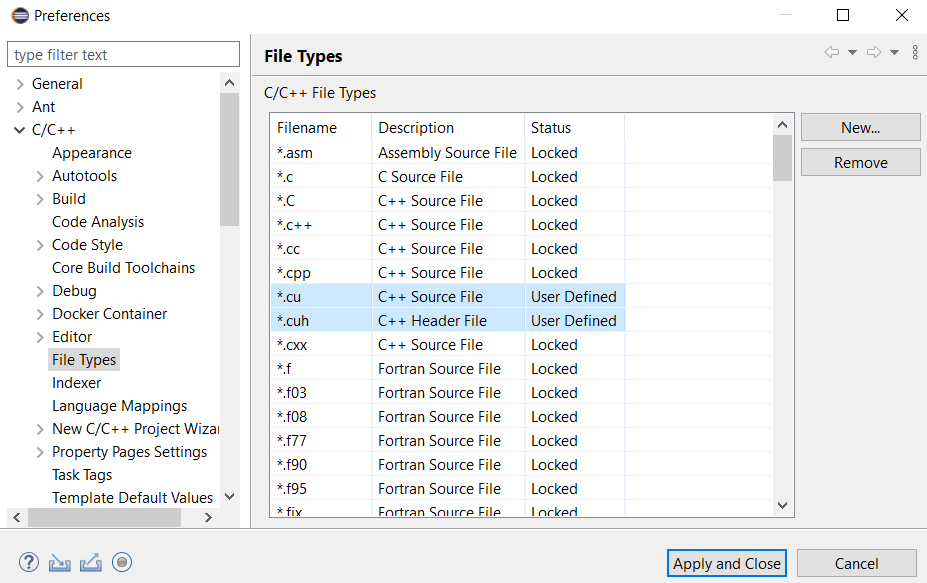
Click OK button. - The result is
Click Apply and Close button.
- In Eclipe IDE for Java developers, press CTRL N.
Select a wizard panel appears.
Select C/C++ folder then C/C++ Project.Click Next > button.
- New C/C++ Project panel appears.
Select C Managed Build.Click Next > button. - C Project panel appears.
Provide Project name: CppVS64Mandelbrotnvcc
Select Empty Project in Executable.
Select Microsoft Visual C++ in Toolchains.
Click Finish button. - Right click the folder of CppVS64Mandelbrotnvcc in Package Explorer.
Select New, then Folder.
New Folder panel appears.
Provide the name src for Folder name.
Click Finish button. - Right click the folder src of CppVS64Mandelbrotnvcc
in Package Explorer.
Select New, then File.
Create New File panel appears.
Provide the File name: Mandelbrot_cuda.cu
Click Finish button. - Copy and paste the file
C:\Users\pm\source\repos\cuda-samples-12.5\Samples\5_Domain_Specific\Mandelbrot\Mandelbrot_cuda.cu into the empty source file.Press Ctrl S to save Mandelbrot_cuda.cu.
- Right click the folder src of CppVS64Mandelbrotnvcc
in Package Explorer.
Select New, then File.
Create New File panel appears.
Provide File name : Mandelbrot.cpp
Click Finish button. - Copy and paste the file
C:\Users\pm\source\repos\cuda-samples-12.5\Samples\5_Domain_Specific\Mandelbrot\Mandelbrot.cpp into the empty source file.Press Ctrl S to save Mandelbrot.cpp.
- Right click the folder src of CppVS64Mandelbrotnvcc
in Package Explorer.
Select New, then File.
Create New File panel appears.
Provide the File name: Mandelbrot_gold.cpp
Click Finish button. - Copy and paste the file
C:\Users\pm\source\repos\cuda-samples-12.5\Samples\5_Domain_Specific\Mandelbrot\Mandelbrot_gold.cpp into the empty source file.Press Ctrl S to save Mandelbrot_gold.cpp.
- Select the folder src of CppVS64Mandelbrotnvcc in Package Explorer.
Select New, then File.
Create New File panel appears.
Provide the File name: Mandelbrot_kernel.cuh
Click Finish button. - Copy and paste the file
C:\Users\pm\source\repos\cuda-samples-12.5\Samples\5_Domain_Specific\Mandelbrot\Mandelbrot_kernel.cuh into the empty header file.Press Ctrl S to save Mandelbrot_kernel.cuh.
- Select the folder src of CppVS64Mandelbrotnvcc in Package Explorer.
Select New, then File.
Create New File panel appears.
Provide the File name: Mandelbrot_gold.h
Click Finish button. - Copy and paste the file
C:\Users\pm\source\repos\cuda-samples-12.5\Samples\5_Domain_Specific\Mandelbrot\Mandelbrot_gold.h into the empty header file.Press Ctrl S to save Mandelbrot_gold.h.
- Right click the folder src of CppVS64Mandelbrotnvcc
in Package Explorer.
Select New, then File.
Create New File panel appears.
Provide the File name: Mandelbrot_kernel.h
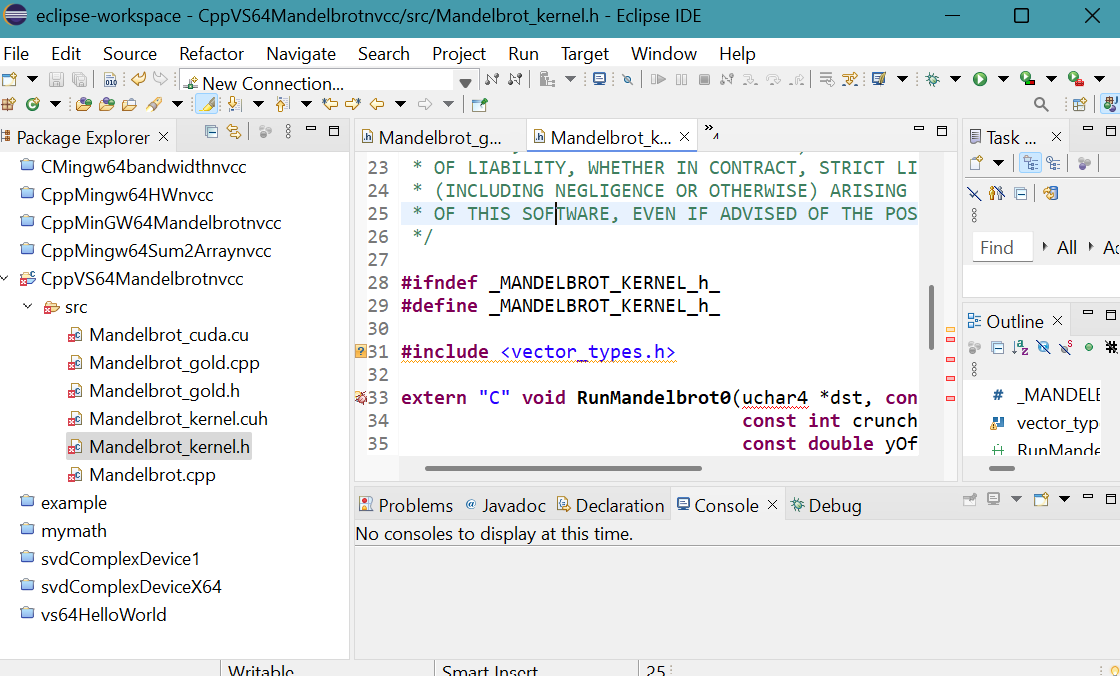
Click Finish button. - Copy and paste the file
C:\Users\pm\source\repos\cuda-samples-12.5\Samples\5_Domain_Specific\Mandelbrot\Mandelbrot_kernel.h into the empty header file.Press Ctrl S to save Mandelbrot_kernel.h.
- Right click CppVS64Mandelbrotnvcc project folder in Package Explorer,
then select Properties.
Properties for CppVS64Mandelbrotnvcc panel appears.
Click Settings in C/C++ Build.
Click Libraries for Linker (link) in Tool Settings tab.
Provide three libraries (cudart_static.lib, glew64.lib, freeglut.lib) and their folder location ("${CUDA_LIB_PATH_64}", "${INCLUDE1}", "${INCLUDE2}") to the linker.Click Apply button.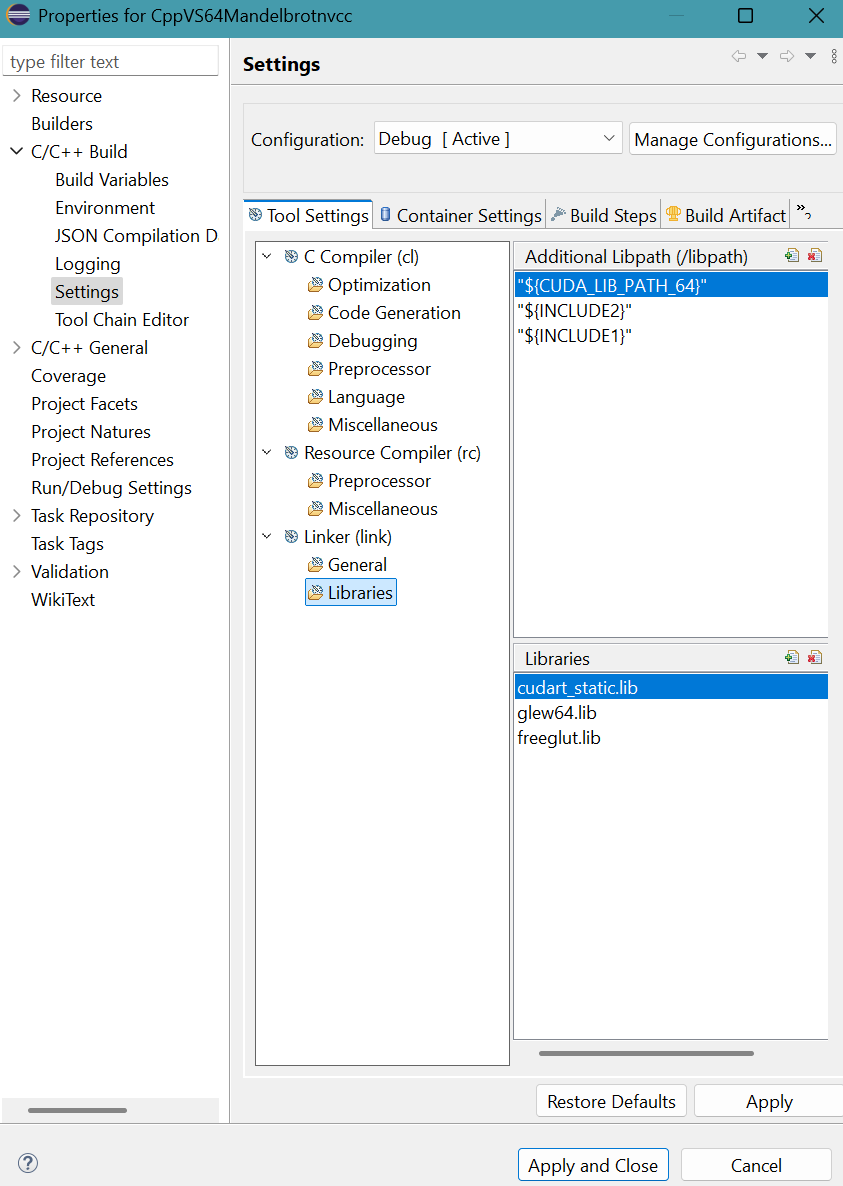
Click Apply and Close button. - Right click the file Mandelbrot_cuda.cu in Package Explorer,
then select Properties.
Properties for Mandelbrot_cuda.cu panel appears.
Select C/C++ Build then Settings.
Click Build Steps tab.
Select Apply Custom Build Step Overriding Other Tools in Custom Build Step Applicability choice box.
Provide Mandelbrot_cuda.obj for Output file name(s).
Provide ${NVCC} -I "${INCLUDE1}" -I "${INCLUDE2}" -c "..\src\Mandelbrot_cuda.cu" -o "src\Mandelbrot_cuda.obj" for Command.Click Apply button.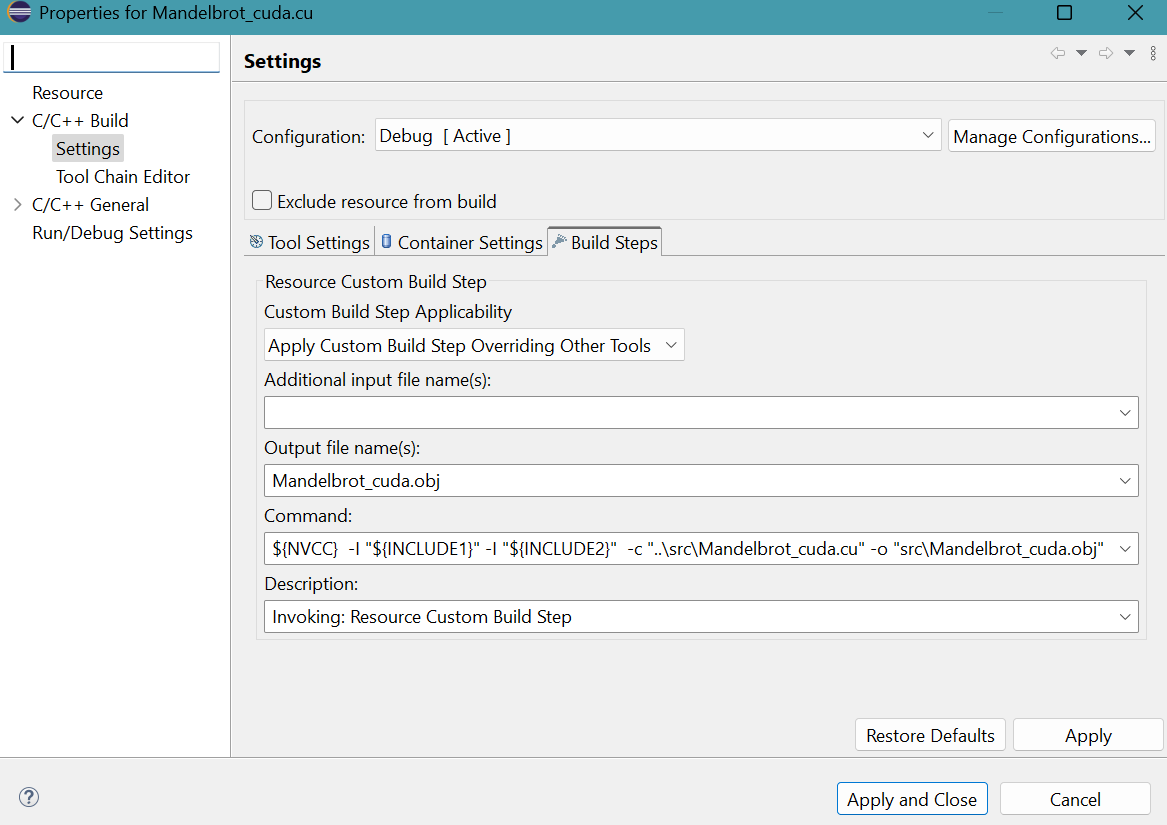
Click Apply and Close button. - Right click the file Mandelbrot.cpp in Package Explorer,
then select Properties.
Properties for Mandelbrot.cpp panel appears.
Select C/C++ Build then Settings.
Click Build Steps tab.
Select Apply Custom Build Step Overriding Other Tools in Custom Build Step Applicability choice box.
Provide Mandelbrot.obj for Output file name(s).
Provide ${NVCC} -I "${INCLUDE1}" -I "${INCLUDE2}" -c "..\src\Mandelbrot.cpp" -o "src\Mandelbrot.obj" for Command.
Click Apply button.
Click Apply and Close button. - Right click the file Mandelbrot_gold.cpp in Package Explorer,
then select Properties.
Properties for Mandelbrot_gold.cpp panel appears.
Select C/C++ Build then Settings.
Click Build Steps tab.
Select Apply Custom Build Step Overriding Other Tools in Custom Build Step Applicability choice box.
Provide Mandelbrot_gold.obj for Output file name(s).
Provide ${NVCC} -I "${INCLUDE1}" -I "${INCLUDE2}" -c "..\src\Mandelbrot_gold.cpp" -o "src\Mandelbrot_gold.obj" for Command.
Click Apply button.
Click Apply and Close button. - Select Project menu then Build Project.
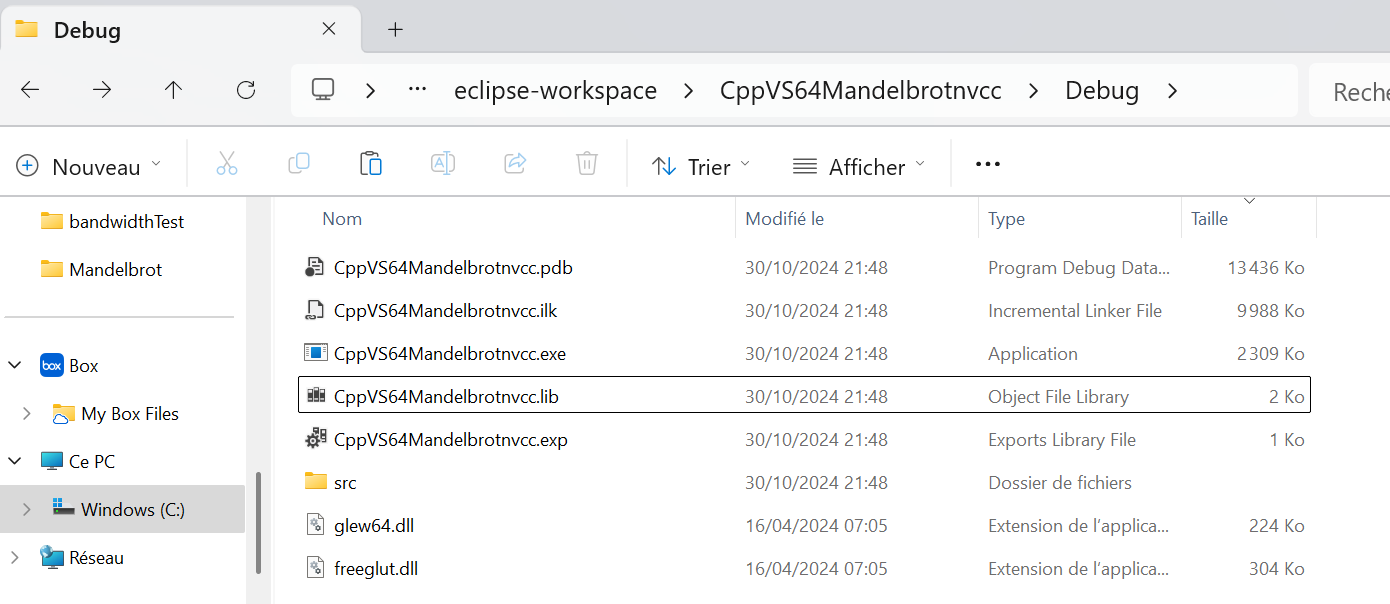
Debug folder appears in project folder.64-bit CppVS64Mandelbrotnvcc.exe is available in Debug folder.
The message on CDT Build Console is avalable as text file. - Copy and paste the two files glew64.dll and freeglut.dll from the folder
C:\Program Files\NVIDIA GPU Computing Toolkit\CUDA\v12.5\extras\demo_suite into the folder C:\Users\pm\eclipse-workspace\CppVS64Mandelbrotnvcc\Debug, the folder containing CppVS64Mandelbrotnvcc.exe.
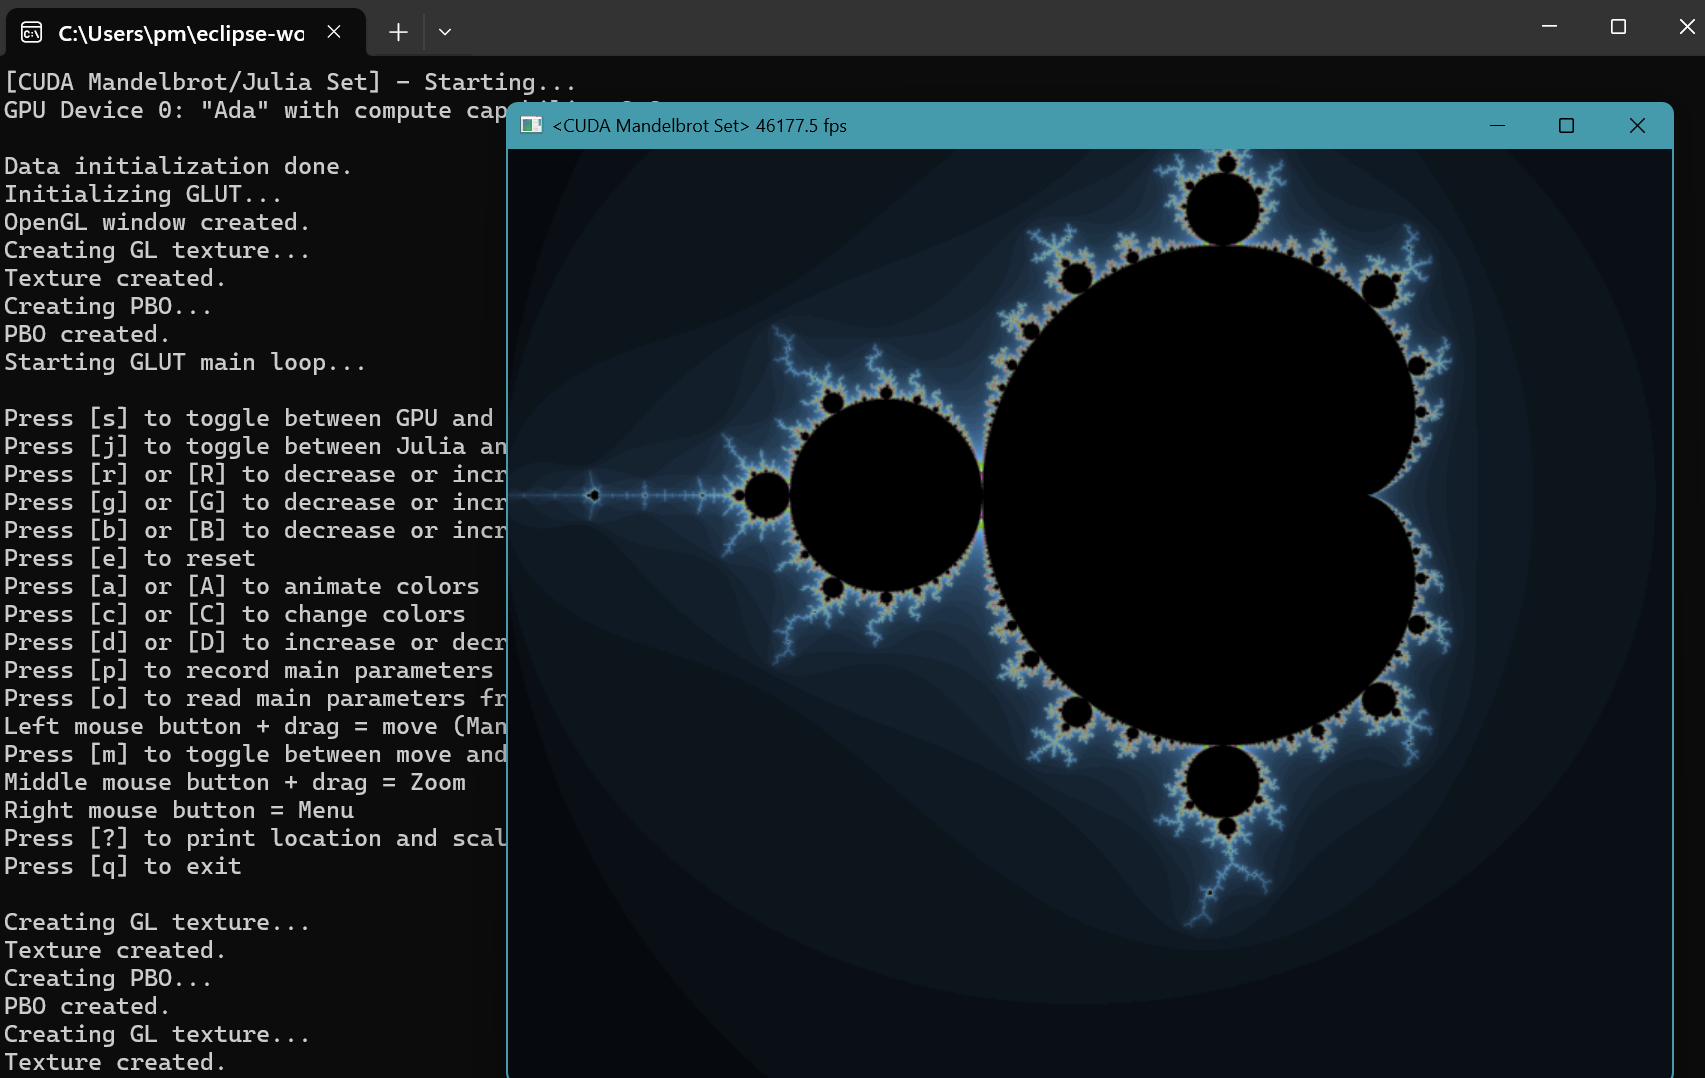
- Double click CppVS64Mandelbrotnvcc.exe in Debug folder
to launch the program.
Mandelbrot project with nvcc in MinGW GCC toolchain
- Launch Eclipse IDE for Java Developers. Press CTRL N.
Select a wizard panel appears.
Select C/C++ folder then C/C++ Project.Click Next > button.
- New C/C++ Project panel appears.
Select C Managed Build.Click Next > button. - C Project panel appears.
Provide Project name: CppMinGW64Mandelbrotnvcc
Select Empty Project in Executable.
Select MinGW GCC in Toolchains.
Click Finish button. - Right click the folder of CppMinGW64Mandelbrotnvcc in Package Explorer.
Select New, then Folder.
New Folder panel appears.
Provide the name src for Folder name.
Click Finish button. - Right click the folder src of CppMinGW64Mandelbrotnvcc
in Package Explorer.
Select New, then File.
Create New File panel appears.
Provide the File name: Mandelbrot_cuda.cu
Click Finish button. - Copy and paste the file
C:\Users\pm\source\repos\cuda-samples-12.5\Samples\5_Domain_Specific\Mandelbrot\Mandelbrot_cuda.cu into the empty source file.Press Ctrl S to save Mandelbrot_cuda.cu.
- Right click the folder src of CpMinGW64Mandelbrotnvcc
in Package Explorer.
Select New, then File.
Create New File panel appears.
Provide File name : Mandelbrot.cpp
Click Finish button. - Copy and paste the file
C:\Users\pm\source\repos\cuda-samples-12.5\Samples\5_Domain_Specific\Mandelbrot\Mandelbrot.cpp into the empty source file.Press Ctrl S to save Mandelbrot.cpp.
- Right click the folder src of CppMinGW64Mandelbrotnvcc
in Package Explorer.
Select New, then File.
Create New File panel appears.
Provide the File name: Mandelbrot_gold.cpp
Click Finish button. - Copy and paste the file
C:\Users\pm\source\repos\cuda-samples-12.5\Samples\5_Domain_Specific\Mandelbrot\Mandelbrot_gold.cpp into the empty source file.Press Ctrl S to save Mandelbrot_gold.cpp.
- Select the folder src of CppMinGW64Mandelbrotnvcc in Package Explorer.
Select New, then File.
Create New File panel appears.
Provide the File name: Mandelbrot_kernel.cuh
Click Finish button. - Copy and paste the file
C:\Users\pm\source\repos\cuda-samples-12.5\Samples\5_Domain_Specific\Mandelbrot\Mandelbrot_kernel.cuh into the empty header file.Press Ctrl S to save Mandelbrot_kernel.cuh.
- Select the folder src of CppMinGW64Mandelbrotnvcc
in Package Explorer.
Select New, then File.
Create New File panel appears.
Provide the File name: Mandelbrot_gold.h
Click Finish button. - Copy and paste the file
C:\Users\pm\source\repos\cuda-samples-12.5\Samples\5_Domain_Specific\Mandelbrot\Mandelbrot_gold.h into the empty header file.Press Ctrl S to save Mandelbrot_gold.h.
- Right click the folder src of CppMinGW64Mandelbrotnvcc
in Package Explorer.
Select New, then File.
Create New File panel appears.
Provide the File name: Mandelbrot_kernel.h
Click Finish button. - Copy and paste the file
C:\Users\pm\source\repos\cuda-samples-12.5\Samples\5_Domain_Specific\Mandelbrot\Mandelbrot_kernel.h into the empty header file.Press Ctrl S to save Mandelbrot_kernel.h.
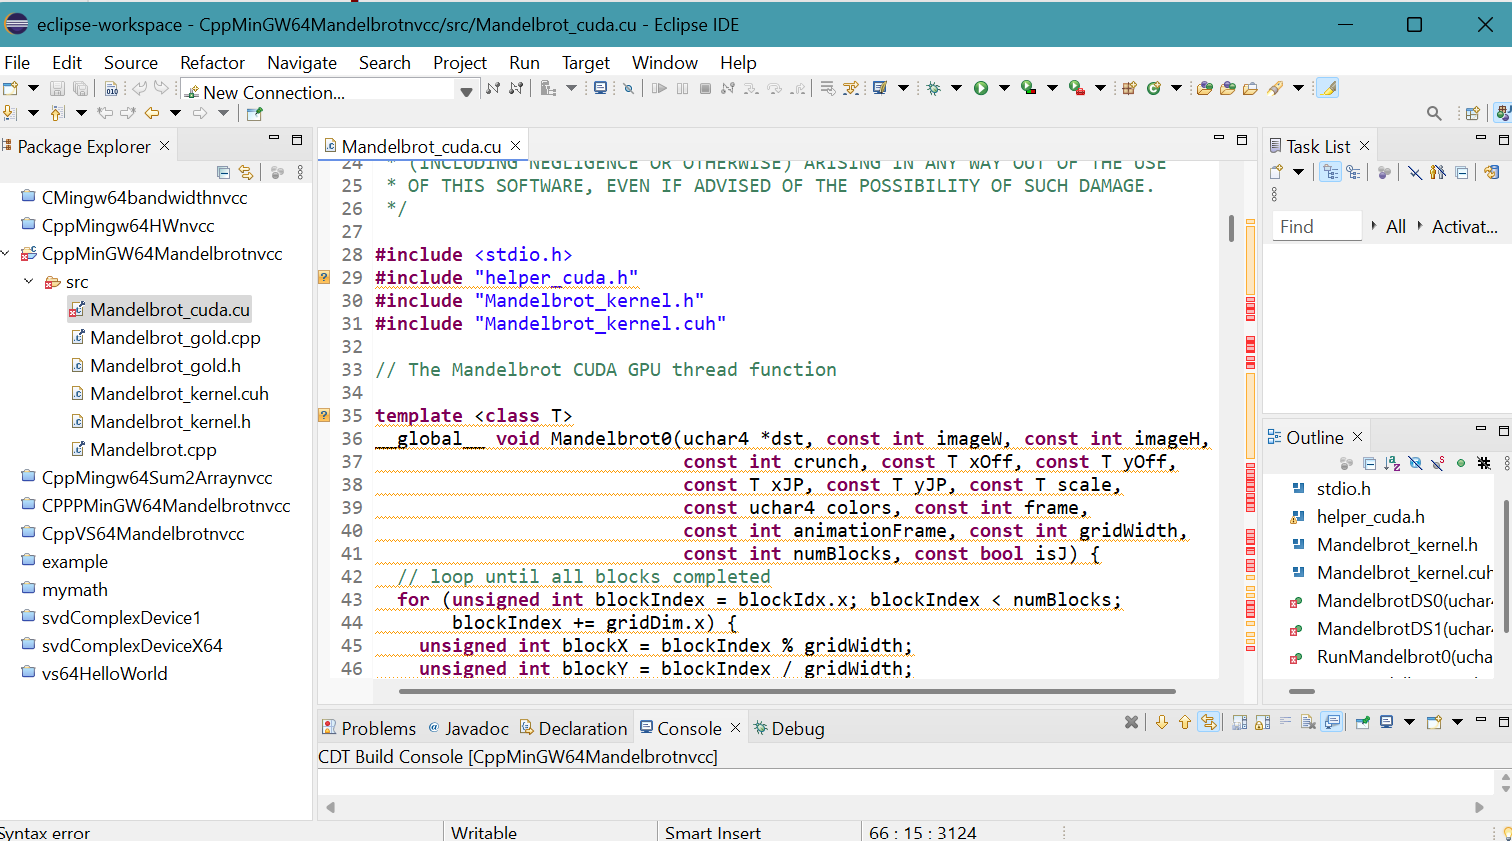
- Right click CppMinGW64Mandelbrotnvcc project folder in Package Explorer,
then select Properties.
Properties for CppMinGW64Mandelbrotnvcc panel appears.
Click Settings in C/C++ Build.
Click Libraries in MinGW C Linker of Tool Settings tab.
Provide three libraries (cudart_static.lib, glew64.lib, freeglut.lib) and their folder location ("${CUDA_LIB_PATH_64}", "${INCLUDE1}", "${INCLUDE2}") to the linker.Click Apply button.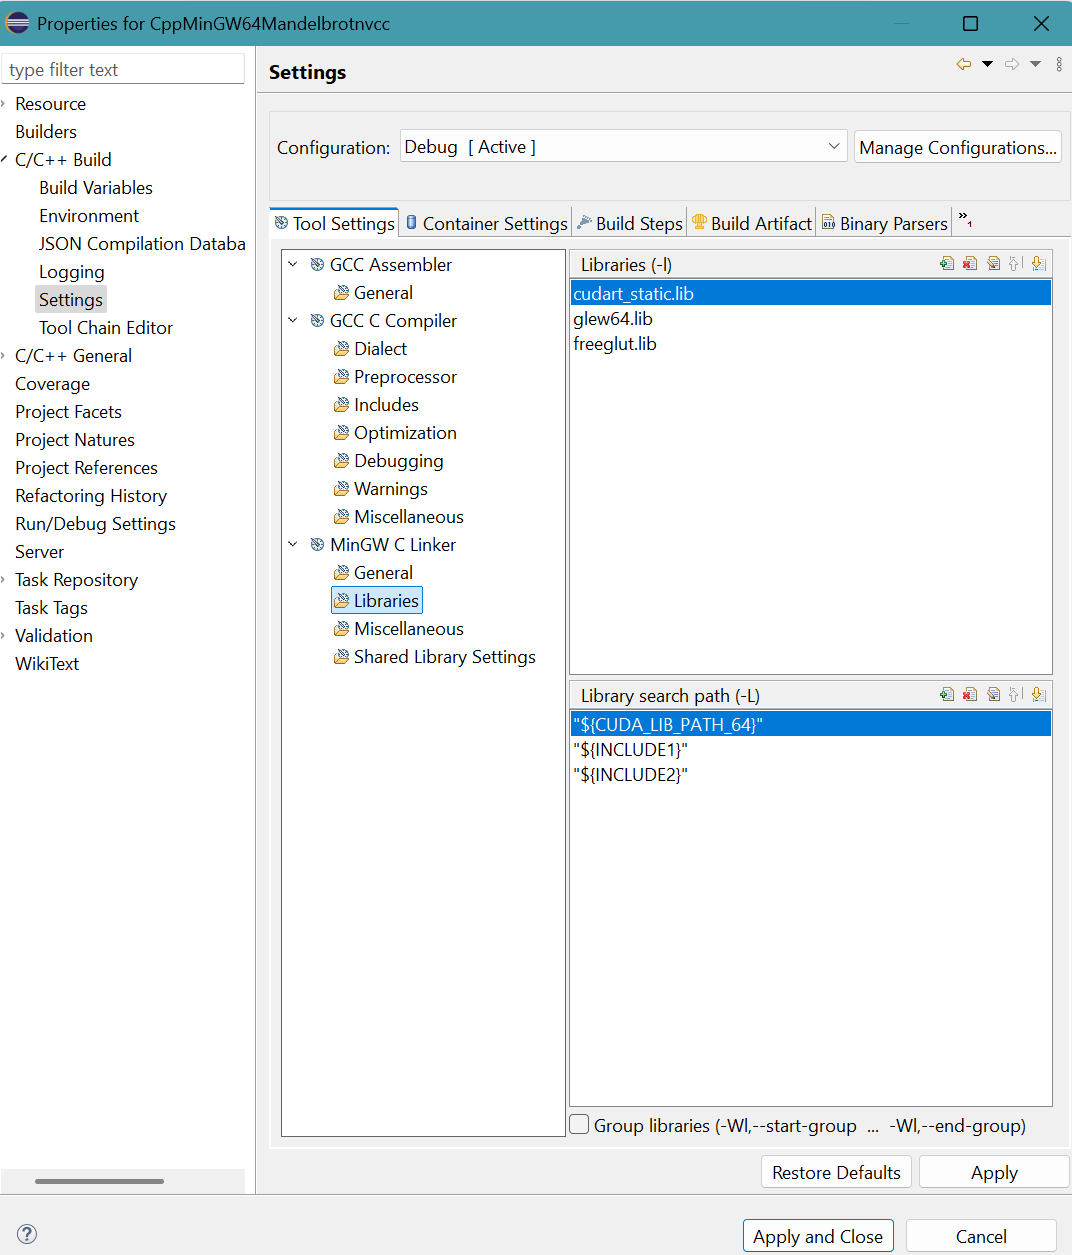
- Click Build Artifact tab.
Select Static Library in Artifact Type.
Delete a in Artifact extension.
Delete lib in Output prefix.Click Apply and Close button.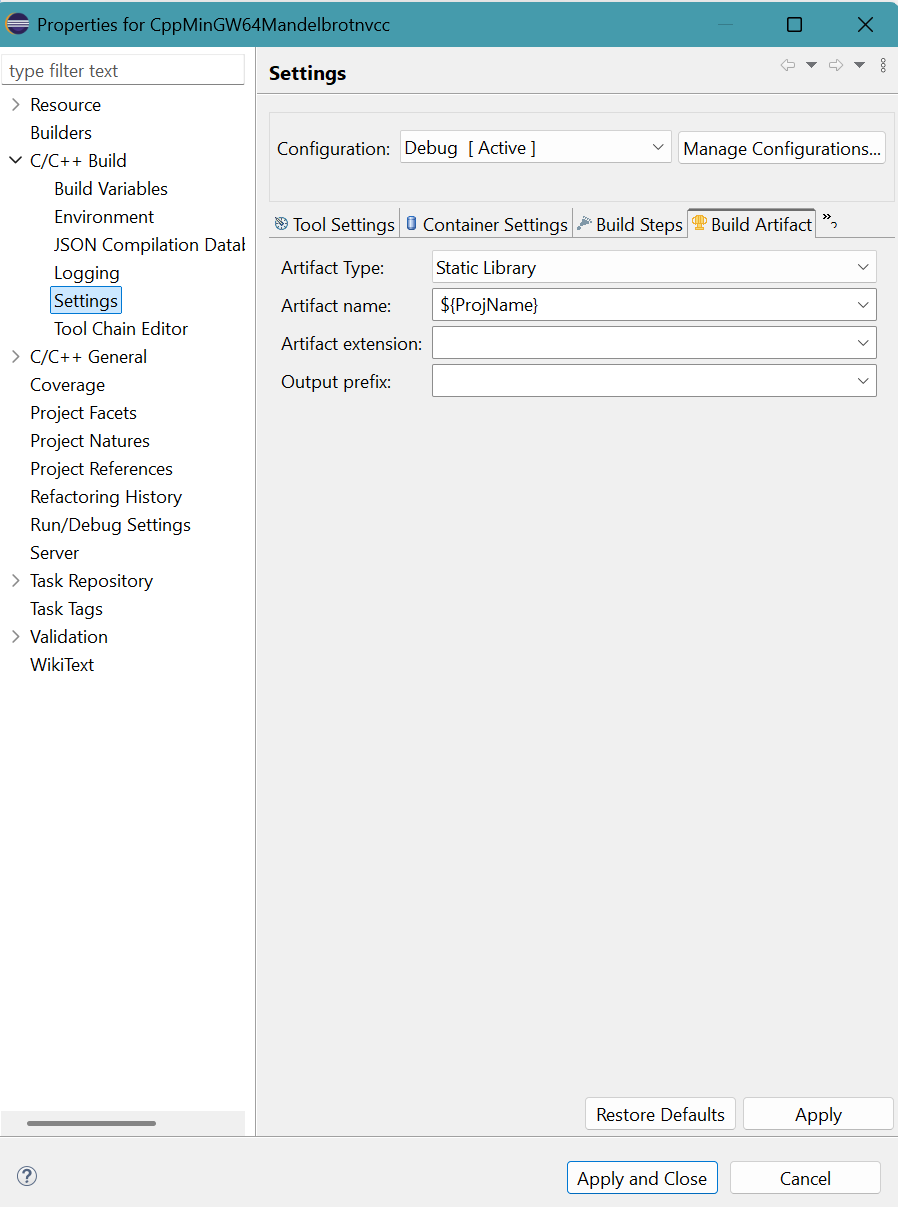
- Right click the file Mandelbrot_cuda.cu in Package Explorer,
then select Properties.
Properties for Mandelbrot_cuda.cu panel appears.
Select C/C++ Build then Settings.
Click Build Steps tab.
Select Apply Custom Build Step Overriding Other Tools in Custom Build Step Applicability choice box.
Provide Mandelbrot_cuda.obj for Output file name(s).
Provide ${NVCC} -I "${INCLUDE1}" -I "${INCLUDE2}" -c "..\src\Mandelbrot_cuda.cu" -o "src\Mandelbrot_cuda.obj" for Command.Click Apply and Close button.
- Right click the file Mandelbrot.cpp in Package Explorer,
then select Properties.
Properties for Mandelbrot.cpp panel appears.
Select C/C++ Build then Settings.
Click Build Steps tab.
Select Apply Custom Build Step Overriding Other Tools in Custom Build Step Applicability choice box.
Provide Mandelbrot.obj for Output file name(s).
Provide ${NVCC} -I "${INCLUDE1}" -I "${INCLUDE2}" -c "..\src\Mandelbrot.cpp" -o "src\Mandelbrot.obj" for Command.
Click Apply and Close button. - Right click the file Mandelbrot_gold.cpp in Package Explorer,
then select Properties.
Properties for Mandelbrot_gold.cpp panel appears.
Select C/C++ Build then Settings.
Click Build Steps tab.
Select Apply Custom Build Step Overriding Other Tools in Custom Build Step Applicability choice box.
Provide Mandelbrot_gold.obj for Output file name(s).
Provide ${NVCC} -I "${INCLUDE1}" -I "${INCLUDE2}" -c "..\src\Mandelbrot_gold.cpp" -o "src\Mandelbrot_gold.obj" for Command.
Click Apply and Close button. - Select Project menu then Build Project.
Debug folder appears in project folder.The message on CDT Build Console is avalable as text file.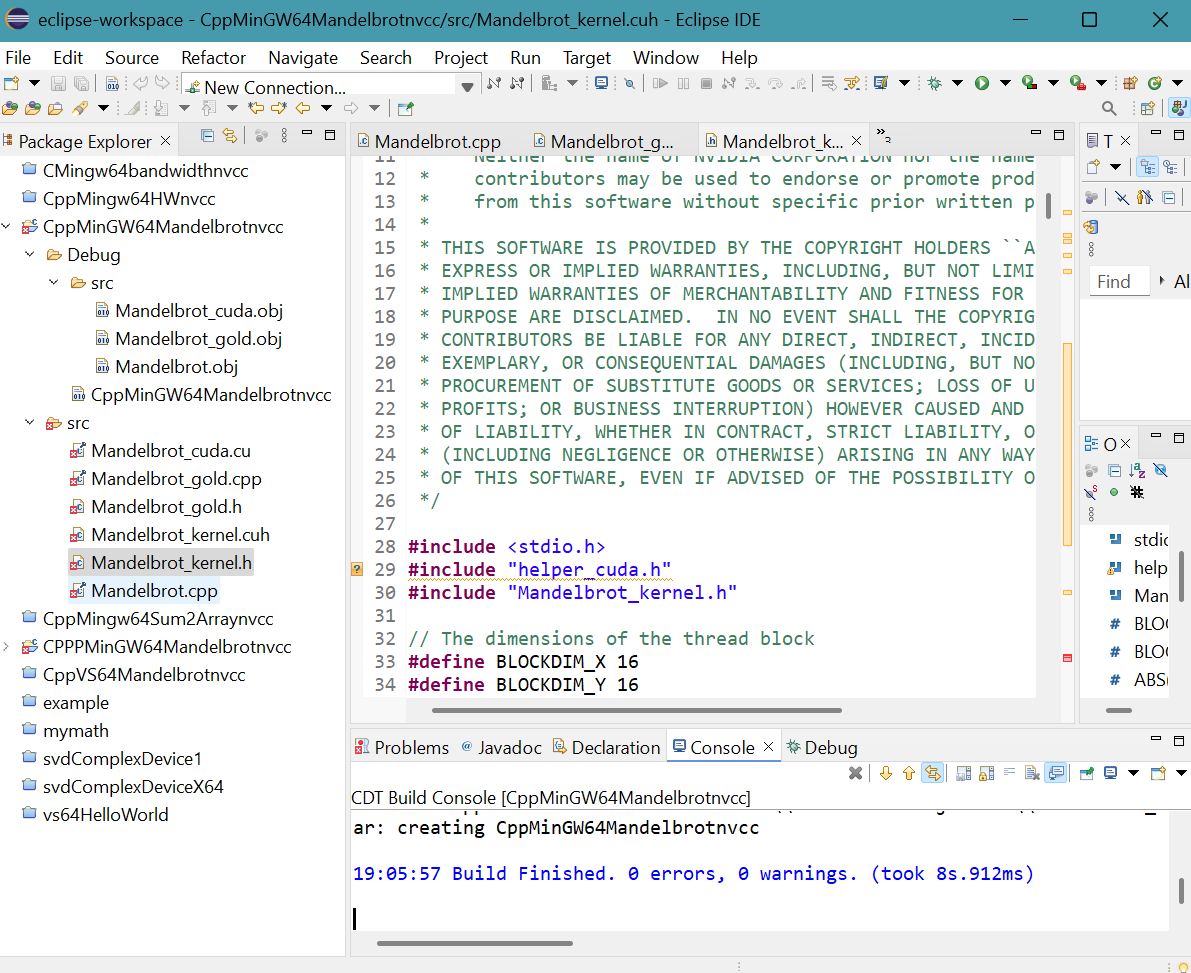
Only three **.obj files are generated in src folder but not **.exe file.
A CppMinGW64Mandelbrotnvcc file is found in Debug folder. - First, copy and paste the two files glew64.dll and freeglut.dll
from the folder
C:\Program Files\NVIDIA GPU Computing Toolkit\CUDA\v12.5\extras\demo_suite into the folder C:\Users\pm\eclipse-workspace\CppVS64Mandelbrotnvcc\Debug\src.
Then copy and paste the two files glew64.lib and freeglut.lib from the folder C:\Users\pm\source\repos\cuda-samples-12.5\Common\lib\x64 into the same folder src.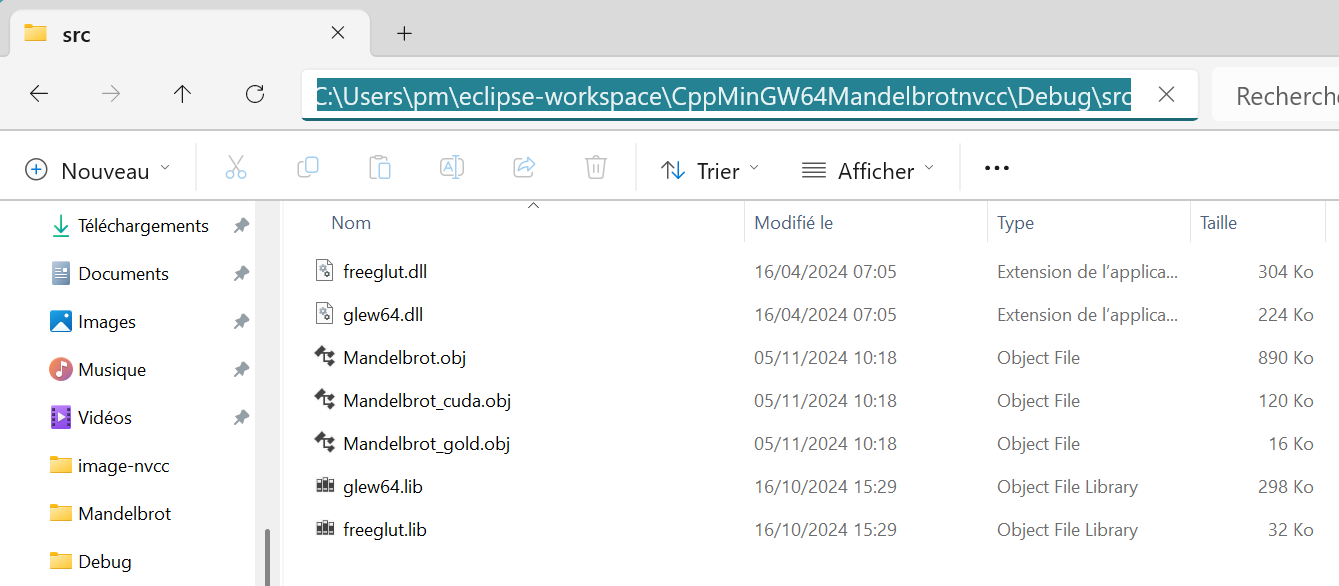
- Enter cmd in search box of Windows 11 taskbar.
MS-DOS prompt appears.
First change the directory; entercd C:\Users\pm\eclipse-workspace\CppMinGW64Mandelbrotnvcc\Debug\src
Then, enter NVCC freeglut.lib glew64.lib Mandelbrot.obj Mandelbrot_cuda.obj Mandelbrot_gold.obj -o Mandelbrot.exe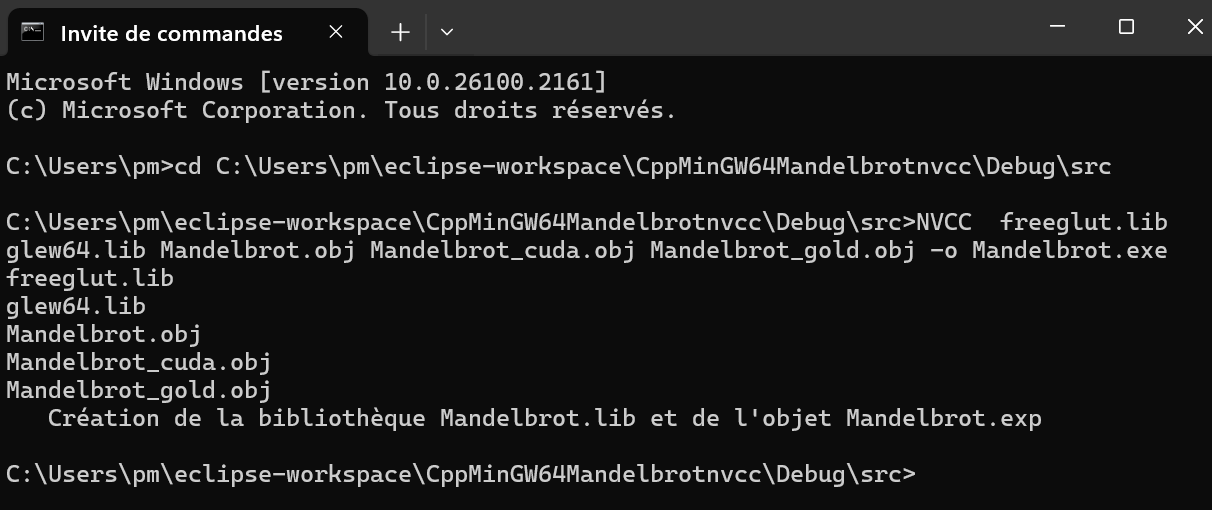
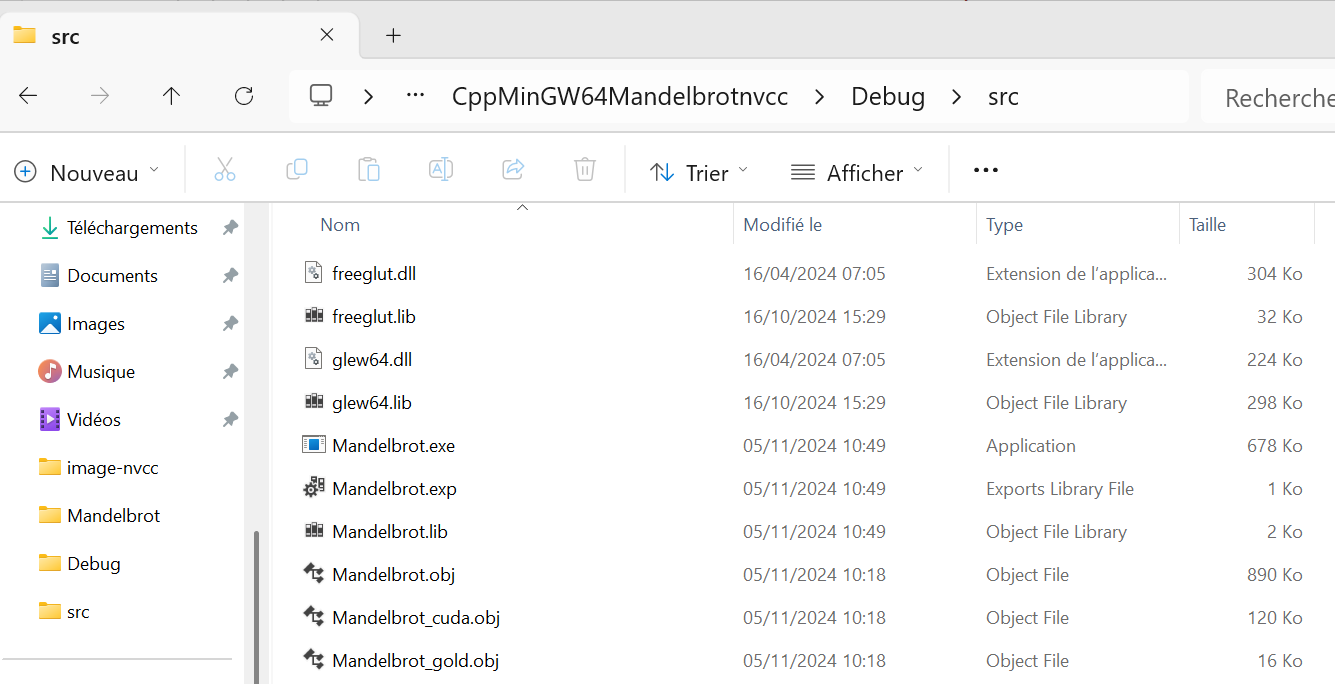
- Three files are generated: Mandelbrot.exe, Mandelbrot.exp
and Mandelbrot.lib.
- Double click the file Mandelbrot.exe:
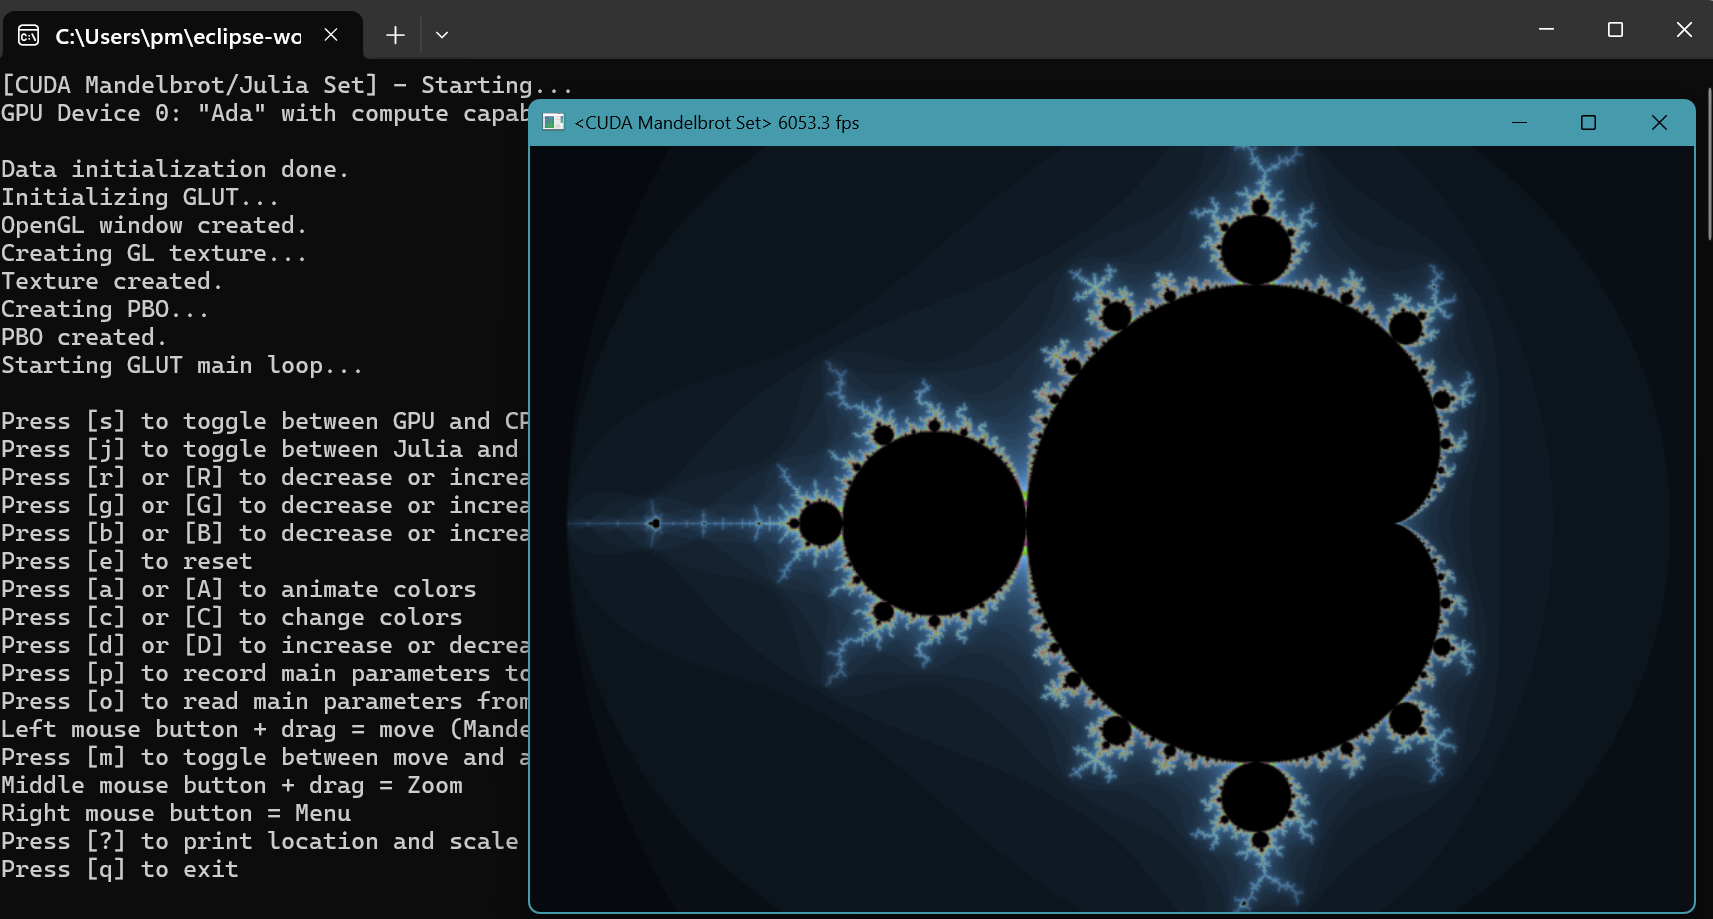
C++ 64-bit shared library svdComplexDevice1.dll project with nvcc in Microsoft Visual C++ toolchain
- The svdComplexDevice1 project is
that
obtained with Microsoft Visual C++ toolchain in Eclipe IDE for Java Developers:
Now, we use Nvidia nvcc compiler to rebuild this project.
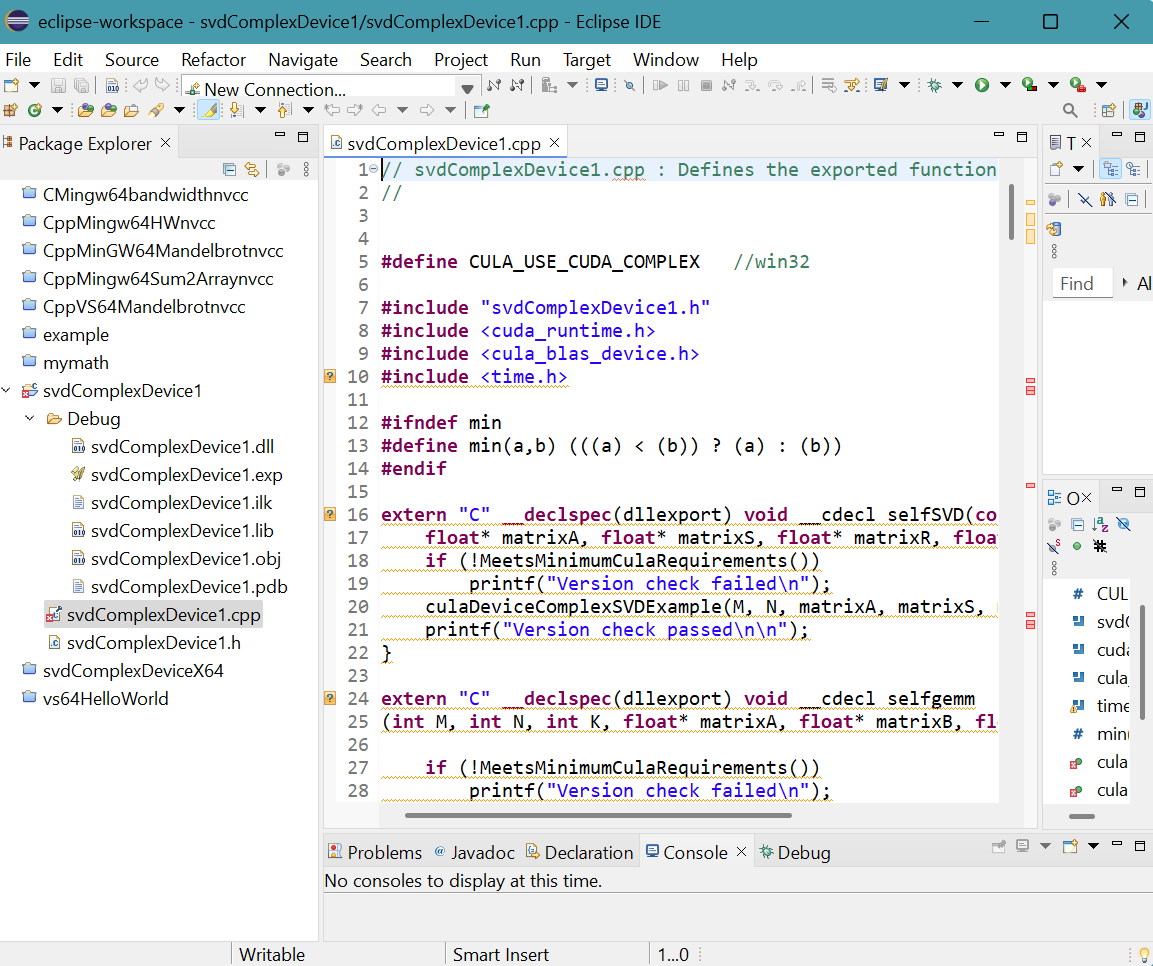
- Right click svdComplexDevice1 project in Package Explorer
then select Properties.
Properties for svdComplexDevice1 panel appears.
Click C/C++ Build then Settings.
Click Preprocessor of C++ compiler (cl).
The two include folders are shown: "${CULA_INC_PATH}", "${CUDA_INC_PATH}".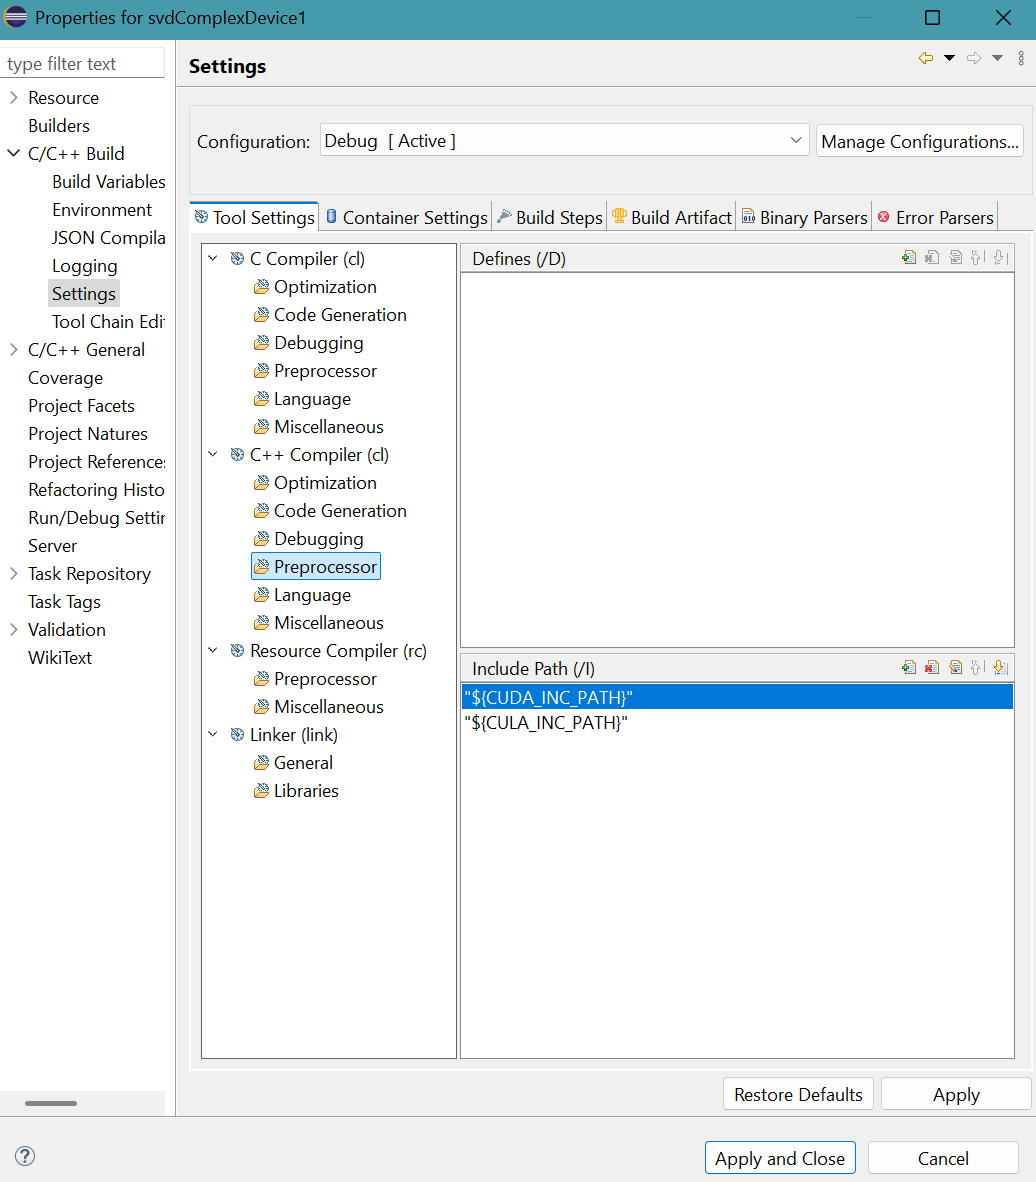
- Similarly, files and paths associated with Linker (link) remain unchanged:
Click Apply and Close button.

- The project must be cleaned. Select Project menu, then Clean...
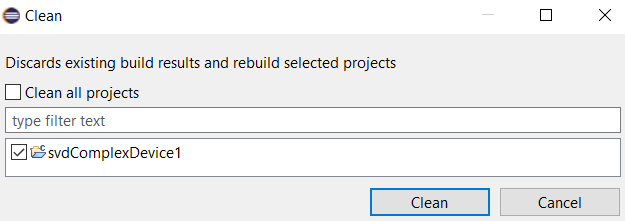
Clean panel appears.
Tick the project.Click Clean button. - The project folder contains two files only.

- Right click the source file svdComplexDevice1.cpp in Package Explorer,
then select Properties.
Properties for svdComplexDevice1.cpp panel appears.
Select C/C++ Build then Settings.
Click Build Steps tab.
Select Apply Custom Build Step Overriding Other Tools in Custom Build Step Applicability choice box.
Provide svdComplexDevice1.obj for Output file name(s).
Provide ${NVCC} -I "${CULA_INC_PATH}" -I "${CUDA_INC_PATH}" -c "..\svdComplexDevice1.cpp" -o "svdComplexDevice1.obj" for Command.Click Apply and Close button.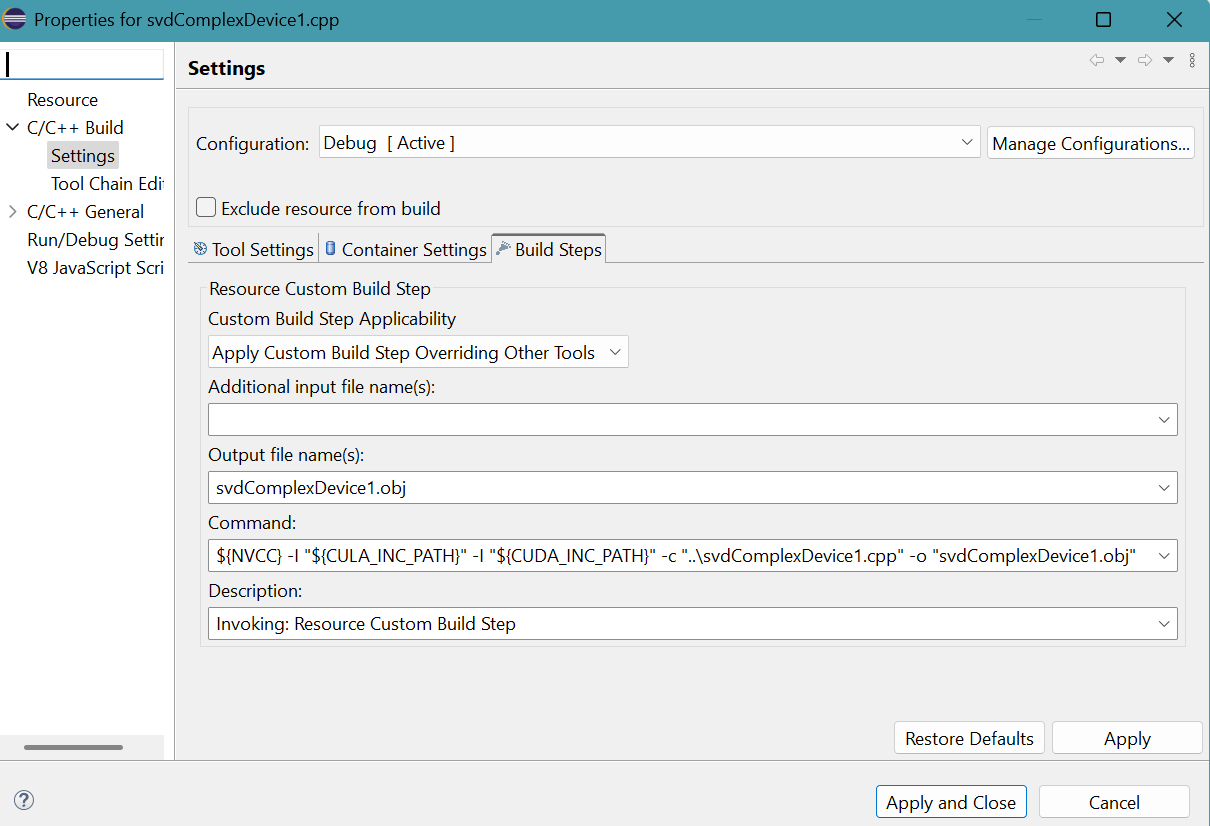
- Select Project menu then Build Project.
Debug folder appears in project folder.
64-bit shared library svdComplexDevice1.dll with 651 kbit size is in Debug folder.The message generated by the compiler is shown on CDT Build Console.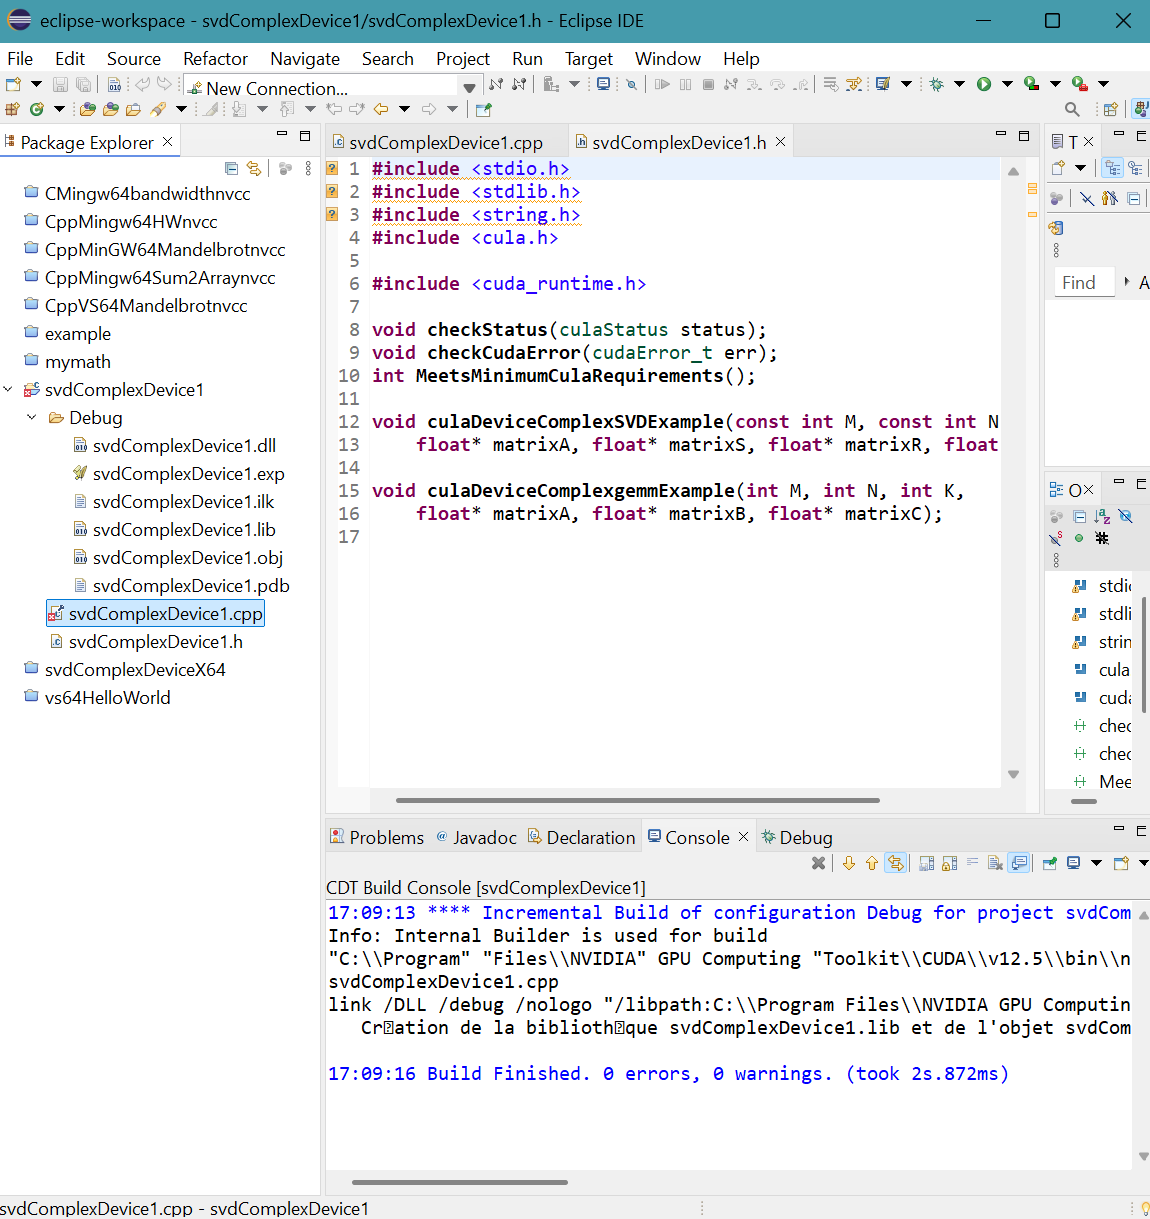
Various references
- Stackoverflow: Error compiling CUDA from Command Prompt
- ProgrammerSought: Windows 10 installation CUDA10.2
- Code Yarns: How to build CUDA programs using CMake
- Ingemar Ragnemalm: The real "Hello World!" for CUDA, OpenCL, and GLSL!
- Nvidia: CUDA toolkit documentation
- Nvidia: Nvcc compiler options on Eclipse
- Nvidia: The CUDA compiler driver NVCC
- Pizzoli: Tools for building CUDA C files
- StackOverflow: How do I tell NVCC to generate an x64 obj?
- StackOverflow: Creating DLL from CUDA using nvcc
- Microsoft: Compiler options
- HelpManual: nvcc help
- RPN: man nvcc
- MATLAB: 64-bit compile of .cu to .ptxw64 --> 'cannot execute c1xx.dll' (error D8027)
- StackOverflow: Cannot open stdio.h
- Awasiljew: Eclipse with CUDA
- CUDA-Wianki: Eclipse with CUDA
- A tingiblog by Thomas Diakos: Getting ready to develop with CUDA in Eclipse under Ubuntu
- RIP Tutorial: Sum two arrays with CUDA
- StackOverflow: How can I create and use a dynamic library ".so" from CUDA C++ and use it inside C# code under Linux environment (CentOS)?
- StackOverflow: How do I compile a CUDA shared library that depends on c++ object files?
- StackOverflow: CUDA build shared library
- Nvidia: NVCC compile shared library
- Nvidia: How to generate DLL from cu
- Nvidia: Creating DLL from CUDA using nvcc
- Learn: Lier un exécutable à une DLL
- Dev: Building Windows DLLs with GCC
- Medium: Getting started with CUDA on Windows: Setting up your environment and writing your first CUDA program
- fahimfba.github: Nvidia CUDA On Windows
- Eric Goubault et Sylvie Putot: TD 4. Introduction à CUDA
- in2p3: Sommaire

